How To Become More Self-Sufficient Without Starting a Full-Blown Farm…
Want to start preserving your harvest, making your own soap, or building a backyard root cellar — but not sure where to begin? “Homesteading Advice” gives you instant lifetime access to 35+ practical homesteading books on food preservation, veggie gardening, DIY natural cleaning products (save over $250 per year with this skill alone), brewing, off-grid energy, and a whole lot more…
Click Here To Check It Out Now!
Your tape measure is lying to you—here is the tool that never misses a fraction. Numbers are an abstraction that leads to error. When you use a story pole, you are transferring the physical reality of your design directly to your material. No math, no misread fractions, and no ‘good enough’ measurements. It is how our ancestors built structures that lasted 500 years with perfect symmetry.
In the world of the modern homestead, we often find ourselves tethered to the yellow tape and the digital level. We trust the numbers printed on a steel ribbon, yet we wonder why a row of siding is an eighth of an inch off by the time it reaches the corner, or why two window headers on opposite walls don’t quite line up. The answer lies in the cumulative error of human calculation. A story pole, or story stick, removes the middleman of the mind and replaces it with the certainty of a physical mark.
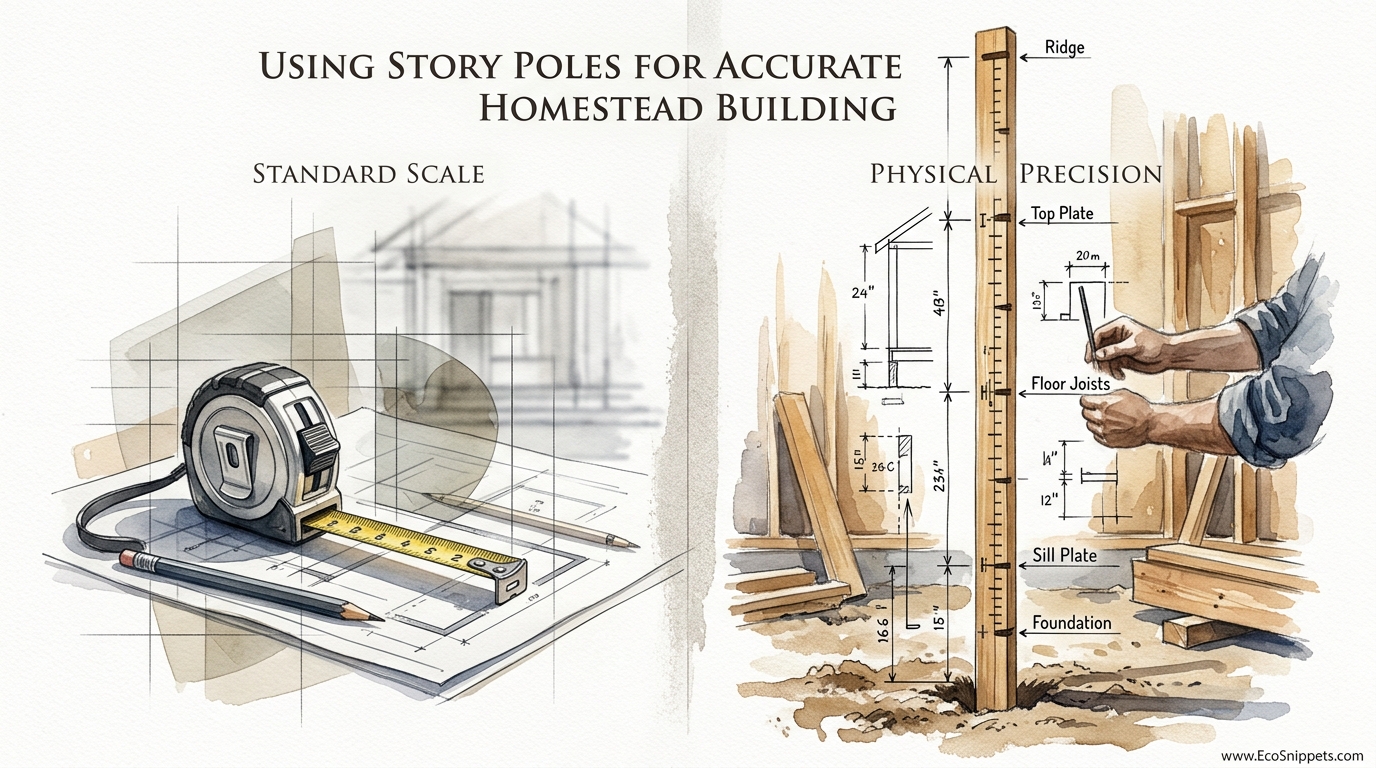
Using Story Poles For Accurate Homestead Building
A story pole is a long, rigid piece of lumber—usually a straight-grained 1×2 or 2×4—that serves as the master blueprint for a specific dimension of your build. Instead of numbers, it contains a series of physical “witness marks” that represent every critical height or width in your project. If you are framing a wall, your story pole will show the exact location of the bottom plate, the window sills, the window headers, and the top plate.
This tool has been the backbone of construction for thousands of years. From the pyramids of Giza to the cathedrals of Europe, builders relied on “jury sticks” and “rods” to maintain perfect proportions without a standardized inch or millimeter in sight. In the context of a homestead, where you might be building a barn, a cabin, or even a set of kitchen cabinets, the story pole ensures that every component is a perfect twin of the last.
Whether you are working alone or with a partner, the story pole acts as the single source of truth. It translates the “story” of the building—the vertical height of every floor, the spacing of every siding course, and the position of every electrical outlet—into a physical object that can be held against a stud or a post. This eliminates the need for “mental arithmetic,” which is where most construction errors originate.
The Anatomy of a Reliable Layout Stick
Crafting a story pole requires more than just grabbing a scrap piece of wood from the burn pile. The tool must be as stable and straight as the structure you intend to build. Select a piece of clear, straight-grained lumber. Pine or fir works well for temporary site poles, while hardwood is often preferred for “layout rods” used in fine furniture making.
The length of the pole should ideally match or exceed the highest point of the layout you are performing. If you are framing a ten-foot wall, a twelve-foot pole is ideal. This allows you to have a “dead zone” at the top and bottom for handling and clamping. Ensure the wood is dry; wet lumber will shrink and warp as it seasons, which can shift your marks by as much as a quarter-inch over an eight-foot span.
Marking the pole is where the precision happens. Use a sharp pencil or, better yet, a marking knife or scratch awl to create “V-marks” (also known as crows-feet). The point of the V is the exact location of the measurement. Unlike a single line, which can be interpreted as having a “left side” or a “right side,” the point of a V is indisputable. Label every mark clearly with a permanent marker—”Top of Header,” “Window Sill,” “Truss Heel”—so there is no confusion three hours into a hot workday.
Step-by-Step: Creating Your Master Layout
Developing your first story pole is a meditative process that front-loads the thinking of your project. Instead of making layout decisions while you have a heavy saw in your hand, you make them at the workbench when your mind is clear.
Start by establishing a “datum” or a zero point. In building construction, this is usually the top of the subfloor or the finished floor level. Every other mark on the pole is measured from this single starting line. Using a high-quality tape measure—just this once—carefully mark out the heights for your bottom plate, the top of the window sills, the bottom of the headers, and the underside of the top plate.
Once the primary marks are set, check them against your blueprints. If you find a mistake, plane the surface of the wood or sand it down and start over. Once the pole is perfect, it becomes the “gold standard.” From this point forward, the tape measure goes back into your pouch. You will place the story pole against every stud in your wall and transfer the marks directly. This guarantees that every window in the building will be at the exact same height, regardless of whether the ground beneath the floor is slightly out of level.
The Inherent Benefits of Physical Precision
Standard scales, like inches and centimeters, are useful for communication, but they are treacherous for execution. A story pole offers physical precision—a 1:1 relationship between the design and the material. When you use a tape measure, you are subject to the “hook error,” where the metal tab at the end of the tape becomes loose or bent, altering your measurements by small but significant amounts.
Speed is another major advantage. On a homestead project, time is often your most limited resource. Measuring twenty studs with a tape measure requires pulling the tape, finding the number, holding the pencil, and marking the wood twenty separate times. With a story pole, you simply lay the stick on the lumber and strike your lines. It turns a thirty-minute task into a five-minute task with a higher degree of accuracy.
Consistency across a team is perhaps the most vital benefit. If you are building a barn with a friend, your “tight 16 inches” might be different from their “loose 16 inches.” By using the same story pole, you ensure that every person on the job site is using the exact same reference. This prevents the “stacking of errors” that occurs when multiple people use different tape measures or different methods of reading a scale.
Common Pitfalls and How to Avoid Them
Even a tool as simple as a stick of wood can be misused if you aren’t careful. The most frequent mistake is failing to maintain a consistent orientation. A story pole usually has a “top” and a “bottom.” If you accidentally use the pole upside down, your layout will be a disaster. Always mark the top of the pole with a large arrow and the word “UP.”
Another common error is neglecting the thickness of the pencil lead. A thick carpenter’s pencil can leave a mark that is nearly a sixteenth of an inch wide. If you mark on one side of the line for the first stud and the other side for the second, you’ve already introduced an error. Always use the point of the “V” and ensure your pencil is sharp. For the highest level of precision, use a marking knife to score the wood, which provides a physical shoulder for your chisel or saw to track.
Finally, be wary of environmental changes. If your story pole is left out in the rain or leaning against a damp wall, it will bow. A bowed pole will give shorter measurements than a straight one because the “distance” follows the curve of the wood rather than a straight line. Keep your story pole flat, dry, and stored in a protected area when not in use.
Realistic Constraints and Limitations
While the story pole is a powerhouse for vertical layout and repetitive framing, it is not a universal solution for every task. For very long horizontal spans—such as laying out a sixty-foot fence line—a story pole becomes unwieldy. In these cases, a transit level, a laser, or a high-quality long tape is more appropriate for establishing your primary benchmarks.
Complex curves and non-rectilinear designs also challenge the story pole method. Because a stick is rigid, it cannot easily “wrap” around a radius to provide accurate layout for curved stairs or round structures. In these scenarios, builders often transition to using flexible templates or “trammel points” to maintain geometric consistency.
It is also important to remember that a story pole is job-specific. A pole made for a shed with 8-foot walls cannot be “repurposed” for a cabin with 9-foot walls by simply adding more marks. Overlapping marks on a single pole lead to confusion and mistakes. When the job is done, the pole should be clearly retired or the surface planed clean for the next project.
Physical Precision vs. Standard Scale
Understanding the difference between these two systems is key to becoming a more proficient builder.
| Feature | Tape Measure (Standard Scale) | Story Pole (Physical Precision) |
|---|---|---|
| Primary Source of Error | Math mistakes, misreading fractions, tape sag. | Wood warpage or inconsistent orientation. |
| Speed of Repetition | Slow; requires a new measurement for every piece. | Very fast; marks are transferred in seconds. |
| Accuracy Across Team | Low; varies between different tapes and users. | High; everyone uses the same physical reference. |
| Versatility | High; one tool fits any project size. | Low; custom-made for one specific project. |
| Mental Load | High; requires constant calculation and memory. | Low; the tool “remembers” the dimensions for you. |
Best Practices for Field Success
To get the most out of your layout sticks, adopt the habits of the master carpenters of old. When you first create your pole, seal it with a quick coat of shellac or wax. This prevents the wood from absorbing moisture on the job site and ensures your marks stay crisp and legible even if the pole gets dirty.
Use different colors of ink or pencil for different types of marks. For example, use red for window openings and blue for floor levels. This visual shorthand reduces the chance of misinterpreting a mark during the heat of construction. If a mark is no longer needed, cross it out completely with a large “X” so you don’t use it by accident later.
Always “index” your pole to a solid reference. If you are marking studs for a wall, make sure the bottom of the story pole is flush with the bottom of the stud every single time. If the pole is even a sixteenth of an inch off the floor, every mark you transfer will be off by that same amount. Consistent indexing is the secret to the story pole’s legendary accuracy.
Advanced Applications: Timber Framing and Cabinetry
Serious practitioners take the story pole concept even further into the realm of “Layout Rods” and “Girts.” In traditional cabinetry, a layout rod is a 1:1 scale drawing of the cabinet’s cross-section on a long piece of wood. It shows the face frame, the door thickness, the drawer slides, and the back panel. By building “to the rod,” the cabinetmaker ensures that every part fits perfectly without ever having to calculate an offset or a reveal.
In post-frame construction and timber framing, story poles are used to layout “girts”—the horizontal members that support the siding. Because timber posts are often irregular or slightly tapered, a story pole allows the builder to mark the girt locations from a consistent laser-leveled datum rather than measuring from the bottom of each post, which might be sitting at a different elevation.
Timber framers also use story poles to mark the locations of mortise and tenon joints on multiple posts. By laying the pole alongside a heavy 8×8 timber, the framer can mark the “peg holes” and “shoulder lines” with absolute certainty. This ensures that the horizontal beams will be perfectly level when the frame is raised, even if the timbers themselves have slight variations in length.
Case Study: Framing a Homestead Cabin
Imagine you are building a 12×16 cabin. You have twenty-four wall studs to mark for window and door headers. Using a tape measure, you would have to calculate the rough opening height, add the thickness of the bottom plate, and account for any subfloor offsets for every single stud.
Instead, you take a straight 2×4 and mark the following: the bottom plate (1.5 inches), the window sill height (36 inches), the window header bottom (80 inches), and the top plate (92.5 inches). You label these clearly. You then lay out all twenty-four studs on a pair of sawhorses.
You walk down the line with your story pole, flushing the bottom of the pole with the bottom of each stud. In less than three minutes, you have transferred every critical height to every stud. When you stand the walls up, you find that a level placed across the window sills is perfectly dead-center. The headers are aligned to the millimeter. This is the power of physical precision in action.
Final Thoughts
The story pole is more than just a piece of wood with marks on it; it is a philosophy of building. It represents a shift away from the abstract world of numbers and a return to the physical reality of the materials in front of you. By removing the chance for calculation errors, you free your mind to focus on the quality of your joinery and the integrity of your structure.
Embracing this ancestral wisdom allows you to build with a level of confidence that a tape measure simply cannot provide. Whether you are a beginner tackling your first garden shed or a seasoned homesteader framing a permanent dwelling, the layout stick is your most loyal ally. It is a tool that asks for very little but gives back the most precious gift a builder can have: the certainty that everything is exactly where it is supposed to be.
As you move forward with your next project, experiment with the 1:1 layout method. Start small with a simple story stick for a shelving unit or a tool rack. Once you experience the speed and the “missing-link” accuracy of the physical mark, you may find that your tape measure starts to collect a bit of dust. Build for the long haul, build with precision, and let your tools tell the story of your craftsmanship.
