How do you design a greenhouse to overcome poor growing conditions, provide a winter space that can cure SADS (Seasonal Affective Disorder) and extend the growing season? In these articles I am going to talk about how to design just a space…
Setting Goals, Site Selection, Aspect Ratio and Shape Part 1 of 4…
Recently I gave a webinar with Curtis Stone and Small Farm Academy where we talked about how to design passive solar greenhouses as well as how to grow inside of them for profit. In this article I will share my multi-step process as well as the replay of the webinar below.
There are really only 11 steps to passive solar greenhouse design that you need to know about in order to succeed.
Step 1 – Setting Goals…
The first step in designing a passive solar greenhouse is setting your goals. The easiest way to think about this so that it effectively translates into an actionable design is, what climate are you trying to mimic. As most gardeners think in terms of USDA zone, if you can determine which USDA zone you would rather be gardening in, you can design a space that will “bring you” to that zone without having to move there.
The wonderful thing with USDA zones is that they are based on extreme minimum winter temperature which gives me, a mechanical engineer, a lot of information about how much insulation the building will need, how much it will cost to heat and what type of glazing to use. As most people wanting these structures are not mechanical engineers, I built a passive solar greenhouse design tool that anyone that understands USDA growing zones can use.
It asks you for a USDA and a few other simple design metrics and answers a lot of the questions around R-Value for you. Other goals or elements you may wish to place into a passive solar green house might include:
- Hot tub space
- Sauna
- Canning kitchen
- Root cellar
- Rainwater storage
- Hammock
- Sunbathing for Seasonal Affective Disorder (SADS)
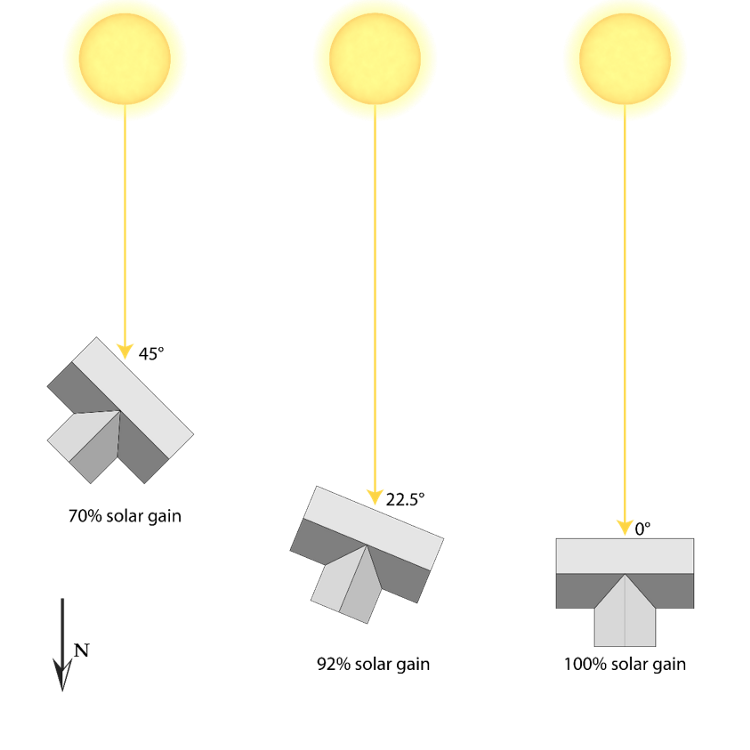
Orientation of a solar building and its respective solar gain…
Step 2 – Site Selection…
Site selection is key. A passive solar greenhouse is basically a solar collector, however it is collecting solar energy for heat and photosynthesis. Your ideal orientation is going to be ~15 degrees to the east of South in the Northern Hemisphere. This optimizes morning light and heat when the greenhouse is coldest. Having said that, if you have limited options you can orient it up to 45 degrees off south and still get a decent result….
Choose a site selection that gives you good access to sun all year round. I like to use the solar pathfinder to help me assess the solar resource of the site. It takes no batteries and is an incredible tool for assessing the solar resource of a site at anytime of year, for the entire year…
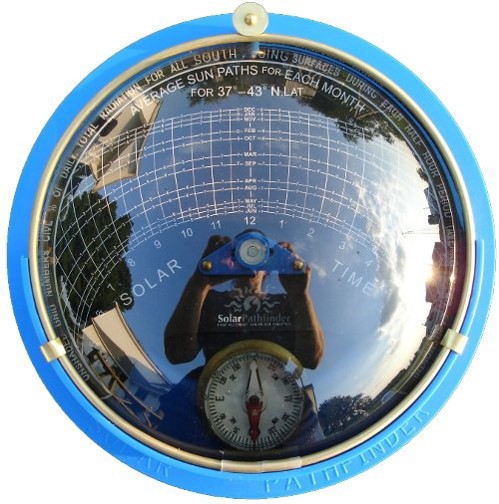
Here is a video that I made on how to use the solar pathfinder…
You can also use an app for android or IOS if you want a digital version of the pathfinder. Sunseeker on Android or IOS are good apps.
One of the things you want to ensure when you assessing your site is that there is not excess shading as a result of trees or buildings. With greenhouses we want all the sun we can get!
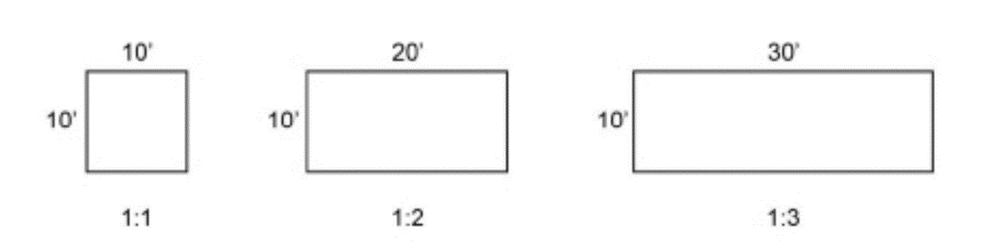
Step 3 – Aspect Ratio…
You want to get the aspect ratio right. The aspect ratio of a greenhouse determines its “footprint”. There are a few aspect ratios that you can use with your greenhouse but generally we want to maximize solar gain while minimizing thermal loss, which translates to long an narrow buildings. Having said that, we can change this a bit to suit your site. Any of the aspect ratios below will work quite well…
Step 4 – Shape…
The shape, or cross section of the greenhouse will determine how the building will look in 3d. There are many different shapes that are possible and each of them has different pros and cons…
The basic principle in choosing a cross section is:
- How high does it need to be to grow what you want to grow?
- Where is the upper and lower vent wall going to go?
- Are their site height restrictions you need to be aware of?
- Are there are functions you want to integrate into the greenhouse that require and adjustment of shapes?
- What ergonomic requirements do you have in the greenhouse?

Once you have your aspect ratio and cross section (shape) your greenhouse shell is designed. The next steps are when we detail out the rest of the building.
Foundations, Kneewall, Ventilation & Glazing – Part 2 of 4…
Here we are going to talk about foundations, knee-walls, ventilation and glazing in the greenhouse.
Step 5 – Foundations…
Foundations are a crucial component that dictates the success of any building. It is a component and we often don’t think about, yet a ton of energy goes into the design and construction of a foundation. There are literally enough foundation options out there to write about them for years so I am going to stick to my top 3 options, but first lest start with a few principles specific to greenhouses.
Principle 1) The foundation of a greenhouse should connect the greenhouse to the soil. Plants love getting into the actual earth, not growing above it. A good foundation should allow the plants to dip their roots into subsoil.
Principle 2) The greenhouse foundation should start below the frost line to prevent heaving or, should prevent the frost from entering the greenhouse.
Principle 3) The foundation option you choose should align with your goals.
Principle 4) The foundation should not be toxic to the soil.
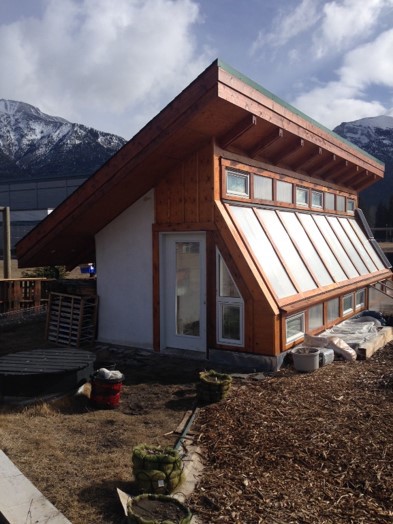
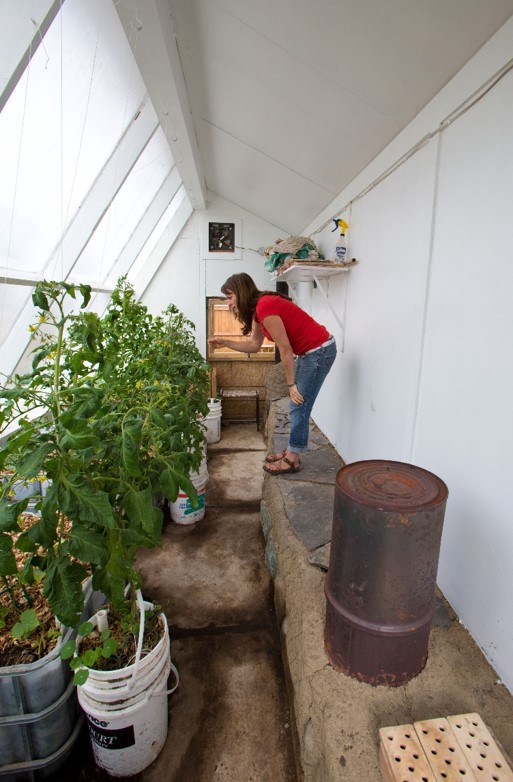
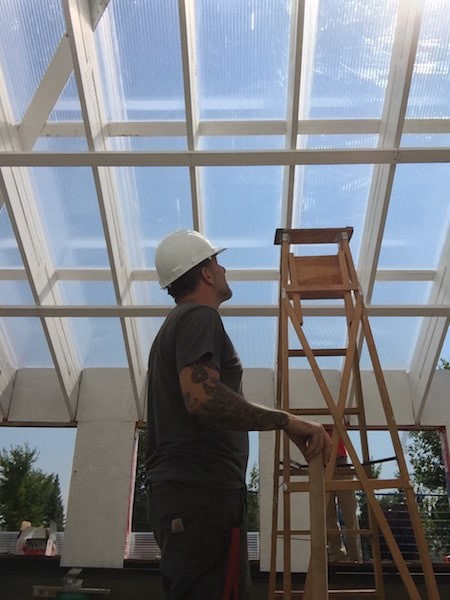
My greenhouse ignores the first three of these three principles…here is why. I built a greenhouse on top of a car parking stall and I did not have the heart to rip up the concrete. I was also not has far along in my permaculture career and did not realize the effects of ignoring all these principles.
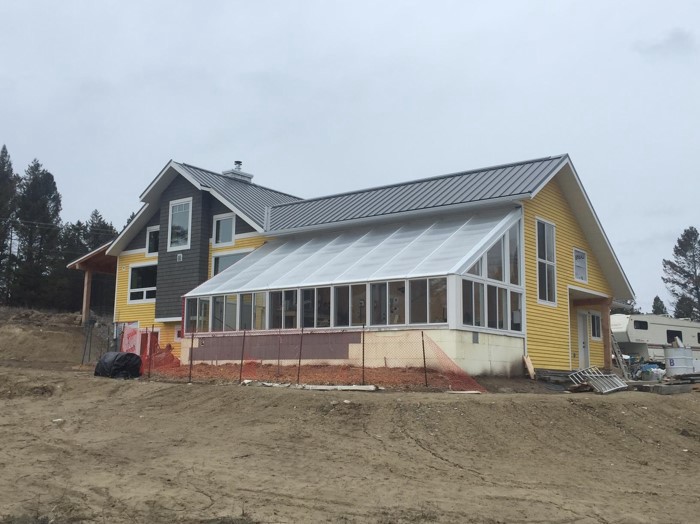
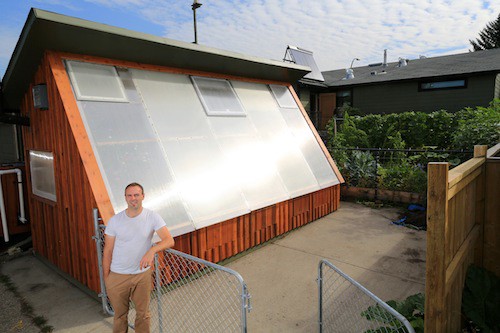
While my greenhouse is perfect for seedlings, and microgreens it will never be perfect for my original intention, 4 season growing of food in the ground. Because I ignored these 3 principles I have had to adapt the space to its constraints, as opposed to designing the greenhouse around mine. Case study for our passive solar greenhouse…
If you want to see the full case study of our greenhouse click here. We have collected 5 professionally filmed passive solar greenhouse case studies from geodesic domes to commercial scale greenhouses to back yard scaled ones. In them you can learn from the successes and failures of each style of greenhouse
Option 1) The first foundation that I am a big fan of is frost protected shallow foundations. These are strip footings with an insulated stem wall and a horizontal projection of insulation. This allows plants to express the roots, prevents the frost in and does not restrict what you do in the soil going forward. This type of greenhouse can grow trees, seedlings or microgreens.
Option 2) The second foundation is a deep foundation that can be built with a strip footing, concrete wall and some form of insulation. Insulated concrete forms (NEXCEM blocks or styrofoam blocks work well here). These are basically soil filled basements. They are a little more expensive than option 1.
Option 3) This is actually my favorite option but a lot of building codes do not recognize it. This is a rubble trench with horizontal thermal protection. It is basically a less expensive version of option 1. This requires little to no concrete, so it is easy and inexpensive to build, and is great for DIY folks. Rubble trench foundations are one of the oldest foundation types and buildings that are built on them have stood the test of time.
Do you research and choosing the footing and foundation for your building, it will pay dividends in the future. If you choose a different option, screwpiles, concrete piles, pressure treated plywood ect. do your research and run it through the principles.
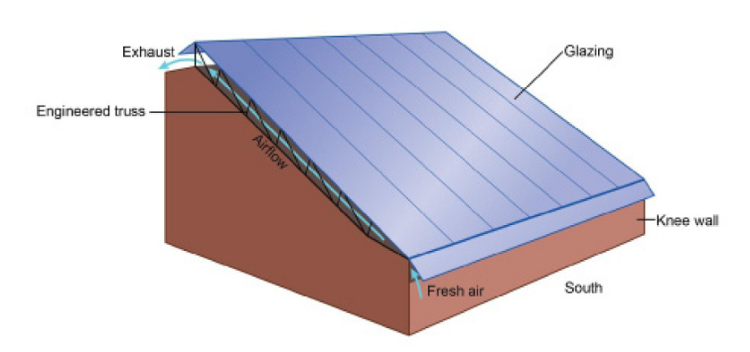
Step 6 – The Kneewall…
You are probably thinking, what is a kneewall? It is the front vertical wall in the greenhouse that supports the lower vent system. The kneewall is an important component as it sets the height at the front of the greenhouse (important for the ergonomics of the space for tall guys like me) but it also gives a vertical space for snow to accumulate as it slides off of the glazing…
Believe it or not, your greenhouse may still need to open its front vents in the middle of the winter on a sunny day so making sure those vents don’t get blocked by snow is important. Typically I make sure that the kneewall + the vent system is high enough so the trusses don’t hit my head and this seems to work for me.
Generally speaking a kneewall of 3 – 4 ft seems to work however if you live in a high snow fall environment you may need to think about making it larger or clearing the snow in front of the greenhouse from time to time.
Step 7 – Ventilation and Air Movement…
Ventilation is arguably the design detail that almost every greenhouse gets wrong. The reason they get it wrong is because it is hard to get enough air through a greenhouse. Under-ventilated greenhouses overheat, cause plant pathogens and heat stress and ultimately crop failure. Don’t under ventilate your space. Here are some general guidelines that you can follow to ventilate your space.
- Have low and high vents. If possible, make your high vents larger than your low vents as air expands as it heats up. This will improve the thermosyphon effect of air moving through the space.
- Install seasonal cross vents that can be opened in the height of summer. Cross drafts can do wonders for cooling a space down. I typically specify double doors or an inexpensive plug (oversized non hinged door) that can be pulled to let in more air.
- If you still don’t have enough air movement add in extraction fans as a last resort.
- If you don’t get enough interior air movement add some fans to “exercise” the plants and keep fungal issues down.
When you are doing design don’t under ventilate!
Step 8 – Glazing…
The glazing surface to the south is the collection unit. It is the area that lets in the sun, heats up the space and allows plant to grow. It is also the weakest link in the whole assembly. There is an interesting and unfortunate relationship between transmissivity (how much light comes through) and R value (thermal resistance)….

As the the R value (thermal resistance) goes up (less heat is lost) the transmissivity goes down (less light gets through). If the transmissivity drops below 70% plants don’t get enough light, get “leggy” and never reach their full potential or die. Generally I choose poly-carbonate, but my colleague Curtis Stone has shown that double wall poly (greenhouse grade) is a great alternative at a fraction of the cost.
Here are a couple of guidelines for choosing glazing material…
- Choose the highest R value glazing with a transmissivity of at least 70% or higher.
- Ensure that the glazing will be able to withstand the snow load in your bioregion.
Next we are going to talk about artificial lighting, insulation, and thermal mass…
Light, Insulation and Subterranean Heating and Cooling Systems – Part 3 of 4…
Now let’s discuss artificial light, insulation, thermal mass and subterranean heating and cooling systems.
Artificial Light…
If you live in a cold and cloudy environment or in the extreme north where daylight is very short you might be looking to add artificial light. Generally this is a situation that I try and avoid as the cost of lighting a greenhouse can be very expensive. This is because plants have evolved with the sun, which is not an easy element to replicate on earth. Here is why…
“The amount of energy the earth receives from the sun in 2 minutes is enough to the current energy usage of humanity for an entire year.” – Gulf News
This translates to, the sun is very powerful and trying to replace its function is very expensive. My approach to artificial light is to explore if your greenhouse can operate without it first, if not, the next step is to quantify what it is going to cost to operate the lighting apparatus per month and year to make sure it makes sense.
Here are a couple of scenarios where artificial light is not needed…
- The greenhouse only operates 3 seasons of the year. The greenhouse is used as a hang out space in the 4th, dark season. I don’t consider this a failure as, in my climate this means that I am growing for 200–250 days instead of the measly 100 days I typically get outside.
- The greenhouse is growing tropical plants that typically would live in the understory of the rainforest so low light is something that can be tolerated.
- You are growing microgreens in your greenhouse which does not require additional light in most scenarios.
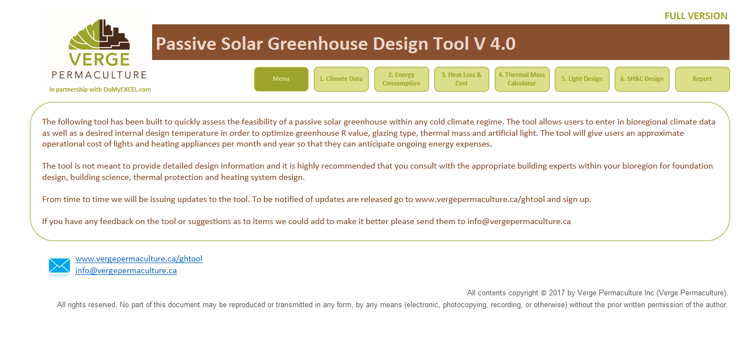
If none of those apply you will want to design your light apparatus carefully. For this I built a passive solar greenhouse design tool which has a light calculator inside of it to make estimating power consumption and cost EASY…
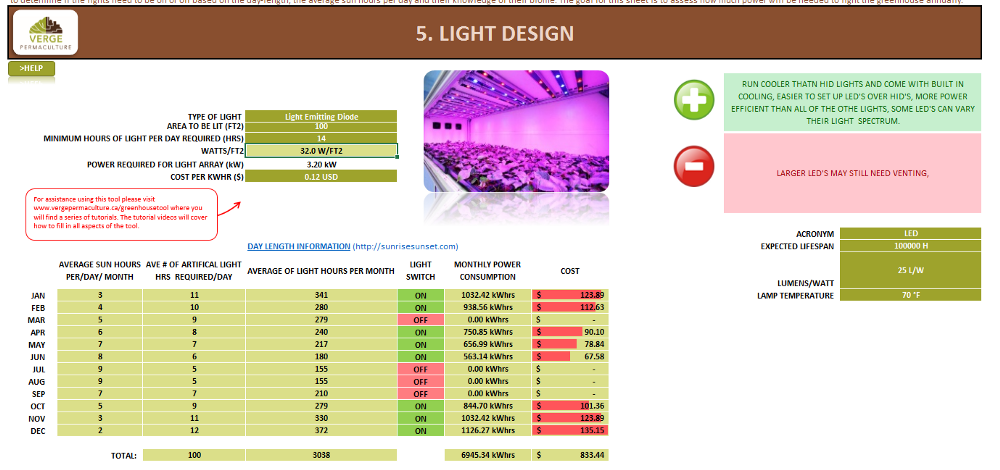
The light calculator has different technologies built into it with their respective power draw per square foot, the pros and cons of the the light technology and the ability to estimate the number of hours the lights will operate per day per month. Once the user enters in an lit area and a cost of power they will be able to estimate how much the lighting in the greenhouse will cost to operate.
The passive solar greenhouse design tool forms the backbone of the 10 week Passive Solar Greenhouse Design Course I am offering through Small Farm Academy. Click here to find out more about our course.
If you don’t have the tool, estimate the area you need lit, the technology and its respective wattage and figure out how many hours you need to light your greenhouse per month.
Cost of light = Cost/kWhr * Power consumption (kW) * hours of opperation
From here you can make an informed decisions about whether your greenhouse should be artificially lit.
Insulation…
Correctly placed insulation is what makes a passive solar greenhouse different then a conventional gable style greenhouse.
Insulation is important but it has an interesting diminishing return in passive solar greenhouses. Because the southern glazing surface (south facing glass) has such a low R-Value relative to the insulated walls there is a very important point in which there are massive diminishing returns in adding any additional insulation into the North, East and West walls.
Basically adding more insulation into the walls has no effect on overall heat loss which translates into, you spend more money on adding insulation and get no benefit. For this reason I built an easy calculator that does not require you to be an engineer to use. The tools allows to sort out what the optimal insulation values are for each of the walls and glazing surfaces in your greenhouse.
It does this by asking the user to enter in surface areas and proposed R value for every surface and then spits out a data visualization pie chart which shows you the breakdown of heat loss in the greenhouse space. This means the user does not need to understand what a BTU is, just how much of the “pie” is leaking through which surfaces. The user can then go back into the tool and try different R-values and strategies until they land on an insulation design that works for them…
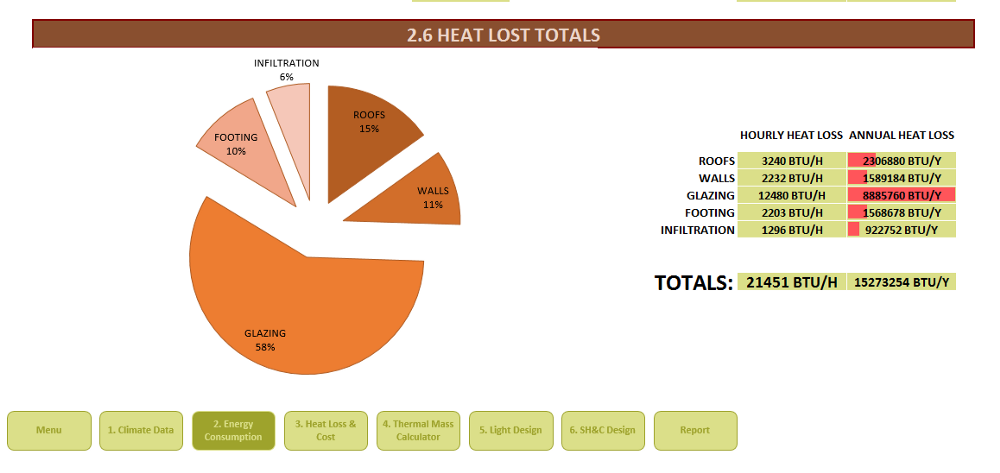
In my ecosystem the R value I start with is around R-20 for walls, R-15 for the foundation and R 1.8 for my glazing.
You will note in the image above that 58% of the energy is leaking from the glazing while only 10%, 6% and 15% and 11% from the footing, infiltration, roof and walls respectively. It should be apparent that doubling the R value of the walls might only reduce the heat loss by ~6% which is hard to justify. Instead we need another approach.
It turns out that most of the heat loss from the greenhouse occurs through the glazing at night. This means if we want to reduce the heat loss dramatically we need to add a thermal curtain at night. Adding a thermal curtain with an R value as little as R-2 can reduce the building heat loss as much as ~25% for a fraction of the cost of doubling the R value in the walls.
The passive solar greenhouse design tool forms the backbone of the 10 week Passive Solar Greenhouse Design Course I am offering through Small Farm Academy. Click here to find out more about our course.
Thermal Mass…
Thermal mass is very important in any passive solar building. Thermal mass helps to cool the building in the summer and keep it warm at night in the winter. There are several different thermal mass options that you can choose from including, rock, concrete, cob, water, water + glycol, metal and basically any cheap material that stores a lot of heat in a small space.
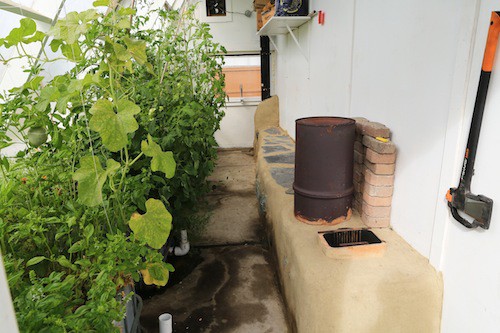
We chose a rocket mass heater in our greenhouse (Cob) but there are an endless number of elements you can use for thermal mass.
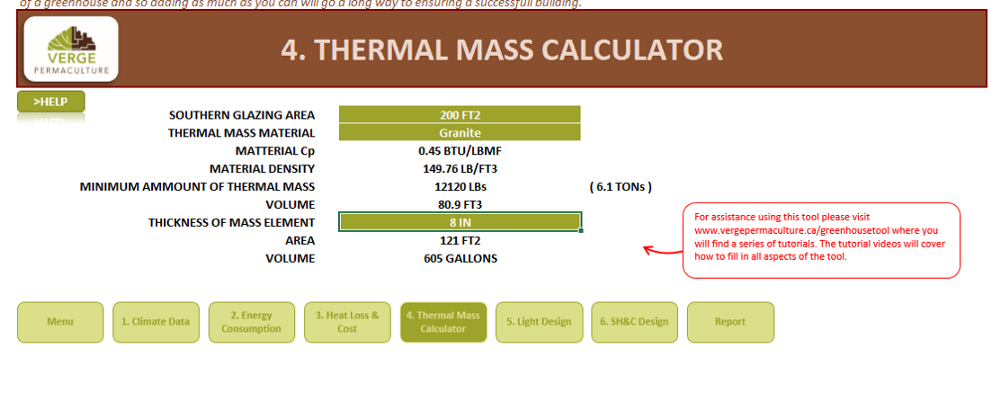
To help design thermal mass we built a specific calculator to help determine how much thermal mass a greenhouse should have. It calculates it based on the glazing surface area (solar collection surface) and type of material that you choose to use (rock, concrete, cob, water, water + glycol or metal)…
The passive solar greenhouse design tool forms the backbone of the 10 week Passive Solar Greenhouse Design Course I am offering through Small Farm Academy. Click here to find out more about our course.
Generally speaking more thermal mass is better than less, however there comes a point when adding more starts to diminish the production area in the greenhouse, so it is a fine balance. There are pros and cons to each thermal mass which you need to be aware of, the materials and their respective pros and con can be delinted into solid non freezable materials and freezable materials.
Non Solid Material Pros and Cons…
Water can freeze which can make using it challenge to use, however it has a high thermal capacitance (it holds a lot of energy) and its cheap, which makes it attractive.
Solid Material Pros and Cons…
Solid materials hold roughly 4 times less energy than water but they don’t freeze and can be easily set up inside of a greenhouse and never touched again.
Subterranean Heating and Cooling Systems…
Subterranean Heating and Cooling Systems (SHCS) or “Climate Battery’s” as some people call them is a heat storage technology that stores heat underground for later use. These systems capture hot air from the top of the greenhouse where the hottest air accumulates and a fan pumps the air below grade through a pipe network similar to the one shown below….
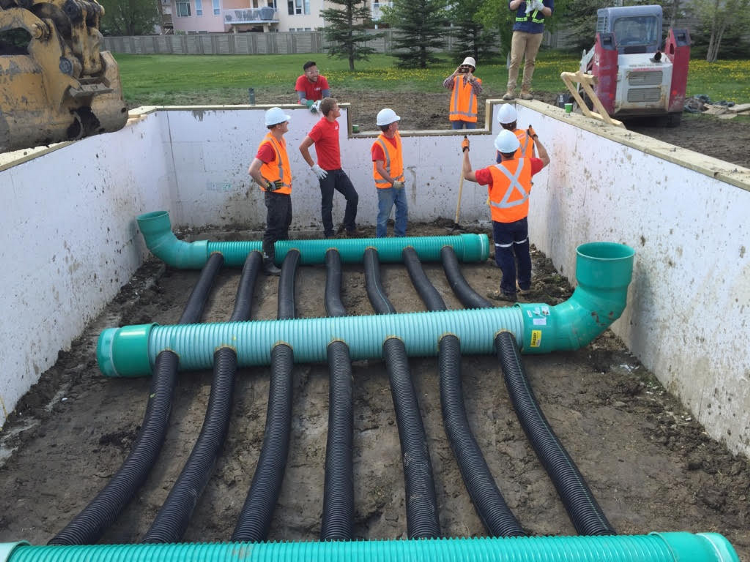
Hot air in a greenhouse typically has a high humidity which translates to moisture stored in the air. The more humidity in air, the more energy air can hold. As warm humid air is pumped through the cold ground the moisture drops out of the air through condensation which releases large amounts of energy into the soil. This is due to the fact that condensation releases energy while evaporation consumes energy. Water then infiltrates through the perforated pipes in the SHCS irrigating the soil and the energy is stored.
These systems store surplus energy from the greenhouse during the day when temperatures rise above 21 C (72f) by turning on a fan. The fan does not operate between 12C (53f) and 20C (68f), however it will turn on when the temperature in the greenhouse goes below 11C or (51.9f) quickly extracting the thermal energy from the ground to keep it above freezing…
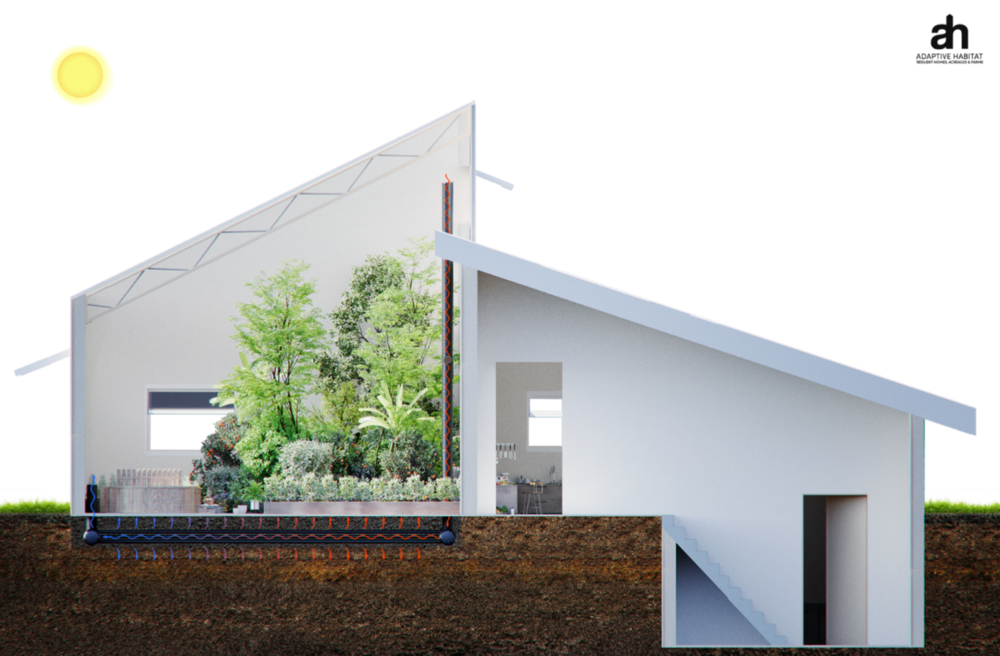
Cross section of a passive solar greenhouse with a subterranean heating and cooling system. Copyright Adaptive Habitat Inc.
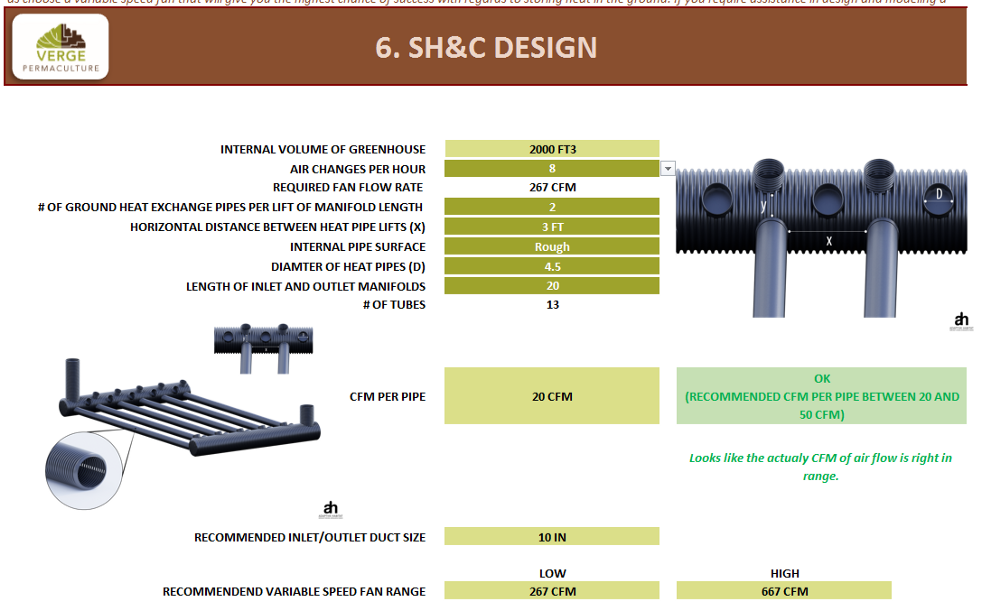
To design a SHCS properly you need to be able to size the right duct sizes and fan sizes so that you are not using more power to push the air then you are storing in the ground. If this occurs, it is cheaper to just add the energy into the greenhouse with direct resistance electric elements.
I size these systems manually with a “ductulator” a calculator for mechanical engineers (we are total nerds) that want to design ducts. However, I realized that no one that was not an engineer would want to use one of these so I built a SHCS design tool so that non engineers could do this for themselves EASILY…
The passive solar greenhouse design tool forms the backbone of the 10 week Passive Solar Greenhouse Design Course I am offering through Small Farm Academy. Click here to find out more about our course.
This tool allows the user to choose duct diameters and through a little iteration choose a fan size. I always recommend that these systems have variable speed fans so that they increase the variability of the system. Basically after the system is installed the user can play with the fan speed to find an optimal air flow rate for the greenhouse and or potentially the season of use.
Generally speaking we want our SHCS to change the air over in the greenhouse 2 – 6 times per hour, with the ability to increase or decrease this if required.
Thermal Dynamic Modeling…
The tool and process will work for any size of greenhouse however, if the greenhouse goes beyond 1500 sqft the construction costs start to escalate quickly. Buildings of this magnitude are worth performing thermodynamic modeling on which is where I typically get involved from a consultancy perspective.
This tool and process can be used as a feasibility tool before getting me engaged but I would not build a large greenhouse without doing some additional optimization and design.
Finally, we will talk about heating your greenhouse and how to add in components like hot tubs, saunas, commercial kitchens and root cellars…
Heating & Integrated Design – Part 4 of 4…
Now I am going to cover heating of passive solar greenhouses and how to use them for more than just growing food…
Heating Your Greenhouse…
If you have decided to grow plants in your greenhouse that requires supplemental / back up heat you are going to to want to understand a few things…
- What options exist to heat your greenhouse
- What the worst case scenario is for heating it.
- How much is it going to cost per year.
There are many options that you can explore for heating your greenhouse, including wood, heat pump, electric, natural gas, oil and coal (if that is even still a thing)…
I have a general rule heating approach which is pragmatic and gives maximum flexibility. I believe that a heated greenhouse should have a primary and secondary heat source here is why. A lot of our clients want to be able to leave on vacation or not be home for several days at a time and do not want to have to worry about the temperature in their greenhouse.
For this reason there is nothing that beats having an automatic heat source that will kick on when you need it without having to start a fire. Having two sources of heat means that during the time that you are on your property you can burn the least expensive fuel, such as pallets or coppiced wood from your property and then when you decide to leave your property for a while your back up source will kick in…
Lets give an example of how this might work. Lets assume that you had a greenhouse with a wood stove burning waste wood most of the time and a back up natural gas heater to kick in if it was needed. The wood would be the “cheap fuel” while the natural gas would act as the back up heat source. This is how the control philosophy would work for this scenario.
While you were home you would keep your wood stove stoked to keep things at an appropriate temperature, lets assume 10C or (50f) or above.
The natural gas heater would have a set point of 5C (41f) and would kick in if the greenhouse temperature ever dipped below that threshold temperature. This threshold temperature would be set based on the least cold tolerant species in the greenhouse.
In the event that you left the greenhouse for a couple of weeks, the natural gas heater would keep things warm. While you were home you could keep things at a warmer more optimal temperature.
To assess this… you guessed it… I built a tool. 🙂
The passive solar greenhouse design tool forms the backbone of the 10 week Passive Solar Greenhouse Design Course I am offering through Small Farm Academy. Click here to find out more about our course.
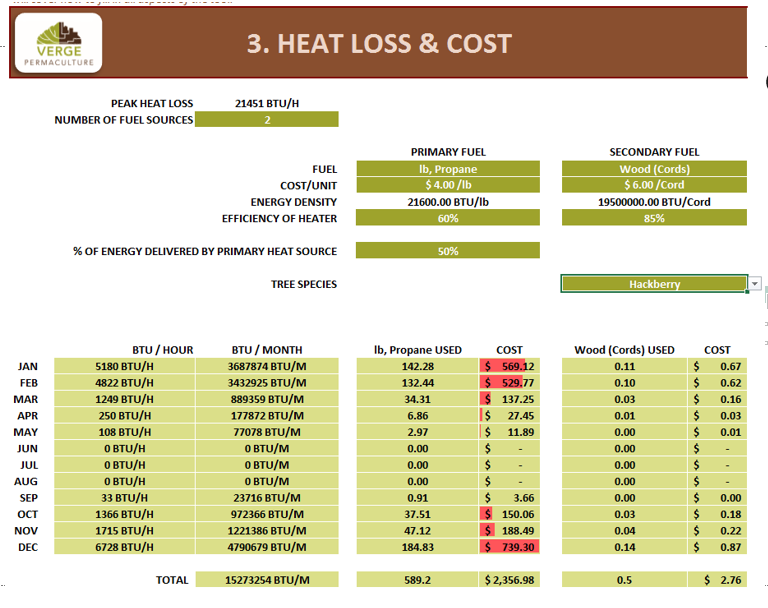
This tool has the ability to select a primary and secondary fuel source just like the example above. The user can specify how much of the space heating will be done by the wood stove versus the natural gas heater, how much the fuels cost per cord, gigajoule, therm, liter, gallon or kWhr. The tool would the output a fuel cost per month and year based on the R-values and the climate the greenhouse is specified to be in.
The heat loss estimated will almost always be larger in the tool than in reality as the tool assumes a “worst case scenario” for exterior temperature, we call this an extreme minimum. This is handy as it informs the user with regards to whether the greenhouse makes economic sense to heat before they go and built it. In addition this part of the tool will allow the user to go back into the insulation section and optimize it based on the cost of heating either adding or subtracting insulation to see how it impacts the annual cost.
Integrated Design…
This is the funnest part of designing one of these greenhouses as we get to put unique elements into them that you would normally not find in typical greenhouses. Integration in design relies upon connecting yields from one element to the needs of another.
In permaculture we call this needs and yields analysis. Learning needs and yields analysis completely changed how I design as an engineer an is one of the most important design tools presented in the permaculture design system. Here is a video that explains how needs and yields works in permaculture…
Elements that might be placed within a passive solar greenhouse might include a;
- Wood fired hot tub
- Sauna
- Commercial kitchen
- Root cellar
- Solar dehydrator
There is really no limit to the types of things that you can integrate with these structures. The beauty with some of the elements above is that they can double as the space heat and or thermal mass.
In addition to these elements there are ways that you can integrate your greenhouse with your home. This can be challenging as you have to take considerable care when considering how vapor from the greenhouse interacts with the house, but it can be done.
The greenhouse in the case study below is attached to a passive house which allows the greenhouse to get access to the “waste” resources from the house including, stale air from the bathroom fans, warm grey water, and exhaust from the heat recovery ventilator. The house gets access to the tempered space of the greenhouse as well as passive solar heat gain when it is warm inside the greenhouse.
The residents have quick and easily accessible food right outside their kitchen 4 seasons of the year…
Click on the video below to watch a webinar I recently did on how to design passive solar greenhouses, you can watch it below…
About Rob Avis:
In less than 10 years, Rob Avis left Calgary’s oil fields and retooled his engineering career to help clients and students design integrated systems for shelter, energy, water, waste and food, all while supporting local economy and regenerating the land. He’s now leading the next wave of permaculture education, teaching career-changing professionals to become eco-entrepreneurs with successful regenerative businesses. Learn more and connect with Rob here.
