How To Become More Self-Sufficient Without Starting a Full-Blown Farm…
Want to start preserving your harvest, making your own soap, or building a backyard root cellar — but not sure where to begin? “Homesteading Advice” gives you instant lifetime access to 35+ practical homesteading books on food preservation, veggie gardening, DIY natural cleaning products (save over $250 per year with this skill alone), brewing, off-grid energy, and a whole lot more…
Click Here To Check It Out Now!
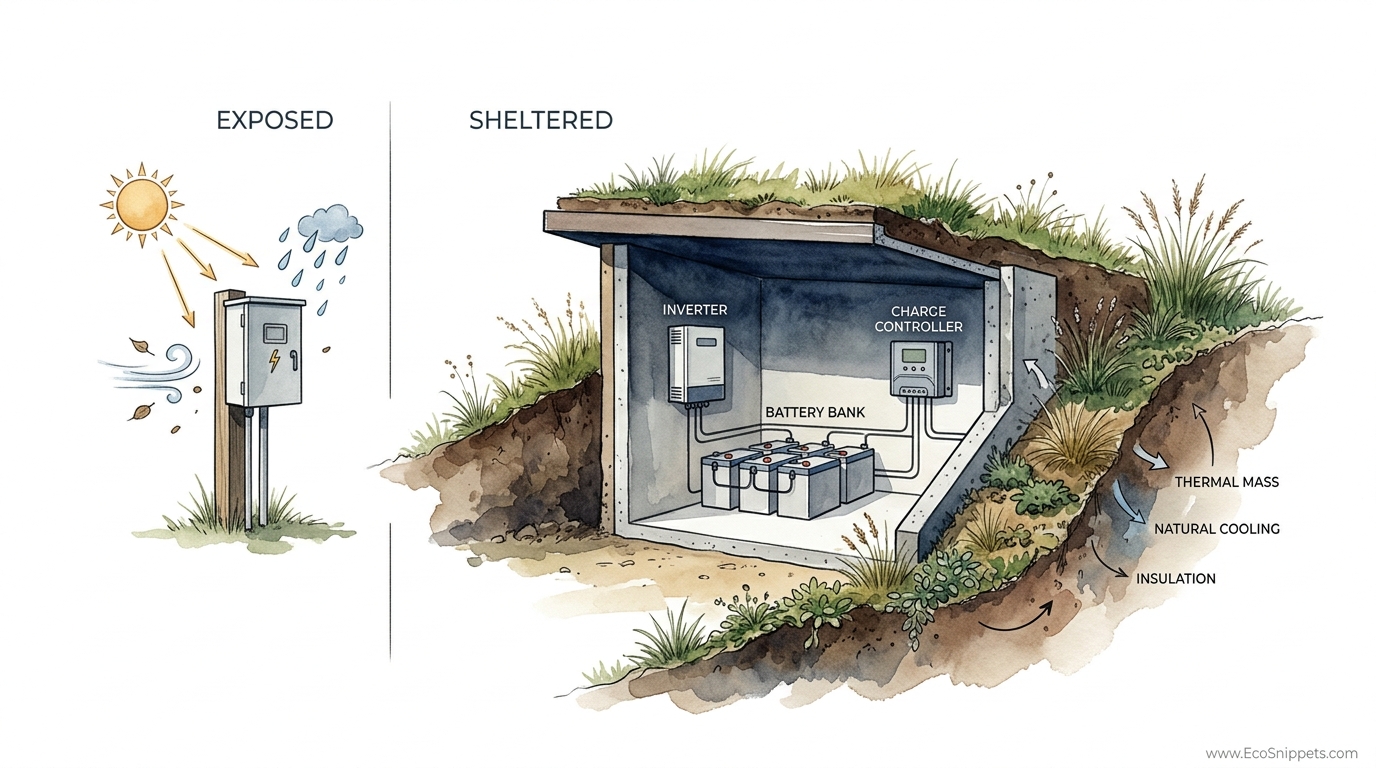
Heat is the #1 killer of expensive solar equipment – is your system baking itself to death? Most solar installers bolt the inverter to the side of the house because it’s easy. But exposed heat can reduce the life of your equipment by 50%. Sheltering your electronics in an earth-cooled bunker uses the planet’s natural thermal mass to keep your system at a constant, safe temperature. It’s quieter, safer, and lasts decades longer.
Every watt of electricity your solar panels harvest passes through an inverter, a charge controller, and eventually into a battery bank. These components are the central nervous system of your energy independence. Yet, many people treat them like garden tools, leaving them to simmer in the sweltering heat of a garage or a thin-walled outdoor shed. In the world of high-capacity electronics, heat is not just a nuisance; it is a relentless predator that eats away at internal capacitors and chemical life cycles.
Building a shelter that works with the earth instead of against the atmosphere changes everything. By sinking your power hub into the ground or backing it against a hillside, you tap into the deep thermal inertia of the planet. This isn’t just about shade. It is about surrounding your investment with a massive heat sink that remains stable regardless of the season.
Understanding the difference between an EXPOSED system and a SHELTERED one is the difference between a system that fails in seven years and one that hums along for twenty. Ancestral wisdom tells us that the safest place for perishables is a root cellar. Your solar electronics are the most expensive “perishables” on your homestead, and they deserve the same protection.
Earth Bermed Power Shed Design For Solar Equipment
An earth bermed power shed is a specialized structure designed to house solar inverters, charge controllers, and battery banks by utilizing the ground as a natural insulator and heat sink. Unlike a traditional cellar that is entirely underground, a bermed structure is typically built at ground level or partially below grade, with earth piled against one or more of its walls. This design allows for easy access and ventilation while retaining the massive thermal benefits of being submerged in the soil.
These sheds exist because standard outdoor enclosures often fail to protect sensitive electronics from “thermal derating.” When an inverter gets too hot, it intentionally slows down its performance to prevent a total meltdown. In many climates, this happens exactly when you need the most power—during the peak sun of a summer afternoon. Earth berming solves this by keeping the ambient temperature of the room near the constant temperature of the earth, which is usually between 13°C and 16°C (55°F to 60°F) once you go down a few feet.
In the real world, you might see these designs in high-end off-grid homesteads, remote telecommunications hubs, or military outposts. They look like small, grassy hillocks with a stout, insulated door on one side. By mimicking the “root cellar” concept, these structures ensure that the chemical reactions inside your batteries—especially Lithium Iron Phosphate (LiFePO4) or Lead Acid—occur in their “Goldilocks zone.”
Think of the earth as a massive thermal battery. While the air temperature might swing 20 degrees in a single day, the earth moves in slow, predictable cycles over months. This stability prevents the “thermal shock” that causes solder joints to crack and battery electrolytes to degrade. It is the ultimate expression of working with nature to protect modern technology.
How the Earth-Cooled System Works
The core principle at play here is thermal mass. Soil, rocks, and concrete have a high capacity to store and move heat slowly. When your inverters generate heat while converting DC to AC, that heat radiates into the air of the shed. In a thin plywood shed, that heat is trapped, and the sun hitting the roof only adds to the misery. In a bermed shed, the concrete walls transfer that heat directly into the cool earth behind them.
This process is known as “passive cooling.” No energy-hungry air conditioner is required because the planet acts as the radiator. To achieve this, the structure must be built with materials that conduct heat well—specifically concrete or stone. The back and side walls are usually poured concrete or filled Concrete Masonry Units (CMU), which are then waterproofed and buried under several feet of soil.
Ventilation is the second half of the equation. Because electronics generate their own heat, you cannot simply seal them in a tomb. A well-designed bermed shed uses a “stack effect” or “solar chimney” for airflow. Fresh, cool air is drawn in from a low-level intake pipe (often buried to further pre-cool the air), and warm air is exhausted out of a high vent at the opposite end of the room.
Water management is the silent partner in this design. You must prevent hydrostatic pressure—the weight of water in the soil—from pushing against your walls. This involves a multi-layer defense: a primary waterproofing membrane, a drainage mat to let water fall to the bottom, and a French drain at the footing to carry water away from the structure. When these systems work together, the interior remains bone-dry and cool, creating a laboratory-grade environment for your power grid.
Benefits of Earth Sheltering Your Gear
The primary advantage is a massive increase in equipment lifespan. Research indicates that for every 10°C (18°F) rise in temperature above 25°C (77°F), the lifespan of electronic capacitors and battery chemicals can be cut in half. By maintaining a steady environment, you effectively double the duration of your investment. This is the difference between replacing a $5,000 battery bank every 8 years versus every 15 to 20 years.
Beyond longevity, you gain significant operational efficiency. Solar inverters operate more efficiently when they are cool. High heat increases the electrical resistance in semiconductor materials, meaning you lose more power to waste heat. A cool inverter converts more of your harvested sunlight into usable household electricity, squeezing every possible watt out of your panels.
Protection from the elements is another major factor. A bermed shed is virtually immune to high winds, hailstorms, and falling branches. While a standard shed might be ripped apart by a hurricane or crushed by a tree, an earth-covered bunker remains untouched. This level of physical security also extends to fire protection. Concrete and earth do not burn, making this the safest place to store high-energy batteries that could otherwise be a risk in a wooden structure.
Finally, there is the benefit of silence. High-power inverters have fans that can be quite loud when running at full capacity. The thick concrete walls and surrounding earth act as a world-class sound barrier. You can stand five feet away from a bermed shed and hear nothing but the wind, while the same system in a garage might vibrate through the entire house.
Challenges and Common Mistakes
The most common mistake builders make is inadequate waterproofing. Simply painting a “sealer” on the outside of the concrete is not enough. Underground moisture is persistent and will find every micro-crack. Using a high-quality EPDM (Ethylene Propylene Diene Monomer) membrane or a rubberized asphalt sheet is mandatory. If you skip this, your expensive electronics will be subjected to high humidity, leading to corrosion on the busbars and circuit boards.
Another frequent error is failing to account for condensation. Because the earth is cool, the interior walls of the shed will also be cool. If warm, humid air from the outside enters the shed and hits those cool walls, water will condense on them—and potentially on your electronics. This is why insulation is actually necessary on the *outside* of the waterproofing layer to keep the wall temperature slightly above the dew point, while still allowing the thermal mass to function.
Poor ventilation is a system killer. Beginners often think “buried means sealed.” If the inverters are working hard and there is no airflow, the shed will turn into an oven despite the earth berm. You must calculate the CFM (Cubic Feet per Minute) requirements of your equipment and ensure your intake and exhaust vents are large enough. For most systems, a 150mm to 200mm (6″ to 8″) pipe is the minimum for passive airflow.
Hydrostatic pressure is the final major challenge. When soil gets wet, it becomes heavy and pushes against the walls. If you don’t backfill with “well-draining” material like gravel or clean sand, the weight of the wet clay could actually crack the walls. Always use a perforated drain pipe at the base of the wall to ensure water never has a chance to pool behind the structure.
Limitations and Environmental Constraints
The local water table is the ultimate limiting factor. If your property is in a swampy area or has a high water table (less than 1.5 meters or 5 feet below the surface), a fully buried or deeply bermed shed is a recipe for disaster. In these cases, you are better off with a “raised berm” design, where the structure is entirely above ground and the earth is piled up in a wide mound around it.
Soil type also dictates the complexity of the build. Granular soils like sand and gravel are ideal because they drain water naturally and are easy to excavate. Cohesive soils like heavy clay are much more difficult; they expand when wet, putting immense pressure on the structure, and they hold moisture like a sponge. If you have heavy clay, you will need to over-excavate and bring in significant amounts of gravel for backfill.
Access and space can also be a constraint. An earth berm is not just a wall; it requires a “slope of repose.” To bury a wall that is 2 meters (6.5 feet) high, the mound of earth will need to extend outward 4 to 6 meters (13 to 20 feet) to remain stable without a secondary retaining wall. This means an earth-bermed shed has a much larger “footprint” on your land than a traditional shed.
Finally, there is the matter of cost and labor. Digging a hole and pouring reinforced concrete is significantly more expensive than buying a pre-built garden shed. You are trading a higher upfront cost for a lower lifetime cost. If you are on a tight budget or only plan to live on the property for a few years, the return on investment for an earth-bermed bunker might not make sense.
Comparison: Exposed Shed vs. Earth Bermed Bunker
Choosing between a standard structure and a bermed design involves weighing immediate convenience against long-term reliability. Below is a breakdown of how these two approaches compare in practical terms.
| Feature | Exposed Outdoor Shed | Earth Bermed Bunker |
|---|---|---|
| Temperature Stability | Poor; follows daily air swings. | Excellent; remains near 15°C (59°F). |
| Equipment Lifespan | 5-10 years (Heat degraded). | 15-25 years (Preserved). |
| Construction Cost | Low ($500 – $2,000). | High ($3,000 – $10,000). |
| Maintenance Need | Moderate (Painting, roof leaks). | Very Low (Structure is buried). |
| Noise Dampening | Minimal. | Superior (Near silent). |
Practical Tips and Best Practices
When you begin your build, prioritize the French Drain above all else. This is a perforated pipe wrapped in “burrito” fabric (geotextile) and buried in a bed of gravel at the base of your footings. It ensures that any water that reaches the shed walls is immediately whisked away to a lower part of the property. Without this, your shed will eventually leak, no matter how much waterproofing you apply.
Use Extruded Polystyrene (XPS) foam boards for your exterior insulation. Unlike the white “beadboard” (EPS) used for packaging, XPS is moisture-resistant and has a high compressive strength, meaning it won’t be crushed by the weight of the dirt. Place it directly against your waterproofing membrane. This creates a “thermal break” that prevents the wall from getting so cold that it causes condensation inside the shed.
Design your internal layout with Air Gaps. Do not bolt your inverters directly to the concrete wall. Instead, mount a piece of fire-rated plywood or a metal Unistrut frame to the wall with a 50mm (2″) gap behind it. This allows air to circulate behind the electronics, preventing hotspots and ensuring the heat can radiate away from the components effectively.
- Always install a dual-sensor humidity and temperature monitor with a remote display in your house so you can check on the bunker without walking outside.
- Install an insect screen over your ventilation pipes. Spiders and wasps love the steady temperature of a power shed and can clog up inverter fans.
- Use bentonite clay panels at the seams of your foundation. Bentonite expands when wet, creating a self-healing seal if the structure ever shifts.
Advanced Considerations: Earth Tubes and Solar Chimneys
For those looking to achieve maximum efficiency, consider installing Earth Tubes. These are long runs of 150mm (6″) smooth-walled pipe buried 2 meters (6.5 feet) deep and extending 20 to 30 meters (65 to 100 feet) out from the shed. As air is pulled through these pipes, it is tempered by the ground. In the heat of summer, 35°C (95°F) air can be cooled to 18°C (64°F) before it even enters your power shed. This is essentially “free” air conditioning for your electronics.
A Solar Chimney can automate your ventilation without using a single watt of battery power. By installing a tall, black-painted vertical pipe on the exhaust vent, the sun heats the air inside the pipe. As the hot air rises, it creates a vacuum that pulls fresh, cool air from your intake or earth tubes. The harder the sun shines—and the more your inverters work—the faster the air moves. It is a perfectly self-regulating system.
Consider the Thermal Polarity of your battery bank. If you are using Lithium (LiFePO4) batteries, they cannot be charged if the internal cell temperature drops below 0°C (32°F). While the earth helps keep things warm, in extremely cold climates (like the Northern US or Canada), you may need a small “heat tape” or a low-wattage heating pad under the batteries. The beauty of the bermed shed is that once you introduce a tiny bit of heat, the earth walls will hold it for days.
Example Scenario: The 10kW Off-Grid Homestead
Imagine a homestead with a 10kW solar array and a 40kWh lithium battery bank. In a traditional setup, the owner might build a small wooden shed next to the panel array. On a July afternoon with an ambient temperature of 32°C (90°F), the interior of that wooden shed could easily reach 45°C (113°F). At this temperature, the 10kW inverter would likely “derate” its output to 7kW to protect itself, and the batteries would be aging at four times their normal rate.
Now, look at the same system in an earth-bermed shed. The owner dug into a north-facing slope and built a 2m x 2m (6.5′ x 6.5′) room using concrete blocks filled with gravel. He applied EPDM waterproofing and buried the roof under 45cm (18″) of soil and grass. Even on that same 32°C (90°F) day, the interior of the bunker stays at a steady 18°C (64°F). The inverter runs at full 10kW capacity with its internal fans barely spinning. The batteries remain in their peak health zone.
Over 15 years, the owner of the wooden shed will likely replace his battery bank twice, costing him roughly $12,000 in total. The owner of the earth-bermed bunker is still on his first set of batteries, having spent only an extra $3,000 on the initial construction. The “bunker” approach paid for itself three times over in battery savings alone, not to mention the peace of mind during a wildfire or hurricane.
Final Thoughts
Protecting your solar investment requires a shift in perspective. We are often taught to think of “high-tech” solutions as things that require more gadgets, more sensors, and more electricity. However, the most sophisticated thermal management system on the planet is the very ground we walk on. Earth berming is a low-tech solution to a high-tech problem, providing a level of reliability that no fan or air conditioner can match.
Building an earth-bermed power shed is a commitment to the long game. It requires more sweat, more digging, and more planning than a standard install. But the reward is a power system that operates with silent, cool efficiency, shielded from the ravages of heat and the unpredictability of the weather. It is a structure that reflects the resilience of the system it protects.
If you are planning an off-grid or high-capacity solar installation, stop looking at the side of your house and start looking at the land. Find a slope, grab a shovel, and build a home for your power that will last as long as the sun continues to shine. Your future self—and your bank account—will thank you for the foresight.
