How To Become More Self-Sufficient Without Starting a Full-Blown Farm…
Want to start preserving your harvest, making your own soap, or building a backyard root cellar — but not sure where to begin? “Homesteading Advice” gives you instant lifetime access to 35+ practical homesteading books on food preservation, veggie gardening, DIY natural cleaning products (save over $250 per year with this skill alone), brewing, off-grid energy, and a whole lot more…
Click Here To Check It Out Now!
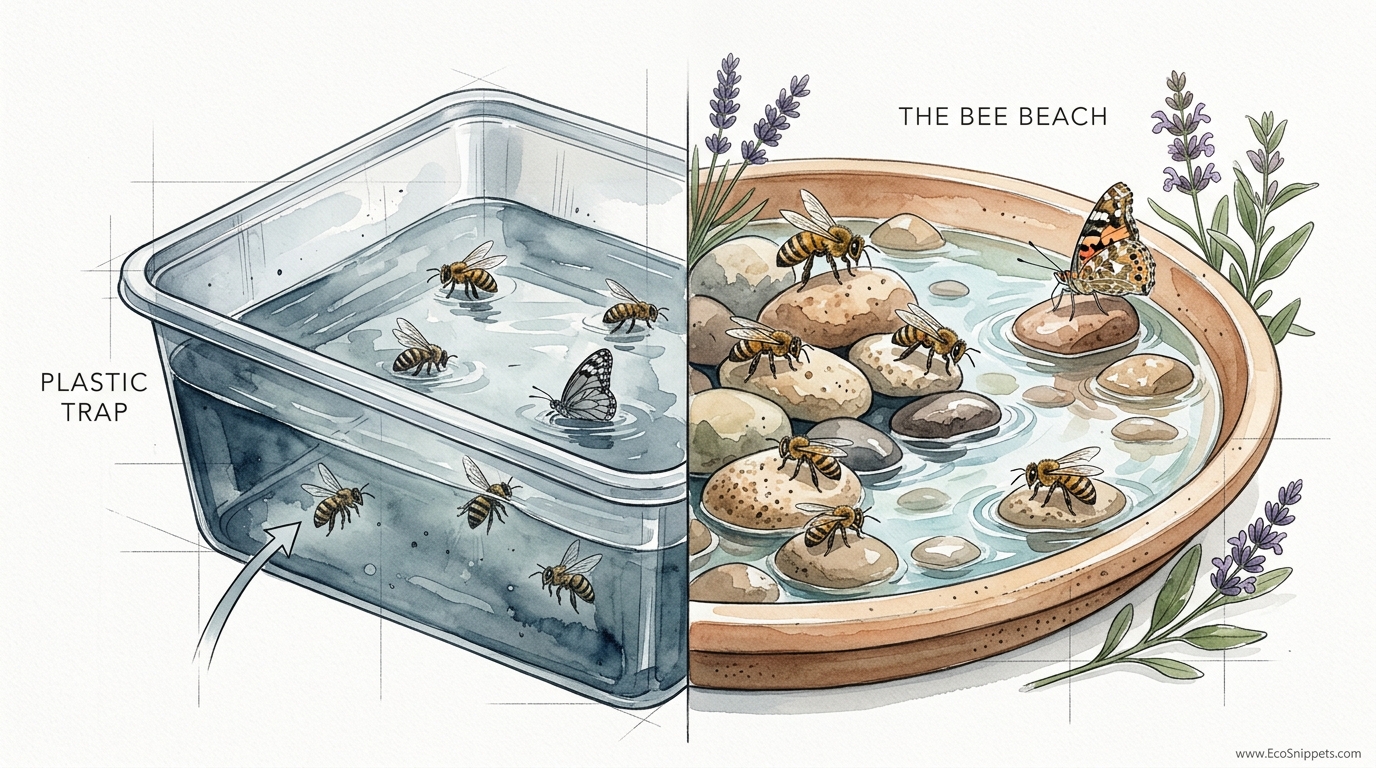
Most backyard ‘waterers’ are actually death traps for the bees you worked so hard to attract. Bees need hydration just like we do, but ‘Synthetic’ solutions are causing more harm than good. Switch to a ‘Natural’ stone-and-moss oasis that keeps your pollinators safe.
Creating a sanctuary for pollinators involves more than just planting a few marigolds or lavender bushes. While nectar provides the energy they need to fly, water is the lifeblood of the entire colony. Unfortunately, many well-meaning gardeners put out deep bowls or birdbaths that end up claiming the lives of the very creatures they intended to help.
This guide will walk you through the process of building a functional, beautiful, and safe watering station. By the time you finish reading, you will understand how to provide a reliable “Bee Beach” that mimics the natural seeps and damp edges found in the wild.
DIY Bee Waterer Tutorial – Safe Water Source For Bees And Butterflies
A DIY bee waterer is a shallow, specialized hydration station designed specifically for insects that cannot swim. Unlike a standard birdbath, which is often several inches (7.6–12.7 cm) deep with steep, slippery sides, a bee waterer uses textured landing zones to provide access to moisture without the risk of immersion.
In the real world, bees look for water in places where they can keep their feet dry. You might have seen them hovering around the edge of a leaky garden hose or landing on damp moss near a spring. They are not looking for a pool; they are looking for a wet surface.
These stations are used in backyard gardens, community allotments, and professional apiaries to ensure that honey bees, bumblebees, and butterflies have a consistent source of clean water. Providing this resource prevents them from seeking moisture in dangerous places like chlorinated swimming pools, chemically treated dog bowls, or stagnant puddles contaminated with pesticides.
Think of this tutorial as an exercise in ancestral wisdom. Long before plastic trays were available, bees survived by visiting the mossy banks of slow-moving streams. We are simply recreating that ancient, reliable system in a controlled environment that fits your garden aesthetic.
How It Works / How to Do It
The physics of a bee waterer relies on the “landing pad” principle. Bees have heavy bodies and delicate wings; if they fall into deep water, surface tension often pins them down, leading to exhaustion and drowning. By providing stones and moss that break the surface of the water, you create a safe zone where they can sip from the crevices.
To build your own, you will need a few basic materials that favor natural textures over smooth, synthetic ones.
- A Shallow Basin: A terracotta plant saucer or a wide, glazed ceramic tray works best. Aim for a diameter of 10–14 inches (25–35 cm) and a depth of no more than 2 inches (5 cm).
- River Stones or Pebbles: Choose rocks with varying sizes and rough textures. These will serve as the “islands” for your pollinators.
- Live Moss or Peat: Moss acts like a natural sponge, drawing water up via capillary action so bees can drink from the damp greenery without ever touching the water’s surface.
- Clean Water: Avoid using distilled water. Bees actually prefer water with a bit of “character”—meaning natural minerals.
- Optional: A Pinch of Sea Salt: A tiny amount of salt can help bees find the water via scent and provides essential minerals.
Step 1: Prepare the Basin. Clean your saucer thoroughly. If using terracotta, soak it in a bucket of water for an hour first so it doesn’t immediately suck all the moisture out of your setup.
Step 2: Arrange the Rocks. Place your stones in the basin. Create a “shoreline” effect where some rocks are completely submerged, some are half-submerged, and others remain completely dry. This variety ensures that as the water evaporates throughout the day, there is always a safe landing spot at the current water level.
Step 3: Nest the Moss. Tuck clumps of live moss between the rocks. The moss should touch the water so it stays hydrated but remains firm enough for a bee to walk on. This is the secret to a high-traffic “Bee Beach.”
Step 4: Fill with Water. Pour water in slowly until it reaches about halfway up your stones. You want the tops of the rocks to remain dry. If you are adding a pinch of salt (less than a quarter teaspoon for a standard saucer), dissolve it in the water before pouring.
Step 5: Placement. Set the waterer in a protected, sunny spot near your most active flower beds. Avoid placing it directly in front of a beehive entrance if you keep bees, as this can cause “traffic jams.” A distance of 10–15 feet (3–4.5 meters) is ideal.
Benefits / Advantages
Providing a dedicated water source offers measurable benefits for both the insects and your garden’s overall productivity. When bees don’t have to fly miles to find a creek, they spend more time pollinating your vegetables and flowers.
Hive Thermoregulation: On hot days, honey bees use water for evaporative cooling. They bring droplets back to the hive, spread them over the honeycomb, and fan their wings to lower the internal temperature. Without water, a hive can overheat, leading to melted wax and dead larvae.
Digestive Health: Bees need water to thin out crystallized honey so they can eat it. They also use it to produce royal jelly, the nutrient-rich substance fed to the queen and developing brood.
Butterfly Puddling: Male butterflies often congregate on damp soil or moss to “puddle.” This behavior allows them to intake salts and minerals that are essential for their reproductive success. A natural waterer with moss and stones provides these nutrients more effectively than a clean, plastic dish.
Safety and Reliability: By creating a “Natural” oasis, you reduce the “Plastic Trap” effect where bees slip on smooth surfaces and drown. A reliable source also “trains” the bees to return to your yard daily, ensuring your garden remains a priority on their foraging route.
Challenges / Common Mistakes
The most common error is “setting and forgetting.” A stagnant waterer can quickly become a breeding ground for mosquitoes or a vector for bee diseases.
Mosquito Larvae: Mosquitoes only need about 48 to 72 hours to lay eggs in standing water. If you see tiny “wigglers” in your basin, you have waited too long to refresh it. To avoid this, dump and scrub the waterer every 2–3 days.
Algae Overgrowth: While a little bit of algae isn’t harmful to bees—and can actually provide some nutrients—too much of it makes the rocks slippery. If the stones feel slimy, give them a quick scrub with a stiff brush and plain water. Avoid using soap, which can be toxic to insects.
The Empty Basin: Bees are creatures of habit. If your waterer goes dry for a few days during a heatwave, the bees will find a new source. Once they’ve established a “flight path” to a neighbor’s pool or a distant pond, it is very difficult to lure them back.
Limitations / When This May Not Be Ideal
While a stone-and-moss waterer is perfect for backyard gardens, it has its limits in certain environmental conditions.
In extremely arid climates where temperatures exceed 100°F (38°C), a small saucer will evaporate in hours. In these cases, a simple saucer isn’t enough; you may need a larger reservoir system or a “drip” setup that slowly replenishes the water throughout the day.
During winter in temperate or cold regions, these waterers will freeze. While bees don’t forage in the deep cold, they do take “cleansing flights” on sunny winter days when temperatures rise above 50°F (10°C). A frozen waterer is useless to them. However, do not use birdbath heaters unless they are specifically rated for shallow water, as they can overheat and crack terracotta.
Finally, if you have a massive commercial apiary with dozens of hives, a few saucers won’t cut it. Large-scale beekeepers often use 5-gallon (19-liter) buckets with floating boards or corks to satisfy the high demand of thousands of bees simultaneously.
Optional Comparison / Context
When deciding how to support your pollinators, it helps to compare the common methods available to the modern gardener.
| Feature | The Plastic Trap (Generic Saucer) | The Bee Beach (Stone & Moss) | Traditional Birdbath |
|---|---|---|---|
| Safety | Low – slippery surfaces cause drowning. | High – textured landing zones. | Medium – too deep for most bees. |
| Maintenance | Low – easy to wipe. | Moderate – requires refreshing moss. | Low – easy to hose out. |
| Attractiveness | Low – no scent or mineral cues. | High – moss and stone mimic nature. | Medium – attracts birds but scares bees. |
| Cost | Very Low ($1–$5) | Low ($5–$15 or free materials) | Medium ($20–$100) |
Practical Tips / Best Practices
If you want to maximize the effectiveness of your watering station, follow these field-tested adjustments.
- Use Scent Cues: If bees aren’t finding your waterer, add two drops of lemongrass essential oil to a dry rock near the water. Lemongrass mimics the Nasonov pheromone that bees use to signal “home” or “good resource” to their sisters.
- Add Mineral Diversity: Occasionally toss in a piece of old wood or a few dried leaves. As these break down, they release tannins and minerals that bees find irresistible. Most honey bees actually prefer “pond-smelling” water over tap water.
- Morning Refills: Refill your waterer in the early morning before the sun hits its peak. This ensures the moss is fully saturated when the bees begin their first water-run of the day.
- Leveling: Ensure your saucer is perfectly level. Even a slight tilt can leave half your rocks high and dry while the other half are submerged too deeply to be useful.
Advanced Considerations
For the serious practitioner who wants to create a self-sustaining system, consider the “Continuous Drip” method. This involves placing a large water reservoir (like a 5-gallon bucket with a tiny pinhole at the bottom) above a slanted board covered in outdoor carpet or moss.
The water slowly drips onto the board, keeping it perpetually damp but never flooded. This setup can serve hundreds of bees an hour without ever needing a manual refill. It is the gold standard for beekeepers in drought-prone areas.
Another advanced technique is the use of “Bti” (Bacillus thuringiensis israelensis). If you find you cannot empty your waterer every two days, you can add a small piece of a “Mosquito Dunk.” This is a biological control that kills mosquito larvae but is 100% safe for bees, butterflies, birds, and pets. It allows you to keep the waterer active without contributing to the local mosquito population.
Examples / Scenarios
Imagine a July afternoon where the temperature hits 95°F (35°C). In a standard garden with only deep birdbaths, a honey bee forager might try to land on the edge of the basin. As she leans down to reach the water, a gust of wind or the ripple from a landing robin knocks her in. Her wings get wet, she cannot gain lift, and she eventually perishes.
Now, consider the same bee in a garden with a “Bee Beach.” She lands on a sun-warmed river stone. She walks down to the edge where the stone meets a patch of damp moss. She stays completely dry while her proboscis reaches into the cool, moist crevices of the moss. She drinks her fill, takes off easily, and returns to the hive to cool her sisters.
This simple difference in infrastructure can save dozens of foragers every hour during the peak of summer. Since a single bee can make up to 50–100 water trips a day, a safe waterer significantly reduces the mortality rate of your local colony.
Final Thoughts
Building a safe water source is one of the most impactful things you can do for your local ecosystem. It is a project that requires very little investment but yields massive dividends in the form of a healthier, more resilient pollinator population.
By moving away from smooth, dangerous “Plastic Traps” and embracing the natural textures of stone and moss, you are honoring the way these insects have survived for millions of years. It’s about working with nature’s design rather than trying to overwrite it with modern convenience.
Start small with a single terracotta saucer and a handful of rocks from your yard. Watch the bees find it, observe how they use the moss, and adjust your setup as you learn their preferences. Your garden—and the bees—will thank you for it.
