
How To Become More Self-Sufficient Without Starting a Full-Blown Farm…
Want to start preserving your harvest, making your own soap, or building a backyard root cellar — but not sure where to begin? “Homesteading Advice” gives you instant lifetime access to 35+ practical homesteading books on food preservation, veggie gardening, DIY natural cleaning products (save over $250 per year with this skill alone), brewing, off-grid energy, and a whole lot more…
Click Here To Check It Out Now!
Did you know that old pallets can be repurposed into a functional and cozy chicken coop? If you’re looking for a cost-effective and sustainable way to house your chickens, then this might be the perfect solution for you.
By using discarded pallets, you not only save money but also contribute to reducing waste and promoting environmental sustainability. But how exactly can you transform these pallets into a chicken coop?
In this article, we will guide you through the process, providing you with step-by-step instructions and helpful tips along the way. So, get ready to embark on this fulfilling project that will not only benefit your chickens but also add charm and character to your homestead.
Why Old Pallets?
- Chicken coop kits can make raising chickens easier and more organized, but you can also make a chicken coop out of old pallets.
- Using old pallets for a chicken coop is a sustainable and cost-effective option.
- Repurposing old materials like pallets reduces waste and promotes environmental friendliness.
- Building a chicken coop out of old pallets allows for customization and creativity in design.
Assessing Your Pallets
Before you begin constructing your chicken coop out of old pallets, it’s important to assess the condition and quality of the pallets you have available. Pallet safety considerations should be your top priority.
Look for any signs of damage, such as broken boards, protruding nails, or splintered wood. These can pose a risk to both you and your chickens. Make sure the pallets are sturdy and can withstand the weight of the coop.
Additionally, consider the size and shape of the pallets.
They should be large enough to accommodate your desired coop design. Once you have ensured the safety of the pallets, get creative with pallet repurposing ideas.
Pallets can be used for walls, floors, and even nesting boxes. With some imagination and basic woodworking skills, you can transform old pallets into a functional and stylish chicken coop.
‘Did you know? Pallets are widely used in the shipping industry and can often be obtained for free or at a low cost, making them an affordable option for building projects like chicken coops.’
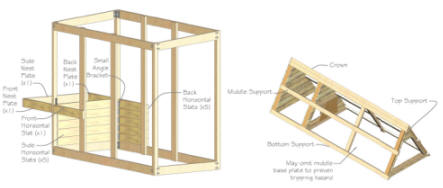
Designing Your Coop Layout
Now that you have assessed the condition and quality of your pallets, it’s time to move on to designing the layout of your chicken coop.
When designing your coop, it is important to make the most of the available space and create a comfortable environment for your chickens. One way to maximize space is by utilizing vertical space.
Consider adding shelves or roosting bars along the walls to provide additional perching areas for your chickens. Another essential element to incorporate is a nesting box. A nesting box provides a safe and private area for your hens to lay their eggs.
To help you visualize your coop layout and what’s needed…
| Area | Purpose | Features |
|---|---|---|
| Main | Roosting | Perches, bedding, ventilation |
| Nesting | Egg-laying | Nesting boxes, bedding |
| Feeding | Eating and drinking | Feeders, waterers |
| Run | Exercise and exploration | Fencing, access door |
Assembling the Coop Frame
It’s important to choose the right tools for this project.
A hammer, nails, and a saw will be necessary for attaching the pallets together securely. If you prefer a more efficient method, a nail gun can be used instead of a hammer.
Additionally, consider finding alternative materials for the coop flooring.
While pallets can be used, other options like plywood or linoleum can provide a smoother surface for the chickens and make cleaning easier. Make sure to measure and cut the flooring material to fit the dimensions of the coop frame accurately.
‘Did You Know? Chickens have been domesticated for thousands of years, with their origins dating back to around 6000 BC in Southeast Asia. They were first raised for cockfighting and later for their eggs and meat.’
Adding Pallet Walls and Roof
For added durability and protection, you’ll now proceed to construct the pallet walls and roof of the chicken coop. Pallets can be repurposed for the coop’s flooring, providing a sturdy and cost-effective solution. They could then be covered with plywood or linoleum after construction.
To create the walls, align the pallets vertically, securing them together with screws or nails. This will create a solid barrier to keep your chickens safe and protected from predators.
As for the roof, you have the option to explore alternative materials such as corrugated metal or fiberglass panels. These materials are lightweight, weather-resistant, and easy to install. They’ll ensure that your coop remains dry and secure, even during harsh weather conditions.
Finishing Touches & Coop Maintenance
As you put the finishing touches on your chicken coop, it’s important to establish a regular maintenance routine to ensure the longevity and functionality of your coop.
Here are some essential tips to help you maintain your coop and keep your chickens safe and healthy:
- Inspect coop ventilation: Regularly check the vents in your coop to ensure proper airflow. Good ventilation helps prevent moisture buildup and keeps the coop fresh and dry.
- Implement predator proofing techniques: Take precautions to protect your chickens from predators. Secure the coop with sturdy locks, reinforce windows and doors, and use predator-proof fencing to keep intruders out.
- Clean and sanitize regularly: Maintain cleanliness by removing droppings and soiled bedding. Regularly sanitize the coop with a safe disinfectant to prevent the spread of disease and parasites.
- Check for signs of wear and tear: Inspect the coop for any signs of damage or wear. Repair or replace any broken or worn-out parts to ensure the structural integrity of the coop.
- Monitor nesting boxes and perches: Keep an eye on the condition of nesting boxes and perches. Replace bedding as needed and ensure they’re comfortable and clean for your chickens.
Step By Step Pallet Coop
This project was made out of 7 unused wood pallets. It uses 3 wood pallets bolted together to form the floor structure, and another 4 to form most of the walls.
In addition, plywood is then used to finish & enclose the coop. The entire coop is raised off the ground allowing the chickens to also scratch around under their new home.
The end result is a really nice, low cost, pretty large chicken coop to house your ladies in…
To build the chicken house using 7 wood pallets, follow these steps:
Materials needed:
- 7 wood pallets
- Bolts and screws
- Plywood sheets
- Nails or screws for plywood
- Hinges
- Latches
- Chicken wire
- Roofing material (such as corrugated metal or shingles)
- Saw
- Drill
- Screwdriver
Instructions:
- Choose a suitable location for the chicken house. Ensure there is enough space for the chickens to roam around and access to sunlight.
- Prepare the floor structure: Take 3 wood pallets and bolt them together securely to form the base/floor of the chicken house. This will provide stability and elevation from the ground.
- Build the walls: Take the remaining 4 wood pallets and stand them upright to create the walls of the coop. Secure them together using bolts and screws. Leave one side open for the entrance.
- Enclose the coop: Measure the open side of the coop and cut plywood sheets to fit. Attach the plywood to the walls using nails or screws. Leave openings for windows and ventilation if desired.
- Add windows and ventilation: Cut out openings in the plywood walls and cover them with chicken wire. This will provide ventilation and allow natural light to enter the coop.
- Construct the roof: Use plywood sheets or additional pallets to create a slanted roof. Secure it in place using screws or nails. Ensure the roof overhangs the walls slightly to protect against rain.
- Install doors: Cut out a door opening on one of the walls and attach hinges to the plywood. Create a latch or lock mechanism to keep the door closed securely.
- Finish the interior: Add roosting bars using scrap wood or branches for the chickens to perch on. Place nesting boxes filled with straw or bedding material for egg-laying.
- Secure the chicken wire: Ensure all openings are covered with chicken wire to prevent predators from entering the coop. Secure it tightly using staples or nails.
- Optional: Paint or stain the exterior of the coop for weather protection and aesthetics.
- Provide bedding and food/water containers inside the coop.
Remember to regularly clean the coop, provide fresh food and water, and maintain good hygiene for the health and well-being of your chickens.
Here you can see how the floor structure has been bolted to the feet…
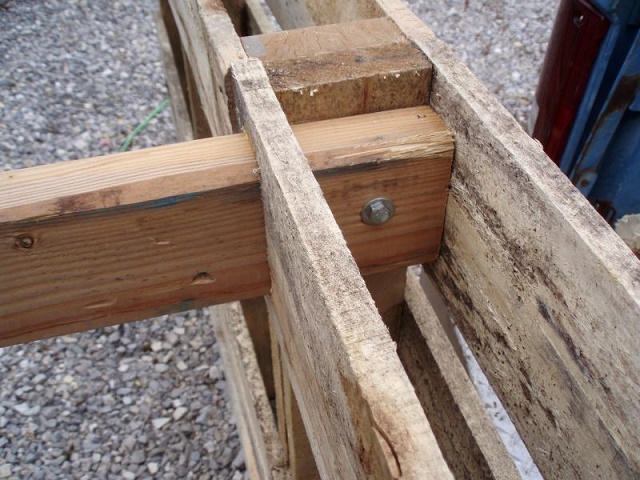
…the floor upside down with feet attached. The pallets have also been bolted together…
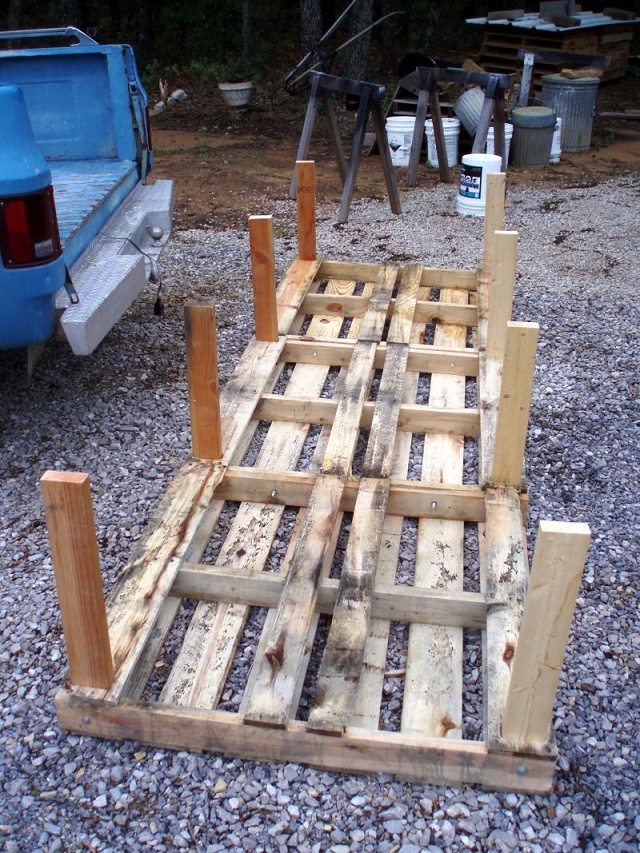
…flipped over and ready to start assembling the walls…

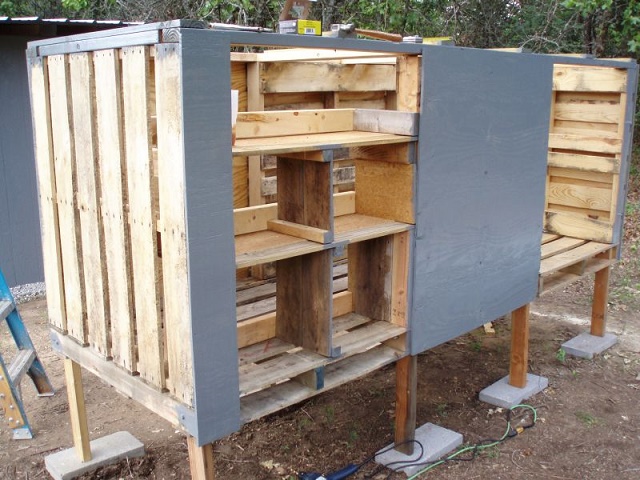
…here you can see more pallets being used to construct the walls, being supported with further timber across the top to strengthen the structure…
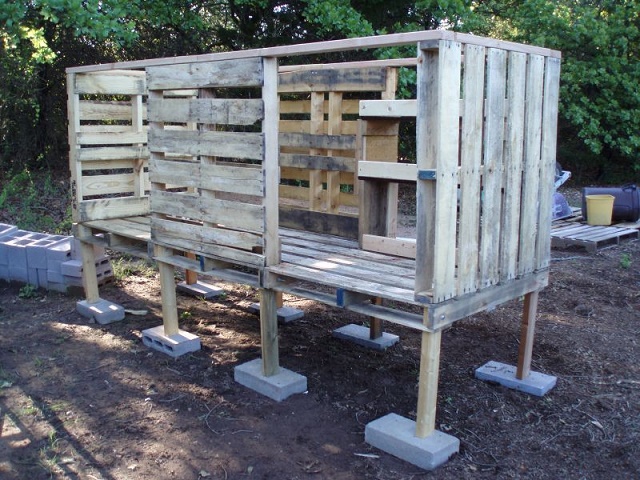
…nesting boxes have been incorporated into a section of the wall, so the hens can lay their eggs…
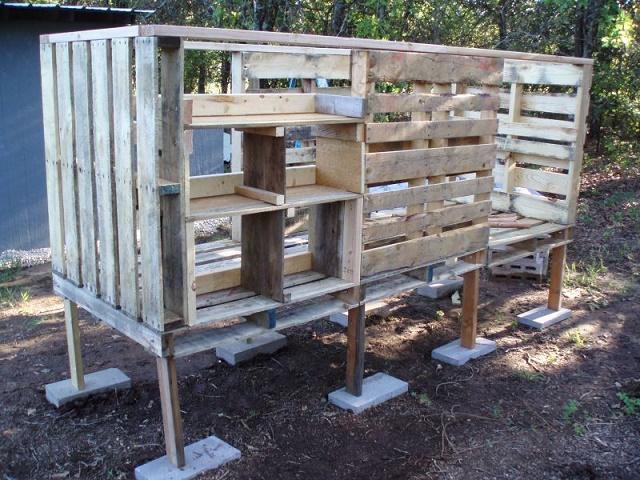
…doors are being added to allow for easy access to the nesting boxes…
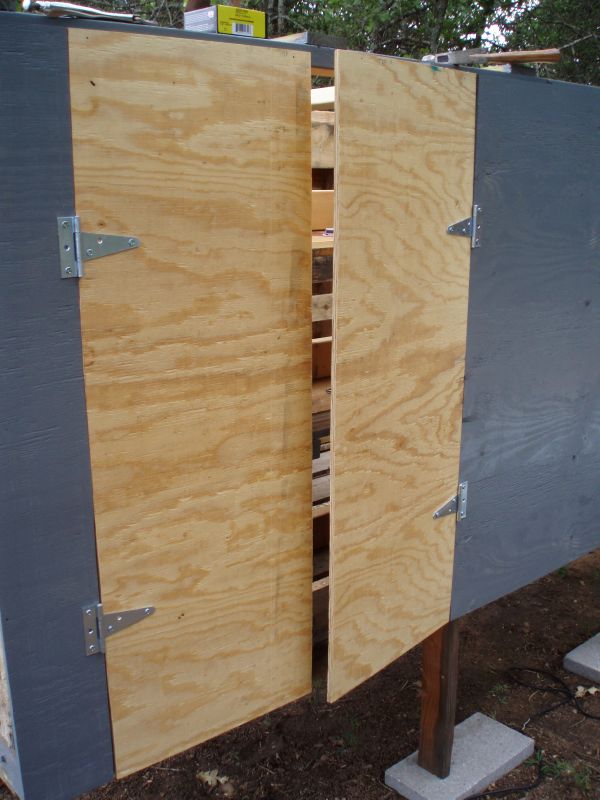
…another shot of the doors, and plywood that has been added to the outside & painted…
…more painting…
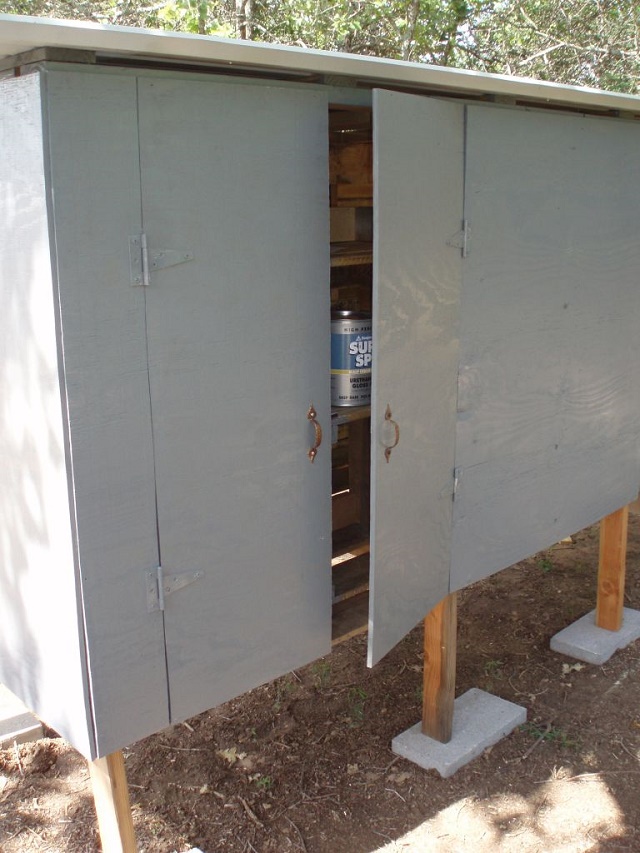
…additional doors are added at the opposite end to be able to access the coop…
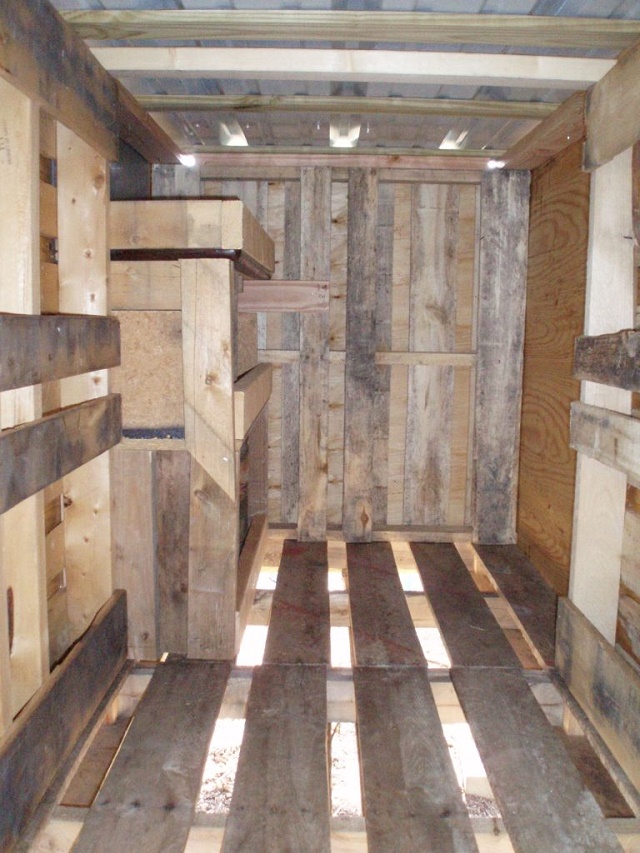
…looking into the coop you can see a few perches have been added…
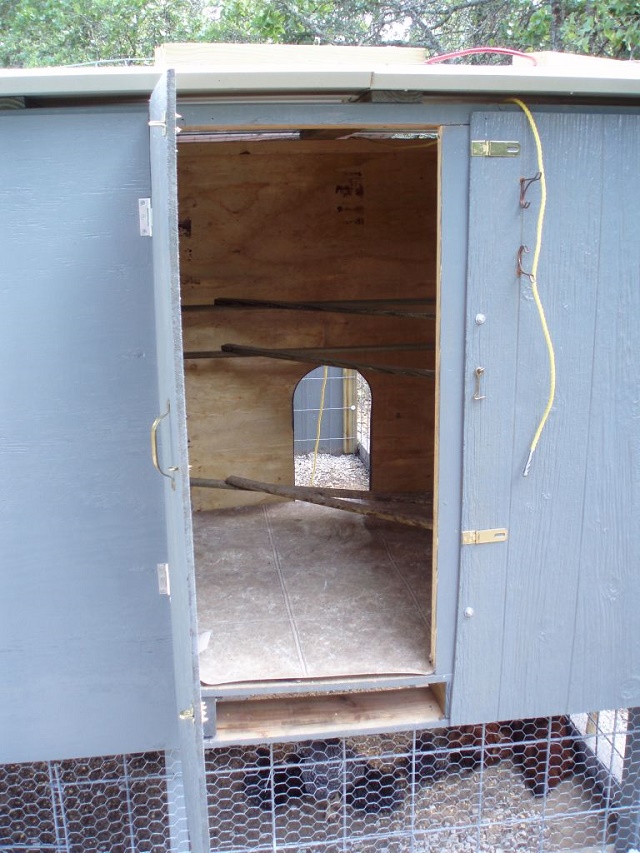
…a look inside the coop. Plenty of room in there for the hens…
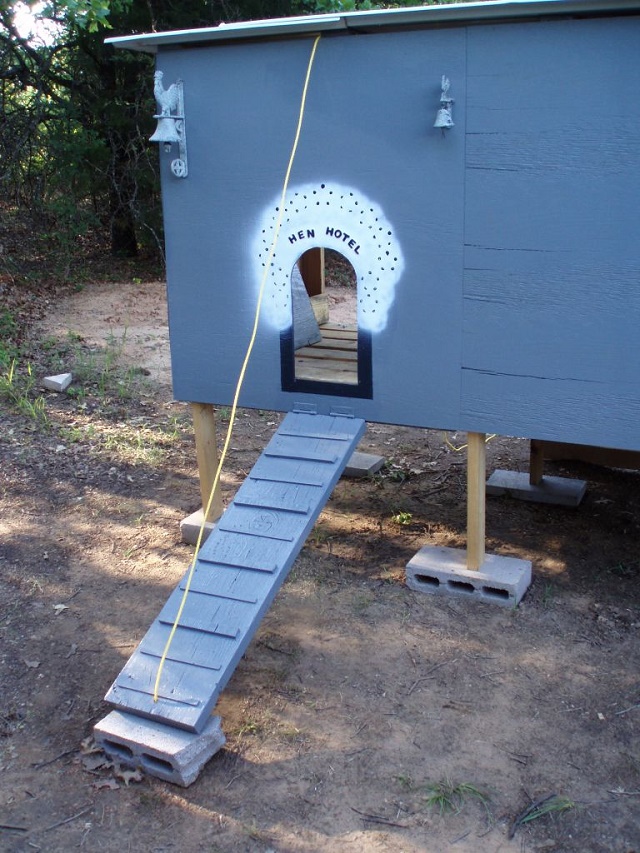
…the entry way for the hens…
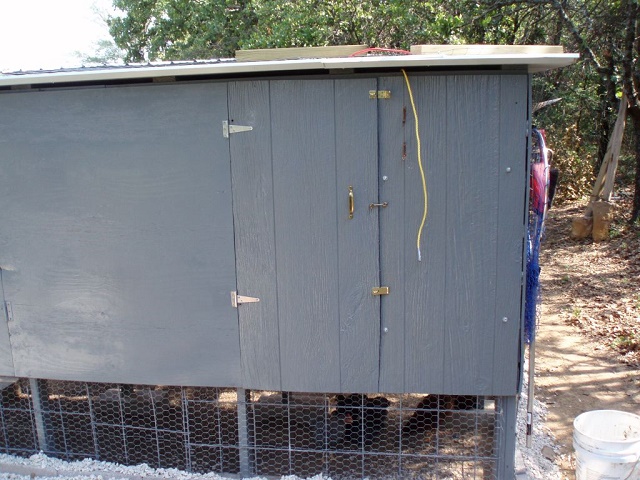
…the final pallet chicken coop…
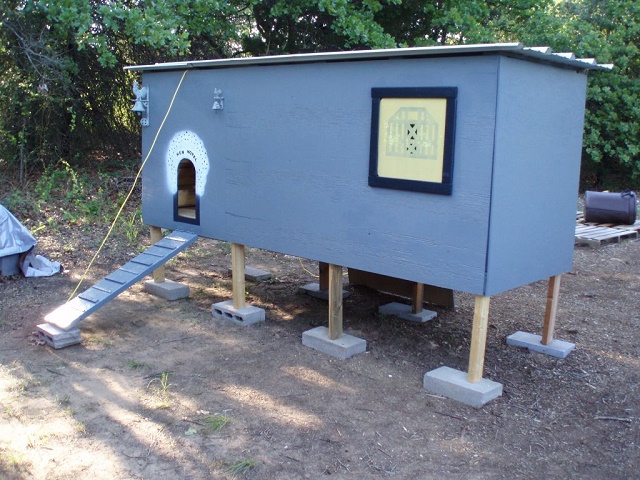
…a really nice job of recycling pallets into something useful. If you’re looking for some more great ideas to help build your own chicken coop, you can download some easy to follow plans here…
And if you want more information about keeping your own chickens at home in the backyard, for fresh eggs daily, check out this excellent free email newsletter.
