I’m smitten with rustic coolers. If you’re in the Southwest region, you’ve probably seen them at HEB or Cabelas, or pretty much any hardware store. They’re just awesome!
Sadly, they retail from $100 and up (like this $279 beauty from Cunningham Living) and it wasn’t really in our budget to buy one.
Yet when my dad was given a slew of barnwood from a neighbor that was moving and offered it to me, I leapt at the chance to build my own!
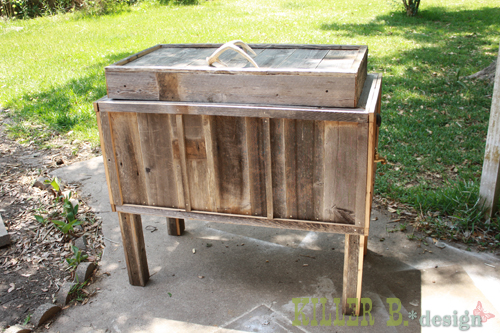
Read more below to find out how we went from this:

To this!

All for only $30.
Supplies:
- Barn wood (try to score some for free on Freecycle or Craigslist, look for piles of lumber on the side of the road, rescue pallets, or ask someone who is replacing fencing. If you can’t find it free, or just like the new look, buy cedar fence pickets)
- 5: 2×2’s @ 8 feet long
- 1: 1×4 @ 8 feet long
- Old cooler (again, CL and Freecycle are good bets, or you can buy new, or choose to line your cooler with insulated foam. There are also very affordable styrofoam coolers that could work for this project)
- 2 1/2 inch screws
- 2 inch nails
- 3/4 inch pipe coupling
- 3/4 inch spigot
- handle (we used an antler shed, go on and get creative for your lid handles too!)
- Side handles (optional)
- Bottle Opener (optional)
- Iron Decor (optional)
This project can be as cheap as the $30 we spent, or you can buy all new supplies and get all fancy and probably spend around $80+. It’s all up to you!
Step 1: Disassemble your cooler

You’ll want to take off all the hardware on your cooler. Make sure it’s good and naked, and the lid is fully detached.
Step 2: Measure your cooler and build the sides

Measure the width, height and depth of your cooler, and determine the height you want it to be. We wanted the legs to be 30 inches so it’s about at counter height for easy drink-grabbing. Make sure you account for your 2×2’s when you do your measurements. When placing the bottom support, add 1.5 inches to the distance between the two, because you’ll be adding 2×2 supports for the cooler to sit on. So, if your cooler is 15 inches tall, place the lower support at 16.5 inches below the top. Build two sides.
Step 3: Attach the sides together to finish the frame

Once you have your two large sides built, cut 4 2×2’s at your depth measurement and attach with wood glue and 2 inch screws. Measure the distance your supports need to be for the cooler to sit on. Cut two and attach with glue and screws.
Step 4: Insert your cooler

Place your cooler into your frame. It should fit snugly without compressing the sides. We were a little off in our depth measurement, so the lid wouldn’t fit because the sides were being squished. So we quickly detached one of our long top supports and trimmed off a quarter inch with the table saw, and voila! Perfect fit. Don’t be afraid to jimmy-rig your frame, because it will be completely hidden once you’re done.
*side note* Please don’t judge my back porch. It’s a hideous mess because it’s our makeshift workshop!
Step 5: Cut your siding and attach with nails

This is where the fun begins. Now that your frame is built, you can measure how long you want your slats to be. We decided to have them overhang an inch just to cover all our bases. The wood was also a bit curved from weathering, and you’ll want to account for that. Start on each end and work toward the center, nailing down your slats with 2 inch galvanized nails. Add some glue if you want additional stability. Once you get to the center, measure the gap and cut a piece to fit. Nail slats down on both long sides, and your non-draining end.

See the overhang? It ensures that we won’t see any 2×2’s peeking out when we’re done.
Step 6: Cut drain hole and attach siding to last end

We used a 1 1/2 inch spade bit to make a hole in the center of one slat. We decided to start in the center on this end, because it didn’t seem wise to try and cut a uniform hole in the middle of two separate boards. Once your hole is cut (and you can use a jigsaw or router if you don’t have a spade bit or hole saw attachment) nail it down to your frame. Attach the remaining slats.
Step 7: Trim out the top and edges

Here’s where things start to get fancy. You need to add trim to the very top of the cooler, to hide the rim where the cooler meets the wood. Cut your pieces down to roughly 2 inches wide with a table or circular saw. We chose to do 45 degree angles, but you can keep things simple with a 90 if you like. It’s all about personal preference! Once you’re done trimming the top lip, add trim to the top and bottom, to the sides, and any decorative pieces.

Fancy trim!
Step 8: Create the lid frame

Here’s where that 1×4 finally comes in. Measure your cooler lid, and create a box around it with the 1×4. Attach with nails and glue or screws. Place the lid onto your cooler, making sure that it fits snugly. It should pop out a little lower than your frame. With the lid still in place, screw the frame into the lid so it’s secure.
Step 9: Cover the lid and add trim
I don’t have a photo for this one, because we ran out of nails and I had to go get some more. While I was gone, the Husbane forged ahead. So, what you need to do is measure the top of your frame, and cut your barnwood to fit. Nail it down into the frame. Next, measure how tall the distance is between the trim on your base to the top of your lid, and trim down your boards as required. Measure the length to cover the box, and nail into your lid frame. Add trim to the top and/or sides if you’re feeling fancy.
Step 10: Cover your legs

Measure from the bottom of your legs to the bottom of your boards. In our case, it was 15 inches. From here, I cut down a few fence slats at 15 inches tall, then ran them through my table saw to create the leg facings. On two sides, the pieces were 1.5 inches wide, and on the other two, they were 2.25 inches wide to account for the thickness of the wood. I just nailed them straight into the 2×2 legs. Add a little glue if you got some.
Step 11: Attach the hinges


You can certainly use plain Jane hinges on this, or you can splurge on fancy cabinet ones. My dad has given me a giant supply of old cabinet hinges, so I just used those. Attach to your lid first, then line it up with your base and make sure the lid fits snugly. Once fit, attach the hinges to the base of the cooler. You can see from my photos how the hinges attach on the inside and outside. It flips open with ease!
Step 12: Details, Details

This is where things really get fun. I added handles to the sides ($5 each from Hobby Lobby, I didn’t even wait for a half off day! *cringe*), and we have a bottle opener that I still need to attach with our lovely state of Texas emblazoned on it. The Husband also plans to attach an antler shed to the top as a handle, but didn’t have time to finish it before he had to go work out of town.
I really love a lot of the rustic decor you can get at places like Tractor Supply and Hobby Lobby. We may add a few things to this once my co-conspirator is back in town. I think it would look really nice with a big ol’ metal star on the front. Or perhaps a large initial for our last name? Who knows? This is just where you get to start having fun with it!
So there you have it. A rather simple tutorial on how to create your very own affordable rustic cooler from recycled materials. I can’t wait to see this one in action!
Source: Killer B Designs
