
How To Become More Self-Sufficient Without Starting a Full-Blown Farm…
Want to start preserving your harvest, making your own soap, or building a backyard root cellar — but not sure where to begin? “Homesteading Advice” gives you instant lifetime access to 35+ practical homesteading books on food preservation, veggie gardening, DIY natural cleaning products (save over $250 per year with this skill alone), brewing, off-grid energy, and a whole lot more…
Click Here To Check It Out Now!
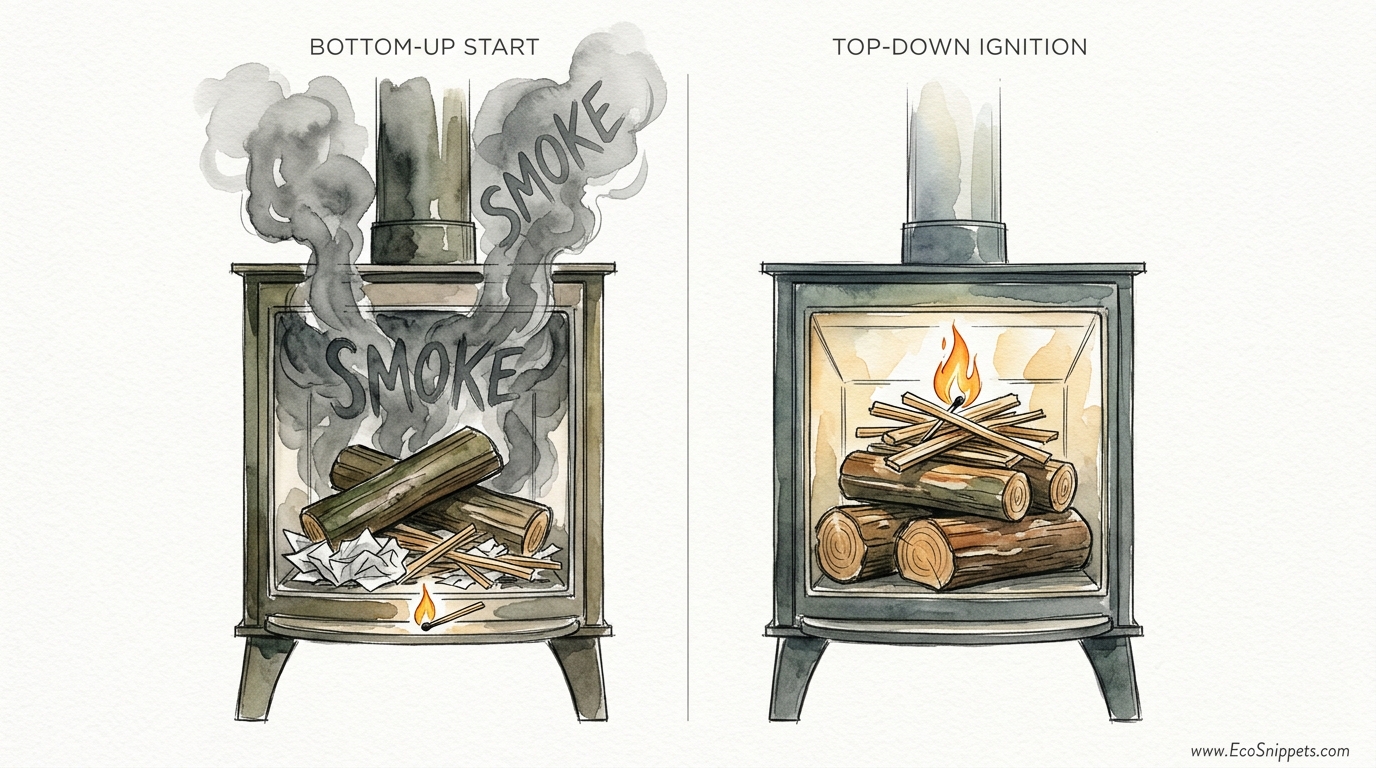
You’ve been lighting your fireplace upside down for years – here is why it’s failing. Lighting a fire from the bottom forces the cold smoke to fight its way through heavy, cold logs, creating creosote and soot. The top-down method pre-heats the chimney instantly and uses the coals to ‘feed’ the logs below, resulting in a cleaner burn and 30% more heat from every split.
For generations, the hearth has been the heart of the home, but much of the ancestral wisdom surrounding it has been diluted by modern convenience. We have been taught to treat a wood stove like a garbage bin—toss in some paper, throw on some sticks, and hope for the best. This haphazard approach is why many homeowners struggle with smoky rooms, blackened glass, and the constant fear of chimney fires.
Understanding how to properly manage a fire is a hallmark of self-reliance. It is not just about survival; it is about efficiency and stewardship of the timber you have worked hard to harvest and season. By shifting your perspective and inverting your stack, you can transform a frustrating chore into a reliable, high-performance heating system.
How To Light A Wood Stove Without Smoke
Smoke is not an inevitable byproduct of a wood fire; it is the visible sign of wasted fuel. When you see thick, white or yellowish smoke billowing from your chimney, you are watching unburned wood gases escape into the atmosphere. Lighting a wood stove without smoke requires a fundamental shift in how we think about combustion and airflow.
The top-down method, often referred to as the “Swiss Method” or “Upside-Down Fire,” is the most effective way to achieve a smoke-free start. In this configuration, you place your largest, most dense fuel logs at the very bottom and build a miniature “starter fire” on the very top. Because the hottest part of the fire is at the highest point in the firebox, it radiates heat upward into the flue immediately.
This instant heat pre-warms the air inside the chimney, creating a strong “draft” or siphon effect. In a traditional bottom-up fire, the cold air in the chimney acts like a heavy plug, forcing smoke to swirl around the firebox and leak out into your living room. The top-down approach removes this plug before the large logs even begin to outgas, ensuring that every bit of smoke is pulled up and out while the gases are burned off by the flames above.
The Anatomy of the Top-Down Fire
Building a fire this way feels counterintuitive because we are conditioned to believe that flames must “climb” a ladder of fuel. In reality, heat travels in all directions, and the embers from a top-down fire provide a steady “feed” of intense heat to the logs below. Here is the step-by-step process to build a perfect stack.
The Foundation: Large Logs
Start by placing two or three of your largest hardwood splits on the floor of the firebox. These should be well-seasoned logs, approximately 3 to 5 inches (7.6 to 12.7 cm) in diameter. Lay them “east-west” or “north-south” depending on the shape of your stove, but leave a small gap between them for airflow. This base provides the long-term energy for your fire and will not ignite for at least 30 to 45 minutes.
The Transition: Medium Splits
Place a second layer of medium-sized splits on top of the base logs. These should be roughly half the size of your foundation logs. If your base layer is laid north-south, lay this layer east-west in a crisscross pattern. This “Jenga-style” stacking is critical because it creates pockets of air that allow oxygen to reach the center of the pile.
The Ignition Layer: Kindling and Tinder
On top of the medium logs, place a generous amount of dry kindling. Softwoods like pine, cedar, or fir are excellent here because they ignite rapidly and burn hot. Finally, place your tinder—tightly twisted newspaper or a natural fire starter—at the very top. When you strike your match, you are lighting the highest point of the stack.
Benefits of the Top-Down Method
The advantages of this method extend far beyond simply avoiding a smoky room. It changes the chemistry of the burn and the longevity of your heating system.
Reduced Creosote Buildup: Creosote is a highly flammable, tar-like substance that forms when unburned wood gases condense in a cool chimney. Because the top-down method pre-heats the flue and burns more cleanly from the start, it significantly reduces the rate of creosote accumulation, making your home safer from chimney fires.
Higher Thermal Efficiency: In a bottom-up fire, the large logs are heated from below before they are ready to burn. This causes them to release gases (pyrolysis) that often escape unburned because the firebox isn’t hot enough yet. The top-down method ensures that as the lower logs heat up and release gases, those gases must pass through the established flame above, where they are consumed. This is why you get up to 30% more heat from the same amount of wood.
Cleaner Glass and Less Maintenance: Modern wood stoves feature “air wash” systems designed to keep the glass clear. These systems only work once the stove reaches operating temperature. A top-down fire gets the stove hot enough to engage the air wash faster, preventing the ugly soot and creosote staining that obscures your view of the flames.
Challenges and Common Mistakes
While the method is superior, it is not foolproof. Many people fail on their first attempt because they carry over habits from traditional fire-starting.
Using Wet Wood: This is the single most common reason for failure. Wood with a moisture content above 20% will hiss, bubble, and struggle to stay lit regardless of the stacking method. The energy of the fire is wasted trying to evaporate the water inside the log rather than creating heat. Always use a moisture meter or look for the tell-tale “checking” (cracks) on the ends of the logs.
Insufficient Kindling: Because the fire is burning downward, you need a robust enough “top” fire to create a coal bed that can drop down and ignite the larger logs. If you only use a few slivers of kindling, the fire may die out before it reaches the secondary layer. Be generous with your starter material.
Incorrect Air Control: At the start, your stove’s air intakes should be fully open. Many homeowners make the mistake of “choking” the fire too soon to try and save wood. This starves the fire of oxygen, leading to smoldering and smoke. Only once the entire stack is actively burning and the stove is hot to the touch should you begin to adjust the air dampers.
Limitations of the Top-Down Method
No single technique works perfectly in every situation. There are specific scenarios where the top-down method might need modification or might not be ideal.
Small Fireboxes: If you are using a very small tent stove or a tiny fireplace insert, you may not have the vertical height required to stack multiple layers of wood. In these cases, a “front-to-back” slope or a modified “lean-to” might be necessary to get the draft moving.
Top-Loading Stoves: Some classic stove designs are intended to be loaded exclusively from the top. While you can still build a top-down fire in these, the logistics of reaching to the bottom of a deep firebox to carefully place logs can be cumbersome compared to a front-loading model.
The “Social” Campfire: The top-down method is designed for controlled, efficient heating in an enclosed space. If your goal is a roaring outdoor campfire where everyone wants to toss sticks in every few minutes, the traditional teepee method is often more satisfying because it allows for constant, chaotic interaction with the fuel.
Comparison: Top-Down vs. Bottom-Up
To see the difference clearly, consider the following comparison based on measurable performance factors in a standard wood stove.
| Factor | Bottom-Up (Traditional) | Top-Down (Modern/Swiss) |
|---|---|---|
| Startup Smoke | High (cold flue) | Very Low (pre-heated flue) |
| Creosote Production | Higher (incomplete combustion) | Minimum (cleaner burn) |
| Maintenance Level | High (needs frequent tending) | Low (set it and forget it) |
| Heat Output | Standard | Up to 30% More Effective |
Practical Tips for Success
If you want to master the art of the wood stove, you must pay attention to the details of your fuel and your environment.
- The Hand Test: If you don’t have a moisture meter, strike two pieces of wood together. Seasoned wood should produce a sharp, metallic “clack” like a baseball bat. Wet wood will produce a dull, heavy “thud.”
- Cedar Shims: Keeping a bundle of cedar shims (the kind used for windows and doors) next to your stove is a secret weapon. They are incredibly dry, split easily, and contain natural oils that catch fire instantly.
- The Ash Bed: Do not clean your stove out to the bare metal every day. A 1-inch (2.5 cm) layer of ash acts as insulation, reflecting heat back into the fire and protecting the floor of the stove.
- Draft Check: Before lighting, hold a lit match or a twisted piece of paper near the top of the firebox. If the smoke is pulled up, you have a draft. If it blows back at you, the air is inverted. You may need to “prime” the flue by holding a small torch or heat gun toward the chimney for 60 seconds.
Advanced Considerations: The Physics of Draft
For those who want to truly understand their stove, we must look at Bernoulli’s Principle and the “Stack Effect.” Your chimney is an engine that runs on temperature differentials. The greater the difference between the hot air inside the flue and the cold air outside, the stronger the draft.
In modern, airtight homes, you may face “competing drafts.” Kitchen exhaust fans or dryer vents can create negative pressure that pulls smoke down the chimney. If you find your top-down fire is struggling, try cracking a nearby window just a quarter-inch (0.6 cm). This “breaks the vacuum” and allows the stove to breathe.
Furthermore, if your stove has secondary combustion tubes—the small, perforated pipes at the top of the firebox—the top-down method is essential. These tubes require a high internal temperature to function. By starting the fire right underneath them, you engage the secondary burn within minutes, which is where the real efficiency (and the beautiful “rolling” flames) comes from.
Example Scenario: A Cold Start in Mid-Winter
Imagine a cold January evening. The house has dropped to 55°F (12.7°C), and the stove is stone-cold. Using the bottom-up method, you would likely spend twenty minutes nursing a small flame, opening and closing the door, and wiping smoke off the glass.
Instead, you spend five minutes carefully stacking your wood: two thick Oak logs on the bottom, three Maple splits on top of those, and a handful of Pine kindling on the very top with two fire-starters. You light the starters, close the door with the air wide open, and walk away to make a cup of coffee.
When you return ten minutes later, the flue thermometer is already in the “Active” zone. The top layer of Maple is beginning to catch, and the glass is crystal clear. Within the hour, the base logs are glowing embers, and the house is gaining a deep, radiant heat that will last through the night without you touching the stove again.
Final Thoughts
Mastering the top-down fire is a rite of passage for anyone who relies on wood for warmth. It is a more sophisticated way to interact with one of our most ancient tools. By honoring the physics of combustion and the quality of your fuel, you reduce your environmental impact and increase your self-sufficiency.
Transitioning to this method takes a bit of practice and a willingness to unlearn old habits. However, once you see the lack of smoke and feel the increased heat output, you will never go back to the old way. It is a cleaner, safer, and far more rewarding way to keep the home fires burning.
Continue to experiment with different wood species and stacking densities. Every stove has its own personality, and every chimney behaves differently based on your local geography and weather patterns. The more you observe, the more you will understand the silent language of the hearth.
