How To Become More Self-Sufficient Without Starting a Full-Blown Farm…
Want to start preserving your harvest, making your own soap, or building a backyard root cellar — but not sure where to begin? “Homesteading Advice” gives you instant lifetime access to 35+ practical homesteading books on food preservation, veggie gardening, DIY natural cleaning products (save over $250 per year with this skill alone), brewing, off-grid energy, and a whole lot more…
Click Here To Check It Out Now!
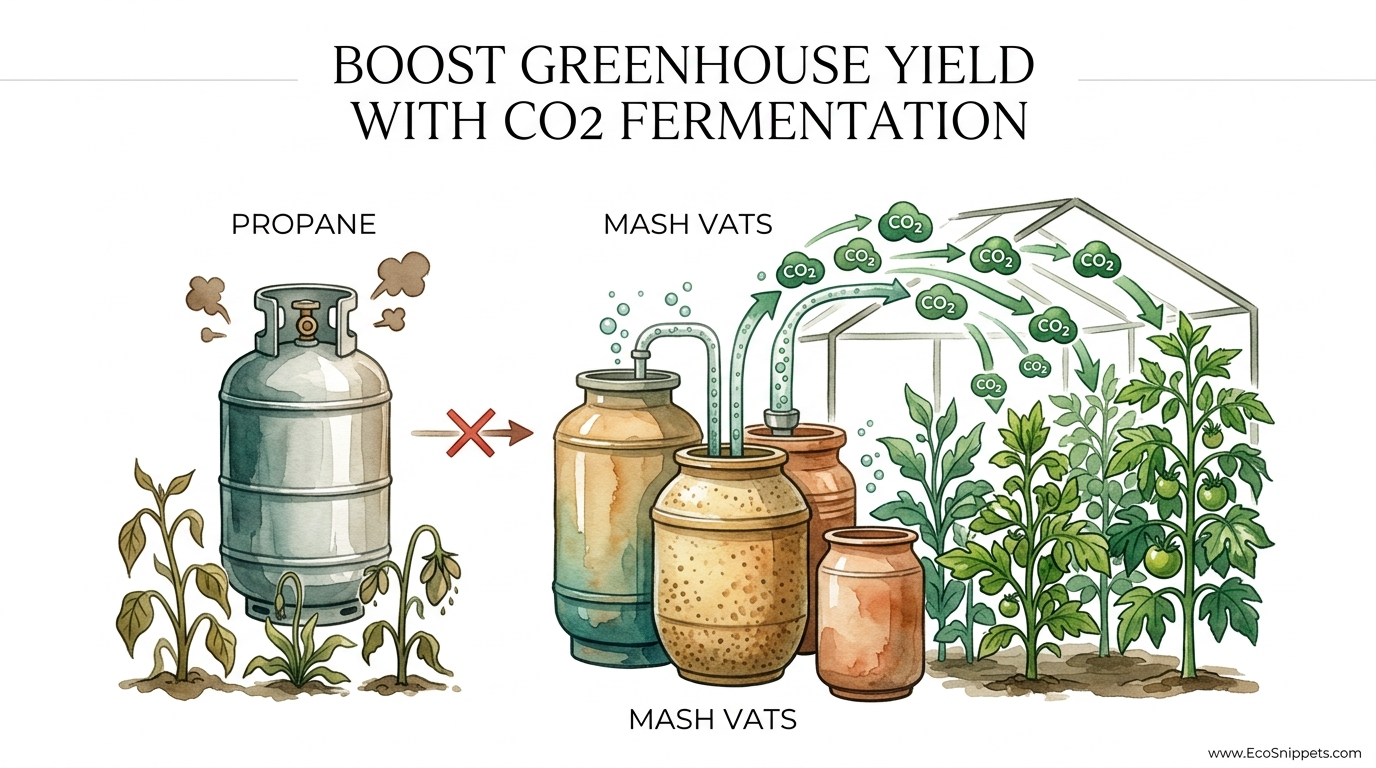
Your kitchen scraps are the secret gas that makes your greenhouse plants grow 30% faster than your neighbor’s. Stop buying propane. Start a fermentation cycle. These vats don’t just heat your greenhouse; they pump out the CO2 your plants are starving for while creating high-value homestead vinegar and spirits.
Imagine a system that takes what you usually throw away—apple cores, bruised potatoes, and old bread—and turns it into the very air your plants breathe. For generations, the idea of “CO2 enrichment” has been sold as a high-tech luxury, requiring expensive propane burners or heavy compressed tanks. But the old ways have always known better. Fermentation is a natural, steady, and clean source of the carbon dioxide that fuels photosynthesis.
By moving your fermentation vats into the greenhouse, you are closing a loop. You aren’t just making a homestead product; you are creating a biological engine. This engine runs on the energy of yeast and bacteria, warming the air through exothermic reactions and saturating the foliage with a gas that acts as a potent nutrient.
Boost Greenhouse Yield With Co2 Fermentation
Carbon dioxide (CO2) is often the limiting factor in plant growth. While we focus heavily on nitrogen, phosphorus, and potassium in the soil, we often ignore the fact that roughly 45% of a plant’s dry mass comes from carbon pulled directly out of the air. In a sealed greenhouse, especially during the peak of a sunny day, plants can strip the air of CO2 faster than it can leak back in from the outside.
Ambient outdoor air typically contains about 400 to 420 parts per million (ppm) of CO2. Inside a busy greenhouse, that level can drop to 150 or 200 ppm within hours of sunrise. When CO2 levels fall this low, photosynthesis effectively stalls, no matter how much water or light you provide. CO2 fermentation enrichment is the practice of using microbial activity to raise these levels back up to 1,000 or even 1,500 ppm.
This process isn’t just about survival; it’s about optimization. Research shows that doubling the ambient CO2 level can increase the growth rate of many crops by 20% to 30%. In real-world terms, this means earlier harvests, larger fruit, and plants that are more resilient to the stresses of heat and drought. The “gas” produced by your fermenting mash is a literal building block for plant tissue.
The Mechanics of Microbial CO2 Production
The heart of this system is the metabolic process of yeast. When you mix sugar, water, and yeast in a vat, the yeast cells consume the sugar to produce two main byproducts: ethyl alcohol and carbon dioxide gas. Chemically, for every 1 kilogram (2.2 lbs) of sugar consumed, the yeast will release approximately 0.5 kilograms (1.1 lbs) of CO2 gas.
Unlike propane burners, which produce CO2 through the combustion of fossil fuels, fermentation is a biological process. Propane burners are effective, but they carry risks. They introduce significant amounts of moisture, which can lead to fungal issues, and if the combustion is incomplete, they can release carbon monoxide (CO) or ethylene gas, both of which are toxic to plants and people.
Fermentation vats produce a “cool” and clean CO2. The gas is released slowly and steadily as the yeast works through the mash. Furthermore, this process is exothermic, meaning it generates its own heat. A large 200-liter (55-gallon) drum of active mash can maintain a temperature 5°C to 10°C (9°F to 18°F) higher than the surrounding air, providing a gentle radiant heat source during cool nights.
Building Your Greenhouse Fermentation System
Setting up a fermentation cycle is straightforward, but it requires attention to detail to ensure you aren’t just making a mess. You need a vessel, a way to direct the gas, and the right ingredients.
Choosing Your Vats
For a small homestead greenhouse of about 10 to 15 square meters (100 to 160 square feet), a single 120-liter or 200-liter (30 to 55-gallon) food-grade plastic drum is ideal. These drums provide enough volume to sustain a CO2 output for several weeks without constant refilling. Ensure the drum has a tight-fitting lid with a rubber gasket; if the gas leaks out of the top of the drum rather than through your delivery system, you lose control over where it goes.
Gas Delivery and Bubblers
You do not want to leave the vat completely open to the air. An open vat can attract pests like fruit flies and may release odors that are less than pleasant. Instead, drill a hole in the lid and install a bulkhead fitting. Connect a flexible 13mm (1/2-inch) hose to this fitting.
The other end of the hose should lead into a “bubbler” or a secondary small jar of water. This acts as a one-way valve, allowing CO2 to escape while preventing oxygen or contaminants from entering the vat. From the bubbler, you can run a secondary line of “soaker hose” or perforated tubing along the floor or just above the plant canopy. Since CO2 is heavier than air, it will naturally sink. Placing the delivery lines slightly above the plants allows the gas to “rain” down onto the leaves.
The Kitchen Scrap Recipe
While you can use pure white sugar, the goal of the self-reliant homestead is to use what is available. Fruit scraps are the gold standard for greenhouse fermentation.
- Apple and Pear Scraps: High in natural sugars and easy to mash.
- Bruised Grapes or Berries: These often contain wild yeasts on their skins, which can kickstart the process.
- Old Bread and Grains: These require an extra step. You must boil them to convert the starches into fermentable sugars, often adding a bit of malted barley or amylase enzyme to help the process along.
- Potatoes: Like grains, these are starches. They must be cooked and mashed to be useful to the yeast.
A basic starting ratio for a 200-liter (55-gallon) drum is 20 kilograms (44 lbs) of sugar-rich material, 150 liters (40 gallons) of non-chlorinated water, and a robust strain of yeast. Distiller’s yeast or “Turbo Yeast” is often preferred because it can handle higher alcohol concentrations and works faster, pumping out more CO2 in a shorter window of time.
Benefits of Fermentation Over Propane
The choice between a propane tank and a mash vat often comes down to your philosophy of homesteading. Propane is a “purchased input”—it is a line item on your monthly budget that ties you to a global supply chain. Fermentation is a “circular input.”
| Factor | Propane Burners | Fermentation Vats |
|---|---|---|
| Initial Cost | High ($300 – $1,500+) | Low ($20 – $100) |
| Operating Cost | High (Fuel prices) | Very Low (Scraps/Sugar) |
| Byproducts | CO, NOx, Water Vapor | Vinegar, Spirits, Heat |
| Risk Factor | Fire, Gas Leaks | Odor, Spill potential |
| Thermal Value | Instant Heat (High) | Radiant Heat (Steady) |
The most significant advantage of the fermentation method is the secondary harvest. Once the yeast has finished its work and the CO2 output drops, you aren’t left with an empty tank. You are left with a vat of “wash” that can be turned into high-value assets for the farm.
The Double Harvest: Vinegar and Spirits
If you simply let the mash sit after the CO2 stops bubbling, it will eventually spoil. A true practitioner of the craft knows that this is the moment the second harvest begins.
Homestead Vinegar
Once the primary fermentation is complete and the yeast has converted the sugars into alcohol, you can introduce *Acetobacter*—the bacteria responsible for making vinegar. By removing the airlock and allowing oxygen to reach the surface of the liquid (usually protected by a cheesecloth to keep out flies), the bacteria will convert the ethanol into acetic acid.
This produces high-quality homestead vinegar that can be used for cleaning, weed control, or, if the initial ingredients were clean fruit, for culinary use and preservation. This vinegar is a valuable trade item and a staple of a self-sufficient kitchen.
Homestead Spirits and Fuel
For those with the proper equipment and legal permits, the finished mash can be distilled. This yields high-proof spirits. On a homestead, these spirits serve multiple purposes: as a potent disinfectant, a base for medicinal tinctures, or even as a clean-burning fuel for lamps and small stoves. The CO2 was the “free” byproduct during the creation of these essential supplies.
Challenges and Common Mistakes
While the system is simple, biological processes can be temperamental. If the vat “goes sideways,” you lose your CO2 output and potentially your secondary harvest.
The Exhaust Fan Trap: This is the most common mistake in greenhouse CO2 management. Many growers run their exhaust fans on a timer or a thermostat. If your fan is constantly pulling air out of the greenhouse to cool it down, it is also pulling out all the CO2 your vats have produced. To solve this, you must coordinate your airflow. The most effective strategy is to enrich during the morning hours when the sun is up but the greenhouse hasn’t yet reached its peak temperature. Turn off the exhaust fans for 2–3 hours while the vats are bubbling to let the plants soak in the concentrated gas.
Temperature Crashes: Yeast is a living organism. If your greenhouse drops below 15°C (59°F) at night, the yeast will go dormant and the CO2 production will stop. In colder climates, you may need to insulate your vats or use a small aquarium heater inside the drum to keep the mash at a steady 24°C to 27°C (75°F to 80°F).
Contamination: If you use dirty kitchen scraps or non-sterilized equipment, wild bacteria can take over the vat. This often results in a “stinky” fermentation that produces methane or hydrogen sulfide (which smells like rotten eggs) instead of clean CO2. Always wash your scraps and ensure your vats are scrubbed clean before starting a new cycle.
Limitations and Environmental Constraints
Fermentation is not a “set it and forget it” system like a pressurized CO2 tank with a computer controller. It requires a hands-on approach. You must monitor the bubbling, stir the mash occasionally, and manage the replenishment of sugars.
For very large commercial greenhouses (over 100 square meters), the sheer volume of mash required to maintain 1,200 ppm can become a logistical challenge. In these cases, fermentation is often used as a supplemental source rather than the sole provider of CO2. Additionally, in very humid environments, the presence of large open vats (even with airlocks) can contribute to an increase in relative humidity, which might exacerbate mold issues like powdery mildew if airflow is not properly managed.
Practical Tips for Maximum Efficiency
To get the most out of your vats, you need to think like a brewer and a gardener simultaneously.
- Stagger Your Batches: Do not start all your vats on the same day. Fermentation follows a curve—it starts slow, peaks in the first 3 to 5 days, and then tapers off. By starting a new vat every week, you ensure a steady, consistent level of CO2 in the greenhouse rather than a massive spike followed by a long drought.
- Use a PPM Meter: You cannot see or smell CO2. Without a meter, you are just guessing. A simple NDIR (Non-Dispersive Infrared) CO2 monitor will tell you exactly how much gas your vats are producing and when it is time to “recharge” the mash with more sugar.
- Circulation is Key: Because CO2 is heavy, it can pool on the floor in “dead zones.” Use small, low-wattage circulation fans to keep the air moving. You want a gentle breeze that rustles the leaves; this breaks the “boundary layer” of air around the leaf surface, allowing the stomata to drink in the CO2 more efficiently.
- The “Morning Bomb”: Plants only use CO2 during the day when they are photosynthesizing. If you stir your vats or add a small “recharge” of sugar and warm water first thing in the morning, you trigger a peak in gas production right when the plants need it most.
Advanced Considerations: Scaling and Nutrient Density
For the serious practitioner, the fermentation vat is also a source of liquid nutrition. The “spent” mash, once the alcohol or vinegar has been harvested, is often rich in residual minerals and yeast cells. After a proper stabilization period, this liquid can be diluted and used as a soil drench. The yeast hulls act as a biological stimulant for the soil microbes, further boosting the health of the greenhouse ecosystem.
If you are scaling up, consider the Thermal Mass Effect. Water holds heat much better than air. By placing 1,000 liters (265 gallons) of fermenting mash in the center of your greenhouse, you are essentially installing a giant “thermal battery.” It soaks up the sun’s heat during the day and slowly releases it—along with the CO2—throughout the night and early morning. This stabilizes the temperature swings that often stress greenhouse plants in late autumn or early spring.
Scenario: The 100-Square-Foot Greenhouse
Let’s look at a practical example. A gardener in a temperate climate has a 10′ x 10′ (3m x 3m) hobby greenhouse. They are growing heirloom tomatoes and peppers.
The gardener sets up two 20-gallon (75-liter) drums. Every Saturday, they empty one drum, harvest the vinegar “mother,” and refill it with a mixture of fallen orchard fruit, old jam jars from the back of the pantry, and 10 lbs of cane sugar. By alternating the two drums, they maintain a consistent CO2 level of approximately 900 ppm throughout the daylight hours.
In the first season, the gardener notices that the tomatoes reach the top of the trellis two weeks earlier than the previous year. The fruit set is denser, and the plants stay green well into the first frosts, aided by the 5-degree temperature buffer provided by the large, warm vats. They end the season with 15 gallons of cleaning vinegar and enough distilled “homestead spirit” to last through the winter.
Final Thoughts
The secret to a thriving greenhouse isn’t found in a catalog or a pressurized tank. It is found in the ancient, bubbling chemistry of life. By harnessing the power of fermentation, you are turning “waste” into a high-octane fuel for your plants. You are moving away from the loud, expensive, and sterile world of industrial agriculture and back toward a system that values resilience and ancestral wisdom.
This approach requires more observation than a digital controller, but the rewards are measured in more than just ppm. They are measured in the weight of your harvest, the health of your soil, and the satisfaction of knowing that your greenhouse is a closed, productive loop.
Start small with a single vat. Watch your plants. Listen for the steady hiss of the airlock. Once you see the “CO2 stretch” in your own garden, you will never look at a bag of kitchen scraps the same way again. They aren’t trash; they are the gas that makes your homestead grow.
