
How To Become More Self-Sufficient Without Starting a Full-Blown Farm…
Want to start preserving your harvest, making your own soap, or building a backyard root cellar — but not sure where to begin? “Homesteading Advice” gives you instant lifetime access to 35+ practical homesteading books on food preservation, veggie gardening, DIY natural cleaning products (save over $250 per year with this skill alone), brewing, off-grid energy, and a whole lot more…
Click Here To Check It Out Now!
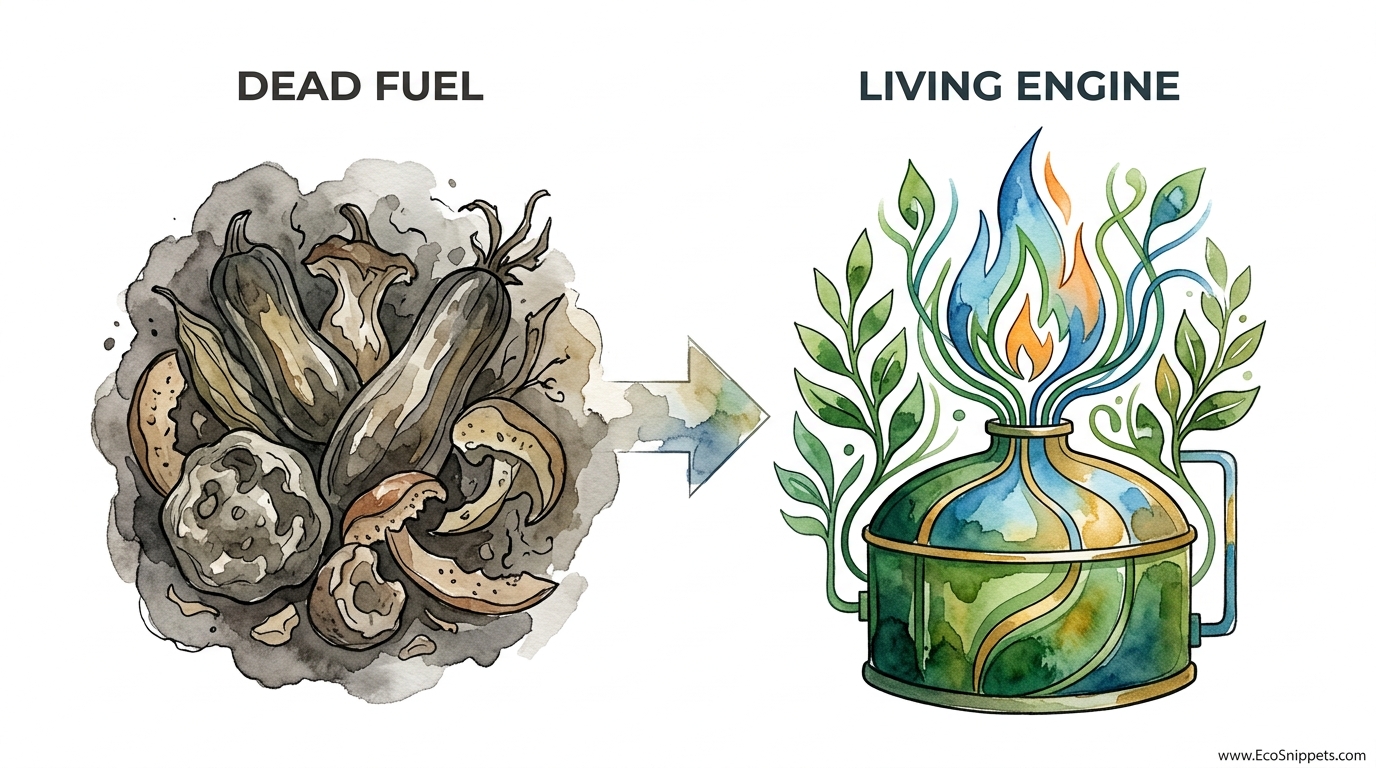
Stop buying ‘dead’ fuel and start feeding the living engine that turns your trash into free energy. In ancient India and China, waste wasn’t something you threw away – it was the energy source for the next meal. Utilizing a simple underground fermentation chamber, you can produce enough methane to cook for 3 hours a day just using your kitchen scraps and animal manure. It’s safe, odorless, and completely off-grid.
How To Make Free Cooking Gas From Kitchen Waste
Generating your own fuel is perhaps the ultimate act of self-reliance. For most of the modern world, energy is a bill that arrives in the mail or a canister that must be exchanged at a station. This is what we call “dead fuel”—a finite resource extracted from the earth, refined in a factory, and sold back to you at a premium. A “living engine,” on the other hand, is a biological system that breathes, eats, and produces energy in a continuous cycle right in your backyard. This system is known as a biogas digester.
A biogas digester is essentially an artificial stomach. It is a sealed, oxygen-free container where specialized bacteria break down organic matter—like your potato peels, leftover rice, and even animal dung—to produce a flammable gas. This gas is primarily methane, the same component found in the natural gas piped into city homes. Instead of coming from a thousand miles away, this gas is born from the very scraps you would otherwise toss into a landfill.
Ancient civilizations understood this cycle long before modern chemistry gave it a name. Evidence suggests that the Assyrians used biogas to heat their bathwater as early as the 10th century BC. In the 1850s, the first modern digestion plant was constructed in a leper colony in Bombay, India, to manage waste and provide light. Today, millions of small-scale digesters hum along in rural China and India, providing clean, renewable cooking fuel to families who have never seen a utility bill.
Bringing this technology to your own home or homestead does not require a degree in engineering. It requires an understanding of biology and a few basic materials. Whether you are using a repurposed shipping container or a custom-built masonry tank, the principle remains the same: create a warm, dark, airtight space for your microbial workers to do their jobs.
The Science of the Living Engine
Anaerobic digestion is the process that drives your gas production. It happens in four distinct stages, each handled by a different group of microorganisms. Think of it like an assembly line in a factory. If one group of workers slows down, the entire line grinds to a halt. Understanding these stages helps you troubleshoot the system when the flame turns blue—or stops altogether.
Hydrolysis is the first stage. This is where complex organic polymers, like proteins, fats, and carbohydrates, are broken down into smaller molecules like amino acids and sugars. Bacteria secrete enzymes that dissolve the solid waste into a liquid form. This is why shredding or grinding your kitchen waste before adding it to the digester is so beneficial; it increases the surface area for these enzymes to work.
Acidogenesis follows hydrolysis. In this phase, acid-forming bacteria take those sugars and amino acids and turn them into volatile fatty acids, along with ammonia, carbon dioxide, and hydrogen sulfide. You can think of this as the “sour” phase. If you’ve ever smelled a compost pile that has gone “off” because it got too wet and lacked air, you have smelled acidogenesis in action.
Acetogenesis is the third step. Specialized bacteria convert the products of the previous stage into acetic acid, which is essentially vinegar. They also produce more hydrogen and carbon dioxide. This stage is a critical bridge to the final, most important phase of the process.
Methanogenesis is the grand finale. This is where methanogens—ancient organisms that are technically not bacteria but Archaea—consume the acetic acid and hydrogen to produce methane gas. Methanogens are the most sensitive workers in your engine. They hate oxygen, they hate big swings in temperature, and they are very picky about the acidity of their environment. When your system is perfectly balanced, these microbes produce a gas that is roughly 60% to 70% methane and 30% to 40% carbon dioxide.
How to Do It: Constructing a Home Biogas Digester
Building a functional digester can be done using several designs, but for a beginner, the IBC (Intermediate Bulk Container) tote method is the most accessible. These 1,000-liter (275-gallon) plastic tanks are found worldwide and provide the perfect “stomach” for your system. You will generally need one tank for the digester and a separate system for gas storage, such as a large PVC bladder or a floating-drum tank.
Start by sourcing a clean IBC tote. Ensure it previously held food-grade materials rather than toxic chemicals, as residue can kill your microbial colony. Position the tank on a level surface. In colder climates, many people choose to bury the tank or surround it with insulation to maintain the internal temperature. The microbes work best when the slurry is between 30°C and 40°C (86°F to 104°F).
Install the “mouth” of the engine next. This is a 4-inch (100mm) PVC pipe that enters the top of the tank and extends nearly to the bottom. This pipe allows you to pour in your slurry of food waste and water without introducing air into the main chamber. The bottom of this pipe should be cut at a 45-degree angle to prevent clogs and ensure the waste enters the main body of the tank easily.
Plumb the “exit” or the overflow pipe on the opposite side of the tank. As you add new waste to the inlet, an equal amount of “digestate”—the liquid fertilizer—will be pushed out through this overflow. This ensures the tank stays at a constant level. Use a 2-inch (50mm) pipe for this, and ensure it is sealed with a Uniseal or a bulkhead fitting to maintain an airtight environment. This digestate is a goldmine for your garden, as the digestion process makes nutrients like nitrogen more available to plants.
Fitting the gas outlet is the final mechanical step. This is usually done through the large cap at the top of the IBC tote. Drill a hole and install a 1/2-inch or 1-inch (12mm to 25mm) fitting. Attach a flexible hose that leads to your gas storage. Every joint must be tested with soapy water to ensure there are no leaks. Even a tiny pinhole leak will prevent the pressure from building up enough to push gas to your stove.
Feeding and Seeding Your Digester
Starting a new digester requires “seeding” it with the right bacteria. You cannot simply fill it with water and food and expect gas the next day. The best seed material is fresh manure from a ruminant animal, like a cow or a horse. This manure is already teeming with methanogens. Mix about 200 liters (50 gallons) of fresh manure with lukewarm water to create a slurry and pour it into your tank. If you don’t have access to manure, you can use “active” sludge from a local wastewater treatment plant or a generous amount of liquid from a healthy, neighboring digester.
Wait for the system to stabilize before you start feeding it heavy loads of kitchen waste. It may take two to four weeks for the bacteria to establish a colony large enough to produce usable gas. During this time, you might see the gas storage begin to inflate. This initial gas is often mostly carbon dioxide and won’t burn well. Discharge this “first breath” and wait for the second fill, which should be rich enough in methane to support a flame.
Balancing the diet of your living engine is the secret to long-term success. The ideal Carbon-to-Nitrogen (C:N) ratio is between 20:1 and 30:1. Most kitchen waste is rich in nitrogen, while materials like straw, cardboard, or dry leaves are rich in carbon. If you feed only high-nitrogen food scraps, the system can become too acidic. If you feed too much carbon, the process slows down. A mix of 70% food waste and 30% animal manure is often cited as a “golden ratio” for household systems.
Grinding your food scraps is a practice used by serious practitioners to boost efficiency. Microbes cannot eat a whole watermelon rind quickly. Passing your scraps through a manual meat grinder or a powered macerator turns the waste into a “soup” that the bacteria can digest almost immediately. This increases the gas yield per kilogram of waste significantly.
Benefits of a Home Biogas System
The most immediate benefit is the reduction of your dependence on external energy. A well-maintained 1,000-liter digester can produce enough gas to cook for 2 to 3 hours a day, depending on the quality of the feed. This eliminates the need for propane or LPG for many daily meals. For someone living off-grid or in an area with high fuel prices, this is a massive financial and logistical win.
Waste management becomes a closed loop rather than a headache. Instead of sending organic waste to a landfill where it produces uncontrolled methane—a potent greenhouse gas—you capture that methane and burn it. Burning methane converts it into carbon dioxide and water vapor, which are far less harmful to the climate. You are essentially turning a pollutant into a resource.
Superior fertilizer is the byproduct that many gardeners value more than the gas itself. The liquid that overflows from the digester is called “bioslurry.” Unlike raw manure, which can contain weed seeds and pathogens, the anaerobic process kills most harmful organisms. The nutrients are “unlocked” and in a liquid form that plants can absorb instantly. Many users find that their vegetable yields double or triple once they start using bioslurry as their primary fertilizer.
Challenges and Common Mistakes
Acidosis is the most frequent cause of system failure. This happens when you “overfeed” the engine. If you add too much high-sugar or high-starch food at once, the acid-forming bacteria outpace the methanogens. The pH level drops below 6.5, and the methanogens go dormant or die. You will know this is happening if the gas starts to smell sour or if the flame becomes difficult to light. Correcting this requires stopping the feed and adding an alkaline buffer like wood ash or baking soda to raise the pH back to the 7.0–8.0 range.
Temperature fluctuations can also cripple your gas production. Methanogens are essentially “tropical” creatures. If the internal temperature of the tank drops below 20°C (68°F), gas production will slow to a crawl. In temperate regions, this means the digester must be heavily insulated with straw, spray foam, or buried underground where the earth provides a thermal buffer. Some advanced users even route their greywater pipes through the digester to provide a constant source of warmth.
Water-to-waste ratios are often misunderstood by beginners. The bacteria need a liquid environment to move and find food. A common mistake is adding solid waste without enough water, leading to a thick sludge that clogs the pipes and prevents gas from bubbling to the surface. A 1:1 ratio of waste to water by volume is the standard rule of thumb. If you add 1 liter of crushed food, you must add 1 liter of water.
Limitations and Realistic Expectations
Space is a primary constraint for urban dwellers. While a digester is odorless when sealed correctly, it still requires a footprint of several square meters for the tank and the gas storage. You also need a place to use the fertilizer. If you do not have a garden or a way to dispose of the liquid overflow, the system will eventually become a burden.
Climate limitations are real. In high-latitude regions where winters are long and harsh, an unheated digester will essentially “hibernate” for several months of the year. While you can use solar water heaters or electric heat tape to keep the system active, the energy required to heat the tank may sometimes approach the energy value of the gas produced. In these environments, biogas is often a seasonal tool rather than a year-round solution.
Feedstock limitations mean you cannot put just anything into the tank. Woody materials like sticks, thick stalks, or large amounts of paper contain lignin, which anaerobic bacteria cannot break down effectively. These will simply sit in the tank and take up space. Similarly, you must avoid adding large amounts of antimicrobial substances, such as citrus peels (which contain limonene), onions, or soapy dishwater, as these can thin out your bacterial colony.
Living Engine vs. Dead Fuel
Comparing these two energy sources reveals a fundamental difference in philosophy and practice. “Dead fuel” (like LPG or Propane) is concentrated and convenient, but it tethers you to a global supply chain. The “Living Engine” (Biogas) requires your daily attention and a bit of “grit,” but it offers true independence.
| Feature | Dead Fuel (LPG/Propane) | Living Engine (Biogas) |
|---|---|---|
| Cost per Year | Variable (Market Based) | Zero (Labor Only) |
| Initial Setup | Low (Purchase Tank) | Moderate (DIY Build) |
| Maintenance | None | Daily Feeding / Monitoring |
| Byproducts | None | High-Quality Liquid Fertilizer |
| Reliability | Depends on Supply Chain | Depends on Biological Health |
Practical Tips for Best Performance
Monitoring the pH of your slurry is the single most important habit you can develop. Inexpensive litmus paper or a digital pH meter can tell you if a crisis is brewing long before the gas production stops. Aim for a pH between 7.0 and 7.5. If the number starts dropping toward 6.5, reduce your feeding immediately and check for signs of over-loading.
Agitation is another key to high gas yields. In a stagnant tank, a “scum layer” of fats and floating debris can form at the top, preventing gas from escaping. Gently rocking the tank or using a built-in internal stirrer for a few minutes each day breaks up this layer and mixes the fresh food with the active bacteria at the bottom. This simple act can increase gas production by as much as 20%.
Gas scrubbing is a technique used by advanced users to produce a cleaner flame. Biogas contains small amounts of hydrogen sulfide (H2S), which has a “rotten egg” smell and can be corrosive to metal stove parts over time. Passing the gas through a simple “scrubber”—a small container filled with rusty steel wool—will remove the H2S. The iron oxide in the rust reacts with the sulfur, leaving you with a cleaner-burning, odorless fuel.
Advanced Considerations for Scaling Up
Transitioning from a single IBC tote to a multi-tank system allows for a more consistent gas supply. By linking three or four tanks in series, you increase the “retention time”—the amount of time the waste spends being digested. Longer retention times ensure that even the most stubborn organic materials are fully broken down, maximizing the gas yield and ensuring the resulting fertilizer is completely stable.
Automated feeding systems are an option for those who want the benefits of biogas without the daily chore. Using a heavy-duty garbage disposal unit mounted to the inlet pipe allows you to grind and pump waste directly from the kitchen into the digester with the flip of a switch. This is particularly useful for small-scale community projects or larger homesteads where the volume of waste is high.
Storing gas at higher pressures is the next frontier for the DIY practitioner. While low-pressure bladders are safe and easy, they are bulky. Some users adapt small compressors to move the biogas into reinforced tanks. Note that methane does not liquefy at room temperature like propane does, so you cannot store a month’s supply of biogas in a standard 20lb BBQ tank. However, moderate compression can help you save a day’s worth of gas in a much smaller footprint.
An Example Scenario
Imagine a small homestead with a family of four and a few chickens. On average, this family produces 1.5 kilograms (3.3 lbs) of kitchen scraps per day—fruit peels, vegetable ends, and spoiled leftovers. They also collect a bucket of chicken manure and bedding every few days. By grinding these scraps and mixing them with an equal volume of water, they produce about 3 liters of slurry daily.
This daily “feeding” of 3 liters of high-quality slurry into a 1,000-liter IBC digester will typically yield about 0.6 to 0.8 cubic meters of biogas. In practical terms, this is enough to run a single high-efficiency biogas burner for roughly 3 hours. That is enough time to cook a pot of beans, boil water for coffee, and prepare a stir-fry dinner. Simultaneously, the system produces 3 liters of liquid fertilizer every day, which is enough to keep a 50-square-meter (540 sq ft) kitchen garden thriving year-round.
Final Thoughts
Embracing the “living engine” of a biogas digester is a return to an ancestral way of thinking where nothing is wasted and everything is a resource. It is a shift from being a consumer of energy to being a producer of it. While it requires more understanding and daily interaction than turning a knob on a traditional stove, the rewards are measured in independence, environmental health, and the literal fruits of your garden.
The beauty of this system lies in its simplicity and its scalability. You can start with a single bucket to learn the biology, move to an IBC tote for your household needs, and eventually build a masonry system that could power a small farm. The bacteria are ready and willing to work; they only require the right environment and a steady supply of scraps.
Experimentation is the best teacher in the world of biogas. Every climate is different, and every family’s waste stream is unique. Start by observing the natural cycles of decomposition in your own backyard, and soon you will be turning your morning’s coffee grounds into the evening’s cooking flame. This is the essence of self-reliance—taking the “trash” of the modern world and refining it into the fuel of the future.
