How To Become More Self-Sufficient Without Starting a Full-Blown Farm…
Want to start preserving your harvest, making your own soap, or building a backyard root cellar — but not sure where to begin? “Homesteading Advice” gives you instant lifetime access to 35+ practical homesteading books on food preservation, veggie gardening, DIY natural cleaning products (save over $250 per year with this skill alone), brewing, off-grid energy, and a whole lot more…
Click Here To Check It Out Now!
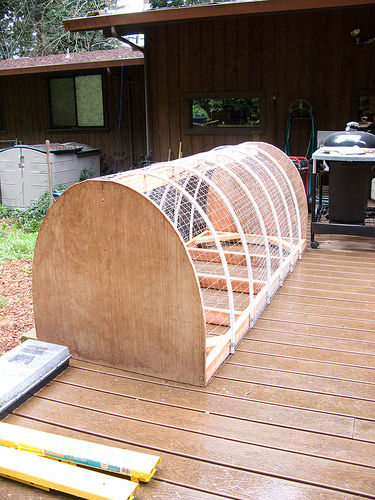
I call this a Chicken Barrow instead of a Chicken Tractor because it really reminds me more of a wheel barrow than a tractor!
Anyway, after researching chicken tractors in-depth online, I finally decided on the “hoop house” type design and am very pleased with how it came out. I think this is a good project for someone with little to no building skills, and it’s easy to get your friends to help because they want to know what it is!
I enlisted the help of some girlfriends and my carpenter husband, who offered lots of advice for my project and helped us end up with a perfectly square frame and very solid final structure. For example, I probably would have used galvanized nails, but he said pre-drilling and using screws is the way to go, which now makes sense, but I would have never thought of that myself. Additionally, I’m pretty sure you could get away with a structure that was not perfectly square, but it certainly made it easier to align the PVC.
I wanted something relatively heavy to deter predators from trying to move/lift it, so 2″ x 4″s were used (and because we had some on hand). A smaller dimension of wood could be used if you think predators are not as much of a problem. We have raccoons, coyotes, mountain lions (rare, but chickens might attract them!), and dogs and cats (including my own) that freely roam the neighborhood.
My barrow is based on this guy’s design, with some slight modifications. His is 4′ x 10′, but we already had a 3′ x 6′ sheet of plywood in the garage as well as some 8-foot 2″ x 4″s, so we decided to make mine 3’W x 3’H x 8’L to minimize waste.
A few things still need to be added:
- On one end, we will use a jigsaw to cut out a door (and attach it with simple hinges) as well as two wheels.
- The wheel bolts I bought to attach the 6″ ball-bearing wheels are not long enough to attach to the 2″ x 4″s, so I will need to find longer bolts at the hardware store, which is why we did not attach them yet.
- On the other end of the barrow, we will add a nesting box with a hinged lid (for egg gathering) made out of plywood as well as two handles for maneuvering the barrow. The handles will also act as extra support for the nesting box.
- I will attach two 4-foot 2″ x 4″s to the ends of a piece of tarp to provide the chickies with shade in the summer and wind protection in the winter.
- Both the hinged door and the hinged lid of the nesting box will be secured with padlocks to deter the opposable thumbs of determined raccoons.
I plan to get four chicks. I think they will be quite comfortable! I will post more pictures when these last items are added and the tractor is painted and finished…
Materials/tools needed:
- six 8-foot 2″ x 4″s (three to be used uncut for long pieces, and three to be cut down into smaller cross braces and diagonal braces)
- one 3′ x 6′ piece of 3/4″ plywood (can fit into a non full-size truck!)
- twelve 1/2″ pipe straps
- six 1/2″ pieces of PVC cut into 8′ lengths by your local hardware store
- about 20 feet of welded wire (you will have some left over – use it for garden cages)
- about 20 feet of chicken wire (ditto)
- lots of galvanized 2 1/2″ deck screws
- cordless drill gun
- cordless screw gun
- jigsaw
- circular saw (optional)
- at least an afternoon’s worth of time!
Step 1: Cut The Plywood Ends


We first cut the piece of plywood in half and screwed both pieces together so they could be cut with the jigsaw at the same time.
Then, using screws as a guide, we carefully bent the PVC, following the edges of the plywood, and then fastened the ends with two pipe straps for safety. We used a pencil to trace the the shape of the PVC.
We removed the guide screws (but not the screws holding the two pieces together) and cut through both pieces of plywood with the jigsaw.
We then unfastened the remaining screws and set the two pieces aside.
Note: we ended with a flat portion at the top of the curve of the plywood, which ended up being useful later.
Step 2: Build The Frame


We used two 96″ (8-foot) 2″ x 4″s for the long ends and two 34 5/8″ 2″ x 4″s for the short ends (takes into account the true dimensions of 2″ x 4″s so we would end up with a frame that was exactly 36″ wide to match the width of our plywood).
My husband cut the short end pieces with the circular saw because he’s fast and I’m afraid to use it. I am, however, comfortable with the jigsaw and could have easily used it to cut any of the 2″ x 4″s.
We added three more 34 5/8″ horizontal cross braces to the rectangular frame. These add stability and double as roosts for the chickens!
We then squared up the frame and added diagonal cross braces.
Every connection was pre-drilled and screwed using two 2 1/2″ galvanized deck screws. It is easier if you have two guns: one for drilling and one for screwing.
Step 3: Take A Break… Then Connect The Plywood Ends


We took a short break. My dog thought the barrow was being built for him.
Next, we attached the plywood end pieces – again, pre-drilling and using screws. I think we used three screws on each end.
We attached another 96″ 2″ x 4″ as a center support and recessed it below the tops of the plywood ends by a half inch to account for the width of the 1/2″ PVC piping that would be bent over the top.
Step 4: Add PVC Supports


We measured the distance needed between each PVC pipe to accommodate six pieces spaced evenly apart and then screwed twelve 1/2″ pipe straps to the frame according to our measurements. I think they were spaced 27.5″ apart.
We snaked the PVC pipe into one end and then the other and cut off the excess with the jigsaw.
I accidentally bought one 3/4″ pipe strap, so we pre-drilled and screwed that end into the 2″ x 4″ since it was loose inside the strap. We later on decided to pre-drill and screw all the PVC ends, just in case the pipe straps became weak.
We also pre-drilled and screwed the tops of the PVC pieces into the top support piece. I didn’t think to buy six additional pipe straps for this top piece, but I think the screws will hold it in place just fine.
Step 5: Cover Your Barrow With Wire


I decided to use both welded wire and chicken wire as a cover for my chicken barrow. The welded wire has the strength that chicken wire lacks, but the chicken wire is smaller than the welded wire to keep out grabby raccoon hands.
The welded wire came in 4-foot width, so even though the long 2″x4″s are 8′, I forgot to account for the depth of the plywood, so two pieces of welded wire didn’t quite cover the length of the barrow. Each length of welded wire was was stapled to the plywood ends, leaving a small approximate 2″ gap in the middle of the barrow. However, I figure that I’m covering the whole thing with chicken wire anyway, so the gap probably isn’t a big deal.
It was easiest to turn the barrow on its side to staple on the wire. We wrapped the wire all the way around the bottom of the frame, but not so much that the sharp edges stuck out beyond the width of the frame. My hand was pretty sore after all the stapling.
We finished stapling the chicken wire, so now all we need to do is cut out the door, attach the door hinges, attach the wheels, attach the handles, and build a small nesting box. That will have to wait until next weekend, though, because it started raining. I will also cover one half of the barrow with a tarp secured by 2″x4″s to provide shade and shelter for the chickies!
Source: Instructables
