How To Become More Self-Sufficient Without Starting a Full-Blown Farm…
Want to start preserving your harvest, making your own soap, or building a backyard root cellar — but not sure where to begin? “Homesteading Advice” gives you instant lifetime access to 35+ practical homesteading books on food preservation, veggie gardening, DIY natural cleaning products (save over $250 per year with this skill alone), brewing, off-grid energy, and a whole lot more…
Click Here To Check It Out Now!
What happens to your water when the batteries run dry? This steam-powered secret doesn’t need them. Most solar pumps convert light to electricity, then electricity to motion. This ancestral hack skips the middleman, using the sun’s heat to pump thousands of gallons with pure, silent steam pressure.
Harnessing the sun is a tradition that predates our modern reliance on silicon and lithium. For generations, farmers and engineers looked at the sky and saw more than just light; they saw a massive, free thermal engine waiting to be tapped. While today’s standard solution is a solar panel and an electric motor, that system is only as strong as its weakest circuit board or battery cell.
Building a solar steam water pump is about more than just moving fluid. It is about building a system that you can fix with a wrench rather than a software update. It is about using the raw physics of expansion and contraction to lift water from the earth, just as the pioneers of the late 19th and early 20th centuries did before the age of cheap oil and complex electronics.
This guide will walk you through the logic, the history, and the practical assembly of a solar thermal pumping system. Whether you are looking to irrigate a remote field or simply want a backup for your homestead that survives the failure of the electrical grid, the answer lies in the heat of the sun and the power of steam.
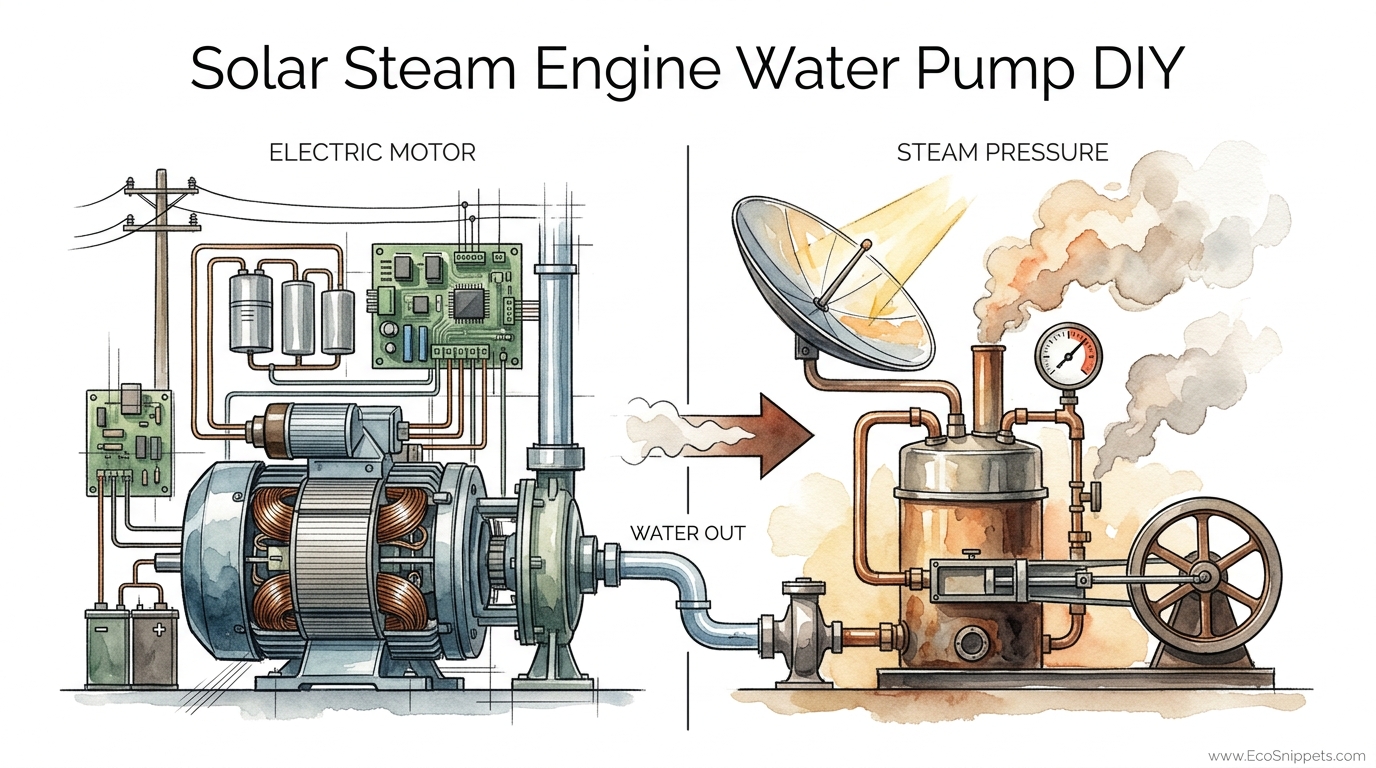
Solar Steam Engine Water Pump DIY
A solar steam water pump is a thermal-mechanical device that uses concentrated sunlight to heat a working fluid—usually water or a low-boiling-point liquid—to create pressure. Unlike a photovoltaic (PV) system, which uses the photoelectric effect to generate current, this system uses thermal energy to create physical displacement. It is an “ancestral hack” because it relies on the same principles that powered the industrial revolution, now refined by modern materials and solar concentration techniques.
These systems were once the pinnacle of high-tech irrigation. In 1913, inventor Frank Shuman built a massive solar thermal power station in Maadi, Egypt. His system used long, parabolic troughs of glass and steel to focus sunlight on boilers, driving a 75-horsepower (56 kW) steam engine. At its peak, Shuman’s engine pumped 6,000 gallons (22,712 liters) of water per minute from the Nile to irrigate cotton fields. This was done without a single solar panel or battery, proving that thermal solar can move massive volumes of water at a scale that still impresses today.
In a DIY context, we often look at two types of solar thermal pumps: the Pulsometer (or Savery-style pump) and the Rankine Cycle pump. The former uses steam pressure to push water directly, while the latter uses a steam engine to turn a mechanical pump. For the self-reliant builder, the pulsometer is often preferred because it has fewer moving parts and can be constructed using standard plumbing components like copper pipe, check valves, and pressure tanks.
Why bother with this today? Because a solar thermal pump is inherently durable. Copper pipes and steel tanks do not “wear out” the way solar cells degrade or batteries fail. If a valve leaks, you can replace a gasket. If a pipe bursts, you can solder it. In a world of planned obsolescence, the solar steam pump represents a return to “fixable” technology that can last for decades with basic maintenance.
How the Solar Steam Cycle Works
The core of any solar steam pump is a cycle of heating, expansion, displacement, and condensation. Understanding these phases is the first step toward building a successful system. You are essentially turning a solar collector into a heartbeat, where the “pulse” of steam pressure moves the water through your pipes.
1. Heat Collection and Phase Change
The cycle begins with a solar collector. This could be a flat-plate collector for low-pressure systems or a parabolic trough for higher-temperature steam. As the sun strikes the collector, the working fluid inside begins to heat up. Once the fluid reaches its boiling point—100°C (212°F) for water at sea level—it undergoes a phase change from liquid to gas. This gas, or steam, occupies significantly more volume than the liquid form, creating a rapid rise in pressure within the boiler or “flash tank.”
2. The Pressure Stroke (Displacement)
This pressurized steam is routed into a displacement chamber. This chamber is already partially filled with water from your source (a well or pond). As the steam enters the top of the chamber, it exerts downward pressure on the water. Because water is incompressible, it is forced out through an exit pipe. A one-way check valve at the inlet prevents the water from being pushed back into the source, while a second check valve at the outlet allows the water to flow toward your storage tank or irrigation line.
3. Condensation and Suction
Once the water has been displaced, the steam in the chamber must be removed or condensed to reset the cycle. In many DIY designs, the steam is allowed to come into contact with the cooler incoming water or is routed through a condenser. As the steam cools, it turns back into a liquid. This transition creates a partial vacuum inside the displacement chamber. This vacuum creates suction, pulling a fresh “charge” of water from the source through the inlet check valve. The chamber is now refilled, and the cycle repeats as soon as the solar collector generates enough new steam pressure.
4. Working Fluids and Organic Rankine Cycles
While water is the most common working fluid, it requires high temperatures to boil. Some advanced DIYers use the Organic Rankine Cycle (ORC), which employs fluids with lower boiling points, such as certain refrigerants or alcohols. This allows the pump to start working earlier in the morning and continue later into the evening, as it requires less intense sunlight to trigger the phase change. However, these systems require a closed-loop design to ensure the working fluid is never lost to the environment.
Detailed Components of a DIY System
Building a solar steam pump requires a mix of thermal engineering and traditional plumbing. To reach high efficiency, you must pay attention to how you capture heat and how you manage the pressure. Here are the primary components you will need to source or fabricate.
The Solar Concentrator
To generate the 100°C (212°F) required for steam, a simple flat plate usually isn’t enough. You will likely need a Parabolic Trough. This is a curved mirror—often made from polished aluminum or silvered Mylar—that reflects sunlight onto a central focal line. A copper pipe, painted with high-heat flat black paint, runs along this focal line. For a small homestead pump, a trough that is 2 meters (6.5 feet) long and 1 meter (3.3 feet) wide can generate significant thermal energy.
The Flash Tank / Boiler
This is where the steam builds up. It must be a pressure-rated vessel, such as a heavy-duty steel pipe or a small propane tank that has been thoroughly cleaned and purged. This tank must include a pressure relief valve (PRV) set to a safe limit, typically 30–50 PSI (2.0–3.4 bar) for DIY systems. Safety is paramount; steam under pressure contains immense energy and can be dangerous if the vessel is not properly rated or maintained.
Check Valves and Plumbing
The “valving” is the brain of the pump. You will need high-quality brass or stainless steel swing check valves. These ensure that water only moves in one direction. One valve sits between the source and the displacement tank, and the second sits between the tank and the output line. For a 1-inch (25 mm) plumbing system, ensure your check valves are sized to match to prevent excessive friction loss, which can kill the efficiency of a low-pressure steam pump.
The Displacement Chamber
Also known as the “pulsometer body,” this is often a vertical section of 4-inch (100 mm) or 6-inch (150 mm) diameter pipe. It acts as the interface between the steam and the water. It needs to be tall enough to allow for a clear air-water interface, preventing steam from blowing straight out the exit pipe before it has pushed all the water out.
Benefits of Steam-Powered Pumping
Choosing steam over electricity isn’t just a nostalgic exercise; it offers several practical, measurable benefits for the long-term land manager. When you remove the dependency on sensitive electronics, you gain a level of autonomy that is hard to match with modern technology.
- Zero Battery Costs: The largest ongoing expense in most off-grid systems is battery replacement. A solar steam pump uses the water itself (in an elevated tank) as the energy storage. By pumping while the sun is out and storing the water for later use, you bypass the need for chemical batteries entirely.
- Extreme Longevity: High-quality copper, brass, and steel components can last 50 years or more. Unlike PV panels, which lose about 0.5% to 1% efficiency every year, a well-maintained thermal collector will perform the same in year 30 as it did on day one.
- Local Repairability: If an electric submersible pump fails, it usually goes into a landfill because the motor windings or seals are not user-serviceable. A solar steam pump can be disassembled, cleaned of mineral scale, and reassembled with basic tools and new gaskets.
- Mechanical Simplicity: In its simplest form (the pulsometer), there are only two moving parts: the check valve flaps. This lack of complexity makes the system incredibly robust against the “dirty” environments common in agricultural settings.
Challenges and Common Mistakes
While the concept is simple, the execution requires precision. Steam is a fickle partner, and small errors in design can lead to a pump that barely moves a trickle or fails to cycle at all. Understanding these pitfalls will save you weeks of frustration during the build phase.
Insulation Failures: The most common mistake is failing to insulate the steam lines between the boiler and the displacement tank. If the steam cools and turns back into water before it reaches the tank, it loses its pressure and the pump stalls. Use high-temperature fiberglass or mineral wool insulation, and wrap it in a UV-resistant outer layer to protect it from the sun.
Thermal Lag: New builders often get discouraged when the pump doesn’t start immediately. A steam system has “thermal mass,” meaning it takes time—sometimes 30 to 60 minutes—for the collectors and the boiler to reach operating temperature. This is normal, but it means these pumps are best suited for continuous daytime irrigation rather than “on-demand” household use.
Mineral Scaling: If you are pumping “hard” water with high mineral content, those minerals will eventually build up inside the boiler and check valves. This acts as an insulator, reducing heat transfer and eventually clogging the system. Designing the boiler with a “blow-down” valve at the bottom allows you to flush out sediment and mineral flakes periodically, extending the life of the unit.
Air Leaks in the Vacuum: For the suction stroke to work, the displacement chamber must be perfectly airtight. Even a tiny pinhole leak in a solder joint will prevent a vacuum from forming, which means the pump will never draw in new water. Always pressure-test your assembly with soapy water before final installation.
Limitations and Environmental Constraints
No technology is a silver bullet. While the solar steam pump is a masterpiece of resilience, it has specific constraints that might make it unsuitable for every location or application. Being realistic about these limits will help you decide if this is the right tool for your specific homestead.
Depth Limitations: Suction-based pumps (where the pump sits on the surface and “pulls” water up) are limited by physics to a maximum lift of about 8 to 9 meters (26 to 30 feet) at sea level. If your water table is deeper than this, you must use a “push-only” design where the steam is piped down to a displacement chamber located inside the well, which significantly increases the complexity and cost of the plumbing.
Startup Energy: On cloudy or overcast days, the collectors may not reach the 100°C (212°F) threshold required for steam. While PV panels can still produce some power in diffuse light, a solar steam pump is an “all or nothing” device. It requires clear, direct solar radiation to build the necessary pressure to overcome the head (height) of your water line.
Physical Size: To move the same amount of water as a small 300-watt electric pump, a solar thermal system requires a much larger footprint. You will need space for the parabolic troughs or collector arrays, which must be oriented correctly and kept free of shadows from trees or buildings.
Comparison: Electric Motor vs. Steam Pressure
When deciding between a modern PV setup and a solar thermal pump, it helps to look at the measurable differences. Each system has its strengths, and the right choice depends on your technical skill level and your goals for long-term self-reliance.
| Factor | Solar PV (Electric) | Solar Steam (Thermal) |
|---|---|---|
| Main Power Source | Solar Photons (Light) | Solar Thermal (Heat) |
| Estimated Lifespan | 10–15 years (Controller/Pump) | 30–50 years (with maintenance) |
| Complexity | High (Semiconductors, Electronics) | Medium (Plumbing, Mechanics) |
| Repairability | Low (Requires replacement parts) | High (Basic workshop tools) |
| System Cost | Decreasing (Cheap components) | Stable (Metal/Glass prices) |
The solar PV system is superior in terms of “set it and forget it” convenience for the first decade. However, the solar steam system wins on generational reliability. If you are building a system that you want your grandchildren to be able to use and fix, the thermal route is the clear winner.
Practical Tips and Best Practices
Applying this theory requires a disciplined approach to construction. If you are ready to start building your first prototype, keep these best practices in mind to maximize your flow rate and minimize maintenance headaches.
- Use Copper for the Boiler: While steel is cheaper, copper has significantly higher thermal conductivity. A copper boiler will react much faster to changes in sunlight, reducing the startup time and increasing the number of “pulses” the pump can achieve in an hour.
- Paint it Right: Don’t just use any black paint. Look for “Selective Surface” coatings or high-temperature stove paint. These are designed to maximize heat absorption while minimizing the amount of heat radiated back out into the air.
- Install a Manual Primer: A steam pump cannot pull water if the suction line is full of air. Always include a T-fitting with a plug at the highest point of your intake line so you can manually prime the system with water before the first run of the season.
- Sizing Matters: If your delivery pipe is too small (e.g., 1/2 inch or 12 mm), the friction will significantly reduce your lift capacity. For most DIY solar steam pumps, a 1-inch (25 mm) or 1.25-inch (32 mm) delivery pipe is the sweet spot for balancing flow and pressure.
- Safety First: Never, under any circumstances, operate a steam system without a functioning pressure relief valve. Steam is invisible and can cause severe burns. Always test your safety valves manually before leaving the system to run on its own.
Advanced Considerations: Scaling and Efficiency
For those who want to go beyond a simple garden pump, there are ways to scale this technology to meet higher demands. Serious practitioners often look toward more complex thermodynamic cycles and better concentrator tracking to improve their gallons-per-hour (GPH) metrics.
Active Sun Tracking
A fixed parabolic trough only performs at its peak for about two hours around solar noon. By adding a simple “clock-drive” or a light-sensing solar tracker, you can keep the trough pointed directly at the sun from dawn until dusk. This can increase your daily water yield by 40% to 60%. Advanced trackers use a small 12V motor powered by a tiny dedicated PV panel, which is a rare but acceptable use of electronics in an otherwise mechanical system.
Multi-Stage Pumping
If you need to lift water to a high elevation—such as a storage tank 30 meters (100 feet) up a hill—a single low-pressure steam pulse may not have the “oomph” to get it there. You can build a multi-stage pump where several displacement chambers are connected in series. The steam pressure from the first stage pushes water into the second stage, which then uses its own steam charge to push the water even higher. This mirrors the “triple expansion” engines found on old steamships.
Thermal Storage (The Salt Tank)
One of the drawbacks mentioned earlier was the inability to pump at night. Some advanced solar thermal plants use Phase Change Materials (PCM) or simple molten salts to store heat during the day. This heat is then used to generate steam after the sun has gone down. For a DIYer, a large, heavily insulated tank of water or sand can act as a thermal battery, allowing the pump to continue cycling for several hours after sunset.
Example Scenario: The 1-Acre Garden
Let’s look at how this works in a practical, real-world application. Imagine you have a 1-acre (0.4 hectare) garden that requires approximately 2,000 gallons (7,570 liters) of water per day during the peak growing season. Your water source is a pond located 50 feet (15 meters) away, with a total vertical lift of 10 feet (3 meters) to your storage tank.
A DIY solar steam pump with a 4-square-meter (43-square-foot) collector array can realistically produce a “pulse” every 3 to 5 minutes during peak sun. If each pulse moves 2 gallons (7.5 liters) of water, you are looking at 24 to 40 gallons per hour per collector unit. By scaling your array to four parallel collectors, you could easily hit a rate of 100–160 gallons (380–600 liters) per hour. Over a 6-hour peak sun window, this system would deliver 600 to 960 gallons (2,270–3,630 liters) to your tank.
While this is less than a high-end electric pump might provide, it is entirely free to operate and requires no fuel or electricity. By using drip irrigation and mulching to conserve water, a solar thermal pump of this size is more than sufficient to maintain a productive 1-acre homestead garden, even in arid climates.
Final Thoughts
The solar steam engine water pump is a testament to the power of simple, elegant engineering. It reminds us that we do not always need more “smart” technology to solve our problems; sometimes, we just need to use the physical laws of nature more effectively. By skipping the conversion to electricity, you eliminate the most fragile parts of a modern water system and replace them with something that you can understand, maintain, and pass down to others.
Building one of these systems is a journey into the heart of self-reliance. It requires a bit of pioneer grit—learning to solder a leak, adjusting a mirror’s focal point, and watching the clouds with a new appreciation for the thermal energy they are blocking. But the reward is the sound of that first pulse: a silent, rhythmic thumping that tells you the sun is working for you, moving the water you need to thrive without a single battery in sight.
If you are looking for a project that combines history, physics, and practical homesteading value, the solar steam pump is the ultimate challenge. Start small with a single collector and a simple displacement chamber. Once you see the water flowing from the power of pure steam, you will never look at a solar panel the same way again.
