How To Become More Self-Sufficient Without Starting a Full-Blown Farm…
Want to start preserving your harvest, making your own soap, or building a backyard root cellar — but not sure where to begin? “Homesteading Advice” gives you instant lifetime access to 35+ practical homesteading books on food preservation, veggie gardening, DIY natural cleaning products (save over $250 per year with this skill alone), brewing, off-grid energy, and a whole lot more…
Click Here To Check It Out Now!
Why build a toxic, energy-draining box when you could build a wall that regulates its own temperature using the soil beneath your feet? Most modern walls are energy-intensive, sterile, and destined for a landfill. Rammed earth uses the very soil from your property to create a high-thermal-mass sanctuary that stays cool in summer and warm in winter. It is not just a wall; it is a breathable, beautiful, and carbon-sequestering part of your ecosystem.
If you are looking for a way to anchor your home to the land, few methods offer the permanence and raw elegance of rammed earth. This technique is an invitation to work with the elements rather than against them. It requires patience and a fair amount of grit, but the result is a structure that feels alive.
Building this way connects you to a lineage of makers who understood that the best materials are rarely found in a store. They are found in the ground. Let us look at how you can take the dirt beneath you and turn it into a fortress of comfort.
Building With Rammed Earth
Rammed earth is a method of constructing monolithic walls by compacting a specific mixture of damp soil into temporary formwork. It is known as “pisé de terre” in French or “tapia” in Spanish, and it has served humanity for thousands of years. From the Great Wall of China to the ancient citadels of Morocco, earth building has proven its worth across every continent and climate.
Essentially, you are creating a man-made sedimentary rock. By applying high pressure to a mixture of sand, gravel, silt, and a small amount of clay, you force the particles into a dense, solid mass. Modern versions often include a small percentage of stabilizer, like Portland cement or lime, to increase weather resistance and structural strength.
In a world obsessed with fast, thin, and disposable materials, rammed earth stands out as a heavyweight. A typical wall is 300mm to 600mm (12 to 24 inches) thick. This thickness is not just for show; it provides the structural stability and the “thermal flywheel” effect that makes these buildings so comfortable.
Today, this technique is enjoying a massive revival. Architects and self-reliant builders choose it because it is non-toxic, fireproof, and aesthetically stunning. Each wall carries a unique fingerprint of the local geology, with soft bands of ochre, sienna, and gray that look like a sunset captured in stone.
The Soil Science: Finding Your Recipe
Your success depends entirely on what is in your dirt. Not every soil is suitable for ramming, and using the wrong mix can lead to walls that crumble or crack as they dry. You are looking for a balance between the “skeleton” (sand and gravel) and the “glue” (clay).
An ideal rammed earth mixture generally consists of 70% to 80% sand and gravel and 20% to 30% clay and silt. If your soil has too much clay, the wall will shrink and crack significantly as it cures. If it has too little, the wall will lack the binding strength to stay together after the forms are removed.
Before you start digging, you must conduct a few simple tests to see what you are working with.
- The Jar Test: Fill a glass jar halfway with soil, add water and a pinch of salt, and shake it vigorously. Let it sit for 24 hours. The layers will settle: gravel at the bottom, then sand, then silt, with clay on top. You can measure these layers to find your percentage.
- The Ribbon Test: Moisten a handful of soil and roll it into a “sausage.” Try to flatten it over your finger into a ribbon. If the ribbon breaks after only an inch (2.5 cm), the clay content is likely too low. If it stretches to three inches (7.5 cm) or more, the clay is too high.
- The Drop Test: This tests moisture content. Squeeze a handful of damp soil into a ball. Drop it from shoulder height onto a hard surface. If it shatters into its original loose form, it is too dry. If it stays in one solid lump, it is too wet. It should break into four or five clean chunks.
Moisture is the most critical factor during the ramming process. Most builders aim for a moisture content of 8% to 12%. This is just enough to lubricate the particles so they slide together under the rammer, but not so much that the material becomes a muddy paste.
How It Works: The Construction Process
Building a rammed earth wall is a rhythmic, labor-intensive process. It begins with a solid foundation. Because these walls are incredibly heavy—weighing roughly 2,000 kg per cubic meter (125 lbs per cubic foot)—they require a reinforced concrete footing or a stone plinth that is wider than the wall itself.
Once the foundation is set, you erect the formwork. These forms must be much stronger than those used for standard concrete because the force of the ramming is intense. Modern builders often use 18mm (3/4 inch) high-density plywood reinforced with steel “walers” and heavy-duty clamps.
The process follows a specific sequence:
- Mixing: The soil is mixed until it is homogenous. If you are using a stabilizer like cement (typically 5% to 10%), it must be thoroughly integrated before adding water.
- Lifts: You pour the damp soil into the forms in layers called “lifts.” Each loose lift should be about 100mm to 150mm (4 to 6 inches) deep.
- Ramming: You compress the soil using either a manual tamper or a pneumatic backfill rammer. You continue ramming until the sound changes from a dull thud to a sharp “ring,” indicating maximum compaction. A 150mm lift will usually compress down to about 75mm to 100mm.
- Successive Layers: You repeat this process, layer by layer, until you reach the top of the form. You can embed electrical conduits and plumbing sleeves directly into the soil as you go.
Stripping the forms can often happen immediately after the final layer is rammed. This is one of the most rewarding moments in construction. As the plywood comes away, it reveals the monolithic, textured face of the earth. The wall will be damp to the touch and will continue to harden and change color over several weeks as it cures.
Benefits: The Earth as a Thermal Battery
The primary reason to choose rammed earth is its extraordinary thermal performance. While it is not a “good insulator” in the traditional sense of stopping heat transfer (like fiberglass or foam), it is a world-class thermal mass.
This means the wall acts as a battery. In the heat of the day, the thick wall absorbs the sun’s energy, keeping the interior cool. It takes hours for that heat to migrate through the dense earth. By the time the heat reaches the inside, the sun has set and the outside air has cooled. The wall then releases that stored warmth into the house during the night.
Beyond temperature, the benefits are numerous:
- Acoustic Insulation: The density of the wall makes it a perfect sound barrier. It can block out highway noise, wind, and the sounds of a busy neighborhood, creating a silent, sanctuary-like interior.
- Fire Resistance: Earth does not burn. Rammed earth walls often achieve a 4-hour fire rating, making them one of the safest choices for building in regions prone to wildfires.
- Indoor Air Quality: These walls are “hygroscopic,” meaning they naturally regulate humidity by absorbing and releasing moisture from the air. They are also entirely non-toxic, with zero off-gassing of volatile organic compounds (VOCs).
- Durability: If protected from direct, driving rain, a rammed earth wall can last for centuries. It does not rot, it is not eaten by termites, and it does not require painting or siding.
Challenges: Common Mistakes to Avoid
The most common mistake beginners make is ignoring the “big hat and big boots” rule. This is an old builder’s proverb: an earth wall needs a wide roof overhang (the hat) to keep rain from washing away the surface, and a waterproof foundation (the boots) to prevent ground moisture from wicking up.
Poor moisture control during the ramming phase is another frequent pitfall. If the mix is too dry, the wall will be porous and weak. If it is too wet, the material will “sponge” under the rammer and won’t compact, leading to massive shrinkage cracks later. Always perform the drop test for every batch of soil.
Another challenge is the “cold bridge” effect in extreme climates. In regions with long, freezing winters, a standard 300mm (12-inch) rammed earth wall will eventually lose all its heat to the outside. Without an insulation strategy, the wall will feel like a block of ice in February.
Finally, do not underestimate the labor. Ramming by hand is a grueling, slow process. Even with pneumatic tools, moving and ramming tons of soil requires a team and a lot of physical endurance. Many projects stall because the builders did not account for the sheer volume of material that needs to be handled.
Limitations and Constraints
Rammed earth is not a universal solution for every site. In very wet, humid climates with high annual rainfall, the maintenance required to protect the surface from erosion may be higher than with other materials. While stabilizers help, constant exposure to driving rain will eventually pit the surface.
Building codes can also be a hurdle. In many parts of the United States and Europe, local officials may be unfamiliar with earthen construction. You may need to hire a structural engineer to provide a “performance-based” design or conduct expensive compression tests to prove the wall can handle the required loads.
Cost is a surprising limitation for some. While the raw material (dirt) is cheap or free, the labor and formwork are expensive. If you are hiring a professional crew, a rammed earth home will often cost 10% to 20% more than a standard timber-frame home. The savings come later through reduced energy bills and zero maintenance, but the upfront capital is higher.
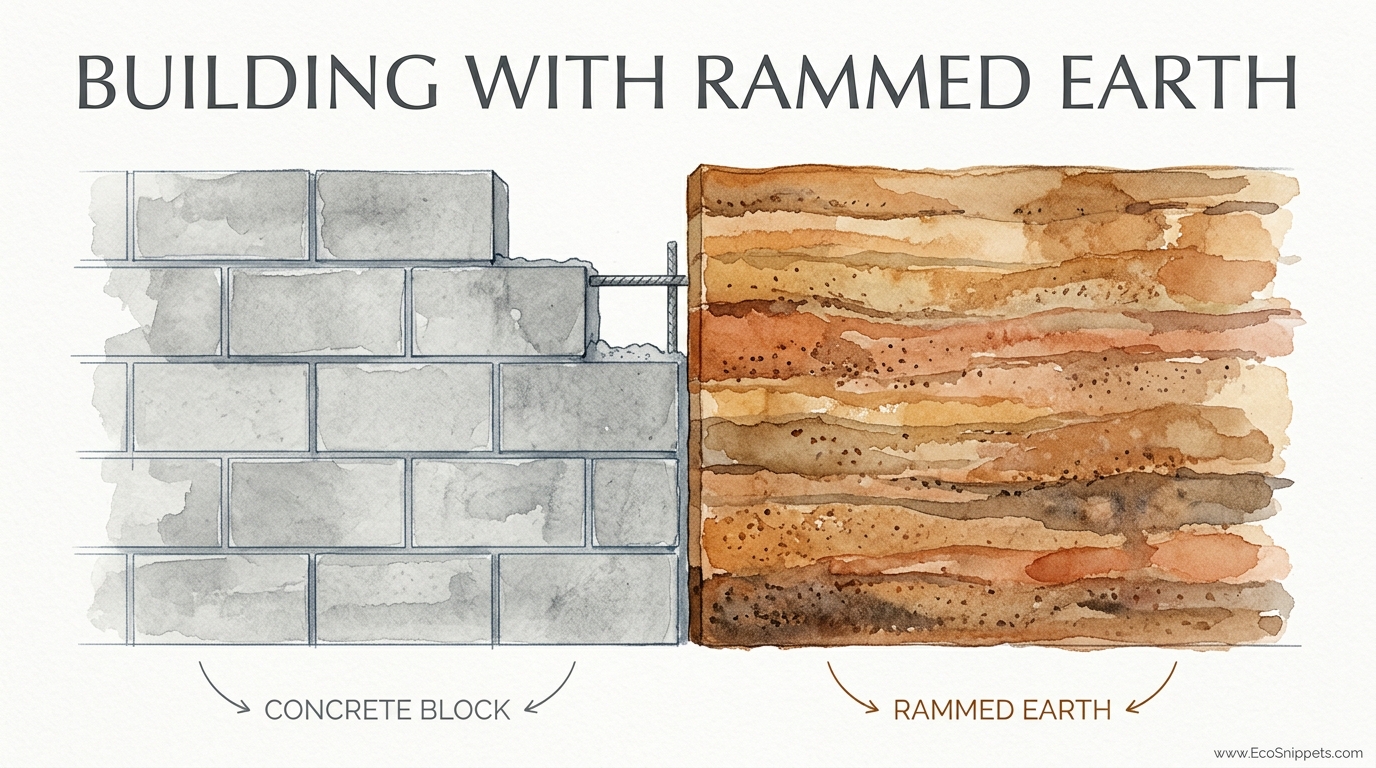
Comparison: Rammed Earth vs. Concrete Block
Many people compare rammed earth to concrete masonry units (CMU), but the two materials behave very differently in a living environment.
| Feature | Rammed Earth | Concrete Block (CMU) |
|---|---|---|
| Embodied Carbon | Very Low (if soil is local) | High (cement intensive) |
| Thermal Behavior | High mass; regulates temp | Lower mass; requires insulation |
| Breathability | Excellent; regulates humidity | Poor; requires vapor barriers |
| Complexity | High; labor intensive | Moderate; requires masonry skill |
| Finish | Natural; no paint needed | Usually needs stucco/paint |
Concrete blocks are faster to stack and easier to permit, but they lack the soul and the passive thermal benefits of earth. A concrete block wall is an industrial product; a rammed earth wall is a geological one.
Practical Tips for the Self-Reliant Builder
If you are planning to build your own wall, start small. Build a garden wall or a small shed before you attempt a house. This allows you to learn how your specific soil behaves in the forms.
Invest in high-quality formwork. If your forms are flimsy, they will bow and warp, leaving you with a wall that is crooked or, worse, a form that bursts mid-ram. Use 18mm (3/4 inch) marine-grade or form-plywood and ensure your ties and clamps are rated for the pressure.
Timing is everything. In temperate regions, it is best to build during the dry season. Rain during construction can ruin your soil stockpiles and make the ramming process a muddy nightmare. If you must build in the wet, keep your materials and the top of the wall covered with tarps at all times.
Consider adding a “water-repellent” additive to the mix. Modern silane/siloxane based additives can be mixed directly into the soil. This makes the entire wall hydrophobic, meaning water will bead off the surface rather than soaking in. This is a game-changer for durability in wetter regions.
Advanced Considerations: The Insulated Sandwich
In cold climates, the “Insulated Rammed Earth” (IRE) wall is the gold standard. Instead of a solid block of earth, you build a “sandwich.” This consists of an outer layer of rammed earth, a core of rigid insulation (usually 50mm to 100mm of XPS or mineral wool), and an inner layer of rammed earth.
This design gives you the best of both worlds. The outer layer protects the home and provides the aesthetic beauty. The insulation core stops heat from escaping. The inner layer provides the thermal mass inside the “envelope” to regulate your living temperature.
Structural ties, usually made of fiberglass or stainless steel, connect the two layers of earth through the insulation. This prevents the wall from splitting apart while minimizing “thermal bridging” (paths where heat can leak through the wall). While this adds complexity and cost, it allows rammed earth to meet the strictest energy codes in places like Canada or Northern Europe.
Example Scenario: A Small Cabin Wall
Imagine you are building a small 3m x 4m (10ft x 13ft) reading cabin. You decide to make the north wall out of rammed earth for its thermal mass and acoustic properties.
For a wall that is 3 meters long, 2.4 meters high, and 0.4 meters thick, you will need approximately 2.88 cubic meters of compacted soil. Because soil loses about 50% of its volume during ramming, you will need to start with roughly 5.7 cubic meters of loose, damp soil.
This equates to about 6 to 7 tons of material. If you and two friends use a pneumatic rammer, you can expect to ram about 0.5 to 1.0 cubic meter of finished wall per day. This means your single wall will take three to four days of intense labor to complete, excluding the time spent setting up the forms and mixing the soil.
The cost of the soil might be zero if you dig it on site. If you add 7% cement for stabilization, you will need about 20 bags of cement. Compared to a standard stud wall, you have traded the cost of lumber and drywall for the cost of your own labor and a few bags of cement.
Final Thoughts
Rammed earth construction is more than a building technique; it is a philosophy. It asks us to slow down, to understand the ground we stand on, and to build something that will outlast our own lifetime. It rejects the “disposable” nature of modern construction in favor of mass, breathability, and permanence.
While the physical demands are high and the learning curve can be steep, the rewards are felt every time you walk into a quiet, cool earth-walled room on a scorching afternoon. You are not just building shelter; you are crafting a thermal battery that works for you every day, without moving parts or monthly bills.
If you have the patience to test your soil, the grit to ram the lifts, and the foresight to protect your walls from the rain, you can create a home that is truly of the earth. Start with a small project, feel the weight of the tamper in your hands, and listen for that “ring” of the earth as it turns to stone. Experiment with the colors of your local clay and embrace the natural imperfections that make these walls so beautiful.
Recommended: Part of the Sustainable Building Essentials series, Essential Rammed Earth Construction is the complete step-by-step guide to designing and building durable, high-performance rammed earth structures. Learn how this ancient method creates homes that are naturally comfortable, resilient, and environmentally friendly.
