How To Become More Self-Sufficient Without Starting a Full-Blown Farm…
Want to start preserving your harvest, making your own soap, or building a backyard root cellar — but not sure where to begin? “Homesteading Advice” gives you instant lifetime access to 35+ practical homesteading books on food preservation, veggie gardening, DIY natural cleaning products (save over $250 per year with this skill alone), brewing, off-grid energy, and a whole lot more…
Click Here To Check It Out Now!
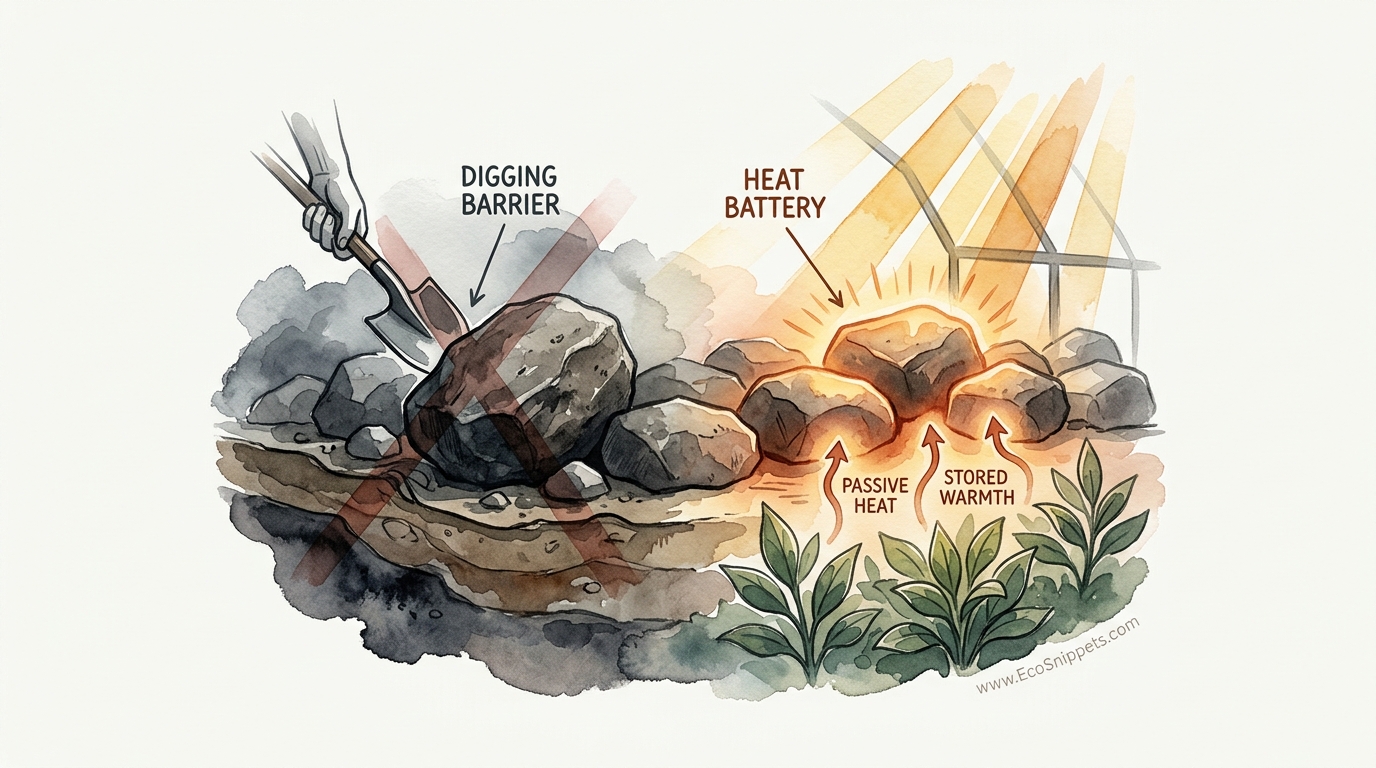
That rock you’re trying to remove might be the only reason your lemon tree survives the winter. Many gardeners see a large rock as a nuisance to be removed, but a permaculturist sees a 500-pound thermal battery. Rocks absorb the sun’s energy all day and release it slowly at night, creating a microclimate that can protect sensitive plants from frost. Here is how to turn your biggest digging headache into your garden’s best defense.
The struggle with garden stones is a tale as old as time. For generations, farmers have cleared fields, stacking stones into walls primarily to get them out of the way of the plow. But those ancestors noticed something: the crops nearest the stone walls always stayed green a little longer when the first autumn frost bit the air. They were witnessing the power of thermal mass, a natural phenomenon that acts as a stabilizer in an unpredictable world.
In modern gardening, we often focus on fertilizers and irrigation, forgetting that temperature is the primary master of plant growth. By understanding how to manage the “energy budget” of your backyard, you can push the boundaries of your hardiness zone. You can grow citrus where it shouldn’t grow and harvest tomatoes weeks before your neighbors. It all starts with the heavy, stubborn stones already sitting under your feet.
Turn Garden Rocks Into Passive Heat Batteries
A passive heat battery is simply a dense material that stores thermal energy from the sun and releases it when the surrounding air temperature drops. In the context of your garden, rocks are the most durable and cost-effective batteries available. They require no wiring, no maintenance, and they never wear out. When you place a large boulder next to a sensitive plant, you are essentially installing a low-voltage heater that runs on 100% renewable solar energy.
The reason rocks work so well is due to a property called thermal inertia. Just as a heavy flywheel is hard to start spinning but carries its momentum for a long time, a large rock is slow to heat up but holds that heat long after the sun has set. This creates a buffer. While the air temperature may plummet at 2:00 AM, the air immediately surrounding the stone remains several degrees warmer. This small margin—often just 3°C to 5°C (5°F to 9°F)—is frequently the difference between a thriving tree and a frozen stump.
In the real world, this is the same principle that causes the “urban heat island” effect. Cities, filled with concrete and asphalt, stay significantly warmer than the surrounding countryside. As a gardener, you are looking to create a localized “heat island” specifically for your most prized or delicate plants. Whether you are using a single massive boulder or a collection of smaller river stones, you are building a system that moderates the wild swings of nature.
The Physics of Stone: How Thermal Mass Works
To truly master the use of rocks as heat batteries, you must understand the two physical levers at play: specific heat capacity and thermal conductivity. Specific heat capacity refers to how much energy a material can hold per unit of mass. While water actually has a higher heat capacity than stone—storing about four times more energy per kilogram—stone is significantly denser. A granite boulder weighing 500 kg (about 1,100 lbs) occupies a relatively small footprint but represents a massive reservoir of potential warmth.
Thermal conductivity is the speed at which heat moves through the material. Metals have high conductivity and lose heat almost instantly. Rocks have a much lower conductivity, meaning the heat absorbed by the outer layers during a sunny afternoon slowly migrates into the core. At night, that process reverses. The core feeds the surface, and the surface radiates that heat into the air and the soil.
Different types of stone perform differently. Dense, dark-colored rocks like basalt or dark granite are the gold standard. They absorb more solar radiation (the albedo effect) and have the density to store it. Lighter, more porous stones like limestone or sandstone are less efficient but still far superior to bare soil or organic mulch when it comes to heat retention.
How to Design Your Garden Heat Battery
Effectiveness in thermal gardening is entirely dependent on placement. You cannot simply drop a rock anywhere and expect it to work. You must orient the system to catch the “charge” from the sun and deliver the “discharge” to the plant.
First, consider the sun’s path. In the Northern Hemisphere, your heat batteries should be placed on the north or northeast side of the plant, facing south. This allows the stone to soak up the full intensity of the midday and afternoon sun. In the Southern Hemisphere, the rocks should be on the south or southwest side, facing north. By placing the rock behind the plant relative to the sun, you ensure the stone receives the light while the plant receives the radiated heat and a shield from cold winds.
Distance is the next critical factor. For a single fruit tree or a small grouping of vegetables, the thermal mass should be within 30 to 60 cm (1 to 2 feet) of the trunk or stems. If the rock is too far away, the heat dissipates into the open air before it can protect the plant’s tissue. If it is too close or touching the plant, you risk “burning” the stems during a hot summer day or creating a localized pocket of humidity that could lead to fungal issues.
Strategic Burial and Root Zone Warming
A common mistake is sitting a rock entirely on top of the soil. While this helps warm the air, it does little for the roots. In many cases, the roots are more sensitive to freezing than the branches. To maximize your battery, bury the rock about one-third of its depth into the ground.
This creates a direct thermal bridge into the soil. The rock warms the earth surrounding the root ball, keeping the biological activity in the soil alive even when the surface is frosted over. This root-zone stability allows the plant to recover faster once the morning sun returns, as it doesn’t have to wait for the entire ground to thaw before it can begin moving water and nutrients.
Building the Battery: Implementation Methods
There are several ways to incorporate stone thermal mass into your landscape, depending on the materials you have and the scale of your garden. You don’t always need a backhoe and a massive boulder to see results.
The Standing Sentry (Boulders)
Using large, individual boulders is the most “pioneer” way to manage heat. A single stone weighing at least 100 kg (220 lbs) provides a significant thermal buffer for a single tree. These are best used for high-value specimens like citrus, figs, or pomegranates. Ensure the flattest, darkest side of the boulder is facing the sun to maximize absorption.
The Gabion Wall
If you have a surplus of smaller “nuisance” stones, a gabion wall is an excellent solution. These are wire mesh cages filled with rocks. Because they are composed of many small stones, they have a massive surface area to absorb heat. However, because they are porous, they also allow air to move through them. To make a gabion wall an effective heat battery, you should line the back (the side away from the sun) with a solid barrier like heavy plastic or landscape fabric to prevent the wind from stripping the heat away too quickly.
Rock Mulching and Pathways
In many climates, using a “mulch” of 5–10 cm (2–4 inch) river stones or crushed basalt around the base of plants acts as a surface-level thermal battery. This is particularly effective for Mediterranean herbs like rosemary, lavender, and thyme, which crave warm soil and good drainage. Similarly, a stone pathway running alongside a garden bed acts as a large-scale heat sink that prevents the edge of the bed from freezing.
Benefits of the Rock-Heat Strategy
The primary advantage of using rocks as thermal mass is the sheer reliability of the system. Unlike frost blankets or plastic tents, stones do not blow away in a storm. They don’t require you to run out at 10:00 PM to cover your plants because you saw a weather alert.
Practical benefits include:
- Extended Growing Season: By keeping the soil 2°C to 4°C warmer in the spring, you can plant out heat-loving crops like peppers or tomatoes up to three weeks earlier.
- Frost Shielding: On nights when the temperature dips just below freezing, the radiant heat from the stones can keep the air around the leaves in the “safe zone” (above 0°C or 32°F).
- Promotion of Soil Life: Warm soil supports active mycorrhizal fungi and beneficial bacteria, which in turn leads to stronger, more resilient plants.
- Wind Protection: Large stones act as physical windbreaks, preventing the “chill factor” from desiccating tender leaves during winter gales.
Common Challenges and Mistakes
While the physics are sound, the implementation can go wrong. The most frequent error is neglecting the “shadow effect.” A rock that is tall enough to provide heat at night may also cast a shadow on the plant during the day if not placed correctly. If the plant is in the shadow of the rock during peak sunlight hours, the lack of photosynthesis will do more damage than the cold ever would.
Another common pitfall is ignoring drainage. Large rocks are heavy and can compact the soil beneath them. If you place a massive stone right against a tree trunk, you might create a “basin” where water collects. In cold weather, this standing water can freeze and cause “crown rot” or bark splitting. Always ensure the soil is sloped slightly away from the stone-plant interface.
Finally, do not underestimate the power of summer. A rock that saves a lemon tree in January can cook it in July. In high-desert or tropical environments, these thermal batteries can become too efficient, raising soil temperatures to levels that stress the roots. In these regions, you may need to cover the stones with organic mulch or light-colored straw during the hottest months to “turn off” the battery.
Limitations: When This Method May Not Work
The rock-heat battery is a passive system, and like all passive systems, it has its limits. If you live in a region with persistent, heavy cloud cover throughout the winter, your “batteries” will never fully charge. Thermal mass requires direct solar radiation to work. On a gray, overcast day, the rocks will eventually reach the same temperature as the ambient air, providing zero benefit at night.
Furthermore, rocks cannot protect against “Arctic Blasts” or prolonged deep freezes where the temperature stays below -10°C (14°F) for several days. In these extreme events, the thermal energy in the rock will be exhausted within the first few hours. Rocks are best suited for “marginal” freezes—those nights where the temperature drops just enough to kill blossoms or tender new growth, but not enough to freeze the ground solid for weeks.
Comparison: Rocks vs. Water vs. Concrete
When deciding on a thermal mass material, it helps to look at the data. While rocks are the focus here, they are part of a broader toolkit of heat-retaining materials.
| Material | Density (kg/m³) | Specific Heat (J/kg·K) | Durability |
|---|---|---|---|
| Granite / Basalt | 2,600 – 3,000 | ~790 | Permanent |
| Water (in barrels) | 1,000 | 4,186 | Medium (leaks, freezing) |
| Concrete | 2,400 | 880 | High |
| Dry Soil | 1,200 – 1,600 | ~800 | Variable |
While water is the undisputed champion of heat storage, it is difficult to manage in a landscape. Barrels are unsightly to some and can burst if they freeze solid. Rocks, however, provide a “set it and forget it” solution that integrates naturally into the aesthetics of a garden. They are the middle ground of efficiency and permanence.
Practical Tips and Best Practices
If you are ready to start placing stones, follow these field-tested tips to squeeze every bit of energy out of your garden:
- Paint them dark: If you have light-colored stones, you can significantly increase their efficiency by painting the sun-facing side with a matte black, non-toxic masonry paint. This can increase surface temperatures by up to 10°C (18°F) on a sunny day.
- Use the “U-Shape”: For maximum protection, don’t just place one rock. Create a U-shaped “cradle” around the plant, with the open end of the U facing the sun. This traps the warm air around the plant and prevents it from being blown away by side-winds.
- Combine with Water: If a hard freeze is predicted, place a few 20-liter (5-gallon) buckets of water directly against your rocks. The rocks will help keep the water from freezing, and the water will provide an extra boost of thermal mass.
- Clear the snow: If it snows, clear the snow off the top and south side of your rocks immediately. Snow is an insulator; it will prevent the sun from “charging” your battery for the next night.
Advanced Considerations: The Sun Trap Design
For those looking to go beyond individual trees, you can design an entire “sun trap” using the landscape’s topography and stone. A sun trap is a horseshoe-shaped arrangement of thermal mass (walls, mounds, or large stones) that faces the equator.
In this design, the back wall of the trap should be the highest point, effectively “scooping” the sunlight and reflecting it toward the center. This creates a pocket of air that can be an entire USDA hardiness zone warmer than the rest of your property. By layering stones of different sizes—large boulders for long-term storage and smaller gravel mulches for quick daytime heating—you create a multi-stage thermal system.
This approach is how farmers in the high Alps or the Andes have successfully grown crops at altitudes that should be far too cold. They don’t fight the stones; they use the stones to capture the only free energy source available: the sun.
The Lemon Tree Scenario: A Practical Application
Imagine a gardener in a borderline climate—perhaps Zone 8b—who wants to grow a Meyer Lemon tree. Normally, a dip to -6°C (21°F) would be the end of that tree.
By planting the tree 45 cm (18 inches) in front of a 300 kg (660 lb) dark granite boulder and mulching the base with 10 cm (4 inches) of dark river stone, the gardener has changed the math. On a clear winter day, that boulder might reach a surface temperature of 25°C (77°F) even if the air is only 10°C (50°F).
When night falls and the temperature drops to -6°C, the boulder begins its slow release. The air in the 30 cm gap between the rock and the tree stays at a steady 1°C or 2°C (34-36°F). The ground-level river stones keep the roots from freezing. The tree wakes up the next morning with no leaf drop and no bark splitting. The “nuisance” rock has saved the harvest.
Final Thoughts
The transition from seeing a rock as a **DIGGING BARRIER** to seeing it as a **HEAT BATTERY** is a hallmark of a mature gardener. It is a shift from fighting nature to collaborating with it. In a world of high-tech solutions and expensive greenhouse heaters, the humble stone remains one of the most effective tools for self-reliance.
By strategically placing thermal mass in your garden, you are doing more than just protecting a few plants; you are learning to read the energy of your land. You are observing how the sun moves, how the wind flows, and how the earth holds onto the warmth of the day. This is the ancestral wisdom that allowed our forebears to survive and thrive in harsh environments.
Start small. Find one stubborn rock, move it to the sun-facing side of your favorite sensitive plant, and watch the results. You might just find that the biggest headache in your garden becomes its greatest asset. Experiment with different stone types, try the U-shaped cradle, and don’t be afraid to leave those heavy boulders exactly where they can do the most good. Your garden—and your lemon tree—will thank you when the first frost arrives.
