How To Become More Self-Sufficient Without Starting a Full-Blown Farm…
Want to start preserving your harvest, making your own soap, or building a backyard root cellar — but not sure where to begin? “Homesteading Advice” gives you instant lifetime access to 35+ practical homesteading books on food preservation, veggie gardening, DIY natural cleaning products (save over $250 per year with this skill alone), brewing, off-grid energy, and a whole lot more…
Click Here To Check It Out Now!
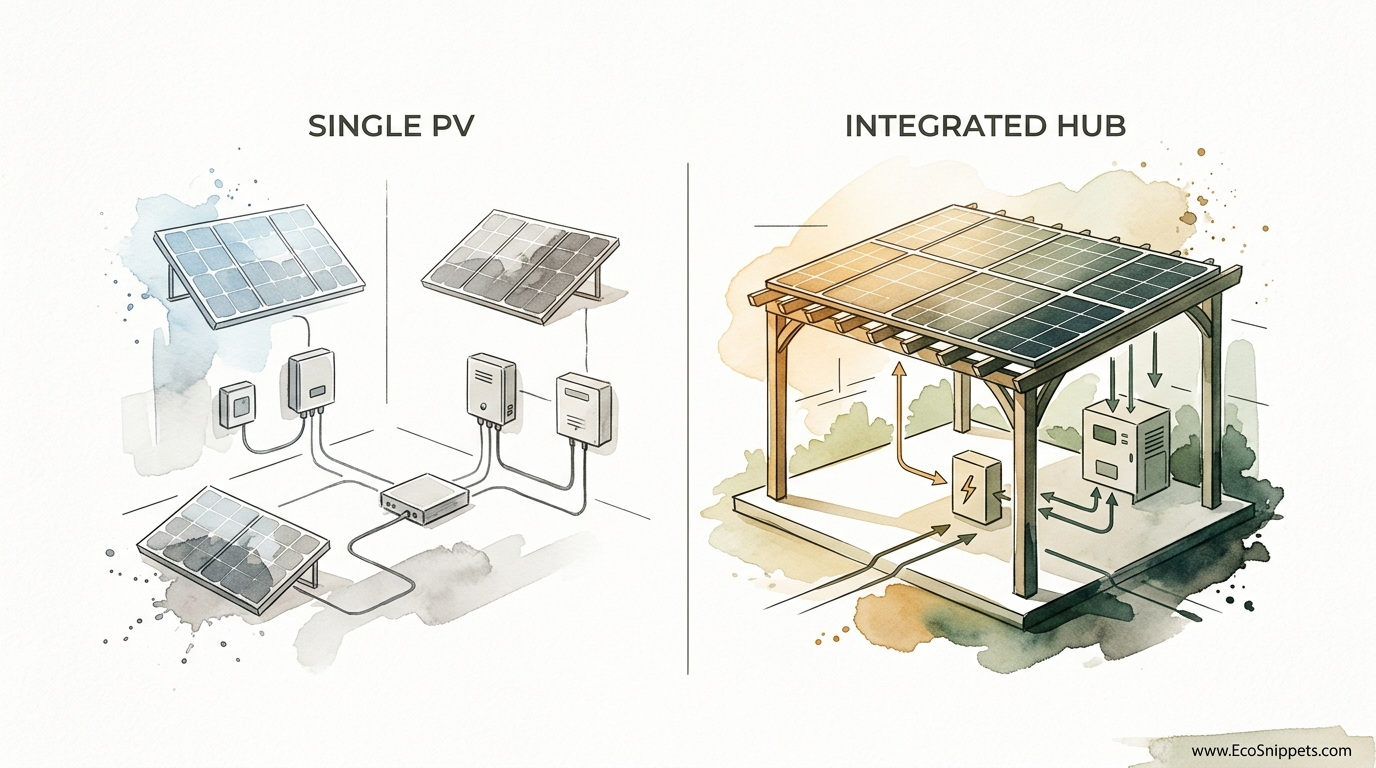
Your solar array shouldn’t just take up space—it should be the most useful structure on your property. Why waste backyard space on a ‘Single-Use’ solar rack when you can build an ‘Integrated Hub’? This Power Pergola design doesn’t just harvest watts; it provides a shaded living space, filters rainwater through its vertical support legs, and acts as a central charging station for your farm tools. When your energy infrastructure has three or four jobs, the ROI isn’t just in the electricity —it’s in the lifestyle.
Modern homesteading requires a shift in how we view “equipment.” In the past, a solar array was a series of glass panels bolted to a metal rack in a field, doing nothing but soaking up sun while the grass grew long and tangled beneath it. This is the **SINGLE PV** approach—functional, but inefficient in its use of land. The **INTEGRATED HUB**, or solar pergola, transforms that footprint into a productive sanctuary. It provides the backbone for a self-sufficient homestead by combining energy production, water catchment, and thermal management into a single, sturdy piece of architecture.
How To Build A DIY Solar Pergola Hub
A Solar Pergola Hub is a multi-functional outdoor structure designed to support photovoltaic (PV) modules while providing usable space beneath. Unlike a traditional ground-mount system, which sits low to the earth and renders the ground beneath it inaccessible, the hub is elevated. This elevation allows for a patio, a workshop, or even a livestock shelter to exist in the same footprint as your energy production.
In real-world terms, this structure acts as the “energy brain” of a property. It is often situated near a workshop or garden to minimize the distance electricity and water must travel. By using the solar panels as the “roofing” material, you solve two problems at once: you generate power and you create shade. When engineered correctly, these structures can withstand extreme weather, from hurricane-force winds of 170 mph (273 km/h) to heavy snow loads of 70 psf (3.35 kPa).
The concept exists because land is a finite resource. On a modern homestead, every square foot (or square meter) must justify its existence. The Solar Pergola Hub earns its keep by replacing three separate structures—a solar rack, a garden shed, and a gazebo—with one cohesive unit.
How It Works: Designing for Multi-Functionality
Building an integrated hub is a project of precision and heavy-duty materials. You are not just building a garden trellis; you are building a power plant that must remain stationary during a windstorm while supporting hundreds of pounds (kilograms) of glass.
1. Structural Engineering and Foundation
The first principle of a solar hub is gravity and wind uplift. A standard solar panel weighs approximately 40–50 lbs (18–22 kg). A 5kW array might consist of 12 to 14 panels, meaning your roof alone carries 600–700 lbs (270–317 kg) of dead weight. However, the wind is the greater threat. Because a pergola is open on the sides, wind can get under the panels and create an “airplane wing” effect, attempting to lift the structure out of the ground.
To counter this, foundations must be deep. In many regions, this means concrete piers poured at least 20–36 inches (50–90 cm) deep, depending on the frost line and local wind ratings. Using heavy-duty posts, such as 6×6 or 8×8 pressure-treated lumber or structural aluminum, is non-negotiable.
2. The “Water-Tight” Roof System
One of the primary challenges of a solar pergola is making it waterproof. Standard solar panels are designed to have gaps between them for thermal expansion. To turn these panels into a functional roof, you must manage the water that falls through the cracks. There are two primary ways to do this:
- Gutter Channels: Installing small U-shaped aluminum or plastic channels beneath the seams between panels. These channels catch the drips and carry them to a main gutter at the edge of the frame.
- EPDM Gaskets: Using UV-rated EPDM T-gaskets that fit snugly between the panels. These seals allow for the 1.5mm per linear meter of thermal expansion required for the panels while preventing water from passing through.
3. Harnessing Bifacial Technology
For a pergola, bifacial solar panels are the gold standard. These modules have glass on both sides and can harvest light from the front (direct sun) and the back (reflected light from the ground). In a pergola setting, where there is significant “albedo” or reflected light from a concrete patio or light-colored gravel below, bifacial panels can increase energy yield by 11% to 30% compared to traditional monofacial panels.
The Step-by-Step Build Process
The construction of a Solar Pergola Hub follows a logical progression from the ground up. Before starting, always consult local building codes, as structures over a certain height or containing high-voltage electrical often require permits and engineering stamps.
Site Selection and Orientation
Choose a location with a clear southern exposure (in the Northern Hemisphere) or northern exposure (in the Southern Hemisphere). Ensure there are no shadows from trees or chimneys between 9:00 AM and 3:00 PM. The ground should be level or easily gradable to ensure the vertical posts are perfectly plumb.
Frame Construction
Assemble the “skeleton” of the hub. This usually consists of:
- Posts: The vertical supports. 6×6 (15×15 cm) timber is standard for smaller builds; 8×8 (20×20 cm) for larger arrays.
- Headers/Beams: The horizontal supports that connect the posts. These must be sized to prevent sagging under the weight of the panels.
- Rafters: The slanted supports that provide the “pitch” for the solar panels. A 5 to 15-degree tilt is common for pergolas to allow for water runoff while maintaining an aesthetic profile.
- Purlins: Cross-members that the solar panel mounting rails bolt into.
Mounting the Array
Using a dedicated solar racking system (like Unirac or IronRidge) is safer than bolting panels directly to wood. Wood expands and contracts with moisture; aluminum racking does not. The racking creates a stable, level plane for the panels and includes integrated grounding hardware to protect the system from lightning strikes and electrical surges.
Electrical Integration
Wire the panels in “strings” and run the conduit down the inside of one of the support legs. This keeps the wiring hidden and protected. For an integrated hub, this is the time to install a weatherproof sub-panel or a 12V/24V DC charging station. This allows you to plug in farm tools, e-bikes, or workshop equipment directly at the source.
Benefits of the Integrated Hub Approach
Choosing to build an integrated hub over a simple ground-mount or roof-mount system offers measurable advantages that extend beyond just “green energy.”
Increased Land Utility: You gain 100% of the footprint back as usable space. Whether you use it for a potting bench, an outdoor kitchen, or a wood-drying rack, the land remains productive.
Enhanced Efficiency: Solar panels perform better when they are cool. Rooftop systems often trap heat against the shingles, which can reduce efficiency. A pergola allows for 360-degree airflow around the panels, keeping them at optimal operating temperatures even in mid-summer.
Water Independence: By adding a gutter system to the pergola, you can collect hundreds of gallons (liters) of water in a single rain event. This water is “gravity-fed” to nearby gardens or stored in IBC totes for livestock. A 10’x20′ (3m x 6m) pergola can harvest approximately 120 gallons (450 liters) of water from just one inch (2.5 cm) of rain.
Aesthetics and Property Value: A well-built timber or aluminum pergola is an architectural asset. Unlike a field of racks that might look industrial, a hub integrates with the landscaping and increases the appraisal value of the home.
Challenges and Common Mistakes
Building a structure that combines high-voltage electricity with outdoor living is not without its pitfalls. Most errors occur in the planning phase.
Structural Under-Engineering
The most common mistake is treated the solar pergola like a standard decorative garden arbor. A standard arbor only supports its own weight and maybe some climbing vines. A solar hub must support a “dead load” (the panels) and a “live load” (wind and snow). Using undersized beams or failing to use structural screws (like GRK or LedgerLoks) can lead to sagging or structural failure during a storm.
Neglecting Thermal Expansion
Solar panels are essentially large sandwiches of glass and metal. They expand when hot and contract when cold. If you butt them tight against each other with no gap or use rigid caulk to seal the seams, the glass can shatter as the frames expand. You must leave a minimum of 1/4 inch (6mm) gap between modules.
Improper Drainage
If the pergola is not pitched at least 5 degrees, water will pool on the panels. This leads to “soiling” (dirt buildup) which blocks sunlight and reduces power output. It also increases the risk of water seeping through the seals and dripping on your furniture below.
Limitations: When a Hub Is Not Ideal
While the Power Pergola is a superior homestead design, it isn’t the right choice for every situation.
Shading Constraints: If your backyard is heavily forested, an elevated pergola might actually be more shaded than a high roof-mount system. In these cases, the “Single-Use” roof array is more practical.
Cost of Infrastructure: A ground-mount rack might cost $2,000 in materials. A structural pergola hub can easily cost $6,000 to $10,000 for the frame alone. If your only goal is the cheapest possible kilowatt-hour, a hub may not meet your budget.
Zoning and Setbacks: Many suburban areas have strict rules about “accessory structures.” You may be allowed to put solar on your roof, but a 10-foot-tall structure in your backyard might violate a setback requirement or an HOA rule.
Comparison: Single PV vs. Integrated Hub
| Feature | Single PV (Ground Rack) | Integrated Hub (Pergola) |
|---|---|---|
| Land Use | Dead space beneath racks | Usable patio/workshop space |
| Installation Cost | Lower (simple racking) | Higher (structural framing) |
| Panel Cooling | Moderate | Excellent (high airflow) |
| Water Catchment | Rarely implemented | Primary design feature |
| Bifacial Benefit | Low (low clearance) | High (elevated clearance) |
Practical Tips and Best Practices
- Albedo Optimization: To maximize the “bonus” energy from bifacial panels, use a light-colored surface beneath the pergola. White gravel, light gray pavers, or even reflective outdoor paint on a concrete pad can boost your energy production by an extra 5-10%.
- Bird Deterrents: Birds love the high, protected rafters of a solar pergola. Install bird spikes or netting early to prevent droppings from fouling your furniture and the panels.
- Microinverters vs. String Inverters: If your pergola is partially shaded by a nearby tree at certain times of day, use microinverters. This ensures that a shadow on one panel doesn’t “choke” the production of the entire array.
- Stainless Fasteners: In any outdoor structure, especially one near garden irrigation, use 304 or 316 stainless steel bolts and screws. Galvanized hardware will eventually rust, potentially staining your wood or compromising structural integrity.
Advanced Considerations: The Off-Grid Hub
For those looking to achieve true self-reliance, the Solar Pergola Hub can be equipped with a local battery bank. Instead of running all the power back to the main house, you can install a “homestead sub-hub.”
This involves mounting a weather-rated battery enclosure (using Lithium Iron Phosphate or LiFePO4 batteries) at the base of the structure. This stored energy can run high-draw farm equipment—such as table saws, air compressors, or deep-well pumps—without putting a load on the main house batteries or the grid. In an emergency, the hub becomes a standalone survival station where you can charge communications gear and run basic refrigeration independently of any other building.
Additionally, consider “DC-coupled” lighting. Since the panels produce DC power and the batteries store DC power, you can run high-efficiency LED lighting throughout the pergola without the energy losses of an inverter. This makes for a robust, low-maintenance lighting system that works even when the grid is down.
Example Scenario: The 4kW Garden Hub
Imagine a homestead in the Pacific Northwest (USA) or Central Europe. The owner builds a 12’x16′ (3.6m x 4.8m) pergola using ten 400-watt bifacial panels.
1. Energy: On a sunny day, the hub produces 20-24 kWh of energy. This covers the entire daily electrical load of the homestead’s well pump and workshop tools.
2. Water: During a typical autumn rainstorm (2 inches or 50mm of rain), the integrated gutters collect 240 gallons (900 liters) of water. This is piped into three 55-gallon drums used for the spring vegetable garden.
3. Space: Beneath the panels, the owner has a dry, shaded area to store a tractor and a workbench. The bifacial panels allow a soft, ambient “dappled” light to filter through, making it a comfortable place to work even in the heat of July.
By combining these three functions, the owner has maximized their ROI. The cost of the wood and labor is offset by the fact that they didn’t need to build a separate equipment shed or buy as much municipal water for the garden.
Final Thoughts
The transition from a single-use solar rack to an integrated hub is more than just a construction project; it is a philosophy of resilience. It recognizes that every asset on your land should serve multiple purposes. By lifting your panels off the ground and onto a structural pergola, you reclaim your land, protect your equipment, and secure your energy future.
Building this hub requires a respect for the elements—wind, water, and sun. It demands sturdy joinery, deep foundations, and a thoughtful approach to electrical safety. However, the result is a structure that feels less like a piece of high-tech machinery and more like a permanent part of the homestead’s heritage.
Whether you are starting with a small 2kW array or planning a massive 10kW charging hub, the principles remain the same. Build for the storm, harvest the rain, and let the sun do the work. Your property is more than just a place to live; with an integrated hub, it becomes a power-generating, water-catching engine of self-sufficiency.
