How To Become More Self-Sufficient Without Starting a Full-Blown Farm…
Want to start preserving your harvest, making your own soap, or building a backyard root cellar — but not sure where to begin? “Homesteading Advice” gives you instant lifetime access to 35+ practical homesteading books on food preservation, veggie gardening, DIY natural cleaning products (save over $250 per year with this skill alone), brewing, off-grid energy, and a whole lot more…
Click Here To Check It Out Now!
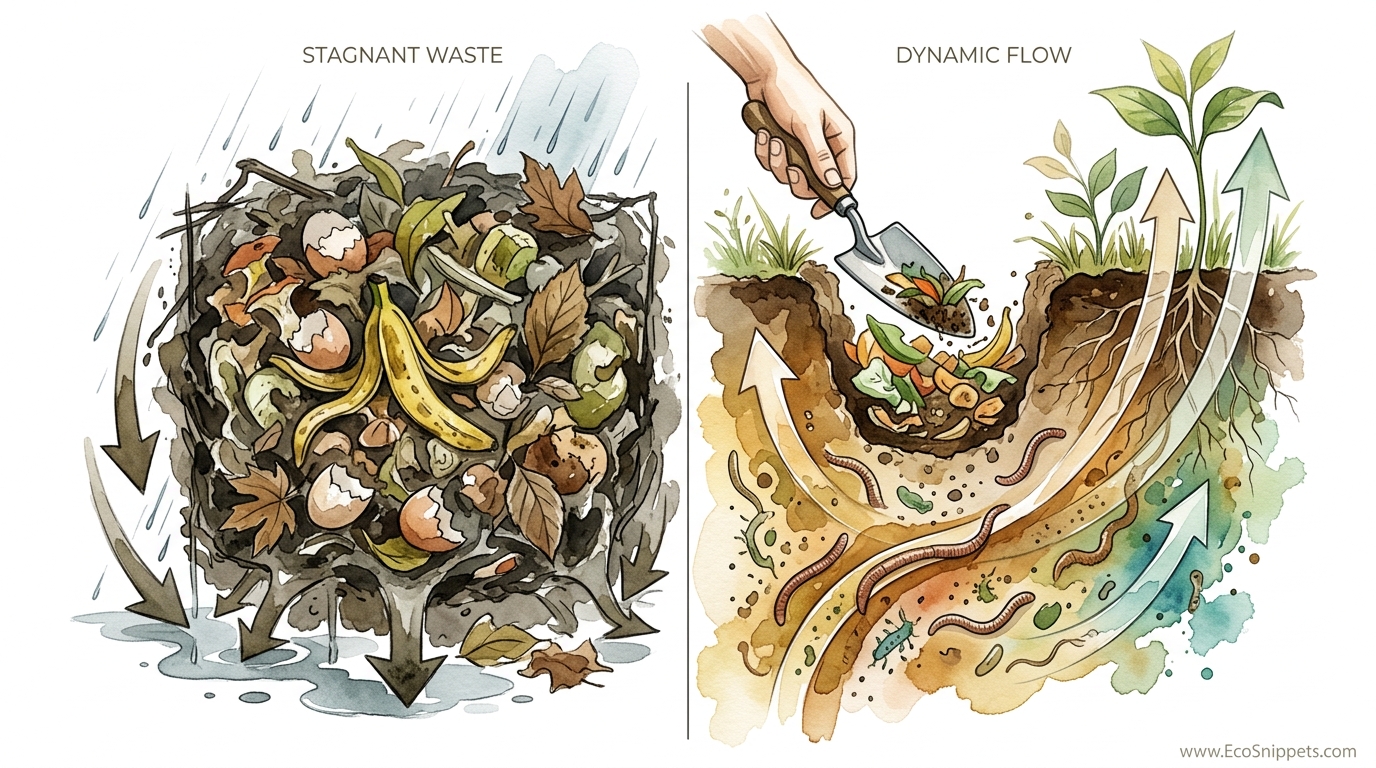
What if you could delete your compost pile and grow 30% more food at the same time? Why wait a year for a plastic bin to turn scraps into soil when you can feed your plants directly? Trench composting moves the nutrient flow to the roots in real-time, skipping the work and the waste.
For centuries, the most successful growers didn’t rely on expensive plastic tumblers or complex chemical ratios. They relied on a simple, gritty truth: the best place for organic matter is exactly where the plants are going to grow. This is the essence of trench composting—a method that turns your garden soil into a living, breathing digestive system.
Instead of managing a mountain of “stagnant waste” in a corner of your yard, you create a “dynamic flow” of nutrients. You aren’t just getting rid of kitchen scraps; you are building a subterranean reservoir of fertility. This article will guide you through the process of reclaiming this ancestral wisdom to supercharge your garden beds.
Trench Composting For Beginners
Trench composting, often called “dig-and-drop” composting, is the practice of burying kitchen scraps and garden waste directly into the soil. It is perhaps the oldest and most straightforward method of soil amendment known to man. Rather than building an above-ground pile that requires turning, watering, and monitoring, you let the earth itself act as the composting vessel.
In a world of high-tech gardening gadgets, trench composting stands out for its raw simplicity. It exists because it works. It mimics the natural cycle of the forest floor, where organic matter falls, is covered by more matter, and eventually becomes part of the earth. In a garden setting, we simply speed up this process by placing the “fuel” exactly where the “engine”—the plant roots—can reach it.
Real-world examples of this are everywhere once you look. English allotment gardeners have used “bean trenches” for generations to grow prize-winning runner beans. Indigenous cultures across the Americas buried fish and plant residues beneath their corn mounds to ensure a harvest in lean years. Whether you have a massive backyard or a few small raised beds, this method scales to fit your needs without requiring a single piece of specialized equipment.
The Mechanics: How to Trench Compost
The process of trenching is as much about physics as it is about biology. To do it correctly, you must understand the “12-inch rule” (30 cm). Digging a trench to a depth of 12 to 18 inches (30 to 45 cm) ensures that you are deep enough to avoid attracting pests, yet shallow enough that the aerobic and anaerobic microbes can still thrive in the root zone.
Start by identifying a section of your garden that will be fallow for at least a few months. Dig a trench or a series of holes. If you are using the classic “trench” method, make it about 12 inches (30 cm) wide and the length of your planting row. Pile the excavated soil to one side—you will need this for the cover.
Fill the bottom 4 to 6 inches (10 to 15 cm) of the trench with your organic materials. This includes vegetable peelings, coffee grounds, eggshells, and soft garden trimmings. For a balanced “dynamic flow,” chop these materials into small pieces with your spade; smaller surface area means faster decomposition. Many experienced practitioners add a thin layer of “browns”—dried leaves or shredded cardboard—to provide carbon for the soil microbes.
Once your scraps are in, cover them with the remaining soil. You should have at least 6 to 8 inches (15 to 20 cm) of soil on top. This depth is critical because it acts as a biofilter, trapping any odors that might attract neighborhood dogs, raccoons, or rodents. Over the next few months, the soil dwellers—specifically earthworms—will move into this “Earthworm Cafe” and begin the work of turning your waste into gold.
Benefits: Why Choose the Trench?
The primary advantage of trench composting is the direct delivery of nutrients. In a traditional pile, nutrients can leach into the ground *under* the pile where no plants are growing. In a trench, the nitrogen, phosphorus, and potassium are released exactly where your next crop of tomatoes or squash will be searching for them.
This method also excels at moisture retention. Organic matter acts like a subterranean sponge. During the heat of summer, a bed with a buried compost trench will stay hydrated longer than a bed amended with only surface mulch. The decaying matter holds onto water and releases it slowly as the plants demand it.
- Labor Efficiency: There is no turning of heavy, smelly piles. Once the waste is buried, your job is done.
- Odor Control: By burying scraps under a thick layer of soil, you eliminate the “garbage smell” often associated with poorly managed compost bins.
- Space Saving: You don’t need to dedicate a corner of your yard to a messy compost area. Every inch of your garden remains productive.
- Pest Prevention: Properly buried waste is invisible and scentless to most surface-dwelling scavengers.
Challenges and Common Mistakes
The most frequent error in trench composting is shallow burial. If you only put 2 inches (5 cm) of soil over your kitchen scraps, you are essentially inviting every local raccoon to a midnight buffet. Always aim for a minimum of 6 inches (15 cm) of cover soil to ensure security and effective odor filtration.
Another pitfall is “clumping.” If you dump a massive pile of wet grass clippings into a hole, they will mat together and go anaerobic in a way that produces a foul, slimy mess. To avoid this, always mix your “greens” (wet scraps) with a bit of soil or “browns” (dry material) as you fill the trench. This creates air pockets and allows for more even decomposition.
Patience is also a factor. Trench composting is generally slower than “hot” aerobic composting. Because the material is insulated by soil and has less access to oxygen, it can take 4 to 6 months to fully break down in cool climates. If you plant too early, the decomposition process might temporarily “lock up” nitrogen as microbes work to break down the carbon-heavy materials, leaving your young plants yellow and stunted.
Limitations: When the Trench Fails
Trench composting is not a universal solution. In regions with heavy, waterlogged clay soil, a buried trench can become a “sour pit.” Without proper drainage, the water collects in the trench, the oxygen is completely cut off, and the material rots into a toxic sludge rather than healthy humus. If your garden has drainage issues, you must amend the soil with grit or compost *before* attempting deep trenching.
Frozen ground is the other major constraint. If you live in a northern climate where the soil freezes solid for four months of the year, you cannot dig new trenches in mid-winter. Experienced growers often dig their trenches in the late autumn, leaving them open and covered with a heavy board so they can dump scraps into the “pre-dug” hole throughout the winter. When spring arrives and the ground thaws, they simply cover the winter’s accumulation with soil.
Finally, trench composting does not reach the high temperatures necessary to kill weed seeds or soil-borne pathogens. If you bury diseased tomato vines or seedy dandelions, you are simply planting next year’s problems. Keep diseased material and invasive weeds out of your trenches and stick to kitchen scraps and healthy garden trimmings.
Comparison: Trench vs. Traditional Bin
Deciding between a bin and a trench depends on your goals and your physical ability. A bin creates “mobile” compost that you can move to any part of the garden, while a trench creates “in-situ” fertility that stays where it is buried.
| Factor | Trench Composting | Traditional Compost Bin |
|---|---|---|
| Maintenance | Set and forget; no turning required. | Requires regular turning and aeration. |
| Speed | Slow (4–12 months). | Fast (2–4 months if managed). |
| Nutrient Retention | High; nutrients stay in the root zone. | Moderate; nutrients can leach out. |
| Aesthetics | Hidden underground. | Visible structure in the yard. |
| Cost | Free (requires only a shovel). | Low to High (bins can be expensive). |
Practical Tips and Best Practices
To optimize your trenching, adopt the “Chop and Drop” philosophy. Before you bury your scraps, take a sharp spade and chop them into the smallest pieces possible. This increases the surface area for bacteria and fungi to attack. A whole cabbage head might take a year to disappear; a chopped cabbage head will be gone in six weeks.
Use the “English Method” of rotation to keep your whole garden fertile. Divide your garden plot into three equal strips. In Year 1, use the first strip for your compost trench, the second for your pathway, and the third for your crops. In Year 2, move the trench to the former pathway, the crops to the former trench, and make the former crop area the new path. By the end of Year 3, every square inch of your garden has been deeply fertilized by a buried trench.
Mark your trenches! There is nothing more frustrating than trying to dig a new hole only to uncover a half-decomposed mess from three weeks ago. Use simple wooden stakes or stones to mark the “active” end of your trench so you know exactly where the fresh waste ends and the ready-to-plant soil begins.
Advanced Considerations: Soil Biology
While most composting is described as aerobic (needing air), trench composting is often a hybrid of aerobic and anaerobic processes. The top few inches of the buried material benefit from oxygen filtering through the soil, while the bottom layers may be broken down by anaerobic microbes. This is why adding a “starter” of healthy garden soil or a handful of finished compost to the trench is so effective—it inoculates the waste with the specific microbes needed for subterranean breakdown.
If you want to take your trenching to the next level, consider “Worm Trenching.” By adding a handful of red wiggler worms to your freshly filled trench, you speed up the process significantly. The worms will tunnel through the material, creating aeration channels and depositing nutrient-dense castings directly into the root zone of your future plants.
Consider the pH balance as well. If you are burying large amounts of acidic material like coffee grounds or citrus peels, you might want to sprinkle a small amount of garden lime or wood ash over the layer before covering it with soil. This prevents the trench from becoming too acidic, which can slow down the activity of beneficial earthworms.
Example Scenario: The “Heavy Feeder” Bed
Imagine you have a 4×8 foot (1.2×2.4 m) raised bed where you plan to grow tomatoes and pumpkins—two of the hungriest plants in the garden. In the late autumn, after the first frost, you dig a deep trench down the center of the bed, roughly 15 inches (38 cm) deep. Over the winter, you fill this trench with your kitchen scraps, coffee grounds, and the remains of the autumn harvest.
By March, the trench is nearly full. You cover it with the original soil, mounding it slightly to account for the settling that will happen as the material decomposes. In May, you plant your tomato starts on either side of the trench. As the summer heat hits, the tomato roots grow deep, finding the moist, nutrient-rich “vein” of compost in the center of the bed. While your neighbor’s tomatoes are struggling with the heat and needing daily fertilization, your plants are tapping into a subterranean reservoir, producing larger fruit and resisting disease with their superior vigor.
Final Thoughts
Trench composting is more than just a waste disposal method; it is a philosophy of gardening that respects the natural cycles of the earth. By moving the “nutrient flow” directly into the soil, you eliminate the middleman of the compost bin and build a garden that is self-sustaining and incredibly productive.
This method requires grit and a willing back, but the rewards are measurable. You will see more earthworms, better soil structure, and a noticeable increase in the health of your heavy-feeding crops. It is a return to a simpler time when nothing was wasted and every scrap of organic matter was seen as a gift to the future harvest.
Do not be afraid to experiment. Start with a single “dig-and-drop” hole near a hungry shrub or at the end of a vegetable row. Once you see the results—the deep green leaves and the robust growth—you may find yourself “deleting” your compost pile for good and letting the earth do what it does best.
