How To Become More Self-Sufficient Without Starting a Full-Blown Farm…
Want to start preserving your harvest, making your own soap, or building a backyard root cellar — but not sure where to begin? “Homesteading Advice” gives you instant lifetime access to 35+ practical homesteading books on food preservation, veggie gardening, DIY natural cleaning products (save over $250 per year with this skill alone), brewing, off-grid energy, and a whole lot more…
Click Here To Check It Out Now!
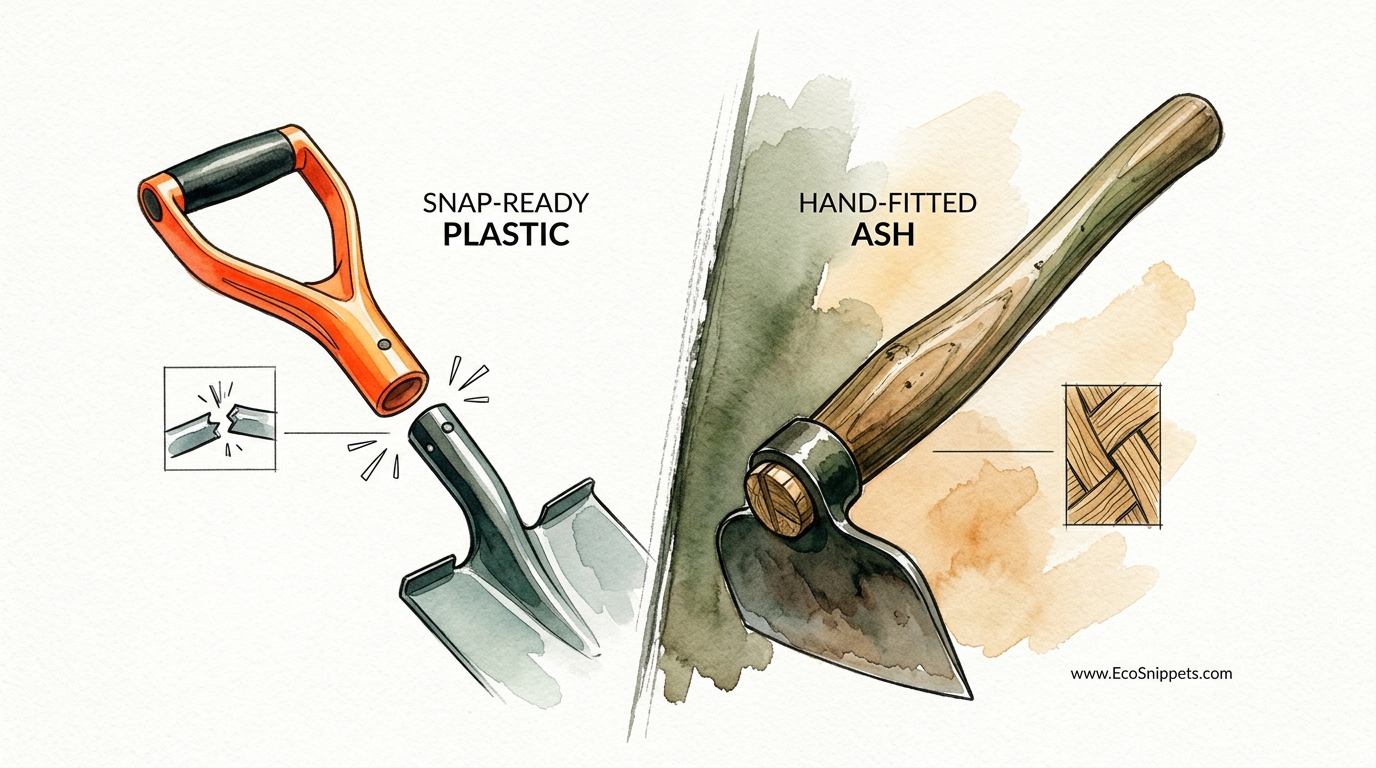
Are you buying a new shovel every three seasons, or are you building one that your grandson will use? We traded ‘Legacy’ durability for ‘Temporary’ convenience, and our sheds are full of plastic waste because of it. Learn why a hand-carved wooden handle is the last one you will ever need.
A tool is only as good as the connection between the user and the work. When you pick up a modern hardware store shovel, you are often holding a piece of snap-ready plastic or a mass-produced dowel with grain running the wrong way. These tools are designed to fail, forcing a return trip to the store. In contrast, a hand-fitted ash or hickory handle is a piece of engineering that breathes, flexes, and absorbs the vibration of every strike.
Building your own handles is not just about saving a few dollars. It is about self-reliance and the mastery of a skill that our ancestors considered fundamental. When you carve a handle from a log you harvested yourself, you are creating a tool that is perfectly balanced for your height and grip. You are moving away from the “throwaway” culture and toward a life of enduring quality.
Best Wood For Homestead Tool Handles
Choosing the right species of wood is the most critical decision in the entire process. Not every tree in the forest is suited for the stresses of striking or prying. You need a wood that balances hardness with flexibility—a trait known as “toughness.”
Hickory is the undisputed king of tool handles in North America. With a Janka hardness rating of approximately 1,820 lbf (8,095 N), it is dense enough to resist crushing but has a unique, interlocked grain that prevents splitting under heavy impact. It is the primary choice for axes, sledgehammers, and picks because of its incredible shock-absorbing qualities.
Ash (specifically White Ash) is the standard for long-handled tools like shovels, rakes, and hoes. It is slightly lighter and more flexible than hickory, making it easier to use for hours of gardening or trail work. Ash fibers are long and straight, which allows the tool to spring back into shape after being stressed.
Other notable mentions include:
- Osage Orange: Often called “hedge,” this wood is incredibly dense and naturally rot-resistant. It makes for a heavy but nearly indestructible handle for hatchets or short-handled hammers.
- White Oak: While strong and widely available, white oak is more brittle than hickory. It is excellent for “static” tools like mallets or wheelbarrow handles but can be jarring if used for a high-impact felling axe.
- Hard Maple: This is a fine-grained wood that feels smooth in the hand. It is the traditional choice for chisel handles because it resists mushrooming when struck with a mallet.
How to Hand-Carve a Handle: Step-by-Step
The process of making a handle begins long before you pick up a knife. It starts with understanding how a tree grows. To create a handle that lasts a lifetime, you must follow the natural “flow” of the wood fibers.
Step 1: Harvesting and Riving
Never use a saw to cut your handle blanks if you can help it. A saw cut is straight, but wood grain is rarely perfectly linear. Instead, you should “rive” or split the wood using a froe or a set of wedges. Splitting ensures that the grain runs continuously from the top of the handle to the bottom. This prevents “grain runout,” which is the leading cause of handles snapping during use.
Step 2: Rough Shaping
Once you have a split “stave” or “bolt” of wood, use a hatchet to remove the excess bulk. Aim for a rectangular profile that is roughly 1/2 inch (12 mm) larger than your desired final dimensions. If you are making an axe handle, this is the time to establish the basic “fawn’s foot” or “palm swell” at the base.
Step 3: The Seasoning Process
Green wood is easy to carve but will shrink and crack as it dries. You must allow your rough-shaped blank to “season” or air-dry. The general rule is one year of drying time for every inch (25 mm) of thickness. To prevent the ends from checking (cracking), paint them with old latex paint or wax. This forces the moisture to exit through the sides of the wood slowly and evenly.
Step 4: Final Shaping with a Drawknife
Once the wood is dry (aim for a moisture content of 10-12%), move to the shaving horse. Use a drawknife to refine the shape. Work with long, steady strokes, always following the direction of the grain. If the wood starts to “tear,” you are carving against the grain; flip the piece around and work from the other direction.
Step 5: Fitting the Eye
This is the most delicate stage. The “eye” is the hole in the metal tool head where the handle fits. Use a spokeshave or a rasp to gradually taper the end of the handle until it just begins to enter the eye. You want a “drive-on” fit. A common trick is to blacken the inside of the tool head with soot or a marker; when you test-fit the handle, the black marks will show you exactly where you need to remove more wood.
Benefits of Hand-Fitted Wooden Handles
A hand-carved handle offers several practical advantages that modern synthetic materials cannot match. First among these is vibration dampening. Plastic and fiberglass handles transmit the shock of an impact directly into your elbows and shoulders. Wood, especially hickory and ash, acts as a natural shock absorber, allowing you to work longer with less fatigue.
Ergonomics is another major factor. Commercial handles are made for an “average” hand. By carving your own, you can customize the thickness and shape of the grip. An octagonal grip, for example, provides better orientation and control than a perfectly round one, as your hand can “feel” exactly where the bit of the axe is facing.
Finally, there is the matter of repairability. If a fiberglass handle breaks, the tool is usually destined for the landfill. If a wooden handle breaks, you can simply remove the remaining wood from the eye and “hang” a new handle. This makes high-quality tool heads a multi-generational investment.
Challenges and Common Mistakes
The most frequent error made by beginners is ignoring grain orientation. If you look at the end of a handle, the growth rings should ideally run parallel to the direction of the strike (vertical). If the rings run perpendicular (horizontal), the wood is much more likely to shear and break.
Another pitfall is over-drying the wood in a kiln or near a wood stove. While you want the wood dry, removing too much moisture can make the fibers brittle and “lifeless.” Naturally seasoned air-dried wood retains a level of “spring” that is essential for durability.
Failure to “seat” the head properly is also common. If there are gaps between the wood and the metal inside the eye, the head will eventually wobble. This wobble creates friction, which wears down the wood and leads to a dangerous tool. The fit should be so tight that you have to drive the handle into the head with a mallet.
Limitations: When Wood May Not Be Ideal
Despite its many virtues, wood is a biological material and has its limits. In extremely humid or tropical environments, wood handles are susceptible to rot and insect damage if not properly maintained. In these cases, a handle made of a rot-resistant wood like Osage Orange or Black Locust is preferable to ash.
For tools that will be left outdoors or used in standing water—such as a heavy-duty industrial pry bar used in marine environments—synthetic materials might offer a longer lifespan with less maintenance. However, for 99% of homesteading and gardening tasks, wood remains the superior choice.
Comparison: Hand-Carved Wood vs. Industrial Synthetic
| Feature | Hand-Carved Wood | Industrial Synthetic |
|---|---|---|
| Shock Absorption | High (Reduces fatigue) | Low (Transmits vibration) |
| Customization | Infinite (User-specific) | None (One size fits all) |
| Repairability | Easy (Replaceable) | Difficult (Often disposable) |
| Cost | Low (Materials are free) | Moderate to High |
Practical Tips and Best Practices
Maintaining your handles is just as important as making them. A dry handle is a brittle handle. You should never use varnish or polyurethane on a tool handle; these finishes sit on top of the wood, making it slippery and prone to causing blisters.
Instead, use Boiled Linseed Oil (BLO) or Pure Tung Oil. These “drying oils” penetrate the fibers and harden within the wood. A traditional maintenance schedule is:
- Once a day for a week.
- Once a week for a month.
- Once a month for a year.
- Once a year for the rest of your life.
For an even better grip and added weather protection, consider a 60/40 mix of linseed oil and pine tar. This was the preferred finish for Scandinavian shipbuilders and tool makers for centuries. It provides a slightly tacky grip that actually improves when your hands are wet or sweaty.
Advanced Considerations
Serious practitioners often look at the “grain count” of their wood. Ideally, you want between 6 and 12 growth rings per inch (25 mm). If the rings are too wide, the wood grew too fast and may be soft. If they are too tight (like 30+ rings per inch), the wood may be too brittle.
Another advanced technique is “friction burning” the handle. By lightly charring the surface of the wood with a torch and then scrubbing it with a stiff brush, you remove the softer “spring wood” fibers, leaving the harder “summer wood” ridges. This creates a natural texture that is incredibly easy to grip and highly resistant to decay.
Example Scenario: The 36-Inch Felling Axe
Imagine you have found an old, rusted axe head at an estate sale. It is a 4-pound (1.8 kg) Dayton pattern head made of high-carbon steel. To bring this tool back to life, you select a straight piece of hickory.
You rive a 40-inch (101 cm) stave from a log, ensuring the split follows the fibers perfectly. After rough-shaping the handle with a hatchet, you let it dry in your barn for a full year. When you finally fit the head, you use a spokeshave to give the handle a slim, “springy” feel in the middle while keeping the “fawn’s foot” at the end large enough to prevent the axe from slipping out of your hands.
You cut a “kerf” (a slot) in the top of the handle and drive in a wedge made of dry black walnut. The result is a tool that feels like an extension of your arm. When you swing it into a log, there is no vibration—only the satisfying “thwack” of steel meeting wood.
Final Thoughts
Creating your own tool handles is a journey back to a time when quality was measured in decades, not fiscal quarters. It requires patience and a willingness to learn from the wood itself. Every log you split and every handle you shave will teach you something new about the resilience of nature and the rewards of handcraft.
A hand-carved handle is more than just a piece of wood. It is a testament to your skills as a steward of your land and your tools. By choosing to build instead of buy, you are preserving ancestral wisdom and ensuring that your shed is filled with legacies, not garbage.
Start with something simple, like a hammer or a hatchet. Once you feel the difference of a custom-fitted handle in your palm, you will never look at a plastic tool the same way again. Experiment with different woods available in your region, and remember: the best tool in the world is the one you know how to fix.
