How To Become More Self-Sufficient Without Starting a Full-Blown Farm…
Want to start preserving your harvest, making your own soap, or building a backyard root cellar — but not sure where to begin? “Homesteading Advice” gives you instant lifetime access to 35+ practical homesteading books on food preservation, veggie gardening, DIY natural cleaning products (save over $250 per year with this skill alone), brewing, off-grid energy, and a whole lot more…
Click Here To Check It Out Now!
This multi-purpose dome can serve as a storage shed or cool pantry above ground, or as a rootcellar or storm shelter below ground. No building permit is typically needed, because it is below the minimum size required by building codes, is not inhabited and is not attached to a residence.
Earthbag structures provide a cool space in summer and an escape from the cold in winter (ideal for humans and animals), which means this earthbag dome is well suited for many purposes, like a quiet space for relaxing or playing music, as well as those listed previously. Depending on your needs, the most practical combination of uses might be a rootcellar/cool pantry for daily use and a disaster shelter for emergencies such as tornadoes or hurricanes.
The key concept that makes earthbag domes work is corbelling. This means each course (each row) of bags is inset slightly from the course below. Corbelled domes made of adobe and stone have been built for thousands of years. The concept has been applied to earthbags in the last few decades.
Basic project information:
18’ exterior diameter; 8’ interior diameter; 11’ exterior diameter, 50 sq. ft. interior floor space; total cost of materials: $300, which is about $6/square foot.
Tools:
Tamper(s), round nose shovel(s), grape hoe or grub hoe (digging tool), 13” x 16” sheet metal slider, knife, hammer, 2’ level, 2” x 4” x 10’ leveling board, tape measure, fencing pliers, handsaw, trowel, garden hose with spray nozzle, 6’ or 8’ stepladder
The following instructions assume you have cleared and leveled the site, removed topsoil, positioned fill soil around the building site to minimize work, dug a trench to stable subsoil, put about 12” of gravel in the trench, and added two stakes with string lines: a center stake with string line to measure the radius, and a stake in front of the door to measure the dome curvature.
Bags or tubes can be used. We demonstrate bags, because they’re often available recycled for very low cost.
Step 1 – Dome Plans…
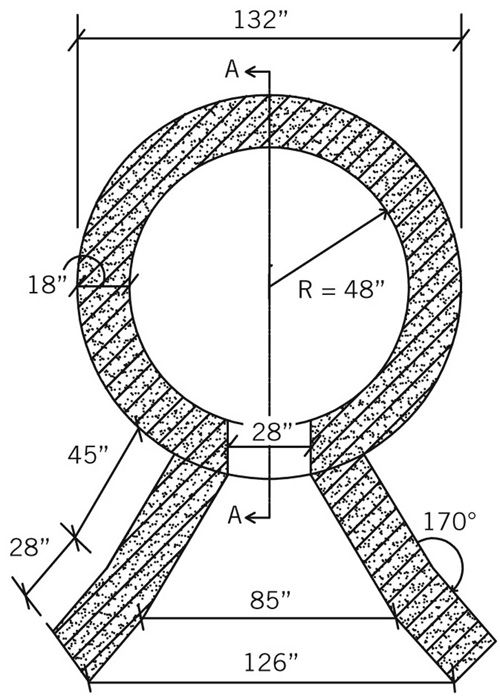
Let’s briefly take a look at the plans so you’ll better understand the building process. The first drawing is the floorplan that shows the dimensions for the dome base and the angled buttresses in front.
The buttresses provide reinforcing on both sides of the door and also act as retaining walls to hold back the earth. Make a rubble trench under the buttresses the same as the dome, and interlock (overlap) each course where the dome and buttresses intersect.
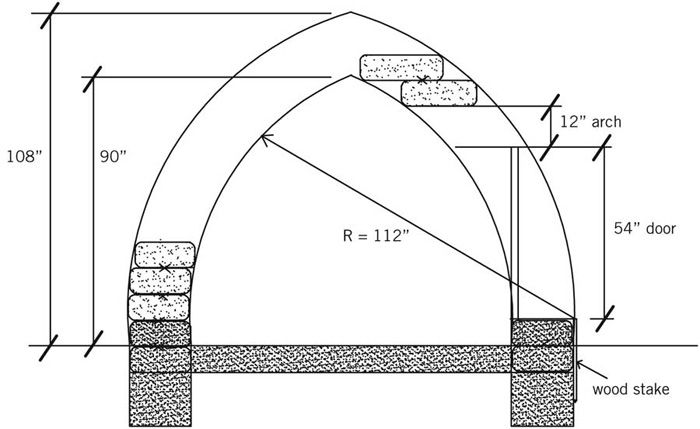
The second drawing is the dome section that shows key vertical dimensions, earthbag foundation, door and arch. Note the wood stake in front of the door. The string line on this stake guides the curvature of the dome (112” radius in this case). This dimension remains constant. Put the stake off to one side of the doorway so you’re not tripping on it during construction.
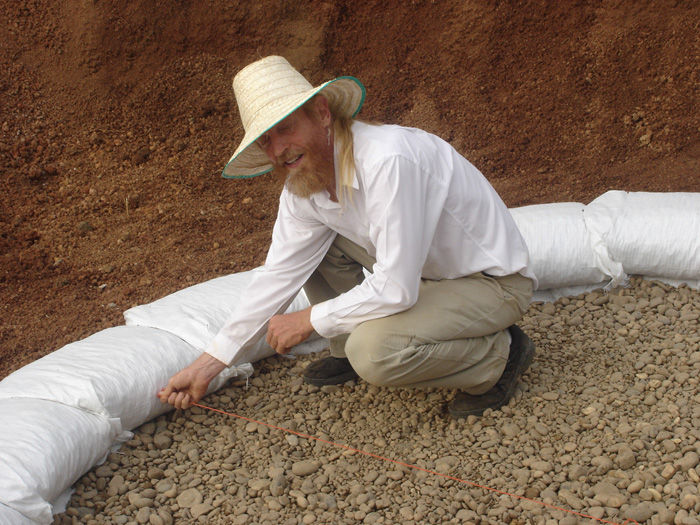
Step 2 – Earthbag Foundation…

This includes poly bags, double-bagged for strength, filled with gravel to prevent wicking moisture into upper courses. The bags sit directly on the rubble trench. Build the buttresses at the same time, in the same way. After the two gravel bag courses are finished, add soil around the sides of the dome and tamp solid to prevent the bags from moving.
Step 3 – Measure The Radius…
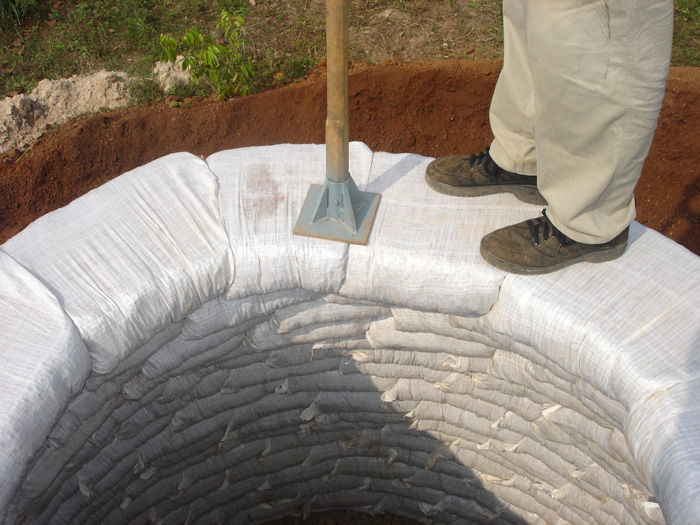
Use the string line on the center stake to measure the radius. Move the string to make sure each bag is the same distance from the center point. This creates a perfect circle. Repeat this step for every course except the very highest ones. By that point, the circles become so small that you can just eyeball them. Note: the string line on the center stake is lengthened to measure each course. Just make sure it remains a constant length for each entire course. (You could use temporary knots or pinch the string between your fingers.)
Step 4 – Level Each Course…
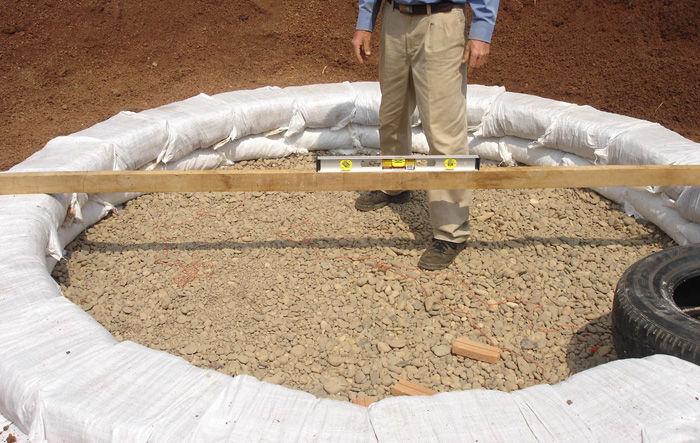
Check each course for level after tamping. For small domes like this one, a straight 2×4 works great. Put the level on the 2×4 and gradually move it around over the center stake to check each bag. We fill each bag with the same number of buckets so the walls are almost self-leveling. Also, we’re careful to use the same technique for each bag.
Step 5 – Moisten The Soil…
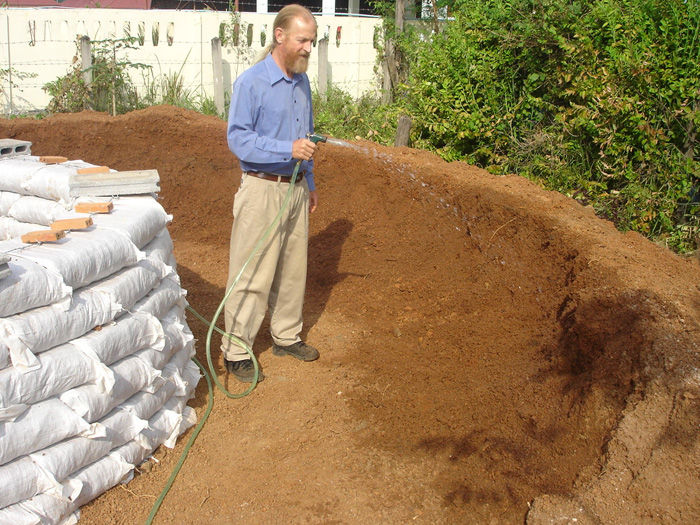
You’re almost ready to start laying soil-filled earthbags. The soil in the earthbags needs to be slightly moist – just enough to pack densely into the bags. Use a garden hose to mist the soil. Test the moisture content by making a ball in your hand. If it looks wet or if water oozes out of the bags, then there’s too much water.
You’ll soon recognize the proper moisture content. Also, note how the soil in the photo below has been distributed around the dome to minimize labor. Each bucket load is only moved a few steps. The reddish soil is called road base. It’s the same material used to build roads in many parts of the world, and is ideal for earthbag.
Step 6 – First Course Of Soil Filled Earthbags…
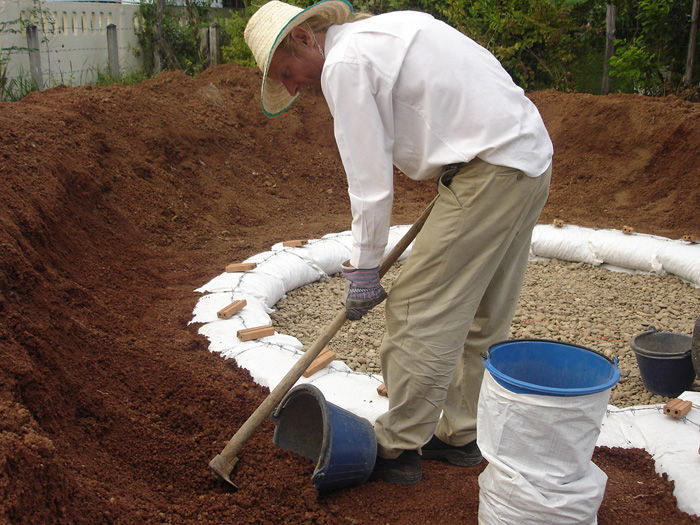
Now that you’re above the level where moisture can cause problems, you can start filling bags with soil. We use 2-gallon buckets to fill bags. The easiest way to fill buckets is with a sturdy hoe that’s made for digging. We use a grape hoe to pull the soil into the buckets. And with just a flick of the tool, the bucket is pulled upright.
Step 7 – Tamping…

Tamp each course solid, starting with the high spots. Keep the tamper moving so you don’t create low spots. The first pass doesn’t require much force. After you’ve gone around once, you can start tamping more vigorously. Final tamping is usually done with more force. You’ll hear a change in pitch as the earthbags become solid.
Step 8 – Door Anchors…
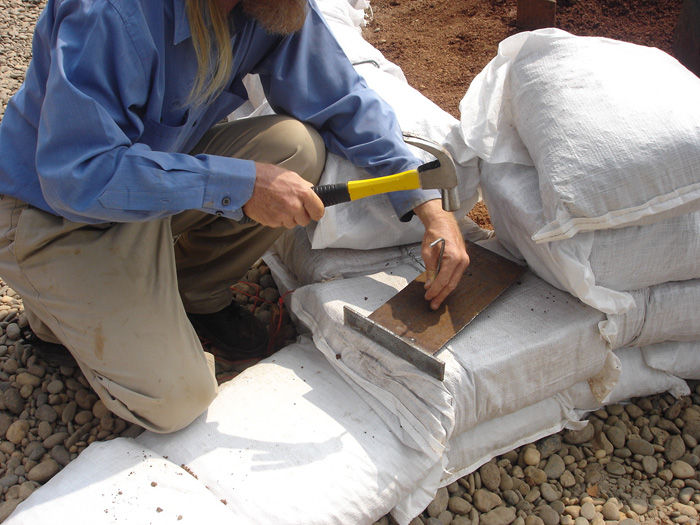
There are various ways of attaching door and window bucks. On this dome we made six anchors with small pieces of steel welded together in a T-shape. Drill holes in the anchors and pin to the earthbags as shown with ¼” steel rod. Distribute the anchors, three per side, so there are two near the bottom, two in the center and two near the top of the arched door opening. A steel door buck was welded to these anchors after the dome was built.
Step 9 – Barbed Wire…
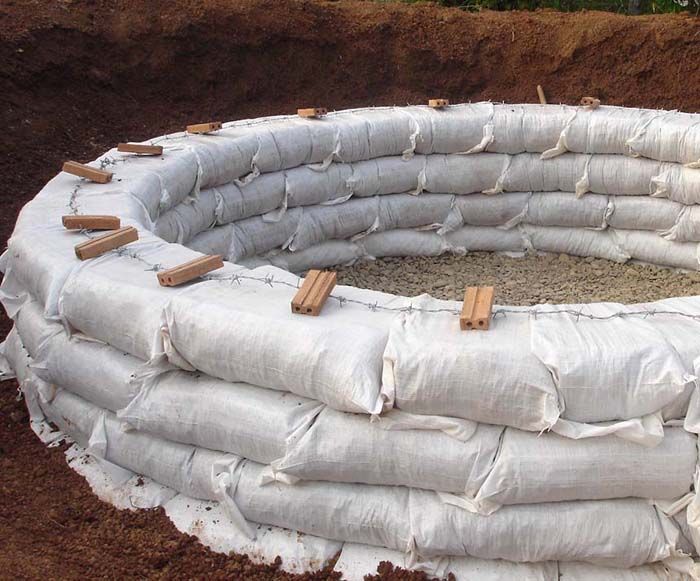
Remember to always use 4-point barbed wire between courses. We used one strand on this dome due to its small size. Use two strands of barbed wire between every course for domes larger than this one.
Step 10 – Angle Ends Of Bags Towards The Center…
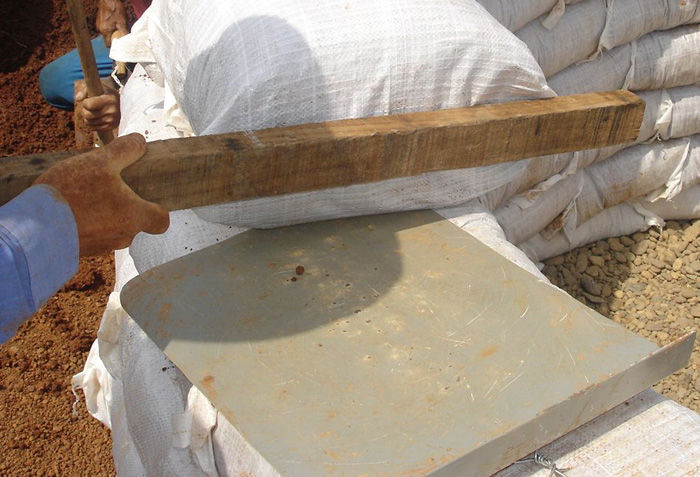
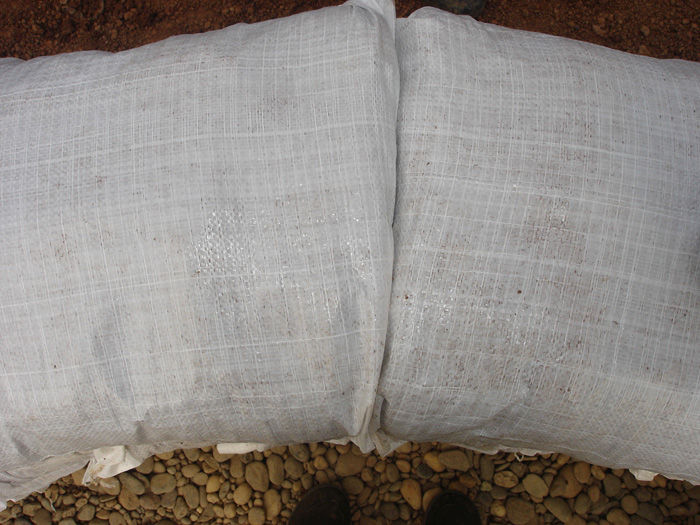
On straight earthbag walls, you can just butt the bags against each other. But for roundhouses and domes, you need to align the bag ends to the center point so the bags sit tightly against each other. Hit the bottom of each bag with a board until it aligns with the center of the dome.
The second photo shows how the bag joints appear looking from above. (They look like mitered joints.) Repeat this process throughout the dome. At the top, the process becomes more pronounced as the radius decreases.
Step 11 – Building The Arch…

You need a way to support the bags as you build the arch over the door. You could build an elaborate wood and plywood form. This might be worthwhile if you’re building lots of arches the same size. But this dome has just one arch, so we lashed two used tires together for the form.
Build some supports on each side of the door opening to hold the tires at the correct height. Add some horizontal blocking to hold everything together, but leave enough space in the middle to squeeze through and for the string line that will determine your dome curvature. Note: you could temporarily fill the space with adobes, bricks, etc. and remove them later, but then you lose access to the dome and can’t use the string line.
It looks really complicated to build an arch, but it’s not. Make tapered earthbags about 12” high. Make sure you use the right soil mix that will withstand high pressure. Compact the bags from the sides and top as much as possible. The taper aligns with the center point of your form (the center of the tires in this case). You could use a string line for this or just eyeball it like I did.
Step 12 – Building The Eyebrow…
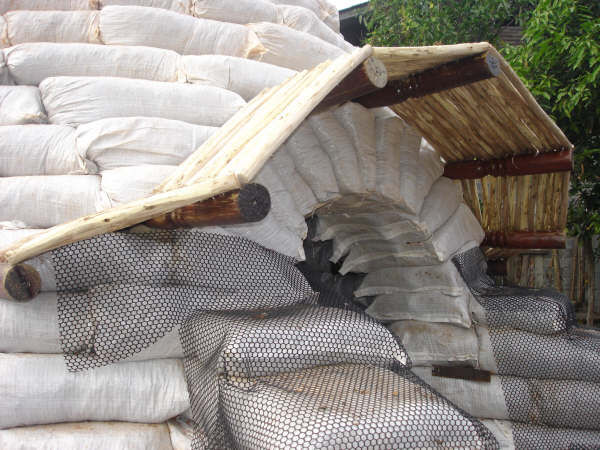
It’s a good idea to include a protected overhang above entry doors to protect the door and shelter people going in and out. This eyebrow or overhang is made with hardwood table legs embedded between bags. Then short pieces of insect resistant eucalyptus wood were nailed to the table legs and covered with 6 mil plastic sheeting. The wood was varnished with polyurethane for greater durability. (The table legs were varnished in advance.)
Step 13 – Buttresses…
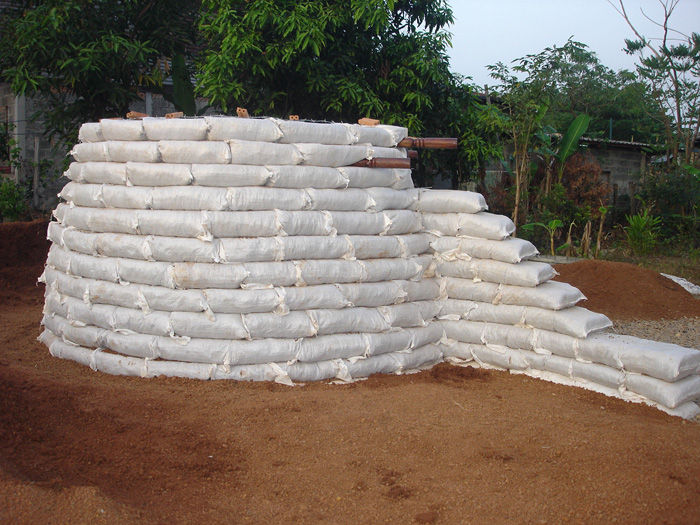
Continue building the buttress at the same time as the dome. The bags and barbed wire interlock at every course. We added a few ½” pieces of rebar for added strength where it seemed it would do the most good: down through the top of the bags to help preventing overturning, and where the buttresses connect to the dome. The buttresses are stepped to match the slope of the earth. The steps make it easy to climb on the dome. The lower part makes a nice bench.
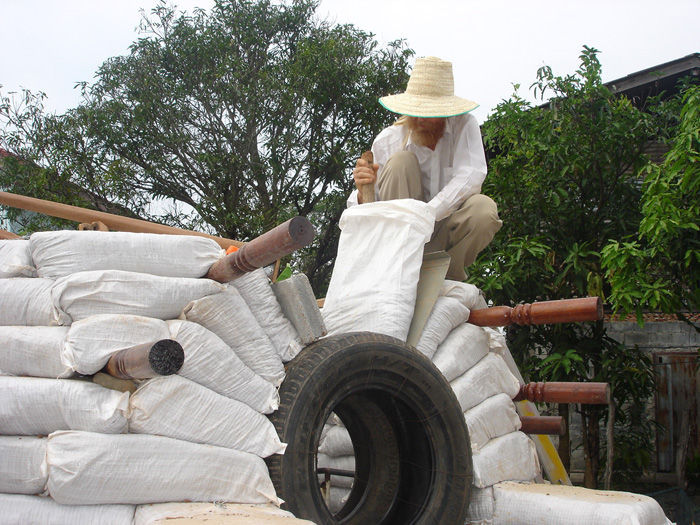
Step 14 – Upper Courses Of Earthbags…
Continue the same process of laying and tamping bags. The corbel (overhang between courses) will increase the higher you go. Use the string lines at every course to arrive at the desired shape. Make sure each bag is angled toward the center point and tightly butted to the next bag. (This is what makes the dome really strong.)
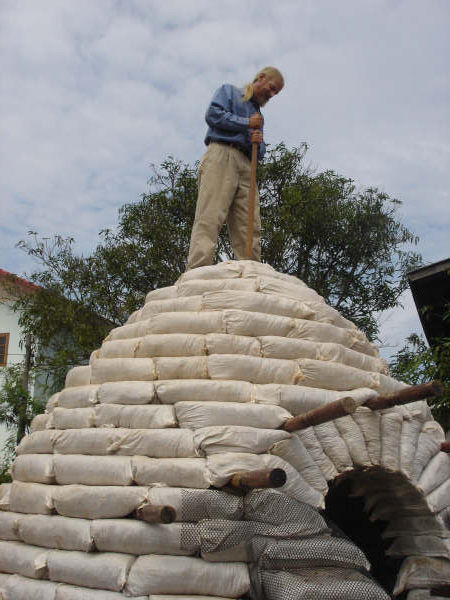
The photo shows the view from above. You’ll get to a point where there’s almost nothing under your feet. It’s a strange sensation to say the least. Don’t step on the inner edge of the corbel or the bag could tilt loose. Be extra careful working higher on the dome. You’ll be working around barbed wire, tools laying on the wall, etc. Watch your step. Don’t get in a rush. Take lots of breaks and drink plenty of water.
The second photo shows the last bag being put in place with a great feeling of accomplishment. The last bag looks like a mushroom cap.
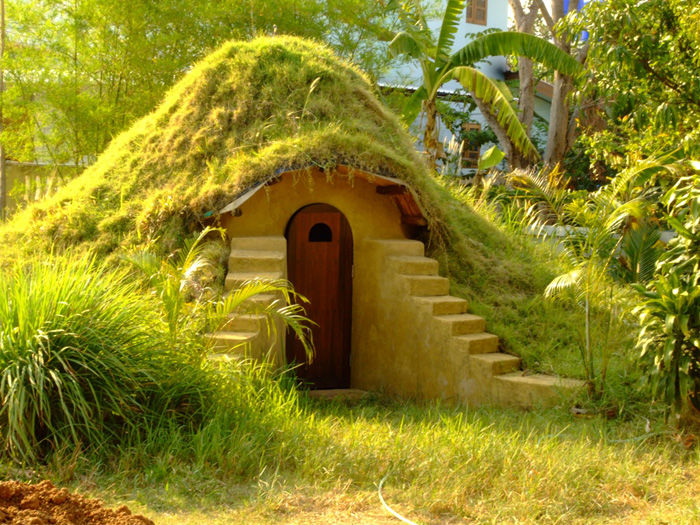
Step 15 – Living Roof…
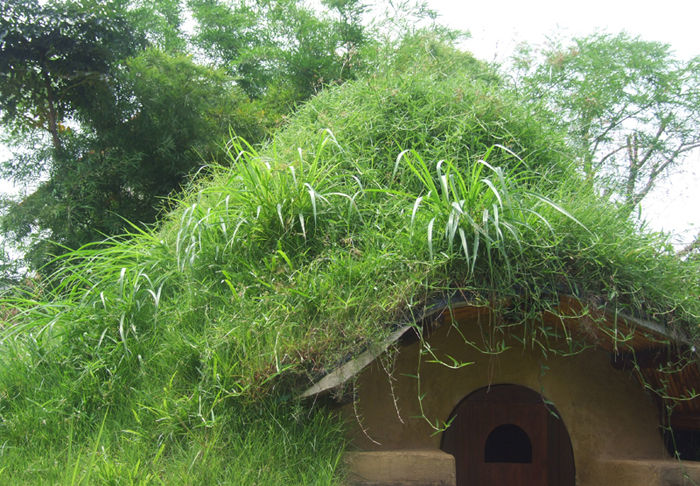
The easiest method of finishing the dome is plaster. We live in a rainy climate where a plastered dome might leak. Plus, we wanted a beautiful plant covered dome in our backyard. Living roofs require a lot of regular maintenance just like gardening, so think long and hard before going this route.
Without regular watering, weeding and fertilizer the living roof will turn into a giant weed patch, die or maybe even erode away. We’ve worked hard to establish really healthy grass, as you can see in the photo.
The main steps for the living roof include adding two or three layers of 6 mil plastic sheeting (“black poly”). I put one layer directly against the dome and back side of the buttresses. Then I backfilled with earth (more road base) about half way up and added another layer of plastic. I added a third layer of plastic on the top of the dome where the risk of water penetration is greatest.
Work carefully and try not to puncture the plastic. Gradually add soil on top of the plastic starting at the bottom and working up. Compact it slightly as you go. I used ‘field dirt’ – soil from rice fields for this step. It has enough clay to stay in place, but still enable grass to grow.
Add drought resistant sod once the dome is covered in a layer of soil. Some pieces of sod require bamboo pins to keep from slipping. Time the project so the sod gets started during the rainy season. We have a lawn sprinkler on top of the dome and water it whenever it gets dry.
Step 16 – Plastering…
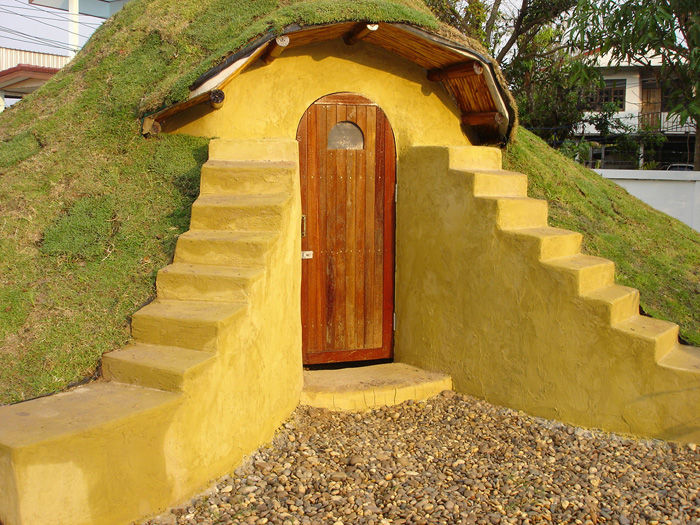
The outside (front area only) is plastered with cement plaster with yellow iron oxide pigment. All edges are rounded slightly to soften the look. Plaster mesh isn’t typically needed on earthbags, but we used plastic plaster mesh in this application due to the buttresses being exposed to the elements. Plastic mesh won’t rust. We never plastered the inside since our dome is used as a tool shed. This allows people to come and see how the dome was built.
Step 17 – Conclusion…
Domes are the strongest form in nature and easily support enormous forces. We added about 20 truck loads of soil on the dome without it moving one bit. I’m confident another 100 truck loads could be put directly on top and it wouldn’t make any difference, because the dome is all in compression, and tamped earth (road base in our case) can support very high loads.
So if you want to build underground, domes are a good way to go – that or roundhouses. Both gain their strength from the circle: forces (loads) are transferred directly to the ground. There are no components to fail as in post and beam or wood frame walls.
Domes have lots of other advantages. They create the most floor space for a given length of wall. There are no wasted corners. The feeling inside is magical. Those who live in domes (and roundhouses) most likely never live in boxes again. Wind flows around domes and does not build up pressure against them.
You can build domes without wood. You can build domes with minimal tools and materials – no nails, no wood, no plywood, no shingles. This makes domes a good candidate for those who lack carpentry skills and for emergency shelters for disaster areas and war refugees. Give people some rice or grain bags and a little training, and soon they can build their own sturdy, safe shelters.
But no building system is perfect for all climates and situations. For instance, domes are not culturally accepted in some areas. Domes evolved in desert regions where wood was scarce, and are not the best choice in rainy climates. They’re exposed to the elements and vulnerable to leaks.
It’s difficult to get a perfect plaster job that doesn’t leak. A leak could soften the soil and cause the dome to collapse, so the fill soil has to be stabilized, which adds to the labor and expense. For this reason we typically advise against domes in rainy climates, but this is not to say it can’t be done. There’s a dome in Koh Phangan, Thailand where it rains almost constantly for months at a time, and it hasn’t leaked yet.
It was built by Phangan Earthworks with expert plasterer’s. However, few people can match this skill level, even those who do plaster work for a living. Plastered domes are particularly risky where there are freeze/thaw cycles. Water will get into every little crack (plaster always has small cracks) and burst the plaster when it freezes. That’s how nature turns mountains of stone into sand and gravel…
So the choice is yours. Domes are enormously popular among earthbag builders. If you live in a rainy climate, you could build a dome with a living roof like we did. We’ve had no leaks so far (via Instructables).
If you like this idea, be sure to share it with your friends and inspire someone you know. Anything becomes possible with just a little inspiration…
