How To Become More Self-Sufficient Without Starting a Full-Blown Farm…
Want to start preserving your harvest, making your own soap, or building a backyard root cellar — but not sure where to begin? “Homesteading Advice” gives you instant lifetime access to 35+ practical homesteading books on food preservation, veggie gardening, DIY natural cleaning products (save over $250 per year with this skill alone), brewing, off-grid energy, and a whole lot more…
Click Here To Check It Out Now!
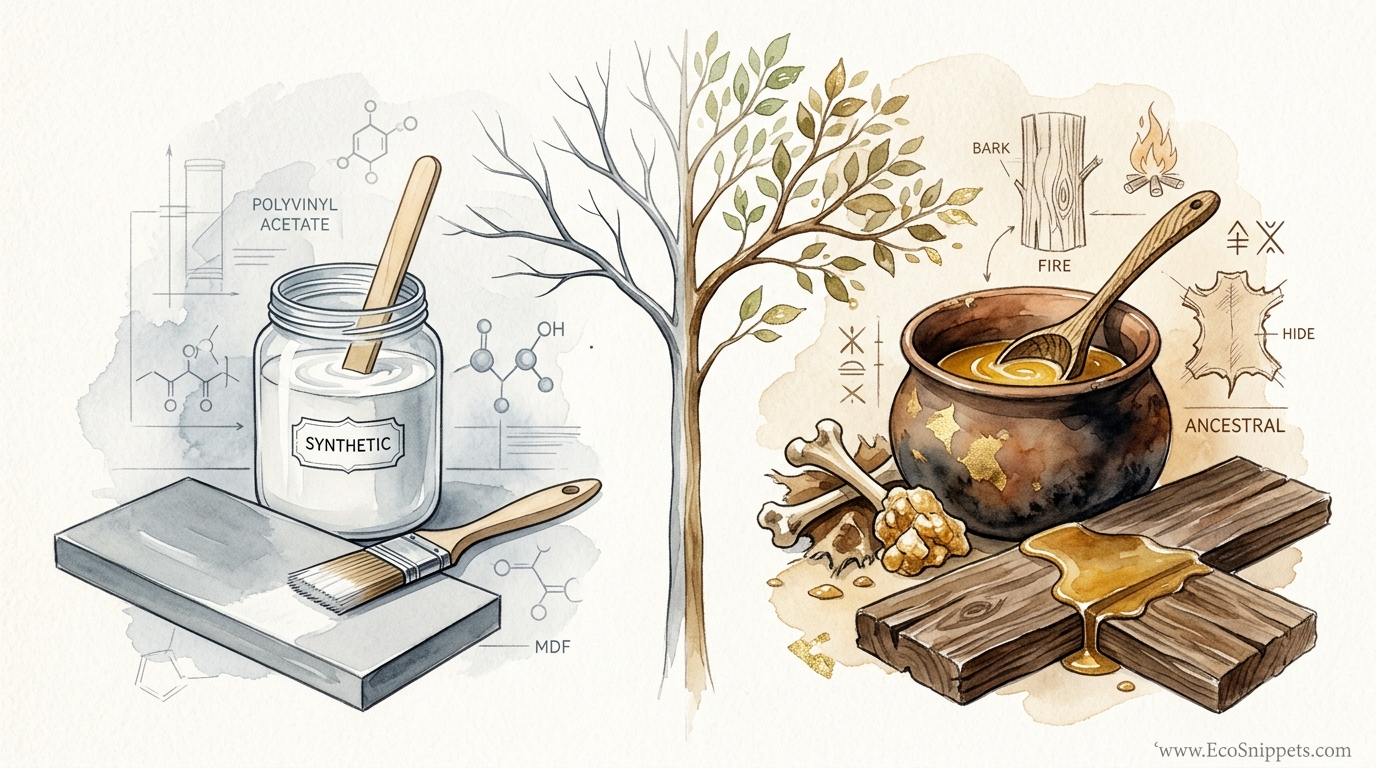
Your ancestors built furniture that lasted 200 years using a ingredient sitting in your fridge right now. Modern super glues are toxic, brittle, and create a permanent mess. Casein glue—made from simple milk—has been holding the world together for centuries and is actually stronger than the wood itself once it cures.
Walking into a modern hardware store, you are met with rows of plastic bottles filled with synthetic polymers. These adhesives work, but they come with a cost to your health and the environment. Most are based on petroleum and release volatile organic compounds (VOCs) that linger in your workshop for days. If you make a mistake, you often have to sand away the wood itself to fix the bond.
Our predecessors did not have this problem. They looked to the natural world for solutions that were both permanent and reversible when necessary. Casein glue is one of those “lost” technologies that is seeing a resurgence among woodworkers who value self-reliance and non-toxic materials. It is a structural adhesive that was used to build everything from Egyptian sarcophagi to the wooden frames of early 20th-century aircraft.
Working with milk-based glue connects you to a lineage of craftsmanship that predates the industrial revolution. It is a process that feels more like alchemy than construction. You take a liquid meant for nourishment and, through a simple chemical shift, transform it into a rock-hard binder that resists moisture and stands the test of time.
This guide will show you how to harness the power of milk proteins to create a professional-grade adhesive in your own kitchen. Whether you are repairing a family heirloom or building a new table from scratch, this method provides a level of strength and satisfaction that synthetic glues simply cannot match.
Natural Wood Glue Recipe DIY Tutorial
Casein glue is a natural adhesive derived from the protein found in cow’s milk. Approximately 80% of the protein in milk is casein, and it is this specific substance that provides the incredible bonding power. In real-world terms, casein is the same stuff that makes cheese solid, but when treated with an alkaline substance, it becomes a viscous, high-performance glue.
Historically, this glue was the gold standard for high-stress applications. Before the advent of synthetic resins, it was used extensively in the production of plywood and the assembly of wooden airframes during World War I and World War II. If it was strong enough to hold the wings of a de Havilland Albatross together in the rain, it is more than strong enough for your dining room chairs.
The reason this recipe exists is simple: it is a high-strength, food-safe, and biodegradable alternative to modern PVA (polyvinyl acetate) glues. It is particularly useful in “green” woodworking or when creating items that will come into contact with food, such as cutting boards or wooden bowls. Unlike hide glue, which requires constant heating, casein glue can be used cold, making it much more versatile for complex assemblies.
Think of casein glue as a “living” material. It enters the wood fibers as a liquid, then cross-links its protein chains as it dries, effectively becoming part of the wood’s cellular structure. This creates a bond that is often stronger than the surrounding wood fibers themselves. If the joint is ever stressed to the point of failure, the wood will typically splinter before the glue line gives way.
How Casein Glue Works: The Chemistry of the Curd
Understanding the process requires looking at milk at a microscopic level. Milk is an emulsion of fat, water, and proteins. These proteins exist as tiny spheres called micelles. To make glue, we must first isolate these proteins and then “unfold” them so they can grab onto the wood fibers.
The first step is acidification. When you add an acid—like vinegar or lemon juice—to warm milk, it changes the electrical charge of the casein micelles. They stop repelling each other and start clumping together, forming what we know as curds. The liquid left behind is the whey, which contains the water and sugars.
Once you have isolated the curds, they are essentially raw protein. However, in this state, they are not sticky; they are just cheese. To turn them into glue, you must add an alkali, such as baking soda or hydrated lime. This alkali “digests” the protein, breaking down the clumps into a smooth, syrupy liquid.
The choice of alkali determines the final properties of your glue. Using baking soda (sodium bicarbonate) creates sodium caseinate. This is a very strong glue but is not particularly water-resistant. If you use hydrated lime (calcium hydroxide), you create calcium caseinate. This version undergoes a chemical change as it dries that makes it virtually insoluble in water, providing a level of moisture resistance that was prized by early aircraft manufacturers.
Benefits of Using Milk-Based Adhesives
Choosing an ancestral adhesive over a synthetic one offers several practical advantages that go beyond mere nostalgia. The most immediate benefit is safety. You can prepare this glue in your kitchen using the same pots you use for dinner. There are no toxic fumes, no need for gloves, and no risk of chemical burns.
The bond strength is another major factor. In shear strength tests, casein glue frequently exceeds 2.76 MPa (400 pounds per square inch). For most woodworking projects, this is far beyond the structural requirement. Because it cures to a very hard, glass-like state, it does not “creep” over time. Creep is a common issue with modern yellow glues where the joint can slowly shift under constant pressure.
Environmental impact is a significant consideration for the modern craftsman. Synthetic glues are a nightmare for the planet, both in their production and their disposal. Casein glue is fully biodegradable. If you have leftover glue, you can safely put it in your compost pile. Furthermore, because it is made from a renewable resource—milk—it has a much lower carbon footprint than petroleum-based alternatives.
Visual aesthetics also play a role. Many synthetic glues leave a “plastic” look on the wood or interfere with stains and finishes. Casein glue is largely transparent when applied in thin layers and accepts traditional finishes like shellac, wax, or oil beautifully. It does not “seal” the wood in the same way plastic glues do, allowing for a more uniform finish across the joint.
Step-by-Step DIY Casein Glue Recipe
This tutorial covers two versions: the “Home Shop” version for general furniture and the “Pro Shop” version for maximum water resistance. Both start with the same basic preparation.
Step 1: Ingredients and Tools
For the base, you will need 1 liter (about 1 quart) of skim milk. It is vital to use skim milk; fat is the enemy of a good glue bond. You will also need 60 ml (1/4 cup) of white vinegar or lemon juice. For the alkali, have either 15 grams (1 tablespoon) of baking soda or 20 grams of hydrated lime ready.
Step 2: Isolate the Casein
Pour the milk into a stainless steel or glass saucepan. Heat it slowly to approximately 50°C to 60°C (122°F to 140°F). Do not let it boil. Once warm, stir in the vinegar slowly. You will see the milk instantly separate into white clumps (curds) and a yellowish liquid (whey). Stir for a minute to ensure the reaction is complete.
Step 3: Strain and Wash
Line a strainer with cheesecloth or a clean cotton towel. Pour the mixture through the strainer. Let the whey drain away completely. While the curds are still in the cloth, rinse them under cold running water. This “washes” away the excess acid and residual sugars, which is crucial for a strong, clean bond. Squeeze the cloth to remove as much moisture as possible.
Step 4: The Transformation
Place the damp curds into a small bowl. If you are making the “Home Shop” version, sprinkle the baking soda over the curds. Add 15 ml (1 tablespoon) of warm water. Stir vigorously. You will notice the mixture begin to foam and bubble as the CO2 is released. Keep stirring until the lumps disappear and you are left with a smooth, honey-like consistency.
Step 5: The “Pro” Upgrade (Optional)
If you need water resistance, use hydrated lime instead of baking soda. Mix the lime with a small amount of water to form a paste first, then stir it into the curds. This version will thicken much faster, so be ready to use it immediately.
Challenges and Common Mistakes
The most common mistake beginners make is using whole milk or 2% milk. The fat (lipids) in higher-fat milk acts as a lubricant at a molecular level. While the glue may seem to hold initially, the bond will eventually fail because the fat prevents the protein chains from fully interlocking with the wood fibers. Always stick to the leanest skim milk available.
Temperature control is another pitfall. If you overheat the milk during the curdling phase (letting it boil), you can “denature” the proteins too much, resulting in a rubbery curd that won’t dissolve properly into a smooth glue. Aim for that “hot bath” temperature where it is uncomfortable but not scalding to the touch.
Working time, or “pot life,” is the third challenge. Unlike a bottle of Titebond that lasts for years, homemade casein glue has a very short shelf life. The version made with baking soda may last a few days in the refrigerator, but the lime-based version will often gel into an unusable mass within a few hours. Only mix what you intend to use for that specific session.
Cleanliness is paramount. Because this is a protein-based product, it is susceptible to bacterial growth. If your tools or the wood surfaces are dirty, you are essentially providing a buffet for mold. Always wash your curds thoroughly and ensure your wood is free of dust and oils before application.
Limitations and When This May Not Be Ideal
While casein glue is incredibly strong, it is not a “magic bullet” for every situation. One of its main constraints is its rigidity. Because it cures to a hard, crystalline state, it does not handle extreme wood movement as well as hide glue. On very large panels that expand and contract significantly with the seasons, a more flexible adhesive might be preferable.
Another limitation is the staining of certain woods. Because casein glue is alkaline, it can react with the tannins in woods like oak, cherry, or walnut. This can leave a dark, permanent stain along the glue line. If you are working with high-tannin woods, it is wise to do a test piece first. You can mitigate this by being very precise with your application and wiping away squeeze-out immediately with a damp cloth.
Environmental constraints also play a role. Casein glue should not be used for items that will be permanently submerged in water or left in extremely high-humidity environments (like a steam room). While the lime-based version is “water-resistant,” it is not truly “waterproof” in the modern industrial sense. Over years of constant dampness, microorganisms can eventually break down the protein bond.
Finally, consider the assembly time. Casein glue “grabs” fairly quickly once it is applied. If you are doing a very complex glue-up with dozens of mortise and tenon joints, you may find the glue beginning to set before you can get the clamps on. For those scenarios, a slower-setting synthetic glue or a warm hide glue might be more forgiving.
Comparison: Casein vs. Hide Glue vs. PVA
| Feature | Casein Glue (Milk) | Hide Glue (Animal) | PVA Glue (Modern White) |
|---|---|---|---|
| Toxicity | Non-toxic / Food safe | Non-toxic | Varies (usually contains VOCs) |
| Water Resistance | High (with lime) | Very Low | High (Type II/III) |
| Reversibility | Low (difficult to reverse) | Very High (heat/steam) | Low (mechanical only) |
| Creep Resistance | Excellent | Excellent | Poor to Fair |
| Cost | Very Low (DIY) | Moderate | Moderate |
Practical Tips for Best Results
To get the most out of your homemade glue, proper surface preparation is vital. Unlike some gap-filling epoxies, casein glue works best on tight-fitting joints. The surfaces should be freshly planed or sanded to around 120 grit. If the wood is too smooth (higher grits), the glue may not be able to “bite” into the fibers as effectively.
Applying the glue requires a stiff-bristled brush. You want to work the adhesive into the pores of the wood. For end-grain joints, which are notoriously difficult to bond, apply a “sizing” coat first. This is simply a thinned-down version of the glue (add a bit more water) that you apply and let dry for 10 minutes. This seals the thirsty end-grain so it doesn’t soak up all the glue from the final joint.
Clamping pressure should be firm and even. Because casein glue contains water, it will cause the wood fibers to swell slightly at first. This is actually a benefit as it helps “lock” the joint together, but it means you must keep the clamps on for at least 4 to 6 hours for a standard bond, and 24 hours for full structural strength. In cooler workshops (below 15°C / 60°F), extend these times.
If you are concerned about mold, especially in humid climates, you can add a few drops of clove oil or wintergreen oil to the mix. These act as natural fungicides and will extend the pot life of the glue slightly. Historically, woodworkers even added a tiny amount of copper sulfate (bluestone) to create a more rot-resistant bond for outdoor items.
Advanced Considerations for Serious Practitioners
For those who want to take their natural adhesives to the next level, the ratio of lime to casein is the most important variable to master. A high-lime content increases water resistance but makes the glue more brittle and shortens the working time. A lower lime content (or using borax instead) creates a more flexible, longer-lasting glue that is easier to apply but less resistant to moisture.
You can also experiment with “dry mix” versions. Historically, casein was dried and ground into a fine powder. This powder was then mixed with dry hydrated lime. When the woodworker needed glue, they simply added water to the dry mix. This is how industrial casein glue was sold for decades. If you have a food dehydrator, you can dry your washed curds and grind them in a coffee mill to create your own shelf-stable glue powder.
Another advanced technique involves the use of “glycerin” as a plasticizer. If you find that your glue is too brittle for a specific application—such as bonding thin veneers—adding about 5% glycerin by weight can give the cured glue a slight amount of flexibility. This helps prevent the “checking” or cracking that can sometimes occur in large veneered surfaces as the wood moves.
Finally, consider the “open time” adjustments. In a hot, dry workshop, the glue can skin over quickly. You can extend the open time by lightly misting the wood surfaces with water before applying the glue. This prevents the wood from sucking the moisture out of the glue too fast, giving you more time to align your joinery.
Real-World Examples and Scenarios
The Heritage Chair Repair: Imagine a 19th-century spindle chair that has developed a wobble. Using a modern polyurethane glue would be a mistake because it expands and can make future repairs impossible. By using a baking soda-based casein glue, you can inject a non-toxic, high-strength binder into the socket. It will bond to the old wood fibers and create a rock-solid joint that honors the chair’s history.
The Food-Safe Serving Board: You are crafting a charcuterie board from maple and cherry. Using a chemical-heavy synthetic glue feels wrong for a surface that will hold cheese and crackers. A casein glue made with skim milk and baking soda provides a completely food-safe bond. Even if a tiny amount of glue is exposed at the joint, it is nothing more than milk protein and minerals.
The Lightweight Plywood Project: You are building a small boat or a lightweight camping box where moisture resistance is key. By using the hydrated lime version of the recipe, you can create a laminate that resists delamination even when exposed to splashes or high humidity. This mimics the historical aircraft-grade glues that paved the way for modern aviation.
Final Thoughts
Mastering the art of casein glue is a significant step toward a more self-reliant and sustainable workshop. It proves that we do not always need complex, industrial chemicals to achieve professional results. The ingredients you need have been available to craftsmen for millennia, and they remain just as effective today as they were in the time of the pharaohs.
As you experiment with these recipes, you will begin to develop a “feel” for the material—the way it changes from a simple curd to a silky adhesive, and the way it grips the wood as you tighten your clamps. This tactile connection to your materials is something that is often lost in the world of pre-packaged, synthetic solutions.
Do not be afraid to fail on your first few attempts. Every batch of milk and every environment is slightly different. Start with small projects, test your bonds to destruction, and observe how the glue reacts to the specific woods you use. By reclaiming this ancestral knowledge, you are ensuring that the furniture you build today will be around for your descendants to admire 200 years from now.
