
How To Become More Self-Sufficient Without Starting a Full-Blown Farm…
Want to start preserving your harvest, making your own soap, or building a backyard root cellar — but not sure where to begin? “Homesteading Advice” gives you instant lifetime access to 35+ practical homesteading books on food preservation, veggie gardening, DIY natural cleaning products (save over $250 per year with this skill alone), brewing, off-grid energy, and a whole lot more…
Click Here To Check It Out Now!
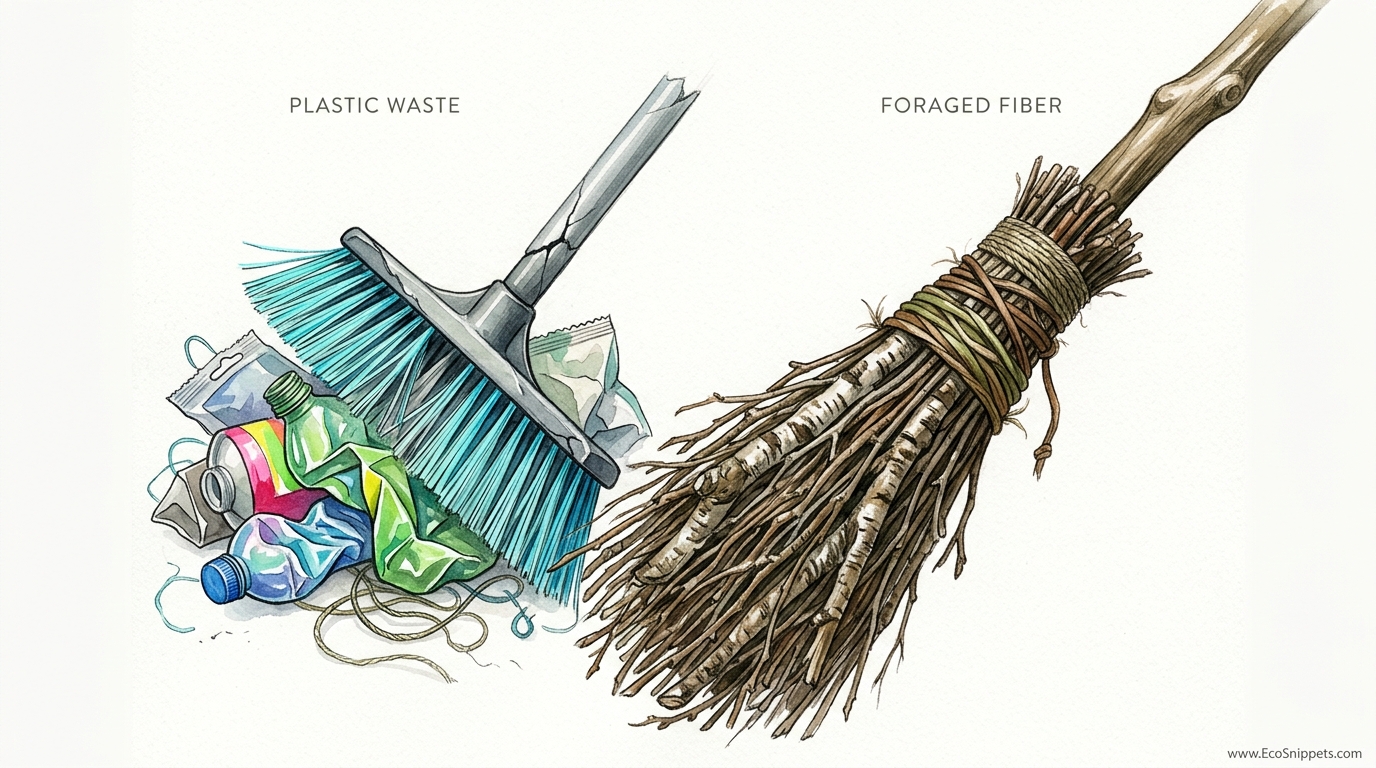
Stop buying plastic tools that snap in a season when the forest is growing a lifetime of sweeping power for free. Every year, millions of plastic brooms end up in landfills because their synthetic bristles lose their shape. Our ancestors didn’t have this problem. They spent a morning in the woods and walked out with a tool that cleans better, lasts longer, and returns to the earth when it’s finished. Here is how to craft your own foraged birch broom.
The traditional birch broom, often called a besom, is more than a rustic relic of folklore. It is a highly engineered piece of primitive technology designed to move debris across uneven surfaces with a level of efficiency that modern plastic simply cannot match. While a store-bought broom relies on stiff, uniform bristles that flick dust into the air, the varied texture of foraged birch twigs creates a “velvet” sweeping action that traps fine particles while remaining tough enough to move heavy wet leaves or gravel.
Embracing this craft means reconnecting with the seasonal rhythms of your local landscape. It requires a shift in perspective, viewing the “waste” of a forest floor or the trimmings of a garden as valuable raw material. You are not just making a cleaning tool; you are participating in a lineage of “broom-squires” who have managed woodlands and maintained clean hearths for centuries.
How To Make A Traditional Birch Broom
A traditional birch broom is a “besom,” a term derived from the Old English besma, meaning a bundle of twigs. It consists of a central wooden handle, known as a stail or stave, and a brush head made from a dense bundle of birch “spray.” Unlike modern brooms where the bristles are glued into a plastic block, a besom is held together by tension. The handle is driven into the center of the twig bundle, expanding it from the inside out to create a rock-solid mechanical bond.
These tools have been the standard for outdoor and industrial cleaning for over a thousand years. In the 18th and 19th centuries, broom-squires lived in the heathlands of Europe, harvesting birch and heather to supply cities with the millions of brooms needed to sweep streets, stables, and even early steel mills. Today, the birch broom remains the superior choice for gardens, gravel paths, and workshops because the twigs are naturally flexible and do not snag on rough textures.
The beauty of the birch broom lies in its simplicity and its complete lack of petroleum-based components. When the broom eventually wears down after years of hard labor, the head can be tossed onto a compost pile or into a woodstove, and the handle can be fitted with a fresh bundle of twigs. It is a circular system that requires only hand tools and a little bit of sweat equity.
Essential Terminology for the Aspiring Maker
- The Stail (or Stave): The long wooden handle, usually made from a straight piece of hazel, ash, or lime.
- The Spray: The fine, twiggy growth from the tips of birch branches that forms the “bristles.”
- The Bonds: The rings that hold the twigs together. Traditionally made from split willow withies or hazel, though modern makers often use galvanized wire.
- The Butt: The thick, cut end of the twig bundle where the handle is inserted.
The Seasonal Cycle of Harvesting
Timing is everything when it comes to gathering birch. You cannot simply walk into the woods in mid-summer and expect to make a durable broom. The quality of your tool is determined by the state of the sap within the tree. Professional broom-squires traditionally harvest their birch “spray” between mid-winter and early spring, specifically from December to March in the Northern Hemisphere.
During these colder months, the sap is dormant. Twigs harvested now will be “tough” rather than “brittle.” If you cut birch when the sap is rising or when the tree is in leaf, the twigs will shrink significantly as they dry. This shrinkage causes the binding to loosen, and your broom will literally fall apart during its first use. Furthermore, leaves must be absent to ensure a clean, dense bundle of bristles.
Harvesting is often a byproduct of woodland management. Look for areas where birch is being thinned or find a local landowner who has recently felled trees. The “top-and-lop”—the fine branches at the very crown of the tree—provides the highest quality material. These twigs are long, straight, and have a natural spring that provides the sweeping power you need.
Materials and Tools Required
Making a besom does not require a workshop full of expensive power tools. In fact, the most effective tools for this job are the same ones used centuries ago. You will need a way to cut, a way to shave, and a way to bind.
- Cutting Tool: A sharp pair of loppers or a small hand-saw for harvesting. A billhook is the traditional choice for “processing” the spray.
- Shaving Tool: A drawknife and a shaving horse are ideal for preparing the handle, though a sharp pocketknife or a spoke-shave will work for a single project.
- Measuring Tape: To ensure your handle and head are proportional.
- Binding Material: If you are a purist, you will use willow withies. If you want a broom that is easy to assemble and extremely durable, 2mm (12-gauge) galvanized wire or heavy-duty jute twine is recommended.
- Pliers and Hammers: For tightening wire and securing the handle.
Selecting the Right Wood
Silver Birch (Betula pendula) is the gold standard for broom making because its twigs are exceptionally fine and flexible. Downy Birch (Betula pubescens) is also suitable, though it tends to be slightly more “twiggy” and less straight. For the handle, hazel is preferred for its lightness and strength. A piece of hazel roughly 25mm to 35mm (1 to 1.5 inches) in diameter and 1.2 to 1.5 meters (4 to 5 feet) long makes for a comfortable, balanced tool.
Step-By-Step: Crafting the Broom Head
The construction of the head is where the magic happens. You are transforming a chaotic pile of sticks into a disciplined, functional tool. The secret is in the sorting. You do not just grab a random handful of twigs and tie them up; you must build the head in layers.
1. Sorting the Spray
Spread your harvested birch twigs on a flat surface. You need to sort them into two distinct piles. The first pile should consist of the “rough” material—thicker, slightly knottier twigs. These will form the core of the broom. The second pile should be the “prime” spray—the finest, straightest, and most flexible twigs. These will form the outer layer, providing the “velvet” finish to your sweeping action.
2. Creating the Core
Take a handful of the rougher twigs and align their butt ends. You want a bundle that is roughly 10cm (4 inches) in diameter. Give the bundle a twist to lock the twigs together. This core provides the structural integrity of the broom, preventing the head from flopping over when you apply pressure during a sweep.
3. Wrapping the Outer Layer
Pick up your prime twigs and begin laying them around the core. You are looking for symmetry here. Ensure the fine tips of the outer twigs extend slightly past the tips of the core twigs. This creates a tapered, aerodynamic shape that allows the broom to get into tight corners and under low edges.
4. Applying the Bonds
Once your bundle is about 15cm to 20cm (6 to 8 inches) in diameter, it is time to bind it. If using wire, you will need two or three “bonds.” The first bond should be placed about 15cm (6 inches) from the butt end. The second should be 10cm (4 inches) below the first. Use a pair of pliers to twist the wire as tight as possible. The tension should be so high that you cannot pull an individual twig out of the bundle with your hand.
Fitting the Handle
Inserting the handle is the most satisfying part of the process. This is the moment your bundle of sticks becomes a broom. Unlike modern brooms that use a threaded screw, the besom handle uses a taper-fit. This means the harder you push, the tighter the broom becomes.
Prepare your handle by stripping the bark (if desired) and smoothing it with a drawknife. Use an axe or a large knife to carve a 15cm (6 inch) long taper on one end, bringing it to a blunt point. This pointed end is what will be driven into the brush head.
Stand the twig bundle upright on a firm surface, such as a chopping block. Find the exact center of the butt end and push the tapered handle down into the core. If the bundle was tied tightly enough, you should feel significant resistance. Use a heavy mallet or the back of an axe to drive the handle into the bundle. It should penetrate about 20cm to 25cm (8 to 10 inches) into the head.
To ensure the head never slips off, many makers drill a small hole through the center of the bundle and the handle, then drive a wooden peg or a large nail through the entire assembly. This mechanical lock makes the tool virtually indestructible.
Benefits of Foraged Birch over Plastic
Plastic brooms are cheap because they are a byproduct of the oil industry, but they come with a hidden cost. They are rigid, which means they tend to bounce off hard surfaces rather than gliding over them. Because synthetic bristles are uniform, they often miss fine dust, requiring multiple passes to get a floor truly clean.
Birch twigs are naturally coated in a resinous substance that helps them pick up fine particles. Furthermore, a birch broom is self-sharpening. As you use it, the tips of the twigs wear down, exposing fresh, sharp edges that continue to sweep effectively. A plastic broom, by contrast, simply frays and becomes useless.
From an environmental standpoint, the comparison is stark. A plastic broom releases microplastics into your environment with every stroke. When it breaks, it stays in a landfill for centuries. A birch broom is a carbon-neutral tool. It grows from the earth, serves a purpose, and then returns to the soil as organic matter. There is a profound satisfaction in knowing that your cleaning routine is not contributing to the global waste crisis.
Challenges and Common Mistakes
The most frequent error for beginners is using “green” wood that hasn’t been seasoned. Even if you harvest in winter, the twigs still contain a significant amount of moisture. Traditional makers often cut their birch and let it “weather” in stacks for 6 to 12 months before making the brooms. This allows the wood to stabilize. If you must use fresh wood, be prepared to tighten your bonds after a few weeks as the wood shrinks.
Another common mistake is making the head too large. A massive broom might look impressive, but it is heavy and tiring to use. A diameter of 15cm (6 inches) at the bond is the “sweet spot” for a domestic broom. It provides enough surface area for efficient sweeping without being cumbersome.
Finally, avoid “crossing” the twigs. When you assemble the bundle, all the twigs should run parallel to each other. If they are crossed or tangled inside the core, the handle will not drive in straight, and the broom will have a lopsided, ineffective sweep.
Limitations and Trade-offs
While the birch broom is a masterpiece of design, it is not a universal tool. It is an “aggressive” sweeper. On delicate surfaces like polished hardwood or high-gloss tile, the birch twigs can leave micro-scratches if used with too much pressure. For indoor use on modern flooring, a softer fiber like broomcorn or hog hair is often a better choice.
The besom also requires more maintenance than a plastic tool. It cannot be left standing on its bristles, or they will take a “set” and become permanently curved. You must store your broom by hanging it up or standing it on its handle. Furthermore, birch is a natural material that can rot if left in a damp, unventilated corner for months. It needs to breathe.
Comparison: Traditional Besom vs. Modern Plastic Broom
| Feature | Traditional Birch Besom | Modern Plastic Broom |
|---|---|---|
| Material | Foraged wood/twigs (Renewable) | Petroleum-based plastic (Non-renewable) |
| Cost | Free (if foraged) | $15 – $40 USD |
| Longevity | 2-5 years (Head is replaceable) | 1-2 seasons (Disposable) |
| Cleaning Style | Traps dust, moves heavy debris | Flicks dust, struggles with weight |
| End of Life | Compostable / Firewood | Landfill (Microplastics) |
Practical Tips for Best Results
To get the longest life out of your foraged broom, you should soak the head in a bucket of water for an hour once a month. This keeps the birch twigs hydrated and prevents them from becoming brittle. A hydrated twig will flex and spring back, whereas a bone-dry twig will eventually snap.
When sweeping, use a “pulling” motion rather than a “pushing” motion. The traditional way to use a besom is to stand to the side and draw the broom toward you in a rhythmic, circular arc. This technique uses the natural spring of the twigs to move debris with minimal effort, and it prevents the handle from putting undue stress on your back.
- Trimming the Ends: After you have fitted the handle, use a sharp axe or a pair of garden shears to trim the sweeping end of the broom. A flat, square-cut end is best for patios, while a slightly rounded “fan” shape is better for uneven garden paths.
- The “Witch’s” Secret: If you find the twigs are spreading too much, you can add a third bond halfway down the length of the brush. This creates a stiffer, more controlled tool for heavy-duty tasks like clearing snow or wet mud.
- Handle Comfort: Spend time sanding your handle. A rough handle will cause blisters during a long afternoon of yard work. Apply a light coat of linseed oil to protect the wood without making it slippery.
Advanced Considerations: The Art of the Withe
For those who want to achieve total self-reliance, the use of willow “withes” for binding is the ultimate skill to master. A withe is a long, slender shoot of willow that has been soaked in water until it is as flexible as a leather strap. You wrap the withe around the bundle, tucking the ends back into the twigs to create a bond that is entirely made of wood.
This technique requires a deep understanding of wood tension. As the willow withe dries, it shrinks and tightens its grip on the birch bundle, creating a bond that is actually stronger than wire. This level of craftsmanship requires years to perfect, but it results in a tool that is a work of art, representing a perfect harmony between the maker and the materials provided by the land.
Real-World Scenario: The Gravel Path Challenge
Imagine a long gravel driveway covered in autumn leaves. A standard plastic push-broom will either skate over the top of the leaves or catch on the gravel, flicking stones everywhere. A birch besom, however, is the ideal tool for this scenario. The fine tips of the birch spray reach into the gaps between the stones, lifting the leaves without disturbing the gravel bed.
By using a sweeping arc, a single person can clear a 20-meter (65-foot) path in less than ten minutes. The broom doesn’t clog with wet leaves because the twigs are spaced naturally. Once the job is done, the broom is hung on a peg in the shed, ready for the next season, while the leaves are moved to a compost pile—a perfect, closed-loop system of property maintenance.
Final Thoughts
Learning how to make a traditional birch broom is an act of quiet rebellion against a disposable culture. It is a reminder that the most sophisticated solutions to our daily needs are often found growing right outside our back door. By choosing to forage your own fiber, you are reclaiming a piece of ancestral wisdom that prioritizes durability, efficiency, and environmental stewardship.
This project is an invitation to slow down and observe the world around you. You will begin to notice the straightness of a hazel sapling, the flexibility of a birch branch, and the way the seasons dictate the strength of the wood. These are the skills that build true self-reliance—skills that cannot be bought in a store but must be earned through practice and patience.
Whether you use your besom to sweep a stone hearth, clear a garden path, or simply as a beautiful reminder of your connection to the forest, you have created something of lasting value. Start small, gather your materials this winter, and discover for yourself why the forest has always provided the best tools for a life well-lived.
