How To Become More Self-Sufficient Without Starting a Full-Blown Farm…
Want to start preserving your harvest, making your own soap, or building a backyard root cellar — but not sure where to begin? “Homesteading Advice” gives you instant lifetime access to 35+ practical homesteading books on food preservation, veggie gardening, DIY natural cleaning products (save over $250 per year with this skill alone), brewing, off-grid energy, and a whole lot more…
Click Here To Check It Out Now!
Why 50% of your garlic harvest is likely rotting before you even get to peel it. Braiding and hanging garlic looks beautiful for photos, but it’s the worst way to cure it for long-term storage. To keep your harvest fresh for 12 months, you need professional airflow. A single layer on a screen-bottomed tray ensures the neck dries completely, locking out the rot that destroys tight bundles.
Every grower knows the heartbreak of reaching into a storage bin in mid-winter only to find a handful of dust and shriveled cloves. We pour months of labor into the soil, tending to the crop through frost and spring rains, only to lose the battle in the final weeks. The difference between a bulb that lasts until the next harvest and one that turns to mush by October isn’t just luck; it is a matter of biology and engineering.
Curing is not simply “drying” the garlic. It is the process of allowing the plant’s energy to retreat into the bulb while the outer skins and the neck constrict to create a natural, airtight seal. If moisture is trapped within those skins during this transition, you aren’t curing; you are composting. To achieve the 12-month storage life that our ancestors relied on, we must move beyond the decorative techniques of social media and adopt a professional mindset toward airflow.
How To Cure Garlic For Long Term Storage
Curing garlic is a post-harvest preservation technique designed to remove excess moisture from the outer wrappers and the neck of the bulb. This process creates a protective, papery barrier that prevents dehydration of the cloves and shields them from pathogens. In the real world, curing is the bridge between a fresh, perishable vegetable and a shelf-stable staple that can withstand months of dormancy.
Think of the garlic bulb as a living organism entering a deep sleep. At harvest, the plant is saturated with water—sometimes up to 60% of its total mass. If you store it immediately, that moisture has nowhere to go but into the cloves, leading to mold and decay. By curing the garlic, you are essentially “canning” it in its own skin. This is used everywhere from small homesteads to massive commercial operations in regions like California or Spain, where garlic must be stable enough for global shipping.
For the home grower, successful curing means your hardneck varieties will stay pungent for 4 to 6 months, while your softneck varieties, like Silverskin, can last up to a full year. Without this step, even the finest “Music” or “California White” garlic will begin to sprout or rot within weeks of leaving the soil.
How the Professional Airflow Method Works
The core principle of professional curing is the rapid removal of moisture from the “neck”—the area where the leaves meet the bulb. This is the most vulnerable point for infection. In a professional setup, often referred to as a “slat vent” or tray system, garlic is laid out so that air moves horizontally across the bulbs and vertically through them.
First, the garlic must be moved out of the sun immediately after harvest. While it is tempting to let it dry on the soil, direct sunlight can reach temperatures above 90°F (32°C), which literally “cooks” the bulbs and ruins their flavor. Instead, move them to a shaded, well-ventilated space like a barn, shed, or covered porch.
Place the garlic in a single layer on a screen-bottomed tray or a slatted wooden rack. This ensures that the bottom of the bulb isn’t sitting in its own dampness. Professional growers often use large fans to maintain a constant breeze of about 1 cubic foot of air per minute (cfm) per cubic foot of garlic. This constant movement prevents “pockets” of stagnant, humid air from forming around the neck, which is where Botrytis neck rot typically begins.
Benefits of Professional Slat-Vent and Tray Curing
The primary advantage of this method is the dramatic reduction in storage rot. By ensuring the neck dries fast and tight, you create a “cork” that pathogens cannot penetrate. This is far superior to the traditional bunched hang, where the center of the bundle often remains damp and becomes a breeding ground for mold.
Another benefit is the preservation of the garlic’s essential oils. Slow, controlled curing at temperatures between 70°F and 80°F (21°C to 27°C) allows the flavor to stabilize. If you cure too quickly with excessive heat, the garlic becomes “waxy” and loses its bite. Tray curing offers the perfect middle ground: fast enough to prevent rot, but gentle enough to keep the flavor profile intact.
Finally, this method allows for easier inspection. When garlic is spread out in a single layer, you can quickly spot a bulb that is “leaking” or showing signs of blue mold (Penicillium). Removing one bad apple early can save the entire batch, a task that is nearly impossible once garlic is tightly braided or bundled.
Challenges and Common Mistakes
One of the most frequent errors is washing the garlic after harvest. It seems logical to clean off the mud, but introducing water at this stage is a death sentence. Moisture gets trapped under the outer skins, and no amount of airflow can reach it. Instead, let the mud dry and gently brush it off with your hands or a soft brush after the curing is complete.
Another challenge is the “premature trim.” Many growers are eager to cut the stems and roots immediately to save space. However, the bulb continues to draw energy and moisture from the remaining stem for the first few days of curing. Trimming too early leaves a “wet” wound at the neck, inviting bacteria to enter the heart of the bulb. Wait at least two to three weeks until the neck is straw-like and brittle before you even think about reaching for the shears.
Overcrowding the curing area is also a common pitfall. If you have a bumper crop, the temptation is to stack the garlic deep in crates. This creates a humid microclimate in the center of the pile. Even with a fan, the air will take the path of least resistance around the pile rather than through it. If you lack the space for a single layer, you must significantly increase your fan power to force air through the stack.
Limitations of the Method
Environmental factors are the greatest constraint. In extremely humid climates, such as the coastal South or the maritime Northwest, ambient air may already be at 80% or 90% humidity. In these conditions, a simple tray and a breeze won’t be enough. You may need to incorporate a dehumidifier or a heat source to drop the relative humidity into the ideal 60% to 70% range.
There is also the matter of space. A 50-pound (23 kg) harvest spread in a single layer requires a significant footprint. For urban gardeners or those with limited outbuildings, this can be a logistical hurdle. In such cases, vertical racks or mesh “hammocks” may be used, but they still require aggressive fan support to mimic the professional slat-vent efficiency.
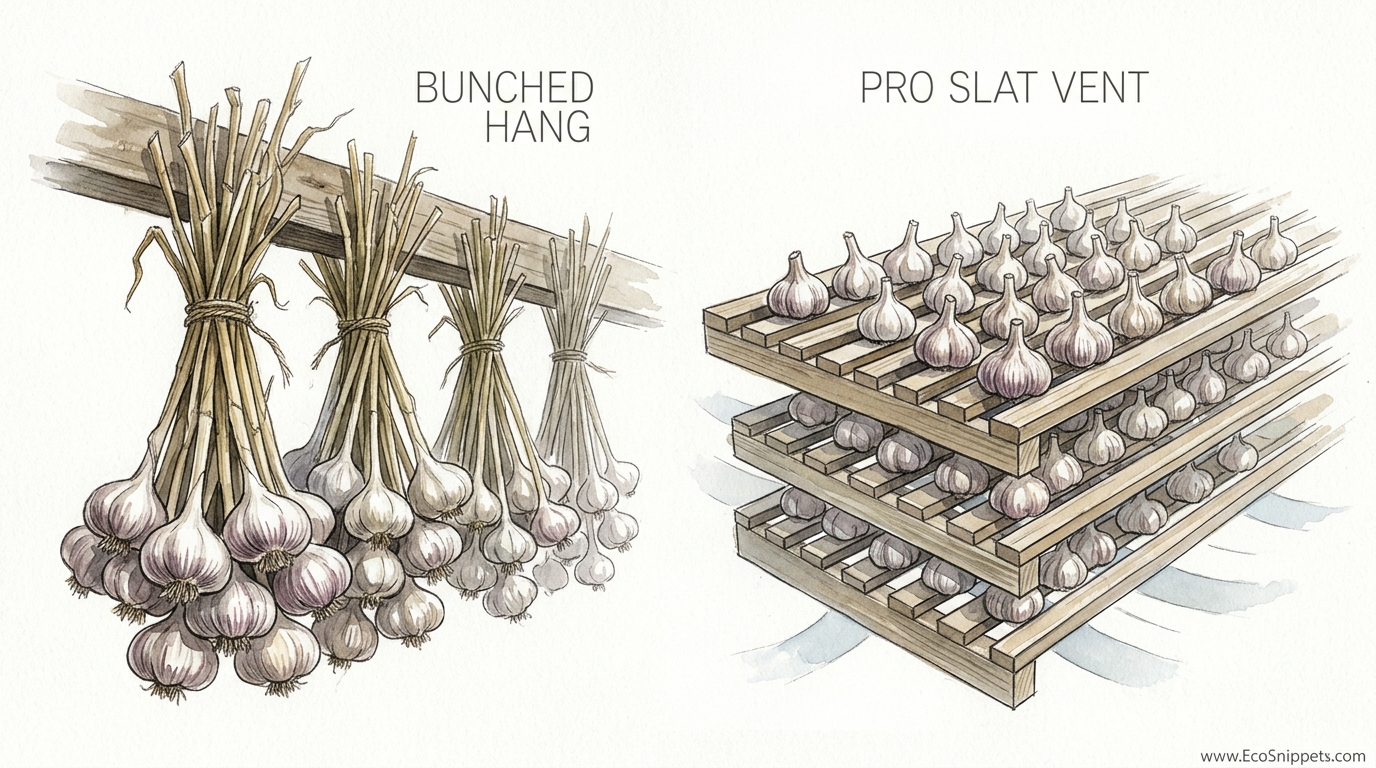
Comparison: Bunched Hang vs. Pro Slat Vent
To understand why professional methods win out, it helps to look at the measurable differences in how the garlic responds to the curing environment. The table below highlights why the “beautiful” method often leads to “ugly” results in storage.
| Factor | Bunched Hang (Traditional) | Pro Slat Vent / Tray (Professional) |
|---|---|---|
| Neck Drying Speed | Slow (center remains damp) | Rapid and Uniform |
| Rot Risk | High (especially in humidity) | Minimal |
| Inspection Ease | Difficult (hidden bulbs) | Excellent |
| Airflow Required | High ambient breeze | Forced/Controlled |
| Space Efficiency | High (vertical) | Low (requires footprint) |
| Storage Life | 3–6 Months | 6–12 Months |
Practical Tips for a Perfect Cure
- Harvest Timing: Lift your garlic when the bottom 3 to 4 leaves have turned brown, but the top 5 to 6 are still green. This ensures you have enough “wrappers” (layers of skin) to protect the bulb during the cure.
- The “Lip Test”: To see if your garlic is ready for storage, clip a stem. Press the cut end against your lip. If it feels cool or damp, the moisture is still moving; it needs more time. If it feels dry and papery, it is ready.
- Keep the Roots: Do not trim the roots until the curing is finished. The roots act as a “wick,” helping to draw moisture out of the basal plate. Trim them to about 1/4 inch (6 mm) only when the bulb is fully dry.
- Darkness is Key: While airflow is important, so is darkness. Light can trigger the garlic to think it is time to sprout again, especially in the spring. Keep your curing area dim or pitch black.
Advanced Considerations for Serious Practitioners
Serious growers should consider the relationship between garlic varieties and curing times. Hardneck varieties (Ophioscorodon) have a solid central stalk that holds moisture longer than the flexible necks of Softneck varieties (Sativum). Because of this, hardnecks often require an extra week of curing time in the tray to ensure the internal core is bone-dry.
If you are scaling up, consider the “forced air” setup. This involves stacking your slatted crates and draping them with a heavy tarp, then placing a high-velocity fan at one end of a “tunnel.” This forces air through every single bulb, regardless of how deep they are in the crate. This is the industrial standard for ensuring no “hot spots” of humidity remain to ruin the crop.
Temperature also plays a chemical role. Curing at the higher end of the range (75°F to 80°F / 24°C to 27°C) helps convert the plant’s sugars and stabilizes the allicin precursors. This is why properly cured garlic often has a more “complex” flavor than fresh-from-the-ground garlic, which can taste somewhat “green” or metallic.
Scenarios: High Humidity vs. Low Humidity
Scenario A: High Humidity (e.g., Vermont or UK in Summer)
In a region with 80% humidity, you cannot rely on open-air curing. You must move your garlic into a closed room with a dehumidifier set to 60%. Use two box fans: one at floor level to circulate air and one at the ceiling to prevent stratification. Without this controlled environment, the necks will stay soft, and you will likely lose your crop to Aspergillus (black mold) before the first frost.
Scenario B: Arid Climates (e.g., Arizona or Central Spain)
In very dry air (below 30% humidity), garlic can actually cure too fast. If the outer skins dry and shatter before the neck can constrict, the cloves will shrivel. In this case, you should slow down the airflow and ensure the garlic is in the coolest part of your barn. You want the cure to take at least 14 days to allow the bulb’s internal chemistry to catch up with the external drying.
Final Thoughts
Success in the garden is often measured by the harvest, but true self-reliance is measured by how much of that harvest makes it to the table six months later. Curing is the final, most critical act of the growing season. It requires us to trade the aesthetics of the “garlic braid” for the cold, hard efficiency of the slatted tray and the electric fan.
When you provide professional-level airflow, you aren’t just preventing rot; you are honoring the months of growth that came before. A properly cured bulb is a heavy, rock-hard testament to a season well-managed. Once you feel the difference between a soft, damp neck and a dry, brittle “snap,” you will never go back to hanging bunches again.
Apply these principles this season. Watch the necks, listen for the rustle of the papery skins, and feel the weight of a bulb that is truly ready for the long winter ahead. Your kitchen, and your future self, will thank you.
Sources
1 keeneorganics.com (https://keeneorganics.com/curing-garlic/) | 2 gardenbetty.com (https://gardenbetty.com/a-guide-to-curing-and-storing-garlic/) | 3 creativevegetablegardener.com (https://www.creativevegetablegardener.com/drying-garlic/) | 4 garlicseed.ca (https://garlicseed.ca/pages/curing-and-storing-garlic) | 5 mountainvalleygarlic.com (https://www.mountainvalleygarlic.com/post/harvesting-curing-your-garlic-harvest) | 6 theseasonalhomestead.com (https://www.theseasonalhomestead.com/how-to-harvest-cure-and-store-garlic-long-term/) | 7 epicgardening.com (https://www.epicgardening.com/curing-garlic/) | 8 resprout.com (https://resprout.com/how-to-dry-cure-garlic-after-harvest/) | 9 gourmetgarlicgardens.com (https://www.gourmetgarlicgardens.com/blogs/curing-and-storing-garlic) | 10 umass.edu (https://www.umass.edu/agriculture-food-environment/vegetable/fact-sheets/garlic-harvest-curing-storage) | 11 cedarcirclefarm.org (https://cedarcirclefarm.org/tips/entry/time-to-harvest-your-garlic)
