How To Become More Self-Sufficient Without Starting a Full-Blown Farm…
Want to start preserving your harvest, making your own soap, or building a backyard root cellar — but not sure where to begin? “Homesteading Advice” gives you instant lifetime access to 35+ practical homesteading books on food preservation, veggie gardening, DIY natural cleaning products (save over $250 per year with this skill alone), brewing, off-grid energy, and a whole lot more…
Click Here To Check It Out Now!
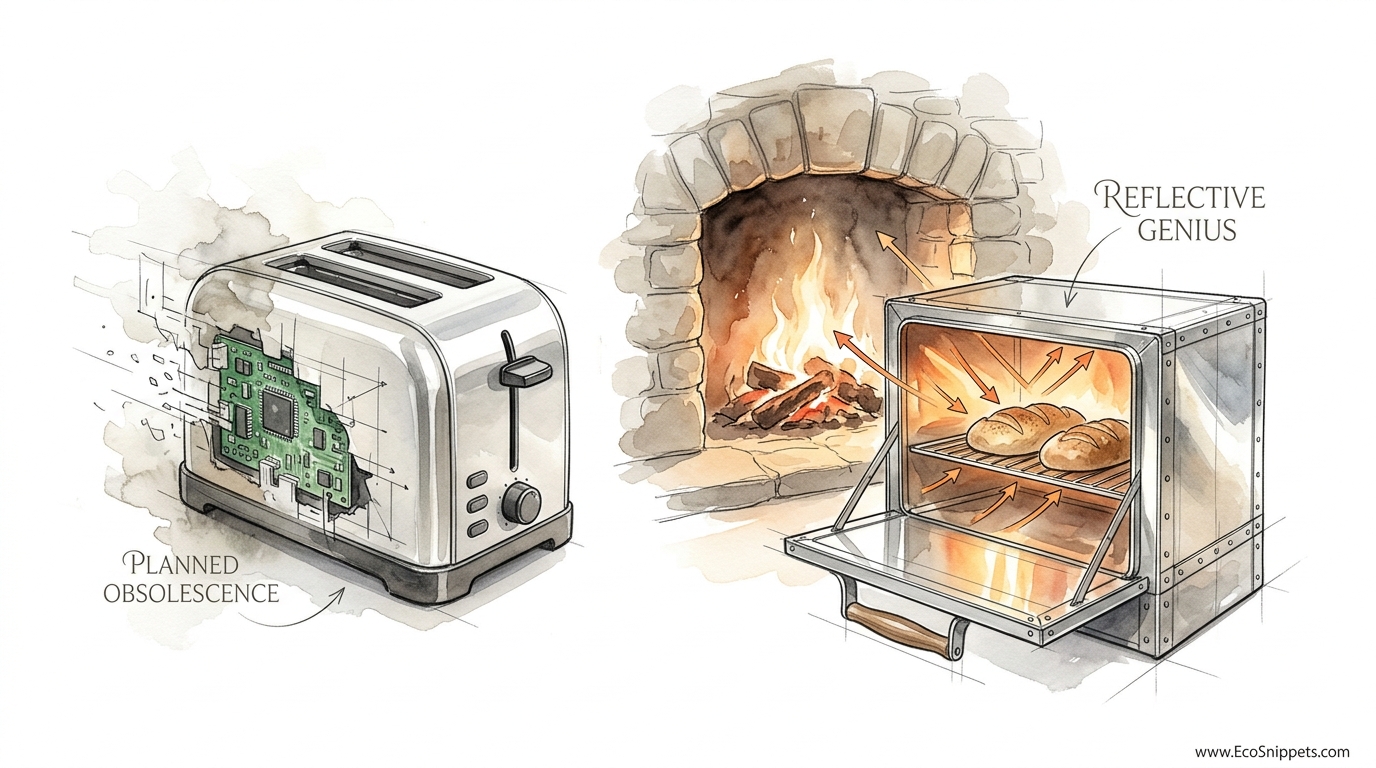
Your ancestors could bake a perfect loaf of bread using the ‘waste’ heat of their fireplace – can your kitchen do that? We traded high-quality physics for cheap heating elements. The reflector oven doesn’t need a plug; it simply captures the heat already escaping your fire and bounces it back onto your food. It’s the ultimate ‘buy-it-once’ energy tool.
Modern convenience has made us forget the elegant simplicity of radiant heat. In the 18th and 19th centuries, the “tin kitchen” was a marvel of efficiency, allowing a cook to roast a turkey or bake cornbread right on the hearth without the need for a massive, wood-hungry masonry oven. Today, this tool remains the secret weapon of serious backcountry explorers and off-grid enthusiasts who refuse to compromise on the quality of their meals.
Learning to build and use a traditional tin reflector oven is about more than just cooking. It is an exercise in understanding thermodynamics and reclaiming a piece of self-reliance that was lost to the age of the electric coil. Whether you are building one from scratch or learning to master a vintage design, this guide will walk you through every nuance of this reflective genius.
Building A Traditional Tin Reflector Oven
The traditional tin reflector oven, often called a “tin kitchen” in colonial probate inventories, is a polished metal container designed to sit beside an open flame. It is usually shaped like a demi-barrel or a three-sided box with a slanting top and bottom. The fourth side remains entirely open, facing the fire to “catch” the heat that would otherwise vanish into the air.
Unlike a standard kitchen oven that relies on convection (circulating hot air), the reflector oven operates almost entirely on radiant heat. When you stand near a campfire and feel your shins getting hot, you are feeling radiant energy. A reflector oven takes that energy, bounces it off its highly polished internal surfaces, and focuses it onto the food sitting on its central shelf. It is a primitive but highly effective laser for calories.
In the real world, these ovens were the microwave of the 1700s. They allowed for quick baking and roasting without waiting hours for a stone oven to preheat. Today, they are prized by canoe trippers and winter campers because they are lightweight, often collapsible, and can produce golden-brown biscuits or a perfectly roasted bird using the exact same fire you built just to stay warm.
How the Physics of Reflection Works
Understanding the physics of the reflector oven is key to mastering its use. There are three primary ways heat moves: conduction, convection, and radiation. Your stove at home uses a mix of all three, but the reflector oven is a specialist in thermal radiation.
The fire serves as a diffuse source of electromagnetic radiation in the infrared spectrum. This energy travels in straight lines until it hits a surface. If that surface is dark and matte, like a cast-iron Dutch oven, the energy is absorbed. If the surface is bright and polished, like tin or aluminum, the energy is reflected.
By angling the top and bottom panels of the oven at approximately 45 to 90 degrees toward the food, you create a “collection zone.” The heat enters the open face, hits the back wall and the slanting “roof” and “floor,” and is then redirected toward the center of the oven. This creates a pocket of intense heat that can easily reach temperatures of 350°F to 500°F (175°C to 260°C) depending on your proximity to the flames.
Step-by-Step Construction: Forging Your Own Tin Kitchen
Building a reflector oven is a project that requires patience but minimal specialized tools. While original versions used hot-dipped tin-plated steel, modern makers often opt for aluminum or stainless steel for their weight and corrosion resistance.
Materials Needed:
- Sheet Metal: A large sheet of 20 to 24-gauge aluminum, stainless steel, or tin-plated steel. Approximately 24″ x 36″ (60 cm x 90 cm) is a good starting point.
- Rivets or Small Bolts: To secure the sides to the back and top.
- Hinges (Optional): If you want the oven to collapse flat for travel.
- Wire or Thin Rod: For the internal shelf supports.
- Metal Handles: To move the oven when it is hot.
Safety Note: Never use galvanized steel. The zinc coating releases toxic fumes when heated to cooking temperatures, which can cause “metal fume fever” or more serious respiratory issues.
Step 1: Layout and Design
Start by sketching your three main components: the back panel (which includes the top and bottom slants) and the two side panels. A standard size for a family-sized oven is roughly 18 inches (45 cm) wide, 12 inches (30 cm) deep, and 14 inches (35 cm) high. Mark your cut lines on the metal using a permanent marker.
Step 2: Cutting the Metal
Using tin snips, carefully cut along your lines. Wear heavy leather gloves; the edges of freshly cut sheet metal are sharper than a surgeon’s scalpel. Once the pieces are cut, use a file or sandpaper to round off the corners and smooth the edges.
Step 3: Folding the Flanges
To join the pieces, you will need to fold 1/2-inch (1.25 cm) flanges along the edges of your side panels. Use a workbench edge and a rubber mallet to create clean, 90-degree bends. These flanges will be where you drill holes for your rivets.
Step 4: Creating the Shelf
The shelf is the most critical part. It must be positioned exactly in the center of the vertical height to ensure even heating from the top and bottom reflectors. You can rivet small “L” brackets to the side walls or drill holes to slide wire rods through, creating a rack that can support a baking tin.
Step 5: Final Assembly
Align your panels and secure them with rivets. If you are building a collapsible model, use piano hinges at the joints. Attach a handle to the top center—ensure it is sturdy enough to carry the weight of the oven plus a heavy roast.
The Measurable Benefits of Reflective Cooking
Why bother with a reflector oven when you could just throw a Dutch oven on the coals? The advantages are practical and measurable.
Fuel Efficiency: A reflector oven uses “waste” heat. You are already building a fire for light or warmth. By placing the oven next to it, you are capturing energy that would otherwise be lost to the atmosphere. You don’t need a separate bed of coals, which saves you the time and effort of burning down large logs.
Visual Monitoring: Unlike a Dutch oven or a closed stove, you can see your food at all times. You can watch the bread rise and the crust turn golden without opening a lid and losing all your accumulated heat.
Flavor Control: Because the oven is positioned to the side of the fire rather than over it, the food is shielded from the direct path of rising smoke. This allows you to bake delicate cakes, pastries, or white breads that would otherwise taste like a chimney if cooked in a more primitive way.
Weight: A collapsible aluminum reflector oven weighs a fraction of a cast-iron Dutch oven. For hikers or those moving by canoe, this is the difference between a luxury meal and a sore back.
Challenges and Common Pitfalls
The most common mistake beginners make is poor fire management. A reflector oven requires a specific type of fire to work effectively. If you use a bed of low-burning coals, you will have plenty of heat for a Dutch oven, but your reflector oven will stay cold.
Reflector ovens need flame height. You want a fire that is at least as tall as the oven itself. A “teepee” or “log cabin” style fire is ideal because it creates a vertical wall of flame that emits a massive amount of radiant energy directly into the oven’s mouth.
Another pitfall is unlevel placement. If the shelf inside the oven isn’t perfectly level, your cake batter will pool on one side, leading to a lopsided loaf. Always use a few flat rocks or pieces of firewood to shim the feet of the oven until the shelf is horizontal.
Finally, remember that the reflectivity matters. If the inside of your oven becomes covered in soot or grease, its efficiency will drop significantly. Keep the internal surfaces polished. A quick wipe with a bit of wood ash and a damp cloth is an old-timer’s trick for restoring the shine to tin.
Limitations and Environmental Constraints
A reflector oven is a brilliant tool, but it is not a magic wand. It has realistic constraints that every practitioner must respect.
Wind: High winds are the enemy of reflective cooking. Wind strips away the thin layer of heated air inside the oven and can even blow ash into your food. If it’s a blustery day, you will need to build a windbreak or find a very sheltered spot for your fire.
Rain: While the oven provides some protection, heavy rain can cool the metal surfaces so rapidly that the internal temperature never reaches baking levels. In wet conditions, you are often better off using a Dutch oven buried in coals.
Space: Because the oven must sit 8 to 12 inches (20 to 30 cm) from the fire, you need a larger cleared area than you might for a simple boiling pot. This makes it less ideal for small, cramped survival shelters.
Reflector Oven vs. Dutch Oven: Which Should You Use?
Both tools have their place in the self-reliant kitchen, but they excel in different areas.
| Feature | Reflector Oven | Dutch Oven |
|---|---|---|
| Heat Source | Radiant flames | Conductive coals |
| Best For | Breads, cookies, roasting meat | Stews, braises, deep frying |
| Portability | High (lightweight/collapsible) | Low (heavy cast iron) |
| Complexity | Requires active fire management | “Set it and forget it” |
Practical Tips and Best Practices
If you want to master the art of the tin kitchen, you need to develop an “instinct” for heat. Since there is no thermostat, you are the controller.
The Hand-Temp Check: To estimate the temperature, hold your hand right in front of the food shelf. Count how many seconds you can keep it there before it becomes too hot.
- 1-2 seconds: ~500°F (260°C) – Very Hot (Searing)
- 3-4 seconds: ~400°F (200°C) – Hot (Baking Bread)
- 5-6 seconds: ~350°F (175°C) – Moderate (Cakes/Cookies)
- 7-10 seconds: ~200°F (95°C) – Low (Warming/Slow Roast)
Rotate for Success: Even the best-designed oven will have a “hot spot” closer to the fire. Every 10 to 15 minutes, give your baking pan a 180-degree turn to ensure the back of your loaf isn’t raw while the front is burnt.
Wood Selection: Use dry hardwoods like oak, maple, or ash for a steady, long-lasting flame. If you need a quick burst of intense heat to brown the top of a pie, toss in a few handfuls of dry pine or cedar twigs. These softwoods burn hot and fast, providing the “broiler” effect you need.
Advanced Considerations for the Serious Practitioner
For those who want to push the limits of what a reflector oven can do, consider adding a rotisserie spit. Traditionally, many reflector ovens featured a horizontal rod that could be turned by a crank on the outside. This allows you to roast large joints of meat or poultry evenly, with the juices dripping into the curved bottom of the oven (the “dripping pan”) to be used later for gravy.
You might also experiment with thermal mass. While the oven itself is lightweight, placing a few dark, flat stones on the shelf next to your baking pan can help stabilize the internal temperature. These stones absorb the radiant heat and slowly release it, acting as a “heat battery” that buffers against fluctuations in the fire’s intensity.
Another advanced technique involves multi-oven setups. If you are cooking for a large group, place two reflector ovens facing each other with the fire in the middle. This creates a “heat tunnel” that maximizes the energy of the fire and allows you to cook twice as much food with the same amount of fuel.
Scenario: Baking Backcountry Biscuits
Imagine you are on the third day of a wilderness trip. The air is crisp, and the sun is beginning to dip. You build a modest log-cabin fire using dry spruce. While the flames begin to climb, you mix flour, baking powder, salt, and a bit of fat into a simple dough.
You set your reflector oven exactly 10 inches (25 cm) from the edge of the flames. You perform the hand-temp check: “One, two, three, four… ouch.” Perfect. You place your pan of biscuits on the shelf.
Within five minutes, the scent of rising dough fills the camp. You notice the biscuits on the left are browning faster, so you slide the oven two inches to the right. Ten minutes later, you rotate the pan. By the time the fire has burned down to a glow, you are sitting by the warmth with golden, flaky biscuits that are better than anything you could have made in a $2,000 electric range. This is the reward of the reflector oven.
Final Thoughts
The traditional tin reflector oven is a testament to the fact that we don’t always need more technology to get better results; sometimes, we just need better physics. By capturing the radiant energy of a fire, we can turn a simple campfire into a high-performance kitchen. It is a tool that rewards attention, skill, and an understanding of the natural world.
As you experiment with your own reflector oven, don’t be afraid of the learning curve. You might burn a few biscuits or undercook a loaf of bread at first. But with each fire, you will gain a deeper connection to the way your ancestors lived and worked. You will find that there is a profound satisfaction in eating a meal cooked by the light of the same flames that are keeping you warm.
Take the time to build your own or seek out a well-made reproduction. Learn the language of the flames and the dance of the reflections. In an age of planned obsolescence and digital complexity, the reflector oven stands as a simple, durable, and brilliant reminder of what self-reliance actually looks like.
