How To Become More Self-Sufficient Without Starting a Full-Blown Farm…
Want to start preserving your harvest, making your own soap, or building a backyard root cellar — but not sure where to begin? “Homesteading Advice” gives you instant lifetime access to 35+ practical homesteading books on food preservation, veggie gardening, DIY natural cleaning products (save over $250 per year with this skill alone), brewing, off-grid energy, and a whole lot more…
Click Here To Check It Out Now!
Why pay a utility company to fight the cold when the earth and sun will keep your seedlings warm for free? Stop letting your winter harvest depend on a circuit breaker. Active heating is a constant drain on your homestead’s budget. Learn how thermal mass and earth-sheltering can create a sub-tropical microclimate in the middle of a blizzard without a single watt of power.
Living off the grid or simply seeking greater self-reliance requires a shift in how we view energy. In a traditional glass greenhouse, you are essentially trying to heat a tent in a windstorm. The moment the sun goes down or the heater fails, the temperature plummets. A passive solar pit greenhouse, often called a Walipini, flips this dynamic on its head. It uses the very ground beneath your feet to store the sun’s energy, acting as a massive thermal battery that keeps your plants thriving while the world outside is frozen solid.
This approach is not just a modern trend; it is a return to ancestral wisdom that understands the “thermal constant” of the earth. Whether you are an experienced homesteader or a beginner looking to extend your growing season, understanding the mechanics of earth-sheltered growing is a fundamental skill for food security.
Passive Solar Pit Greenhouse Design
A passive solar pit greenhouse, or Walipini, is a subterranean growing structure that sits mostly below the ground level. The name “Walipini” comes from the Aymara indigenous people of Bolivia and translates roughly to “place of warmth.” This design was refined by the Benson Institute in the 1990s to help farmers in the high-altitude, cold climates of the Andes grow food year-round.
The core design is simple: a rectangular pit is excavated to a depth of 6 to 8 feet (1.8 to 2.4 meters). This depth is significant because it reaches below the local frost line where the earth maintains a remarkably stable temperature, usually between 50°F and 60°F (10°C to 15°C) regardless of the air temperature above. The long axis of the rectangle is oriented to face the sun—south in the Northern Hemisphere and north in the Southern Hemisphere.
The roof consists of a transparent or translucent glazing material, such as twin-wall polycarbonate or heavy-duty polyethylene, sloped at a specific angle to capture maximum winter sunlight. The excavated soil is typically used to create a berm on the backside of the structure, adding even more insulation and mass. This creates a sheltered pocket of air that is heated by the sun and regulated by the massive thermal inertia of the surrounding soil.
The Mechanics of Thermal Stability
Understanding how a pit greenhouse functions requires looking at three distinct physical principles: earth-sheltering, solar gain, and thermal mass. These three forces work in harmony to create a microclimate that is decoupled from the harsh swings of the surface weather.
The earth-sheltering aspect provides the baseline temperature. While the air temperature might drop to -20°F (-29°C), the soil a few feet down remains relatively warm. This is because soil is a poor conductor of heat but an excellent storer of it. It takes months for the summer heat to migrate deep into the ground and months for the winter cold to do the same. By placing your plants in this “thermal flywheel,” you are starting with a base temperature that is already halfway to the ideal growing range.
Solar gain is the “active” part of the passive system. Sunlight penetrates the glazing and hits the dark surfaces inside the pit. These surfaces—the soil floor, the back wall, and even water containers—absorb the solar radiation and convert it into long-wave infrared heat. Because the structure is sealed and buried, this heat has nowhere to go. It is trapped by the greenhouse effect, warming the interior air significantly above the ambient earth temperature.
Thermal mass acts as the battery. Dense materials like earth, stone, or water have a high “specific heat capacity.” This means they can absorb a tremendous amount of energy during the day without a massive rise in temperature, and then slowly radiate that heat back into the air at night. In a well-designed Walipini, the back wall and the floor are the primary thermal storage units. They soak up the midday sun and then spend the next twelve hours preventing the interior from freezing.
How to Build an Earth-Sheltered Greenhouse
Constructing a pit greenhouse is a labor-intensive process that requires careful planning. You are not just building a frame; you are performing a civil engineering project. Success depends on how well you handle the forces of gravity, water, and light.
Site Selection and Soil Testing
Before the first shovel hits the dirt, you must verify that your site can support a pit. Drainage is the single most important factor. If you dig a hole in a high-water-table area, you are not building a greenhouse; you are building a pond. Perform a percolation test by digging a small hole 12 inches (30 cm) deep and filling it with water. If it hasn’t drained within 24 hours, the site is likely too wet for a sunken design.
Ideally, the floor of your greenhouse should be at least 5 feet (1.5 meters) above the maximum water table level. A south-facing slope is the “gold standard” for a Walipini, as it allows you to cut into the hill, which simplifies excavation and naturally handles some of the drainage requirements.
Excavation and Wall Stabilization
Excavation depth usually ranges from 6 to 8 feet (1.8 to 2.4 meters). In USDA zones 5 or 6, a depth of at least 4 to 5 feet is necessary to clear the frost line and tap into the stable thermal constant. As you dig, keep the topsoil separate from the subsoil. You will need that topsoil later for your growing beds.
Raw earthen walls are prone to collapse, especially in wet weather. You must reinforce them. Options include rammed earth, earthbags (superadobe), or even poured concrete if the budget allows. Rammed earth is a favorite for the self-reliant homesteader because it uses the very soil you just excavated. By mixing the soil with a small amount of cement or lime and tamping it into forms, you create stone-like walls that provide massive thermal storage.
Roofing and Glazing Angles
The roof angle is not a matter of aesthetics; it is a matter of physics. To maximize winter heat, the glazing should be perpendicular to the sun’s rays on the winter solstice. A common rule of thumb is to take your latitude and add 15 to 20 degrees. For example, if you live at 40 degrees latitude, a roof pitch of 55 to 60 degrees is ideal for winter gain.
A steep roof also helps with snow shedding. Heavy snow loads can collapse a plastic roof, so ensure your rafters are spaced appropriately—usually every 2 to 4 feet (0.6 to 1.2 meters)—depending on your local climate. Double-layered glazing is highly recommended, as the dead air space between the layers provides an extra R-value of insulation that prevents heat from escaping through the “window” at night.
Practical Benefits of the Sunken Design
Choosing a pit greenhouse over a traditional structure offers several measurable advantages that directly impact the long-term viability of a homestead. These benefits go beyond simple temperature control.
Wind protection is perhaps the most underrated advantage. In many cold climates, the “wind chill” is what kills plants and strips heat from a greenhouse. Because a Walipini is mostly underground, the wind simply blows over the top. The structure presents very little surface area to the elements, making it incredibly durable in storm-prone regions.
Energy independence is the primary driver for most builders. A traditional glass greenhouse can cost upwards of $25 per square foot to heat during a northern winter. A well-constructed Walipini can maintain a growing temperature for a fraction of that cost, often requiring zero external input. This makes it a one-time investment that pays for itself in avoided utility bills within a few seasons.
Humidity stability is another factor. The surrounding earth acts as a natural buffer, preventing the bone-dry air typical of heated indoor spaces. While you must still manage moisture to prevent mold, the subterranean environment is naturally more conducive to the lush, humid conditions that many vegetables crave.
Challenges and Common Pitfalls
Building into the earth presents unique risks that do not exist with surface structures. Failure to account for these can lead to the total loss of the greenhouse.
The Danger of Flooding
Water is the primary enemy of the pit greenhouse. If the floor is not properly drained, rain and snowmelt will seep through the walls or rise from the water table, turning your growing area into a mud bath. To avoid this, always install a perimeter drain—a French drain—around the exterior of the structure at the base of the walls. The interior floor should consist of 12 inches (30 cm) of gravel covered by landscape fabric and then your soil beds. This allows any water that enters the pit to sink away from the roots.
The “Fungal Jungle” Effect
Because pit greenhouses are so well-insulated and sealed, they can become excessively humid. High humidity without airflow is an invitation for powdery mildew, botrytis, and other fungal pathogens. Passive ventilation is mandatory. You must have at least one low vent (on the cool side) and one high vent (on the warm side) to create a “chimney effect” that pulls fresh air through the space.
Structural Collapse
The weight of the surrounding earth is immense. Every square foot of soil exerts pressure against the walls. Many beginners make the mistake of digging a simple hole and thinking the dirt will stay put. Without proper retaining walls or a slight “batter” (slanting the walls outward), the earth will eventually slump or collapse, especially after a heavy rain.
Limitations and Environmental Constraints
A Walipini is not a “magic bullet” for every climate. There are specific environmental conditions where this design may not be the ideal choice.
High water tables are the most significant deal-breaker. If your land is in a flood plain or has a water table higher than 6 feet, you cannot dig a pit. In these cases, a “bermed” greenhouse is a better alternative. This involves building a traditional greenhouse and then mounding earth up against the north, east, and west walls to mimic the insulation of a pit without the risk of flooding.
Light levels at high latitudes can also be a challenge. In places like Northern Canada or Scandinavia, the sun stays so low on the horizon during winter that a deep pit may actually shade the plants. If the sun cannot reach the floor because the walls are too deep, the “place of warmth” becomes a cold, dark cellar. In these regions, the pit must be shallower, or the north wall must be painted white or lined with reflective material to bounce light back down into the growing beds.
Rocky soil presents a practical limitation. If your land sits on solid granite or heavy shale, the cost of excavation will skyrocket. The “cut and fill” economy of a Walipini relies on easy digging. If you need dynamite or a jackhammer to clear the pit, a surface-level passive solar greenhouse will be more cost-effective.
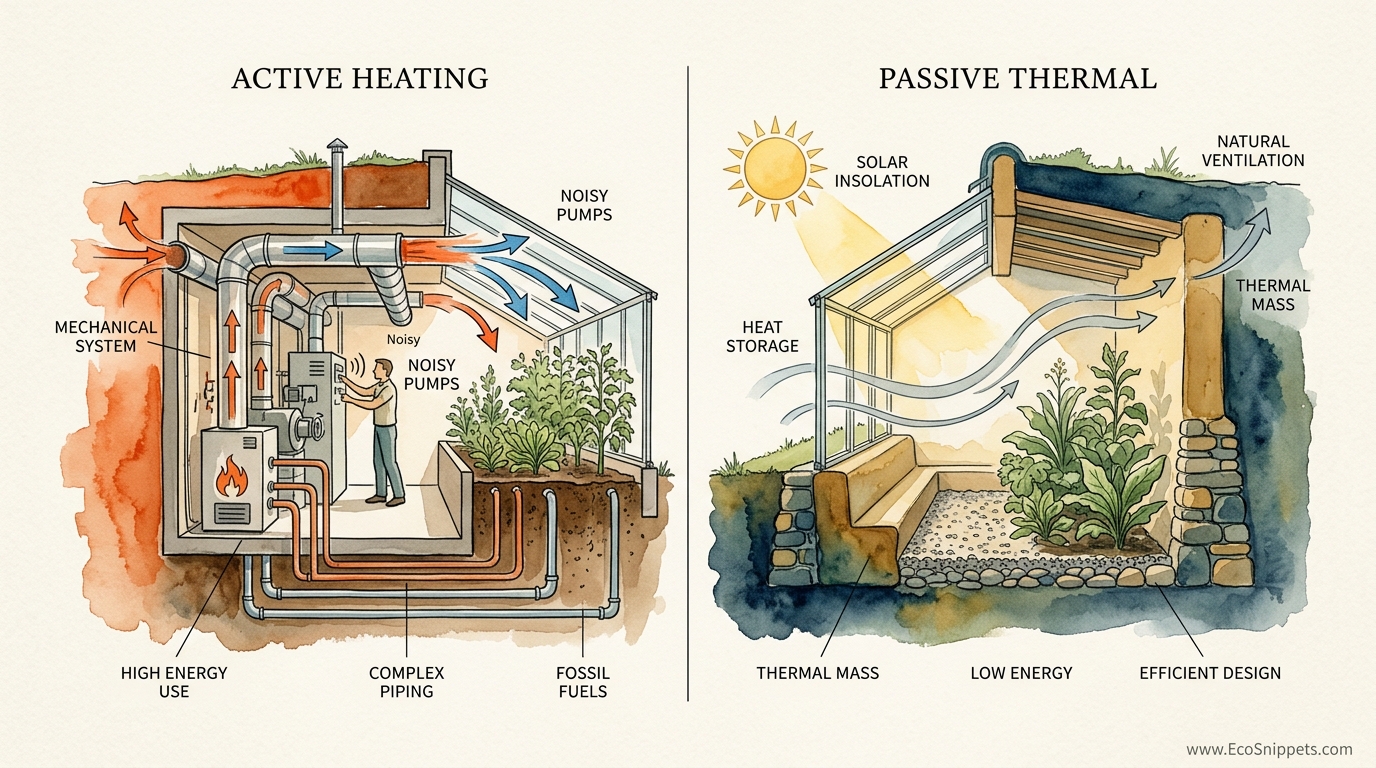
Passive vs. Active Heating Systems
When deciding on a greenhouse strategy, it is helpful to compare the resource requirements of passive and active systems. The choice often comes down to whether you want to spend labor (passive) or money (active).
| Feature | Passive Pit Greenhouse | Traditional Active Greenhouse |
|---|---|---|
| Initial Cost | High (Excavation & Walls) | Medium (Frame & Glass) |
| Operational Cost | Zero to Very Low | High (Gas/Electric/Wood) |
| Thermal Stability | Excellent (High Inertia) | Poor (Rapid Fluctuations) |
| Maintenance | Low (Structural focus) | High (Mechanical systems) |
| Skill Level | Advanced DIY / Engineering | Beginner / Intermediate |
The passive solar pit greenhouse wins on long-term sustainability and resilience. It is a “set it and forget it” system once the physics are dialed in. However, the traditional greenhouse offers more flexibility for those who are renting or who live in areas where permanent earthworks are not permitted.
Practical Tips for Best Performance
Optimization is the difference between keeping plants alive and having a bumper crop. Use these strategies to fine-tune your subterranean microclimate.
- Black Water Barrels: Line the north wall of the pit with 55-gallon (200-liter) drums filled with water and painted matte black. These act as additional thermal mass, absorbing heat during the day and preventing the temperature from dipping too low at 3:00 AM.
- Reflective Surfaces: In the winter, paint your north wall white or use “Mylar” film to reflect low-angle sunlight onto your plants. This can increase the available light by up to 30%.
- Insulated Shutters: On extremely cold nights, covering the glazing with insulated blankets or rigid foam panels can prevent up to 50% of your heat loss. This is especially useful in climates where temperatures drop below 0°F (-18°C).
- Internal Compost: Building a large, active compost pile inside the greenhouse provides two things: heat and CO2. The decomposition process releases warmth into the air, and the extra carbon dioxide acts as a fertilizer for your plants.
Advanced Considerations: Earth Tubes and Integration
For those who want to push the boundaries of passive design, consider integrating an “earth battery” or “GAHT” (Ground to Air Heat Transfer) system. This involves burying a network of perforated pipes several feet below the greenhouse floor. A small solar-powered fan pushes warm daytime air from the top of the greenhouse down into the cool earth. The heat is stored in the soil, and at night, the process is reversed to pull that stored warmth back into the growing space.
Livestock integration is another advanced strategy. Some homesteaders build their pit greenhouse adjacent to a chicken coop or rabbitry. The animals provide body heat and CO2, while the greenhouse provides fresh greens for the animals. This creates a closed-loop system where the waste of one “engine” becomes the fuel for the other.
Scaling the design is also a consideration. A 10×20 foot (3×6 meter) Walipini is a manageable project for a family, but if you intend to go commercial, the excavation and drainage requirements become significantly more complex. Large-scale pit greenhouses often require heavy machinery and professional soil analysis to ensure the safety of the workers inside.
Example Scenario: A Winter Harvest in Zone 5
Imagine a homesteader in a region where winter temperatures regularly hit 10°F (-12°C). They have built a 12×24 foot (3.6×7.3 meter) pit greenhouse dug 6 feet (1.8 meters) deep. The roof is pitched at 55 degrees and uses triple-wall polycarbonate.
During a sunny January day, the outdoor temperature is 20°F (-6°C). Inside the Walipini, the sun hitting the black water barrels and the rammed earth walls raises the air temperature to 75°F (24°C). The homesteader opens the top vent for two hours at noon to flush out excess humidity.
As the sun sets, the outdoor temperature drops to 5°F (-15°C). The thermal mass in the walls and water barrels begins to release the day’s stored heat. Even without a heater, the interior temperature only drops to 52°F (11°C) by dawn. The kale, spinach, and even some cold-hardy citrus trees remain in their optimal growing range, completely oblivious to the blizzard raging a few feet above their leaves.
Final Thoughts
The passive solar pit greenhouse is more than just a garden; it is a declaration of independence. It represents a move away from fragile systems that rely on external energy and a move toward the robust, self-regulating systems of nature. By leveraging the earth’s natural thermal mass and the sun’s consistent radiation, you create a sanctuary where life can flourish regardless of the season.
Success with a Walipini requires a willingness to do the hard work of excavation and the careful work of engineering. It demands respect for water and a deep understanding of light. However, the reward is a year-round harvest and the peace of mind that comes from knowing your food supply is shielded from the volatility of the grid.
As you plan your build, remember that every site is unique. Start with the principles of thermal mass and earth-sheltering, then adapt them to your specific soil, slope, and sun. The earth is ready to help you grow; you only need to go deep enough to find its warmth.
