
How To Become More Self-Sufficient Without Starting a Full-Blown Farm…
Want to start preserving your harvest, making your own soap, or building a backyard root cellar — but not sure where to begin? “Homesteading Advice” gives you instant lifetime access to 35+ practical homesteading books on food preservation, veggie gardening, DIY natural cleaning products (save over $250 per year with this skill alone), brewing, off-grid energy, and a whole lot more…
Click Here To Check It Out Now!
That pile of manure isn’t a chore; it’s a high-grade energy source that can power your kitchen for the next decade. Most farmers see a waste management headache. Smart homesteaders see the ‘Biogas’ loop. Simply putting your organic ‘nuisance’ into a sealed tank allows you to capture the methane and stop paying for propane forever.
Finding a path to true self-reliance often means looking backward at ancestral wisdom while using modern materials. This technology is a bridge between the two. You can take the waste from your livestock and the scraps from your garden to create a continuous stream of clean-burning fuel. It is a closed-loop system that mirrors the natural cycles of the earth.
This guide will walk you through the logic, the build, and the daily maintenance of a home-scale energy plant. You will learn to treat your homestead not just as a piece of land, but as a living organism. Every input has an output, and every output should serve a purpose. Let’s look at how you can stop throwing away energy and start harvesting it.
Diy Biogas Digester For Homesteaders
A biogas digester is essentially an artificial stomach. It is a sealed, oxygen-free container where specialized bacteria break down organic matter. These microorganisms consume carbon-rich materials and release a mixture of gases, primarily methane and carbon dioxide. This gas mixture is what we call biogas, and it behaves much like the natural gas or propane you might currently buy in a tank.
People have used versions of this technology for centuries. Small-scale “gobar gas” plants are common sights in rural India and China, providing heat and light to millions of homes. In the modern homesteading context, these systems are often built from repurposed industrial containers like 275-gallon (1,040-liter) IBC totes. This makes the technology accessible to anyone with basic plumbing skills and a source of organic waste.
The system serves two main functions on a homestead. First, it provides a renewable source of energy for cooking, lighting, or even space heating. Second, it produces a liquid effluent known as digestate. This liquid is a potent, pathogen-reduced fertilizer that acts faster than traditional compost because the nutrients are already broken down into a plant-available form.
How the Digestion Process Works
Microbes perform a complex four-stage dance inside the digester tank. First, hydrolysis breaks down large organic molecules like proteins and fats into simpler sugars and amino acids. This is the preparation stage where the “food” becomes digestible for the next group of bacteria.
Acidogenesis and acetogenesis follow, turning those simple molecules into volatile fatty acids and acetic acid. These stages produce some carbon dioxide and hydrogen as byproducts. The final and most sensitive stage is methanogenesis. Methanogens, which are a type of archaea, convert the acids and hydrogen into methane gas.
Oxygen is the enemy of this entire process. Methanogens are obligate anaerobes, meaning they will die if exposed to even small amounts of air. This is why the digester must remain perfectly sealed. Maintaining a stable environment for these microbes is the key to a productive system.
Designing the System
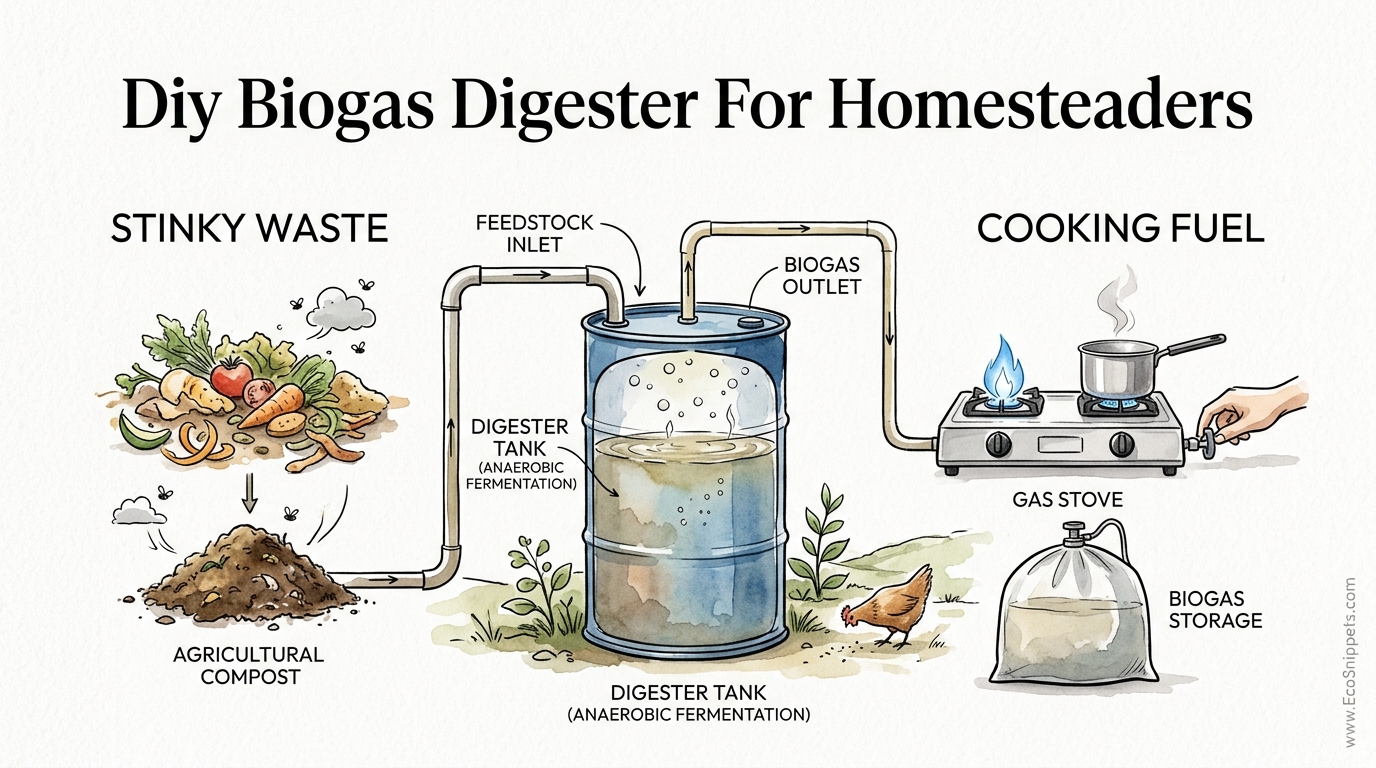
Building a functional digester requires three main components: a digestion tank, a gas storage unit, and a delivery system. The digestion tank is where the slurry lives. It needs an inlet pipe for feeding and an outlet pipe for the fertilizer to overflow.
The gas storage unit is often a separate flexible bag or a “floating drum” that rises as it fills with gas. Many DIY builders use a second IBC tote with the top cut off, filled with water, and a slightly smaller tank inverted inside it. As the bacteria produce gas, it travels through a hose and pushes the inverted tank up. The weight of that tank provides the constant pressure needed to push the gas to your stove.
Slurry consistency is vital for smooth operation. You typically want a mixture of about 1 part solid waste to 3 parts water. This creates a “soup” that the bacteria can easily navigate. Thick chunks of waste can cause clogs or create “dead zones” in the tank where no gas is produced.
Benefits of Small-Scale Biogas
Reducing your dependence on the grid is the most obvious advantage. A single cow can produce enough manure daily to generate about 85 cubic feet (2.4 cubic meters) of biogas. This amount of gas can power a standard stovetop burner for roughly three hours. For a family with a few animals and a large garden, this can easily cover all daily cooking needs.
Waste management becomes an asset rather than a liability. Instead of managing a smelly, fly-ridden manure pile, you put the waste into a sealed tank where the odor is contained. The process kills most weed seeds and harmful pathogens like E. coli and Salmonella. Your homestead becomes cleaner and more efficient at the same time.
The fertilizer benefit cannot be overstated. Traditional composting can take months and results in some nutrient loss through leaching and evaporation. Biogas digestate is ready immediately and retains almost all the nitrogen, phosphorus, and potassium from the original waste. Applying this liquid to your crops can lead to significantly higher yields without the cost of commercial fertilizers.
Challenges and Common Pitfalls
Temperature stability is the biggest hurdle for many homesteaders. Methanogens are most active in the mesophilic range, which is between 95°F and 104°F (35°C to 40°C). If the temperature drops below 70°F (21°C), gas production will slow to a crawl. Keeping the tank warm in northern climates requires insulation or a solar-heated water jacket.
Ph balance is another common point of failure. If you feed the digester too much highly acidic food waste at once, the “stomach” can get sour. The pH should ideally stay between 6.5 and 7.5. If the system becomes too acidic, the methanogens will stop working, and the tank will begin to smell like vinegar or rotten eggs.
Hydrogen sulfide (H2S) is a trace gas produced during digestion that causes a “rotten egg” smell. It is corrosive and can damage metal components or stoves over time. You must include a “scrubber” in your gas line—usually a PVC tube filled with steel wool or iron oxide—to remove this gas before it reaches your appliances.
Limitations and Realistic Constraints
Cold weather remains the primary physical limitation. While people in tropical regions can run digesters with no insulation, those in temperate zones must plan for winter. A digester that freezes will not only stop producing gas but may also rupture as the liquid expands. Underground installations can help leverage the earth’s natural thermal mass, but this adds complexity to the build.
Space is a consideration for urban or suburban homesteaders. While a single IBC tote system is relatively small, you still need room for the gas storage and the slurry mixing area. Local regulations regarding “pressurized gas” or “waste management” may also vary. Always check your local ordinances before installing a large-scale anaerobic system.
The “start-up” period requires patience. You cannot simply fill a tank and expect gas the next morning. It takes 20 to 40 days for the microbial colony to establish itself. You often need to “seed” the tank with active bacteria from a local pond or an existing digester to speed up the process.
Comparing Energy Sources
| Factor | Biogas (DIY) | Propane | Wood Gas |
|---|---|---|---|
| Fuel Cost | Free (Waste) | Market Rate | Labor/Wood Cost |
| Setup Cost | Low ($200-$500) | Tank Rental/Buy | Moderate ($500+) |
| Consistency | Weather Dependent | Very High | High (On-Demand) |
| Byproducts | Bio-Fertilizer | None | Char/Ash |
Practical Tips for Best Performance
Feeding your digester a balanced diet is essential. The carbon-to-nitrogen (C:N) ratio should ideally be between 20:1 and 30:1. Manure is high in nitrogen, while straw and garden stalks are high in carbon. Mixing these materials ensures the bacteria have enough energy (carbon) to work and enough building blocks (nitrogen) to reproduce.
Agitation prevents the formation of a “crust” on the top of the slurry. If a hard layer of floating solids forms, the gas can get trapped underneath, potentially leading to a pressure build-up or a stalled process. Simply shaking the tank or using a built-in stirring paddle for a few minutes each day is sufficient.
Keep your feedstock pieces small. Shredding food scraps or grinding garden waste increases the surface area for the bacteria to attack. This leads to faster digestion and higher gas yields. A simple manual meat grinder or a dedicated garden shredder can make a massive difference in your daily output.
Advanced Considerations for Serious Practitioners
Scaling up often means moving from IBC totes to permanent concrete structures. A fixed-dome digester built into the ground is the gold standard for long-term reliability. These systems use the weight of the earth to maintain temperature and the pressure of the slurry to regulate gas flow. They can last for decades with very little maintenance.
Gas compression is another frontier for the advanced homesteader. Biogas is bulky and low-pressure, making it hard to transport. Using a modified air compressor to fill high-pressure tanks allows you to use the gas for remote tools or even tractors. This requires specialized knowledge of gas safety and moisture removal, as compressed biogas can be highly corrosive if not properly dried.
Electronic monitoring can take the guesswork out of the process. Low-cost sensors can now track the internal temperature, pH, and methane concentration in real-time. Connecting these to a simple microcontroller allows you to set up alerts for when the tank needs feeding or if the temperature is dropping too low.
Example: A Day on the Biogas Homestead
Imagine a homestead with two goats, ten chickens, and a 1,000-square-foot (93-square-meter) garden. Every morning, the homesteader collects the manure and any spilled bedding. This totals roughly 10 pounds (4.5 kg) of waste. This waste is dropped into a mixing bucket with 3 gallons (11 liters) of water.
The homesteader stirs the mixture into a consistent slurry and pours it into the inlet pipe of the IBC digester. An equal amount of liquid fertilizer automatically overflows from the outlet pipe into a collection barrel. This liquid is then diluted and used to water the fruit trees and vegetable beds.
Throughout the day, the gas storage tank slowly rises. By the time the sun sets, the storage unit holds enough gas to boil a large pot of water and cook a full dinner for the family. The cycle is complete, costing nothing but a few minutes of labor and utilizing materials that would otherwise have been a disposal problem.
Final Thoughts
Embracing biogas is a commitment to understanding the biological rhythms of your land. It transforms the concept of “waste” into a concept of “resource.” You are no longer just a consumer of energy; you are a producer, working in tandem with the microbial world to sustain your household.
The beauty of this system lies in its simplicity and its profound impact on your self-sufficiency. Starting small with a single tank allows you to learn the nuances of the “domestic dragon” without a massive financial risk. As your confidence grows, you can scale the system to meet more of your energy needs.
Experiment with different feedstocks and observe how your system responds. Every homestead is unique, and your digester will develop its own personality based on your local climate and your animals. Step into this loop, and you may find that the most valuable thing on your farm was the very thing you were trying to get rid of.
DIY Biogas Digester: Step-by-Step Construction Guide
Building a reliable biogas digester doesn’t require a degree in engineering, but it does demand attention to detail and a commitment to safety. Using an Intermediate Bulk Container (IBC) is the most popular starting point because these tanks are durable, UV-resistant, and already designed for liquid storage. You can often find them second-hand from food processing plants or industrial sites. Ensure the tank you choose previously held food-grade materials rather than hazardous chemicals.
To start your build, you will need the IBC tank, various lengths of 4-inch (100mm) and 2-inch (50mm) PVC pipe, and Uniseal gaskets. The 4-inch pipe serves as the “throat” of the system. You will install this pipe through a hole drilled into the top of the tank, ensuring it extends nearly to the bottom. This allows you to add fresh waste without introducing oxygen into the top portion of the tank where the gas collects.
The 2-inch pipe acts as the overflow for the liquid fertilizer. This pipe should be positioned on the opposite side of the tank from the inlet. As you add new slurry to the inlet, the pressure of the incoming liquid forces the older, fully digested liquid out through this overflow pipe. This “plug-flow” design ensures that the material stays in the tank long enough for the bacteria to extract all the available methane.
Building the Gas Storage Unit
Storing the gas is often the most challenging part of a DIY setup. Biogas is produced at very low pressure, so you cannot simply pump it into a standard propane tank without expensive equipment. The most common solution for homesteaders is the “floating drum” design. You will need a second tank for this, often another IBC with the top cut off. Fill this base tank with water to act as a seal.
Take a slightly smaller container, such as a heavy-duty plastic drum or another IBC with the bottom removed, and place it inside the water-filled base. Connect a hose from the top of your digester to the top of this floating container. As gas enters, the inner container will rise out of the water. The weight of the container itself provides the “head pressure” needed to push the gas through your lines to your stove.
If you find the gas pressure is too low, you can place heavy stones or bricks on top of the floating container. This increases the downward force and boosts the pressure at the burner. Always use a manometer—a simple U-shaped tube filled with water—to monitor the pressure in inches or centimeters of water column. This ensures you stay within safe operating limits for your appliances.
Feedstocks and Ratios for Maximum Yield
Success in biogas production depends entirely on what you feed the bacteria. Manure is the traditional fuel because it contains the necessary bacteria and a good balance of nutrients. Pig and chicken manure are particularly potent, producing more methane per pound than cow or horse manure. However, cow manure is excellent for starting a system because it is rich in the specific methanogens required for the process.
Food scraps are the “high-octane” fuel of the biogas world. Fats, oils, and grease (FOG) have the highest energy density, but they must be introduced slowly to avoid clogging the system. Sugar and starch-rich wastes like bread, pasta, and fruit peels will trigger rapid gas production but can also cause the pH to drop quickly. Balancing these “fast” foods with “slow” foods like fibrous garden waste and manure is the key to a stable tank.
Avoid feeding your digester materials that are too woody or high in lignin. Sawdust, wood chips, and thick straw take too long to break down in a standard anaerobic environment. These are better suited for your traditional aerobic compost pile. Also, keep citrus peels and onions to a minimum, as their natural oils can inhibit bacterial growth if added in large quantities.
The Science of Temperature and Insulation
Biological activity is directly linked to temperature. In the mesophilic range (95°F / 35°C), a well-fed digester can produce its own volume in gas every 24 hours. If the temperature drops to 60°F (15°C), production will fall by more than 75%. This is why insulation is not optional in most climates. Wrapping your tank in several inches of closed-cell foam or burying it in a straw-bale enclosure can make the difference between success and failure.
Some homesteaders use active heating to keep their digesters productive during the winter. You can run a coil of PEX tubing inside the tank and circulate warm water through it from a solar thermal collector or a wood-fired boiler. This creates a feedback loop where you use a small amount of heat to generate a large amount of gas. Always monitor the temperature carefully; if you overheat the tank above 110°F (43°C), you risk killing the mesophilic bacteria and stalling the system.
In tropical regions, simply painting the tank black is often enough. The dark surface absorbs solar radiation during the day, keeping the internal temperature high. If you live in a region with high day-night temperature swings, adding a layer of thermal mass—like a ring of water barrels or a stone wall—around the digester can help stabilize the environment for the bacteria.
Gas Scrubbing and Moisture Management
Raw biogas is not pure methane. It contains 30% to 40% carbon dioxide and trace amounts of water vapor and hydrogen sulfide. While you can burn raw gas, it will have a lower flame temperature and may damage your equipment. Removing the water vapor is the first step. Install a “drip leg” or a T-junction at the lowest point of your gas line to collect condensed water before it reaches the stove.
Hydrogen sulfide (H2S) is the most dangerous contaminant. It smells like rotten eggs and turns into sulfuric acid when it burns, which will rapidly corrode metal burners and valves. A simple H2S scrubber can be made from a PVC pipe filled with rusted steel wool or iron oxide pellets. As the gas passes through, the iron reacts with the sulfur, removing it from the stream. You will need to replace or “regenerate” the iron periodically.
Carbon dioxide removal is usually only necessary if you plan to compress the gas or use it in an internal combustion engine. For cooking, the CO2 acts as a buffer and does not significantly hinder the process. However, if you want a “cleaner” flame, you can bubble the gas through a lime-water solution, which will absorb the CO2 and leave you with nearly pure biomethane.
Safe Operating Procedures
Handling flammable gas always carries risks, but biogas is generally safer than propane because it is lighter than air. If a leak occurs, the methane will rise and dissipate rather than pooling on the ground like propane does. However, in an enclosed space, any gas buildup can be explosive. Always install your digester and gas storage outdoors or in a very well-ventilated structure.
Flashback arrestors are a mandatory safety feature. This is a small device, often a chamber filled with water or a fine metal mesh, installed in the gas line between the storage tank and the stove. It prevents a flame from traveling backward through the pipe into the storage tank. Never operate a biogas system without one of these “bubblers” in place.
Maintenance is straightforward but must be consistent. Check all your pipe connections once a week using soapy water. If bubbles form, you have a leak. Inspect the pressure relief valves to ensure they are not stuck. Methane is a potent greenhouse gas, so preventing leaks is not just a safety issue—it is an environmental responsibility.
Daily Management and Feeding Schedules
Consistency is the secret to a high-yielding digester. It is much better to feed your system a small amount every day than a large amount once a week. Sudden “slugs” of food waste can shock the bacteria and lead to “foaming,” where the slurry bubbles up into the gas lines and causes clogs.
Develop a routine. Collect your waste, mix it with water, and feed the digester at the same time each morning. This keeps the internal environment stable and ensures a steady supply of gas for your evening meal. If you go on vacation, the digester can survive for a week or two without feeding, but gas production will slowly decline as the bacteria run out of food.
Keep a logbook of your inputs and outputs. Note what you fed the system and how much gas was produced. Over time, you will notice patterns. You might find that your goats’ manure produces more gas when they are on fresh pasture, or that your garden scraps need more water to flow smoothly. This data is the foundation of homesteader wisdom.
Advanced System Scaling
Once you master the IBC tote system, you might consider building a permanent underground digester. These are often made of brick, concrete, or ferro-cement. Underground systems are naturally insulated by the soil, making them much more efficient in temperate climates. They can also be built much larger, allowing you to process waste from a small dairy or a large commercial garden.
Integrated systems take the biogas loop to the next level. You can use the heat from a biogas-powered generator to keep the digester warm, creating a self-sustaining energy cycle. The digestate can be used to grow algae or duckweed in a pond, which can then be harvested and fed back into the digester or used as high-protein animal feed.
Community-scale biogas is another growing trend. In some areas, multiple homesteads pool their waste to run a larger, more efficient central digester. This allows for more professional management and the potential to produce enough gas to run a small vehicle fleet or a community kitchen. Cooperation can often turn a marginal resource into a robust energy grid.
The Role of Digestate in Soil Health
We often focus on the gas, but many experienced homesteaders believe the liquid fertilizer is the more valuable product. Unlike raw manure, which can “burn” plants with excessive ammonia, digestate is a balanced, liquid plant food. It contains all the original nutrients in a form that plants can absorb instantly.
The anaerobic process also breaks down complex organic matter into “humic substances” that improve soil structure. Regular applications of digestate increase the water-holding capacity of your soil and encourage the growth of beneficial mycorrhizal fungi. Your garden becomes more resilient to drought and pests, further reducing your reliance on external inputs.
To use the digestate, dilute it with water at a ratio of about 1:5 for garden plants or use it full-strength for fruit trees. Because it is a liquid, it is easy to apply through a standard watering can or a fertigation system. Just be sure to filter it through a fine mesh if you are using it in a drip irrigation line to prevent clogs from any residual fine solids.
Troubleshooting a “Sick” Digester
If your gas production suddenly drops, the first thing to check is the pH. A sour digester will often have a milky or yellowish appearance and a sharp, vinegary smell. You can fix this by temporarily stopping the feeding and adding a small amount of wood ash or baking soda dissolved in water to buffer the acidity.
Foaming is usually a sign of overfeeding, particularly with proteins or fats. If you see foam entering your gas lines, immediately reduce the amount of food you are adding and increase the water ratio. You can also add a small amount of vegetable oil to the tank, which acts as a natural defoamer.
If the tank smells like rotten eggs but the gas yield is still high, your H2S scrubber is likely exhausted. Replace the steel wool or iron oxide pellets. If the gas burns with a yellow flame instead of blue, you may have too much carbon dioxide or moisture in the line. Check your drip legs and ensure your gas lines are properly sized and clear of obstructions.
The Future of Home Energy
Biogas technology is a return to a more logical way of living. It acknowledges that there is no such thing as “away” when we throw things out. By closing the loop on our homesteads, we take another step toward true independence from the industrial systems that dominate modern life.
This is not a “set and forget” technology. It requires a relationship with the microbes and an understanding of the biology of your land. But for the homesteader who values self-reliance, the rewards are immense. You gain heat for your home, fuel for your kitchen, and life for your soil, all from the very materials others consider a nuisance.
Start with what you have. Use the scrap wood in your shed and the old tanks in your field. Build your first “domestic dragon” and watch as your waste becomes your wealth. The knowledge you gain will be a legacy you can pass down, ensuring that the next generation knows how to harvest the energy that has always been right under their feet.
Final Thoughts on DIY Biogas
Transitioning to a biogas system is more than just a plumbing project; it is an ideological shift. It marks the end of the “disposable” mindset and the beginning of a circular way of life. When you stop seeing manure as a problem and start seeing it as a fuel, your entire perspective on farming and homesteading changes.
The practical benefits are undeniable, but the psychological benefits of knowing you can cook your meals and heat your space using only the resources on your own land are even greater. It provides a level of security that no bank account or insurance policy can match. You are in control of your own energy grid.
Continue to experiment, share your findings with your neighbors, and refine your techniques. The world of small-scale biogas is growing, and homesteaders are at the forefront of this energy revolution. Take that first step today, and you will never look at a pile of manure the same way again.
