
How To Become More Self-Sufficient Without Starting a Full-Blown Farm…
Want to start preserving your harvest, making your own soap, or building a backyard root cellar — but not sure where to begin? “Homesteading Advice” gives you instant lifetime access to 35+ practical homesteading books on food preservation, veggie gardening, DIY natural cleaning products (save over $250 per year with this skill alone), brewing, off-grid energy, and a whole lot more…
Click Here To Check It Out Now!
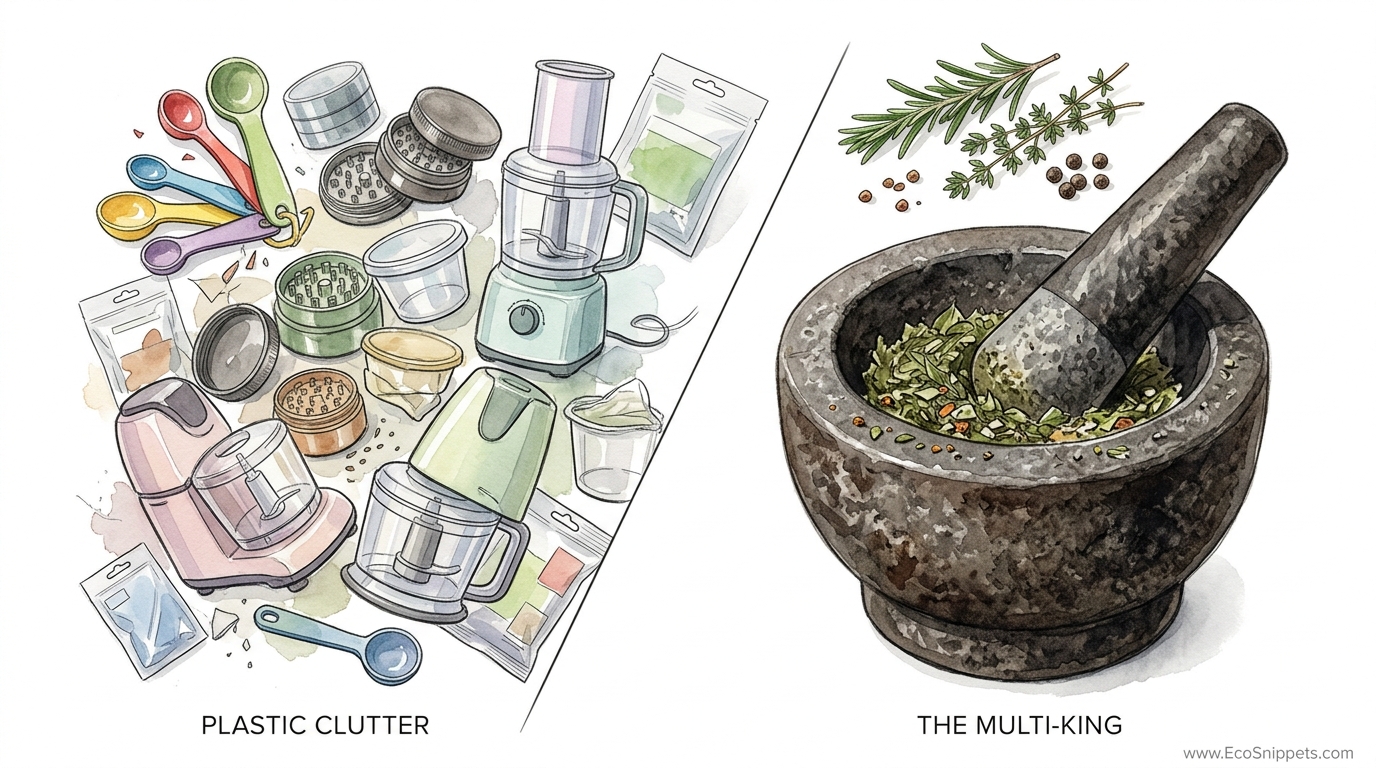
You don’t need a drawer full of gadgets that break; you need one heavy stone that will last forever. We’ve been sold a lie that every vegetable needs its own plastic gadget. One heavy stone mortar can crush spices, emulsify sauces, grind medicine, and make the world’s best pesto—all while using zero electricity and outliving your grandchildren.
Modern kitchens are often cluttered with motorized gizmos that hum, whir, and eventually end up in a landfill. The stone mortar and pestle is the ultimate “multi-king.” It is a tool of pure physics and friction. When you use a stone mortar, you aren’t just preparing food; you are participating in a tradition that spans over 35,000 years.
This guide will help you understand the weight, the texture, and the technique required to master this ancient vessel. Whether you are looking to extract the deepest oils from a handful of peppercorns or create a velvety curry paste from scratch, the stone mortar is your most loyal ally. It rewards patience with flavor profiles that a spinning metal blade simply cannot achieve.
How To Use A Stone Mortar And Pestle
A stone mortar and pestle consists of two parts: the mortar, which is the heavy bowl, and the pestle, the club-shaped tool used for grinding. These tools have existed since the Stone Age because they solve a fundamental human problem: how to turn something hard and dry into something useful and digestible. From the apothecary shops of ancient Rome to the village kitchens of Thailand, the stone mortar has been the primary tool for crushing grains, herbs, and minerals.
In real-world terms, this tool works by applying pressure and friction to rupture the cell walls of your ingredients. While a blender uses sharp blades to slice through food, the stone mortar crushes it. This crushing action is what forces out the essential oils and juices, creating a depth of flavor that is both more intense and more aromatic.
You will find these tools in various weights and materials. A heavy granite mortar is the standard for most kitchens today because its density provides the necessary force without requiring you to push down too hard. The weight of the stone does half the work for you. Smaller marble or porcelain versions are often used for crushing pills or making small batches of dry spices, while the porous volcanic basalt of a Mexican molcajete is the secret to perfect, rustic salsas.
The Mechanics of the Grind: How to Do It
Using a stone mortar is a tactile experience that requires a bit of rhythm. You do not simply bash at the food like a caveman; instead, you use a combination of two distinct motions: pounding and grinding. Mastering these two movements is the key to getting the texture you want.
The Pounding Motion:
Use this for hard, dry ingredients like whole peppercorns, coriander seeds, or nuts. Hold the mortar firmly with your non-dominant hand. With your dominant hand, lift the pestle and bring it down vertically onto the ingredients. You are not trying to smash the bowl; you are using the weight of the pestle to crack the husks of the seeds. It is a controlled “drop and press” motion.
The Circular Grinding Motion:
Once the hard items are cracked, switch to a circular grind. Press the head of the pestle into the bottom and sides of the mortar. Move it in a firm, steady circular pattern. This creates the friction needed to turn the cracked seeds into a fine powder or to emulsify wet ingredients like garlic and oil into a smooth paste.
The Step-by-Step Process:
- Place your driest and hardest ingredients in the bowl first. Only fill the mortar about 1/3 of the way (approximately 100ml to 150ml for a standard 2-cup mortar) to prevent items from jumping out.
- Start with a gentle pound to break the large structures. Keep your hand cupped over the top of the mortar to catch any stray seeds.
- Add your “aromatics” next, such as garlic, ginger, or fresh chilies. The moisture from these will help bind the dry spices.
- Finish with leafy herbs or liquids like lime juice and oil. The circular grind will incorporate these into a cohesive sauce or paste.
Benefits of the Stone
The primary reason to choose a stone mortar over an electric alternative is flavor. Scientific studies on food preparation show that crushing plant material ruptures more cell walls than slicing. When a blade spins at high speed, it generates heat and “bruises” the ingredients, often causing volatile oils to evaporate before they ever reach your plate.
The stone mortar remains cool. It preserves the integrity of the ingredients, ensuring that the bright, citrusy notes of coriander or the pungent bite of fresh garlic are fully captured in the paste. Furthermore, the texture you achieve is superior. A food processor creates a homogenous “smoothie” texture, whereas a mortar and pestle allows for a rustic, layered consistency where you can still see and taste the individual components of a sauce.
Another advantage is the sheer durability. A high-quality granite or basalt mortar is essentially a rock. It cannot “break” in the way a motor can burn out. If you treat it well, it is a piece of equipment that you will pass down through your family. It requires no electricity, makes very little noise compared to a blender, and is remarkably easy to clean once you know the proper technique.
Challenges and Common Mistakes
One of the most frequent errors beginners make is overfilling the mortar. If you put too many ingredients in at once, you won’t have enough room to create the necessary friction. The items will simply slide around each other, and you will end up with a chunky, uneven mess. Always work in small batches if you are making a large quantity of food.
Another mistake is using too much “brute force.” You do not need to slam the pestle into the mortar. If you are using a heavy granite set, the weight of the stone (often weighing between 3kg to 5kg or 7lbs to 11lbs) provides plenty of downward pressure. Focus on the “twist” at the bottom of the stroke. It is the friction between the two stone surfaces that does the grinding, not the impact.
Finally, many people forget that stone is porous. If you use scented dish soap to clean a granite or basalt mortar, the stone may absorb that scent. The next time you go to make a spicy salsa, it might have a distinct “mountain spring” aftertaste. Stick to warm water and a stiff brush for daily cleaning.
Limitations: When This May Not Be Ideal
While the mortar and pestle is a “multi-king,” it is not the fastest tool for every job. If you are preparing a meal for fifty people and need to puree two gallons (about 7.5 liters) of soup, the stone mortar is a poor choice. It is a tool for precision and small-batch intensity, not mass production.
Physical strength can also be a constraint. While the stone does much of the work, grinding a tough curry paste from scratch can take 15 to 20 minutes of active labor. For individuals with arthritis or limited wrist mobility, a heavy stone pestle may be difficult to use for extended periods.
Additionally, certain stones are specialized. A porous volcanic rock (molcajete) is incredible for salsa but terrible for grinding delicate medicine or fine pharmaceutical powders because the material gets trapped in the pores. Conversely, a smooth marble mortar might struggle to grip slippery seeds that a rougher granite surface would handle with ease.
Comparison: Stone vs. Electric Grinders
| Factor | Stone Mortar & Pestle | Electric Spice Grinder / Blender |
|---|---|---|
| Flavor Quality | Superior; releases oils without heat. | Moderate; blades can “burn” volatile oils. |
| Texture Control | Complete; from coarse to fine. | Limited; often pulverizes into dust. |
| Maintenance | Virtually zero; simple rinsing. | High; requires disassembly and washing. |
| Lifespan | Decades or centuries. | 3 to 10 years (motor dependent). |
| Effort Level | High; requires manual labor. | Low; push-button operation. |
| Noise | Low; rhythmic thudding. | High; loud whirring or buzzing. |
Practical Tips and Best Practices
If you have just purchased a brand-new stone mortar, you cannot use it immediately. Most new stone tools have a layer of “stone dust” or grit from the manufacturing process. You must perform a “seasoning” or “curing” process to ensure you don’t end up with sand in your dinner.
The Seasoning Method:
- Rinse the mortar and pestle with plain water and a stiff brush. Let it dry completely.
- Add a handful of dry white rice (about 1/4 cup or 60g). Grind the rice until it becomes a fine powder.
- Look at the powder. If it is grey or has black flecks, discard it and repeat the process with fresh rice. Keep going until the rice powder stays pure white.
- Add some “aromatics” for the final stage. Throw in 4-5 cloves of garlic, a teaspoon of salt, and some cumin seeds. Grind these into a paste and smear it all over the inside of the bowl. Let it sit for an hour, then rinse with water.
To protect your kitchen surfaces, always place a folded kitchen towel or a non-slip silicone mat underneath your mortar. This dampens the noise and prevents the heavy stone from scratching your countertops or cracking your tiles if you are working with a lot of force.
Advanced Considerations
Serious practitioners of the stone grind understand the “Science of Aromatics.” When you are making a complex paste—like a traditional Thai Green Curry—the order of operations matters. Start with the “dry and hard” (peppercorns, dried chilies, salt). The salt acts as an abrasive, helping to grind down the other ingredients faster.
Temperature is another factor. If you are working with fatty nuts or oily seeds, the friction can generate enough heat to turn the oils rancid or sticky. Some professional chefs prefer to use a marble mortar for these tasks, as marble has a high thermal mass and stays cool to the touch, preventing the ingredients from clumping.
For those using the mortar for medicinal purposes (trituration), a porcelain or glass set is often preferred over stone. These materials are non-porous and chemically inert, ensuring that no traces of the previous grind remain in the vessel and that the stone minerals don’t react with the medicine.
Examples and Scenarios
Consider the classic “Genovese Pesto.” In a food processor, the basil is shredded by blades, which causes the edges of the leaves to oxidize and turn dark green or brown. The result is often a “flat” tasting sauce.
In a stone mortar, you begin by crushing a clove of garlic with a pinch of coarse sea salt. Once you have a paste, you add toasted pine nuts and crush them into a creamy consistency. Only then do you add the basil leaves, using a gentle, circular “buffing” motion. Because you are crushing the leaves rather than cutting them, the pesto remains a vibrant, bright green, and the fragrance is significantly more intense.
Another scenario is the “Emergency Spice Blend.” You find a recipe that calls for ground cardamom, but you only have whole pods. An electric grinder is often too large to handle just three or four pods—the blades will simply miss them. A small stone mortar allows you to crack the pods, remove the green husks by hand, and then pulverize the tiny black seeds into a fresh, potent powder in less than sixty seconds.
Final Thoughts
The stone mortar and pestle is more than just a kitchen tool; it is a testament to the idea that the old ways are often the best ways. It represents a shift away from the “plastic clutter” of modern convenience and a return to a more intentional, self-reliant way of living. When you feel the weight of the stone in your hand and smell the sudden burst of aroma from freshly crushed spices, you realize why this tool has never been truly replaced.
Mastering the stone requires a bit of practice and a willingness to put in some physical effort, but the rewards are measurable in every bite of food you prepare. It is a tool that asks for very little—just some rice to season it and water to clean it—and gives back a lifetime of superior flavor.
Start small. Buy a heavy granite set, season it properly, and try making a simple garlic and herb paste. You will likely find that your electric mini-chopper begins to gather dust, while the heavy stone on your counter becomes the heart of your kitchen. Once you’ve experienced the depth of flavor that only friction and stone can provide, there is no going back to the spinning blades of the modern world.
