How To Become More Self-Sufficient Without Starting a Full-Blown Farm…
Want to start preserving your harvest, making your own soap, or building a backyard root cellar — but not sure where to begin? “Homesteading Advice” gives you instant lifetime access to 35+ practical homesteading books on food preservation, veggie gardening, DIY natural cleaning products (save over $250 per year with this skill alone), brewing, off-grid energy, and a whole lot more…
Click Here To Check It Out Now!
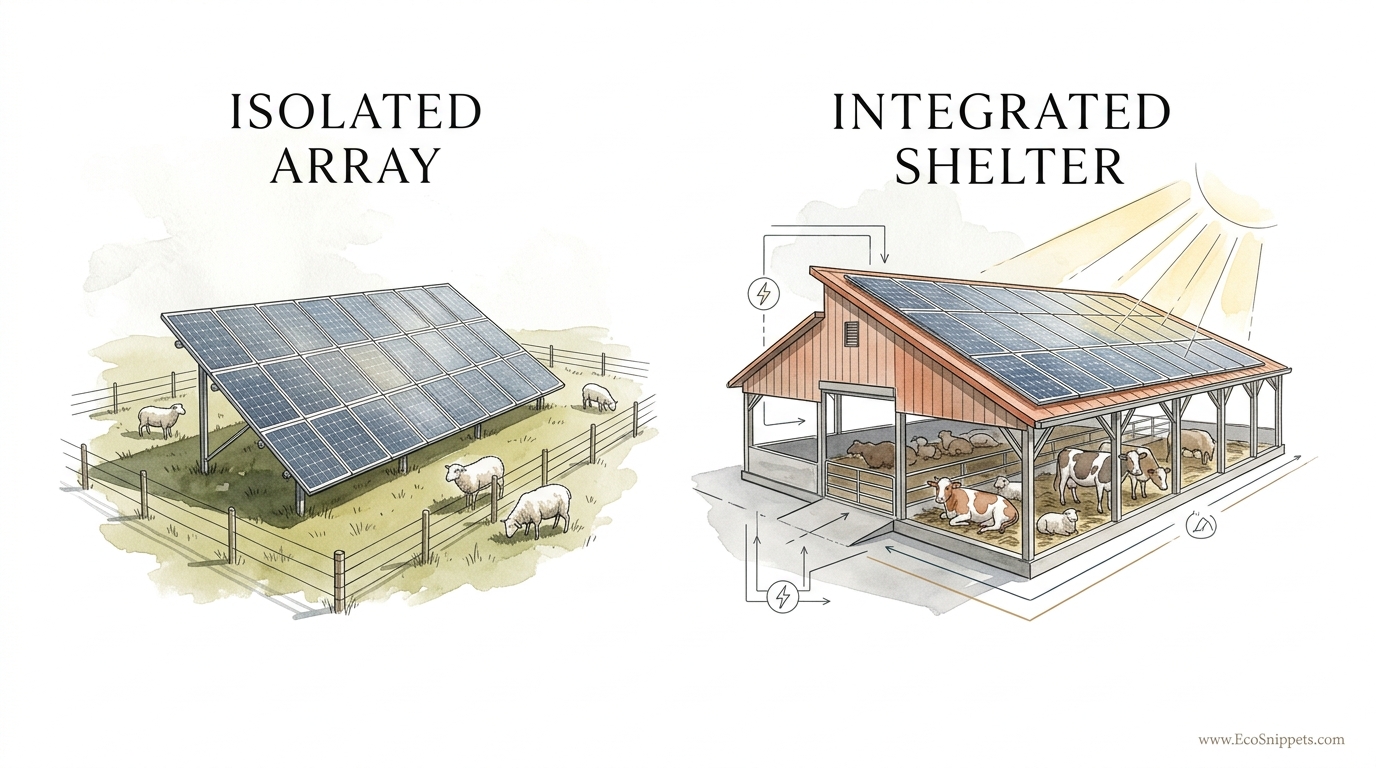
Stop wasting your pasture space on solar racks and start making your buildings work for you. An isolated solar array is just a piece of hardware. An integrated power-shelter is a homestead asset. By turning your livestock housing into your power plant, you save space, provide critical shade, and keep your wiring runs short and efficient.
Setting up a solar array in the middle of a field often feels like a missed opportunity. You spend time and money building a heavy-duty rack just to hold glass in the air, while your animals are huddling under a lone tree or the eaves of a barn to escape the sun. Combining these two needs creates a functional powerhouse that serves the land and the creatures upon it.
This guide walks you through the transition from simple ground-mount arrays to integrated power-shelters. We will look at how to build structures that withstand the weight of winter snow and the curiosity of a thousand-pound (450 kg) steer. This approach is about more than just electricity; it is about building a legacy of self-reliance.
Modern homesteading requires us to be smarter with every square foot (square meter) we manage. Integrating solar into your animal housing is a return to the old ways of multipurpose design, updated with the tools of the future. You are not just harvesting photons; you are providing stewardship for your flock and your soil.
Integrated Solar Livestock Housing
Integrated solar livestock housing is the practice of using functional animal shelters as the mounting foundation for a photovoltaic (PV) system. It is a localized form of agrivoltaics, which is the simultaneous use of land for solar energy and agriculture. Instead of treating the solar array as an obstacle to mow around, you treat it as the roof of a loafing shed, a chicken coop, or a dairy barn.
This concept exists because farm structures are often the largest, most unobstructed surfaces on a property. A south-facing barn roof or a dedicated lean-to provides an ideal angle for solar collection while offering 100% shade to the ground below. In real-world homesteading, this means your sheep can graze or rest directly under the source of your power, staying cool while the panels convert that same heat into electricity.
Think of it as a double-duty canopy. A traditional solar rack is a skeleton that provides no protection from the rain or wind. An integrated shelter adds walls, windbreaks, and potentially bedding areas, turning a high-tech energy system into a low-tech survival tool for animals. In many regions, the shade provided by these panels is the difference between a productive summer and one marked by heat stress and weight loss.
Researchers have found that agrivoltaic systems can improve land use efficiency by up to 60 percent. On a small homestead, that efficiency translates to more pasture available for forage and less space dedicated to “dead” infrastructure. Whether you are housing a small flock of chickens or a small herd of Dexter cattle, the principle remains the same: every roof should be a producer.
How to Build Your Integrated Power-Shelter
Building an integrated solar shelter requires a blend of carpentry and electrical engineering. You cannot simply throw panels on a flimsy shed and hope for the best. The structure must be designed to handle “dead loads,” which is the weight of the panels and rails, and “live loads,” which include wind pressure and snow accumulation.
The first step is site selection. You need a location with clear southern exposure—or northern exposure if you live in the southern hemisphere—free from the shadows of silos, tall trees, or your main house. For most homesteaders, a lean-to design with a 15 to 30-degree pitch is the easiest to build and provides a good balance between solar gain and snow shedding.
Structural integrity is paramount. Solar panels and their mounting hardware typically weigh between 2.5 and 4 pounds per square foot (12 to 20 kg per square meter). You must use 4×4 or 6×6 posts (10×10 cm or 15×15 cm) anchored in concrete to prevent the structure from “sailing” away during high winds. Use heavy-duty rafters, such as 2x6s (5×15 cm) spaced 16 inches (40 cm) apart, to ensure the roof does not sag under the weight.
Wiring must be handled with extreme care when livestock are involved. Use electrical metallic tubing (EMT) or heavy-duty Schedule 80 PVC conduit for all runs. Animals, especially goats and cattle, are notoriously curious and will chew or rub against anything they can reach. Keep the inverter and battery bank in a separate, ventilated “power room” or a locked cabinet that is inaccessible to the animals.
Grounding is your most critical safety step. Since animals are highly sensitive to “stray voltage,” ensure your system is grounded according to local codes. A copper grounding rod driven 8 feet (2.4 meters) into the earth is the standard. This protects both your electronics from lightning and your livestock from electrical faults that could travel through the metal framing of the shelter.
Benefits of the Solar Power-Shelter
The primary benefit of this system is the radical reduction in heat stress for your animals. Research shows that temperatures under solar panels can be 10 to 15 degrees Fahrenheit (5 to 8 degrees Celsius) cooler than in open pasture. For dairy cows, this cooler microclimate has been linked to an 8 percent increase in milk production during peak summer months.
Animal welfare is significantly improved when they have a reliable, permanent shade structure. Sheep, in particular, spend more time resting and ruminating when they have access to solar shade, leading to better weight gain and wool quality. The panels act as a thermal buffer, absorbing the sun’s radiant heat and preventing it from reaching the animals’ skin.
Land efficiency is the homesteader’s greatest win. When you combine your power plant with your livestock housing, you free up the space that a ground-mount array would have occupied. This allows for more intensive rotational grazing or the planting of additional garden beds. You are essentially getting two uses out of the same footprint.
Short wiring runs are another major advantage. When your solar panels are on top of the building where you need the power—such as for a water pump, a tank heater, or barn lighting—you reduce “voltage drop.” Shorter cables are cheaper and more efficient, meaning more of the power you harvest actually makes it to your batteries or appliances.
Passive income or cost savings can be substantial. By generating your own power for farm operations, you insulate your homestead from rising utility costs. If your system is large enough to be grid-tied, you might even see a credit on your bill, essentially allowing your livestock’s roof to pay for their feed.
Challenges and Common Pitfalls
The “Rubbing Factor” is a challenge many beginners overlook. A 1,200-pound (540 kg) cow using a 4×4 support post as a scratching post can exert tremendous lateral force. If your structure isn’t reinforced with cross-bracing or heavy-duty anchors, the vibration can loosen electrical connections or even crack the glass on your panels over time.
Ammonia corrosion is a silent killer of solar hardware. Livestock waste produces ammonia gas (NH3), which is highly corrosive to the aluminum frames and copper wiring of solar modules. In enclosed barns, these concentrations can be high enough to void your panel warranties. To avoid this, ensure your shelter has excellent natural ventilation and use panels certified under IEC 62716 for ammonia resistance.
Cable management is often the point of failure in DIY systems. A loose wire hanging a few inches too low is an invitation for a goat to chew. Always use “rodent-proof” or “animal-proof” conduit. Even “UV-resistant” zip ties will eventually fail under the sun’s glare, so use stainless steel clips to secure your wires to the racking.
Cleaning the panels can be difficult if the shelter is tall or poorly positioned. Farm environments are dusty, and “bio-film” from animal dander and dust can reduce your solar output by 20 percent or more. When designing your shelter, ensure you have a way to safely reach the panels with a long-handled soft brush and water for regular maintenance.
Snow loading requires careful calculation. In northern climates, snow can slide off a metal roof in a “mini-avalanche.” If your solar panels are the roof, that snow will dump right where your animals enter or exit the shelter. You must design the pitch so the snow sheds away from animal traffic areas or install “snow guards” to prevent sudden slides.
Limitations and Environmental Constraints
Not every animal is a good fit for every solar structure. Goats are notorious for climbing, and they will absolutely attempt to get onto the roof of a low-profile shelter. If you have goats, your solar panels must be mounted high enough—typically 8 feet (2.4 meters) or more—to prevent them from jumping onto the glass and shattering it.
Orientation is a fixed constraint. If your best pasture is on a north-facing slope, an integrated shelter may struggle to get enough sun to justify the cost. Solar panels are most efficient when they are perpendicular to the sun’s rays. A shelter built on a steep, shaded hillside might serve as a great animal home, but it will be a poor power plant.
Micro-shading from other farm infrastructure can ruin your efficiency. A single shadow from a nearby silo or a power pole falling across one panel can drop the output of an entire string of panels. You must map the shadows on your property during both the winter and summer solstices to ensure your integrated shelter remains in the sun year-round.
Structural limits of existing buildings can prevent integration. You cannot simply add 500 pounds (225 kg) of solar equipment to an old, rotting shed. Many older farm buildings were built with the bare minimum of materials and may collapse under the additional weight of solar panels and a heavy snow load. Always verify the strength of your rafters before installation.
Comparison: Integrated Shelter vs. Isolated Array
Choosing between these two approaches depends on your available space and the type of livestock you manage.
| Feature | Integrated Power-Shelter | Isolated Ground-Mount |
|---|---|---|
| Land Use | High efficiency; dual-purpose footprint. | Requires dedicated “dead” space. |
| Animal Benefit | Provides critical shade and weather protection. | None; usually requires fencing out. |
| Cost | Lower overall (shared structural costs). | Higher (dedicated racking and fencing). |
| Maintenance | Requires cleaning animal dust/debris. | Requires mowing or herbicide under panels. |
| Complexity | High; requires animal-proofing and ventilation. | Lower; standard mounting hardware. |
Practical Tips and Best Practices
Always install your panels with a gap between them and the roof surface. This “air gap” of 3 to 6 inches (7.5 to 15 cm) allows for airflow, which keeps the panels cool and improves their efficiency. Heat is the enemy of solar production; a panel that gets too hot will actually produce less power than a cooler one.
Use “bifacial” solar panels if your shelter has an open floor or reflective bedding like light-colored sand. Bifacial panels can harvest light from both the top and the bottom. On a livestock shelter, they can pick up reflected light from the ground, potentially increasing your energy harvest by 10 to 20 percent without taking up any extra space.
Protect the uprights from moisture and manure. The base of your shelter’s posts will be in constant contact with animal waste and bedding, which can rot wood or corrode steel quickly. Use heavy-duty post sleeves or concrete piers that extend at least 12 inches (30 cm) above the ground level to keep your main structural members dry and secure.
Establish a “Buffer Zone” for your electronics. Even if the panels are on the roof, your charge controllers and batteries should be behind a solid wall or inside a heavy-duty steel cabinet. Curious animals can vibrate an entire building, which can loosen terminal screws over time. Check your electrical connections every six months for tightness.
Include a “Quick-Disconnect” switch outside the animal area. In the event of a fire or an electrical emergency, you need to be able to shut off the power from the panels immediately without entering the animal enclosure. This is a safety requirement for most building codes and a practical necessity for any homesteader.
Advanced Considerations for Serious Practitioners
For those looking to push their systems further, consider integrating DC-coupled appliances directly into the shelter. You can run high-efficiency DC fans or water pumps directly from the solar panels, bypassing the need for an inverter during the day. This reduces energy loss and creates a more resilient system for critical needs like ventilation.
Automation can turn your solar shelter into a “smart barn.” Use the power generated on the roof to run sensors that monitor water trough levels, animal activity, or interior temperature. You can set up a system where exhaust fans automatically kick on when the temperature hits a certain threshold, powered entirely by the sun that is causing the heat.
Scaling your system requires thinking about the “Micro-Grid.” If you have multiple shelters across different pastures, you can link them together to create a farm-wide power network. This allows a shelter in a sunny pasture to support a water pump in a shaded one, distributing the energy where it is needed most.
Structural reinforcement for “Animal Impact” is an advanced engineering step. In areas with large livestock like draft horses or beef cattle, consider using steel I-beams or reinforced concrete columns for the primary supports. The kinetic energy of a large animal bumping into a structure is significant, and your energy assets must be built to withstand it for 25 years or more.
Scenario: The 1.2kW Mobile Chicken Power-Tractor
Imagine a large, mobile chicken coop—a “chicken tractor”—measuring 8 by 12 feet (2.4 by 3.6 meters). By mounting three 400-watt solar panels on the roof, you create a 1.2kW mobile power plant. This system can power an automated door, an electric fence energizer, and an LED lighting system to extend laying hours during the winter.
The weight of the panels acts as a ballast, helping to keep the lightweight coop from flipping over in high winds. The batteries are stored in a ventilated box on the “tongue” of the trailer. As you move the coop across the pasture to provide fresh grass for the chickens, your power plant moves with them, ensuring your electric fence is always “hot” regardless of how far you are from the main house.
During the height of summer, the chickens spend their days in the cool shade directly beneath the coop’s floor and the panels’ overhang. The panels absorb the intense solar radiation that would otherwise overheat the interior of the coop. This dual-use structure provides the chickens with a predator-proof home and provides the homesteader with a portable source of power for remote tools.
Final Thoughts
Integrating solar power into your livestock housing is a masterclass in homesteading efficiency. It moves you away from being a consumer of technology and toward being a designer of ecosystems. By providing shade and shelter for your animals while harvesting the very energy that creates the heat, you are working with nature rather than fighting against it.
A well-built power-shelter is a testament to the grit and foresight required for true self-reliance. It is a structure that serves the soil, the animal, and the family for decades. Whether you start with a simple shed for a few goats or a massive loafing barn for a dairy herd, the goal remains the same: build it once, build it right, and make it productive.
Take the time to plan your structure, secure your wiring, and respect the curiosity of your livestock. The transition from a simple array to an integrated asset is the first step toward a more resilient, independent future. Start building your power-shelter today and watch your homestead thrive under the dual light of the sun and your own ingenuity.
