How To Become More Self-Sufficient Without Starting a Full-Blown Farm…
Want to start preserving your harvest, making your own soap, or building a backyard root cellar — but not sure where to begin? “Homesteading Advice” gives you instant lifetime access to 35+ practical homesteading books on food preservation, veggie gardening, DIY natural cleaning products (save over $250 per year with this skill alone), brewing, off-grid energy, and a whole lot more…
Click Here To Check It Out Now!
You are paying thousands for a plastic box when the ‘trash’ from old laptops can power your entire house for free. Companies want you to believe that off-grid energy storage has to cost five figures. But at this very moment, thousands of high-quality lithium cells are being thrown away in ‘dead’ laptop batteries. Harvesting and testing these 18650 cells allows you to build a massive power wall with ten times the capacity of a retail unit for the price of a few fuses and some wire.
Modern society is built on a cycle of planned obsolescence that treats energy like a subscription service. When a laptop battery “dies,” it is almost never because every cell inside has failed. Usually, a single weak cell triggers the battery management system to shut the whole pack down for safety. The remaining five or eight cells are often perfectly healthy, sitting in a landfill, waiting for someone with the grit to reclaim them.
Taking control of your energy storage means you no longer have to rely on expensive, proprietary hardware that you cannot repair yourself. An upcycled power wall is more than just a battery; it is a statement of self-reliance. You are learning the fundamental language of electricity and turning discarded industrial waste into a silent, clean, and incredibly powerful engine for your home.
Building this system requires patience, a steady hand, and a commitment to safety. This guide will walk you through the entire process, from cracking open the first plastic casing to wiring a massive 48V (forty-eight volt) array into your home solar system. This is the path of the modern pioneer, using the scraps of the digital age to forge a future that is truly off the grid.
Building Your Own Lithium Battery Bank
A lithium battery bank is essentially a collection of hundreds or thousands of individual cells wired together to act as one giant battery. The most common building block for these systems is the 18650 cell. These cylindrical cells are 18 millimeters (0.71 inches) in diameter and 65 millimeters (2.56 inches) tall, hence the name “18650.” They are the same cells found in everything from Tesla Model S battery packs to high-end flashlights and medical devices.
These cells exist because they offer an incredible energy density. Pound for pound, lithium-ion provides significantly more storage than the old lead-acid batteries found in cars or golf carts. A single 18650 cell typically holds about 13 watt-hours of energy, whereas a standard AA battery only holds about 3.9 watt-hours. When you combine thousands of them, you create a reservoir of power that can run air conditioners, refrigerators, and power tools for days at a time.
Real-world applications for these upcycled banks range from small portable “solar generators” to massive residential storage systems. In an off-grid cabin, a DIY power wall can store the energy collected by solar panels during the day to provide light and warmth all through the night. In suburban homes, these systems act as an insurance policy against grid failure, kicking in instantly when the power lines go down due to storms or peak demand.
Think of each cell like a single brick in a wall. Alone, it doesn’t do much. But when stacked and mortared together with proper wiring and safety protocols, it becomes a structural foundation for your home’s independence. This approach is not just about saving money; it is about reclaiming the wisdom of how things work, much like an ancestor would have known every part of their plow or their loom.
How to Harvest and Test Your Cells
The journey begins with sourcing. Local IT repair shops, e-waste recycling centers, and corporate laptop replacement programs are gold mines for “dead” battery packs. Often, these businesses are happy to give them away for free to avoid paying disposal fees. Medical battery packs are even better, as they are often replaced on a strict schedule regardless of their actual health, resulting in cells with very low cycle counts.
Step 1: The Extraction Process
Opening a laptop battery requires a set of pliers, a flat-head screwdriver, and extreme caution. You must pry along the seams of the plastic housing, being careful not to puncture the cells inside. Most packs are ultrasonically welded or glued, so expect some resistance. Once the plastic is cracked open, you will see a series of cells connected by thin nickel strips. Use wire cutters to snip the strips one by one. Cutting through two wires at once can cause a short circuit, so always work on one connection at a time.
Step 2: Initial Screening
Once the cells are freed, use a multimeter to check their resting voltage. A healthy 18650 cell should sit between 3.0V (three volts) and 4.2V. Cells that read 0V or show signs of physical damage, such as corrosion or leaking fluid, must be set aside for recycling. If a cell reads between 2.0V and 2.5V, it might be recoverable, but it requires a very slow “trickle” charge to bring it back to life safely. Any cell below 2.0V should generally be considered “garbage” because the internal chemistry may have degraded enough to form dendrites, which can cause internal shorts later.
Step 3: Capacity Testing
You cannot build a balanced battery pack without knowing the exact capacity of each cell. Use a dedicated 4-channel tester like the Opus BT-C3100 or the LiitoKala Lii-500. These devices will fully charge the cell, then discharge it to a set voltage while measuring exactly how many milliamp-hours (mAh) it provides. For a high-quality power wall, you should only use cells that retain at least 80% of their original factory capacity. If a cell was rated for 2,200mAh and it now gives 1,800mAh, it is still a prime candidate for your bank.
Step 4: Internal Resistance and Self-Discharge
High internal resistance (IR) is a sign of an aging or damaged cell. When you draw power from a high-IR cell, it will get hot, which is a major safety risk. Healthy cells usually have an IR below 70-80 milliohms. Furthermore, you must perform a “self-discharge” test. After fully charging a batch of cells, let them sit on a shelf for 14 to 30 days. Re-test the voltage after this period. Any cell that has dropped more than 0.1V has a high self-discharge rate and should be discarded, as it will slowly drain the other cells in your pack.
Benefits of the Upcycled Power Wall
Cost is the most immediate advantage. A retail energy storage unit like the Tesla Powerwall can cost between $10,500 and $16,500 including installation. In contrast, building an equivalent 13.5kWh (kilowatt-hour) system from salvaged laptop batteries can cost as little as $500 to $1,000 for the peripheral components like the inverter and BMS. This massive price gap makes off-grid living accessible to almost anyone willing to put in the labor.
Environmental stewardship is another core benefit. Each 18650 cell you harvest is one less piece of hazardous waste entering a landfill. By extending the life of these lithium-ion batteries by another five to ten years, you are significantly reducing the carbon footprint associated with mining raw lithium and cobalt. It is the ultimate form of recycling: taking industrial waste and turning it into clean energy infrastructure.
Modular repairability gives you a level of control that no commercial product can offer. If a cell fails in a retail unit, the entire “black box” often needs to be replaced by a certified technician. With a DIY upcycled power wall, you can identify the exact cell or pack that is underperforming and swap it out in twenty minutes with basic tools. This longevity ensures that your energy system remains operational for decades, rather than being discarded when a warranty expires.
Scalability allows your system to grow alongside your needs. You might start with a small 2kWh bank to run your lights and a laptop. As you collect more cells, you can easily add more parallel packs to increase your capacity to 20kWh or more. This flexibility allows you to build your energy independence incrementally, without the need for a massive upfront investment.
Challenges and Common Mistakes
The biggest challenge is the sheer time commitment required. Testing 2,000 individual cells to build a large bank can take months of consistent work. Many beginners underestimate this “slog” and try to skip steps like the 30-day self-discharge test. Skipping this step often results in a “heater” cell that ruins an entire pack and creates a fire hazard. There are no shortcuts in the battery business; if you don’t have the patience to test every cell, this project is not for you.
Soldering directly to the cells is a frequent and dangerous mistake. The heat from a soldering iron can damage the internal seals of the lithium cell, leading to leaks or internal shorts. While many DIYers do it successfully with high-heat, short-duration “dab” techniques, the gold standard is spot welding. A spot welder uses a quick pulse of high current to fuse nickel strips to the battery without heating up the actual chemistry inside. Investing in a $200 spot welder is the best safety insurance you can buy.
Ignoring “cell matching” can lead to a pack that is out of balance within weeks. If you put a 1,500mAh cell in parallel with a 3,000mAh cell, they will work together, but if you put a high-capacity pack in series with a low-capacity pack, the low-capacity pack will reach its “empty” point first. This causes the voltage of that pack to plummet while the others are still full, which can damage the cells and potentially cause a fire if your BMS is not set up correctly. Always calculate the average capacity of every pack in your series string to ensure they are identical.
Limitations and Practical Constraints
Space is a significant consideration. A DIY power wall built from 18650 cells is much larger and heavier than a sleek retail unit. Because you are using hundreds of individual cells and plastic holders, the system has a lower energy density per cubic foot. You need a dedicated, fire-resistant area—ideally a garage or a separate outdoor shed—to house the bank. These batteries should never be kept in living spaces where people sleep.
Environmental temperature affects performance and safety. Lithium batteries do not like the cold; they cannot be charged when temperatures are below freezing (0°C or 32°F) without causing permanent damage. Conversely, excessive heat (above 45°C or 113°F) accelerates degradation. This means your battery bank may require a climate-controlled enclosure or a heating/cooling system if you live in a region with extreme seasons. Commercial units often have built-in thermal management, a feature you must design and build yourself in a DIY system.
Insurance and local regulations can be a hurdle. Many home insurance companies are wary of DIY electrical systems, especially those involving salvaged lithium-ion batteries. Before you build a massive house-spanning system, check your local building codes and talk to your insurance provider. You may need to house your system in a specific type of enclosure or have it inspected by an electrician to maintain your coverage. This is a trade-off for the “grid-free” life—you take on the liability that companies usually shoulder.
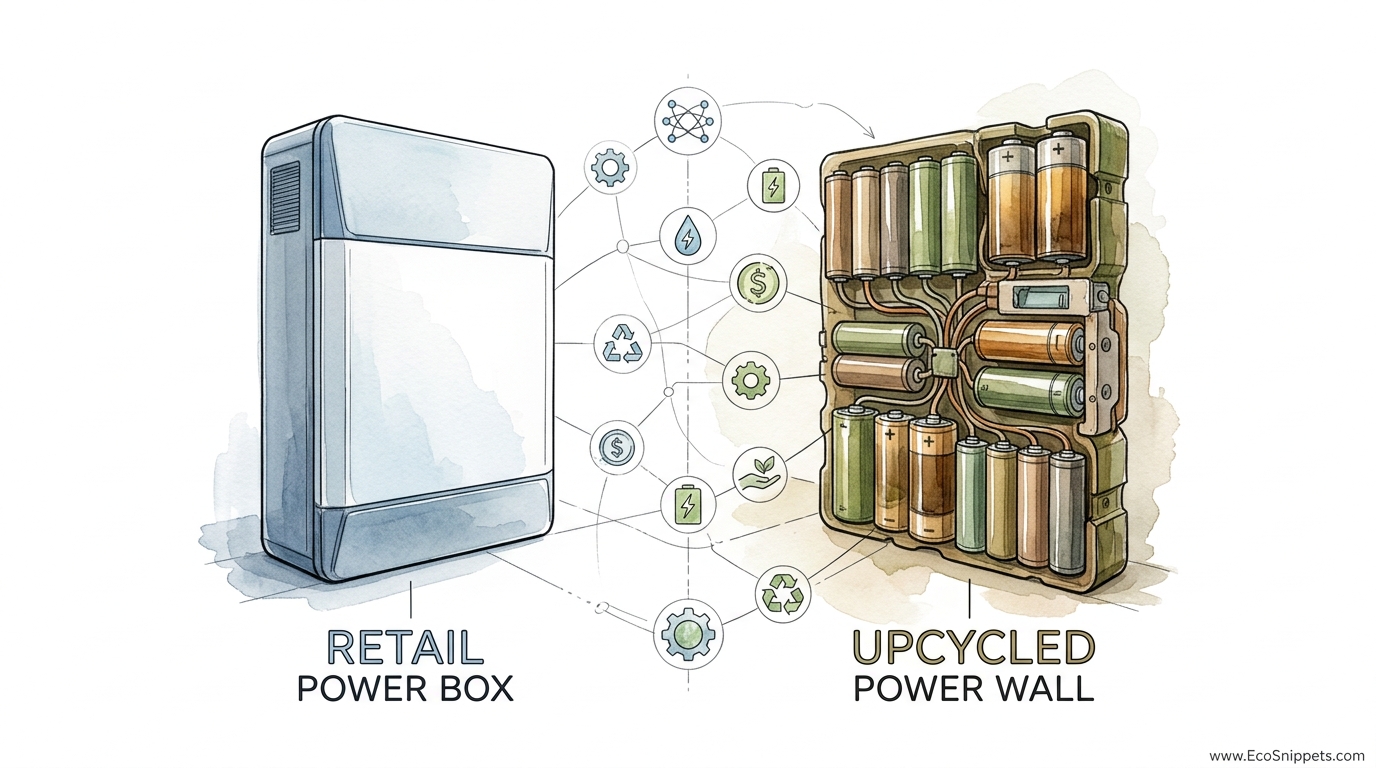
Retail Power Box vs. Upcycled Power Wall
Comparing these two options is a choice between convenience and capability. A RETAIL POWER BOX provides a “plug-and-play” experience with professional aesthetics and a warranty. An UPCYCLED POWER WALL provides a deep understanding of your energy source, massive savings, and the ability to expand indefinitely. The table below outlines the primary differences based on a standard 13.5kWh capacity target.
| Factor | RETAIL POWER BOX | UPCYCLED POWER WALL |
|---|---|---|
| Estimated Cost | $10,000 – $16,000 | $800 – $2,000 |
| Time to Setup | 1-2 Days (Pro Install) | 3-6 Months (Manual) |
| Repairability | Closed System (Requires Tech) | Fully User-Repairable |
| Safety Features | Integrated/Automated | User-Built/External BMS |
| Durability | Fixed Warranty (10 Years) | Indefinite (Part Swapping) |
For the average homeowner who wants a simple backup for the occasional blackout, the retail option is often the only realistic choice. But for the serious practitioner who views energy as a fundamental component of self-reliance, the upcycled wall is the superior machine. The retail unit is a luxury purchase; the upcycled wall is a lifelong skill set.
Practical Tips and Best Practices
Fusing every single cell is the most important safety protocol you can implement. In a large bank, hundreds of cells are wired in parallel. If one cell develops an internal short, every other cell in that pack will dump its entire energy into the “bad” cell, leading to a fire. By using a thin 30 AWG (thirty American Wire Gauge) or 36 AWG copper fuse wire between the cell and the busbar, the connection will melt instantly if too much current flows, isolating the bad cell from the rest of the bank.
Keep your workshop organized with a clear labeling system. When you are processing thousands of cells, it is easy to mix up tested and untested units. Use a permanent marker to write the measured capacity and internal resistance on the side of every cell. Store them in plastic bins labeled by capacity ranges (e.g., 2,000-2,100mAh, 2,100-2,200mAh) so that when you are ready to assemble a pack, you can easily pull matching units.
Invest in high-quality busbars. The busbar is the thick copper or aluminum pipe that carries the combined current of all your cells to the main battery cables. If your busbar is too thin, it will create resistance and heat. For a system expected to pull 100 amps, you should use solid copper wire or strips with a cross-section of at least 25mm² (roughly 4 AWG). Clean the copper with steel wool before soldering or welding to ensure a perfect electrical connection.
Advanced Considerations for Long-Term Success
The Battery Management System (BMS) is the brain of your power wall. It monitors the voltage of every series pack and ensures they stay balanced. For upcycled systems, look for a “Smart BMS” that features Bluetooth connectivity. This allows you to monitor the health of every individual pack from your smartphone, seeing real-time current draw and temperature. A good BMS will also feature an “Active Balancer,” which moves energy from high-voltage packs to low-voltage packs much more efficiently than standard passive balancers.
Depth of Discharge (DoD) is the secret to making your recycled cells last another decade. While lithium-ion cells can technically be discharged down to 2.5V, doing so puts immense stress on the chemistry. If you limit your discharge to 3.3V and your charge to 4.0V, you are using the “middle 70%” of the battery’s capacity. This reduces the energy density slightly but can triple the lifespan of your cells. It is the difference between getting 500 cycles and 2,000 cycles out of your investment.
Integration with your solar inverter requires careful voltage matching. Most DIY power walls are built in 7s (24 volt) or 14s (48 volt) configurations to match standard off-grid inverters. A 14s (fourteen cells in series) lithium-ion bank has a voltage range of approximately 44V to 58V. Ensure your inverter is programmable and can be set to these specific lithium voltage cutoffs, rather than the default lead-acid settings which could overcharge and destroy your new bank.
Example Scenario: Powering a Small Off-Grid Cabin
Imagine you have a small cabin in the woods with four 250W solar panels on the roof. During a sunny day, these panels produce about 5kWh of energy. To store this for night use, you decide to build a 14s60p power wall. This means you have 14 series packs, and each pack contains 60 cells in parallel, for a total of 840 cells.
If your harvested cells average 2,200mAh (2.2Ah) each, each 60p pack has a capacity of 132Ah. At a nominal voltage of 3.7V per cell, each pack holds 488 watt-hours. Multiplying this by 14 (the number of series packs) gives you a total storage capacity of approximately 6.8kWh. This is more than enough to run a small chest freezer, LED lights, a water pump, and a laptop through the night with 30% capacity to spare for a rainy day.
Total cost for this 6.8kWh bank might include $150 for a high-end Smart BMS, $100 for copper busbars and wiring, $50 for fuse wire and holders, and the labor of harvesting 840 cells from free laptop batteries. Compare this to a $3,500 retail “solar generator” of similar capacity, and the value of the upcycled approach becomes undeniably clear. You have saved thousands of dollars and gained a system that you know how to fix if a single wire ever comes loose.
Final Thoughts
Building an upcycled lithium power wall is a masterclass in modern self-sufficiency. It forces you to move beyond the role of a consumer and into the role of a producer. You are not just buying a product; you are acquiring the fundamental skill of energy management. This journey from the “trash” of a discarded laptop to the “treasure” of a fully powered home is one of the most rewarding projects a serious DIYer can undertake.
Take the time to do it right. Respect the chemistry of the lithium, the physics of the electrical current, and the labor of the harvest. A well-built power wall will serve you faithfully for years, silently storing the sun’s bounty and providing security for your family. It is a testament to what is possible when we stop looking at the world through the lens of disposability and start seeing the hidden potential in everything around us.
Start small, test often, and never stop learning. Whether you are building a small battery for a camping trip or a massive bank for a homestead, the principles remain the same. The grid may be reliable today, but true freedom comes from knowing that when the lights go out elsewhere, your home will remain a beacon of light, powered by the very things the rest of the world threw away.
