How To Become More Self-Sufficient Without Starting a Full-Blown Farm…
Want to start preserving your harvest, making your own soap, or building a backyard root cellar — but not sure where to begin? “Homesteading Advice” gives you instant lifetime access to 35+ practical homesteading books on food preservation, veggie gardening, DIY natural cleaning products (save over $250 per year with this skill alone), brewing, off-grid energy, and a whole lot more…
Click Here To Check It Out Now!
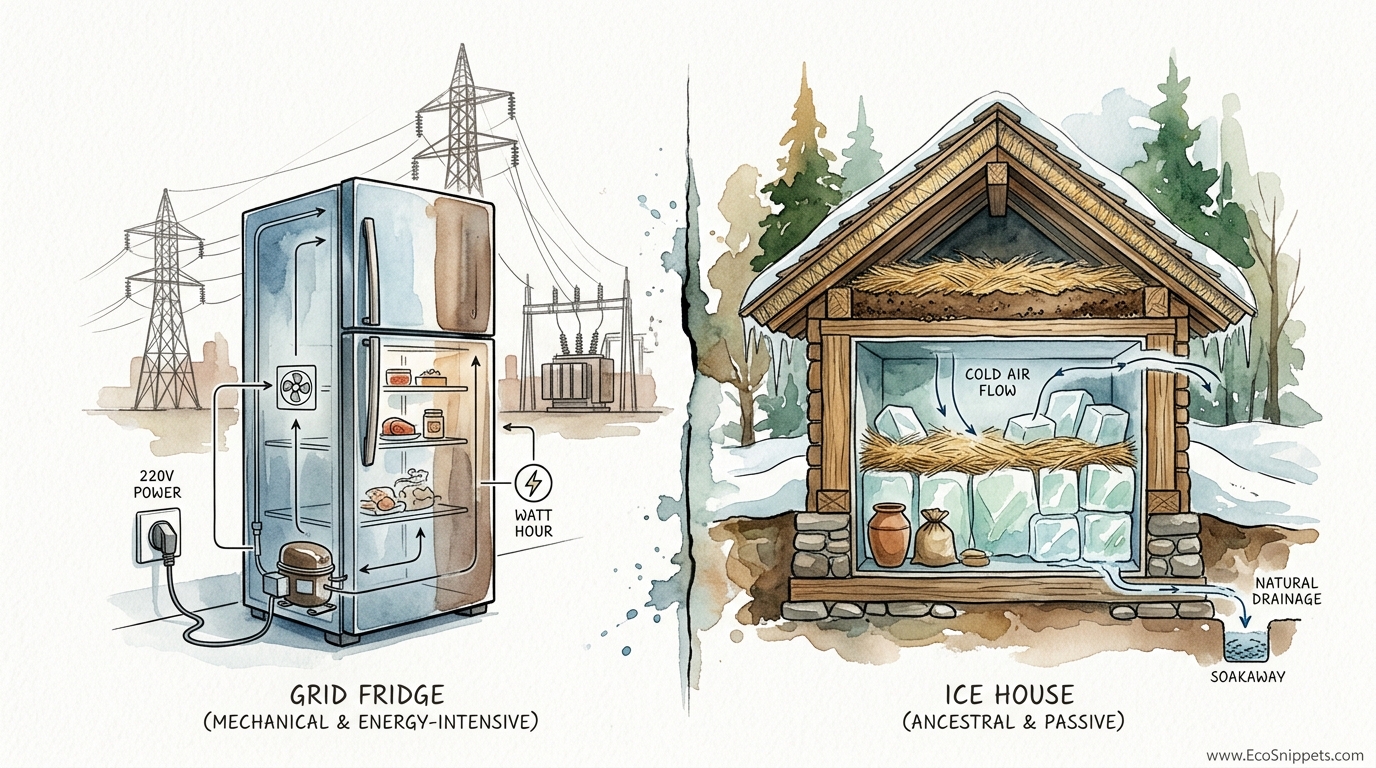
Keep your harvest frozen through the hottest August heat using nothing but last year’s winter. Modern refrigeration is a fragile luxury that ends the moment the grid blinks. Our ancestors used the ‘Ice House’—a low-tech thermal battery that stores the winter’s cold for a full year using nothing but stone, straw, and physics.
For most of human history, the preservation of food was a race against the sun. While salt, smoke, and fermentation were the primary weapons in this fight, the ability to keep items truly cold was once a luxury reserved for kings. Today, we open a plastic door and expect a hum of electricity to keep our milk fresh, but that hum is dependent on a vast, vulnerable infrastructure.
The ice house represents a different path—one of radical self-reliance. By understanding how to capture the seasonal energy of winter and store it within a highly insulated structure, you can create a permanent cooling system that requires no fuel, no copper wires, and no monthly bills. It is the ultimate insurance policy for your food supply.
Building An Ancestral Ice House
An ancestral ice house is essentially a specialized warehouse designed to resist the flow of heat from the outside world. While the concept sounds simple, the execution requires a deep understanding of insulation, drainage, and structural integrity. Historically, these buildings served as the central hub of a homestead’s dairy and meat preservation system.
There are two primary designs for an ice house: the subterranean pit and the above-ground frame. The subterranean model, common in Europe and early Colonial America, relied on the earth’s stable temperature of roughly 55°F (13°C) to provide a head start on cooling. These were often shaped like inverted cones or deep stone-lined cylinders, allowing the ice to settle into a solid mass as it slowly melted.
The above-ground ice house, popularized in the 19th century by “Ice King” Frederic Tudor, proved surprisingly more efficient in many climates. These structures use a “box within a box” design. A heavy timber frame forms the outer shell, and a second, smaller frame is built inside it. The gap between these two walls—usually 12 to 24 inches (30 to 60 cm)—is packed with an insulating medium like dry sawdust or straw.
Whether you choose an in-ground pit or a frame building, the site selection is critical. You must locate the building in the deepest shade possible, typically on the north side of a hill or under a thick canopy of deciduous trees. The ground must be well-drained; standing water is the enemy of ice, as it conducts heat into the stack far faster than air does.
The “Box Within a Box” Construction
To build a modern version of the ancestral frame ice house, start with a solid foundation of well-compacted gravel or stone. This provides the necessary drainage. The floor should be slightly sloped toward a central drain or allowed to permeate through the gravel. On top of this, you build your outer walls using heavy-duty lumber like 2×6 or 2×8 studs.
The inner wall is then constructed leaving a massive cavity. Historically, this cavity was filled with sawdust, which remains one of the best natural insulators because its fine particles trap millions of tiny air pockets. You can also use modern materials like mineral wool or rigid foam, but for the purist, dry pine or cedar sawdust provides excellent R-value and handles moisture better than many synthetics.
The Science of Cold: How It Works
The secret to why a pile of ice doesn’t melt in July lies in a principle of thermodynamics called the “Latent Heat of Fusion.” To turn one pound (0.45 kg) of ice at 32°F (0°C) into one pound of water at the same temperature, the ice must absorb 144 BTUs of energy. In metric terms, it takes 334 joules of energy to melt just one gram of ice.
This means that a massive block of ice is a formidable heat sink. As heat manages to leak through the thick insulation of your ice house walls, it doesn’t immediately warm up the interior air. Instead, that energy is “consumed” by the phase change of the ice melting. As long as there is a significant mass of ice present, the temperature inside the structure will remain pinned near 32°F (0°C).
The efficiency of the system depends on the surface-to-volume ratio. A single 10-ton block of ice will melt much slower than ten 1-ton blocks because it has less surface area exposed to the air. This is why our ancestors packed the ice blocks as tightly as possible, often throwing water over the layers to freeze them into one monolithic “glacier” inside the building.
The Role of Insulation and Ventilation
Insulation works by slowing down the transfer of heat, but it cannot stop it entirely. In an ice house, the insulation must be kept dry. Wet sawdust loses its R-value and begins to rot. This is where the roof design becomes vital. An ice house needs a “cold roof” system—plenty of ventilation in the gable ends to allow warm air that rises off the ice to escape before it can condense on the ceiling and drip back down.
Paradoxically, you want the bottom of the ice house to be airtight to prevent “chimney effect” drafts, but the top must be allowed to breathe. A well-designed ice house uses the rising warm air to pull cooler air through the insulation, creating a micro-environment that protects the core temperature of the ice stack.
The Winter Harvest: Timing and Technique
The harvest is the most labor-intensive part of the ice house cycle. It typically occurs in mid-winter, usually January or February in the Northern Hemisphere, once the ice on a local pond or river has reached a thickness of at least 8 to 12 inches (20 to 30 cm). Anything thinner is too fragile to handle; anything thicker than 18 inches (45 cm) becomes prohibitively heavy.
The process begins by “plowing” or scoring the ice. Our ancestors used horse-drawn ice plows to cut a grid into the surface. On a homestead scale, this can be done with a hand-held ice saw or even a chainsaw (using biodegradable vegetable oil as bar lubricant to avoid polluting the ice). The standard block size was often 22 by 22 inches (56 by 56 cm), which weighs approximately 150 to 200 pounds (68 to 90 kg) depending on thickness.
Once the blocks are cut, they are “piked” or floated through a channel to the shore. From there, they are loaded onto a sled or wagon and transported to the ice house. Speed is essential during the harvest to minimize the “rounding” of the edges from melting, which would create air gaps in the final stack.
Tools of the Trade
- Ice Saw: A long, coarse-toothed hand saw designed to cut through thick freshwater ice.
- Ice Tongs: Heavy iron tongs used for gripping and lifting the slippery blocks.
- Pike Pole: A long wooden pole with a metal hook and point for maneuvering floating ice.
- Ice Chisel: Used for “splitting” the blocks along the scored lines.
- Spud Bar: A heavy bar for prying blocks loose from the main sheet.
Benefits of the Ancestral Ice House
The primary benefit of an ice house is its total independence from the electrical grid. In a long-term emergency or a deliberate off-grid lifestyle, the ability to store fresh meat, dairy, and medicine is a game-changer for health and morale. Unlike a solar-powered fridge, which can fail if batteries die or panels are damaged, an ice house has no moving parts to break.
Another advantage is the sheer scale of storage. A standard 10×10 foot (3×3 meter) ice house can hold enough ice to cool a massive amount of food. By building “ice closets” or shelves directly into the walls of the structure, you create a walk-in refrigerator that can hold half a beef, dozens of gallons of milk, and the year’s harvest of root vegetables without adding a cent to your utility bill.
Furthermore, the ice house provides “free” ice for other uses. In the summer heat, having access to crushed ice for drinks or cold compresses for injuries is a significant quality-of-life improvement. Historically, ice was also a cash crop; farmers who harvested more than they needed could sell blocks to neighbors or local businesses, providing a winter income source.
Challenges and Common Mistakes
The most common mistake in ice house construction is inadequate drainage. If the bottom of the ice stack sits in a pool of its own meltwater, the water will act as a “heat bridge,” rapidly melting the rest of the stack from the bottom up. You must ensure that the floor is permeable or has a dedicated, trapped drain that doesn’t allow warm air to whistle back up into the house.
Another challenge is the management of the insulating medium. Sawdust must be packed tightly around the edges of the ice blocks. As you remove ice for use throughout the summer, you must “tuck” the remaining blocks back in, ensuring no bare ice is exposed to the air. If you leave gaps, the air will circulate and melt your entire year’s supply in weeks.
Finally, mold can be an issue. Because the interior is cold and damp, wooden structures can eventually rot. Using rot-resistant timbers like black locust, cedar, or pressure-treated wood (for the outer shell) is essential. Traditional builders often white-washed the interior with lime to help inhibit fungal growth and reflect what little light entered the building.
Limitations and Environmental Constraints
The most obvious limitation is geography. To use an ancestral ice house, you must live in a region where the winters are cold enough to produce thick ice. Generally, this requires a “Hardy Zone” where temperatures remain below freezing for several weeks at a time. If your local ponds only freeze to 2 inches (5 cm), you won’t be able to harvest enough thermal mass to last through a hot summer.
Labor is the second major limitation. Harvesting 10 to 15 tons of ice is an exhausting physical task. It requires a team of people and, ideally, draft animals or machinery. This is not a “set it and forget it” system like a modern freezer. It requires a seasonal commitment to hard work and ongoing maintenance to ensure the insulation remains intact.
Lastly, there is a risk of food spoilage if the ice levels drop too low. Unlike a digital fridge with a thermostat, an ice house requires the user to be observant. You must monitor the melt rate and adjust your food storage habits accordingly. If the ice stack gets too small, the temperature will eventually rise above the safe 40°F (4°C) threshold, requiring you to process your remaining food quickly.
Comparing Cooling Systems
To understand where the ice house fits in a modern self-reliant setup, it helps to compare it to other off-grid cooling methods. While the ice house excels in scale and reliability, it lacks the convenience of modern electric or gas-powered units.
| Factor | Standard Grid Fridge | Solar DC Fridge | Ancestral Ice House |
|---|---|---|---|
| Energy Source | Utility Grid | Solar/Batteries | Natural Winter Cold |
| Initial Cost | $500 – $2,000 | $1,500 – $4,000 (with panels) | $500 – $3,000 (materials) |
| Maintenance | Low (until it breaks) | Medium (battery care) | High (annual harvest) |
| Resilience | Zero (fails during blackout) | High (independent) | Absolute (no tech needed) |
| Scale | Small (20-30 cu. ft.) | Very Small (5-15 cu. ft.) | Large (Walk-in size) |
Practical Tips for Success
When stacking your ice, always place the “clear” side of the block facing down. Pond ice often has a “snow ice” layer on top which is more porous and melts faster. By keeping the dense, clear ice at the core, you preserve the thermal mass longer. Pack the blocks as tight as a jigsaw puzzle, and use crushed ice or “snow” to fill the cracks between blocks.
Maintain a 12-inch (30 cm) buffer of sawdust between the ice and the walls. Never let the ice touch the wood of the building directly. This air-gap-and-insulation sandwich is what prevents the heat from the sun-warmed walls from reaching the ice. If you are using straw instead of sawdust, you may need to double the thickness of the buffer to 24 inches (60 cm) to achieve the same R-value.
Minimize “door-open time.” Every time you enter the ice house, you lose a massive amount of cold air. Ancestral designs often featured a small “vestibule” or double-door system to create an airlock. Consider using a small, well-insulated “day box” (a traditional icebox) in your kitchen. You can fetch a small block of ice from the house once every few days to keep your kitchen unit cold, rather than opening the main house multiple times a day.
Advanced Considerations: The Physics of Scale
Serious practitioners often look at the “cooling degree days” of their region to calculate exactly how much ice they need. A typical family of four requires about 500 to 700 cubic feet (14 to 20 cubic meters) of ice to last an entire year, including the expected 20-30% loss to melting. This equates to roughly 10 to 14 tons of ice.
If you find that your ice melts too quickly, consider the “thermal mass” of the structure itself. Some advanced builders incorporate a stone or masonry interior liner. While stone doesn’t insulate, it does have high thermal inertia. Once the stone is chilled to 32°F (0°C) by the ice, it helps stabilize the internal temperature against brief spikes in outside heat, acting as a secondary battery.
For those in slightly warmer climates, a hybrid approach is possible. You can use a modern vapor barrier and vacuum-sealed insulation panels to achieve an R-value of 30 or higher. This significantly reduces the amount of ice needed and can extend the life of a smaller harvest through a long, hot southern summer.
Example: A Family-Scale Harvest
Consider a homestead in a northern climate like Vermont or Ontario. The family decides to build an 8x8x8 foot (2.4m cube) ice stack inside a 10×10 foot building. This stack contains 512 cubic feet of ice. Since ice weighs approximately 57 pounds per cubic foot, this total harvest weighs about 29,184 pounds—or 14.5 tons.
Assuming a high-quality construction with 18 inches of sawdust insulation, the family can expect to lose about 1/4 of that mass (3.6 tons) to meltwater throughout the spring and summer. This leaves nearly 11 tons of cooling power. To put that in perspective, 11 tons of ice can absorb over 3 million BTUs of heat before it’s gone. That is enough cooling capacity to keep several hundred pounds of meat and dozens of crates of vegetables at 35°F (1.6°C) even if the outside temperature averages 80°F (27°C) for four straight months.
Final Thoughts
The ancestral ice house is more than just a place to store frozen water; it is a monument to the wisdom of our forebears. It teaches us that the solutions to our most modern problems—energy dependency and food insecurity—are often found by looking backward at the low-tech, high-intelligence systems that sustained humanity for centuries.
Building and maintaining an ice house is a significant commitment of time and sweat. However, the reward is a sense of security that no electric company can provide. There is a profound peace that comes with knowing that even if the world outside goes dark, your family’s harvest will remain crisp and cold, protected by nothing more than last year’s winter and a well-packed layer of sawdust.
As you plan your journey toward self-reliance, consider the ice house not as an antique curiosity, but as a functional piece of infrastructure for the future. Whether you build a small pit for emergency use or a grand walk-in frame house, you are reclaiming a piece of ancestral technology that turns the coldest season of the year into a year-round blessing.
