How To Become More Self-Sufficient Without Starting a Full-Blown Farm…
Want to start preserving your harvest, making your own soap, or building a backyard root cellar — but not sure where to begin? “Homesteading Advice” gives you instant lifetime access to 35+ practical homesteading books on food preservation, veggie gardening, DIY natural cleaning products (save over $250 per year with this skill alone), brewing, off-grid energy, and a whole lot more…
Click Here To Check It Out Now!
See how a 2,300-year-old geometric secret moves 10,000 gallons of water with zero fuel and half the effort. Modern pumps are loud, expensive, and fail the moment the grid blinks. I went back to the 3rd Century BCE to find the Archimedes Screw—a precision-engineered helix that turns a simple rotation into a gravity-defying water elevator. No gas, no electricity, just pure geometry.
Water always finds the low ground. To fight that gravity, we usually resort to brute force—buckets, combustion engines, or complex electrical circuits. But there is a quieter, older way that relies on the “pocket” of a helix to carry water uphill as if it were walking up a flight of stairs.
The Archimedes screw is a masterpiece of self-reliance. It is a pump that does not require a seal, cannot be easily clogged by mud or debris, and can be built from materials sitting in your workshop right now. Whether you are irrigating a back-acre garden or draining a low-lying pasture, this ancient tech offers a level of reliability that modern plastic pumps simply cannot match.
This guide will show you how to revive this technology for your own land. We will look at the geometry that makes it work, the materials needed to build one from scratch, and the specific ratios required to ensure your water actually climbs the spiral instead of just sloshing around at the bottom.
DIY Archimedes Screw For Irrigation
The Archimedes screw is a positive displacement pump that uses a rotating helical surface inside a cylinder to lift fluids. While most people associate it with the Greek mathematician Archimedes of Syracuse, evidence suggests it was helping farmers along the Nile and in the Hanging Gardens of Babylon centuries before he was born. It exists because moving water is the most fundamental challenge of agriculture.
In real-world irrigation, the screw excels at “low-head, high-volume” tasks. This means it is perfect for moving a lot of water a short distance up a bank—say, from a stream or a pond into an irrigation ditch. Unlike centrifugal pumps that require clear water to avoid damaging the internal impellers, an Archimedes screw can handle sticks, leaves, and even small fish without stopping.
Visualize a playground slide wrapped around a central pole and stuffed inside a pipe. When you tilt that pipe and spin the pole, the “dip” in the slide traps a pocket of water. As the screw turns, that dip moves upward. The water isn’t being pushed by pressure; it is being carried by the geometry of the screw itself. It is the original water elevator.
Today, you can see massive versions of these screws in wastewater treatment plants and flood-control stations. They are used there for the same reason you should use one: they are nearly impossible to kill. They rotate slowly, which means low wear and tear, and they can run “dry” for hours without a single part overheating or seizing.
How It Works: The Physics of the Helix
Understanding how a screw lifts water requires looking at the “bucket” or the pocket created by the helix. When the screw is tilted at an angle, the lowest point of each turn of the spiral forms a valley. Gravity pulls the water into that valley. As the shaft rotates, the valley itself moves up the length of the cylinder, taking the water with it.
The Critical Tilt Angle
The most important factor in a functioning screw is the angle of inclination. If you tilt the screw too steeply (above 45 degrees), the pockets will never form, and the water will simply drain back down the center. Most effective screws are set between 22 and 38 degrees. At 30 degrees (0.52 radians), you hit a “sweet spot” where you maximize the volume of water per turn without making the screw excessively long.
The Geometry of the Pocket
The relationship between the pitch (the distance between the threads) and the diameter of the screw determines your flow rate. A common rule of thumb for DIYers is to make the pitch equal to the diameter of the outer pipe. If you have a 100 mm (4-inch) pipe, your screw should complete one full turn every 100 mm (4 inches) of length. This 1:1 ratio provides a stable pocket for water to sit in.
Rotational Speed vs. Efficiency
You do not need high speed. In fact, spinning the screw too fast creates turbulence and splashing, which actually lowers the amount of water you move. For a small DIY screw about 2 meters (6.5 feet) long, a steady 30 to 60 RPM (one rotation per second) is often the peak efficiency point. This is slow enough to be powered by a hand crank, a small solar motor, or even a modest water wheel.
Step-by-Step DIY Build: The Hardware Store Method
For a quick, functional irrigation pump, you can build a screw using a PVC pipe and flexible vinyl tubing. This is the most accessible way to learn the mechanics before moving on to larger, more permanent wooden or metal versions.
1. Gather Your Materials
- One 2-meter (approx. 6.5 feet) length of PVC pipe (100 mm or 4-inch diameter).
- 6 meters (approx. 20 feet) of clear flexible vinyl tubing (20 mm or 3/4-inch diameter).
- Heavy-duty waterproof tape or UV-resistant zip ties.
- A solid central rod (threaded rod or a smaller PVC pipe) for the axle.
- Two bearings or simple bushings made from scrap wood.
2. Layout the Helix
Mark the starting point of your tubing at the bottom of the large PVC pipe. You want the opening of the tubing to be flush with the edge of the pipe so it can “scoop” water effectively. Secure this end firmly with tape. Now, begin wrapping the tubing around the outside of the pipe. Space the wraps evenly—aim for 50 mm to 75 mm (2 to 3 inches) between each turn of the tubing.
3. Secure and Seal
As you wrap, keep the tubing tight against the pipe. Use zip ties or tape every half-turn to ensure the tubing doesn’t shift. If the tubing slips, the “pockets” will become uneven, and your pump will lose efficiency. Once you reach the top, leave a small overhang of tubing to act as a spout where the water will discharge into your ditch or bucket.
4. Mounting the Assembly
Pass your central rod through the pipe (if you chose to use an internal axle) or mount the entire pipe onto a frame using external rollers. The frame must hold the pipe at a 30-degree angle. The bottom end should be submerged about 20% to 30% into your water source. If you submerge it too deeply, the air cannot enter the pockets, and the water will not rise.
5. Adding the Drive Mechanism
At the top end, attach a simple handle. If you prefer automation, a small 12V DC motor with a gear reduction can turn this screw all day using a single solar panel. Because the screw is a positive displacement pump, the motor will experience a constant load, making it very easy to regulate.
Benefits of the Archimedes Screw
The primary advantage is simplicity. Because there are no tight-fitting valves or sliding seals, there is almost nothing to wear out. In a standard centrifugal pump, a single pebble can shatter the impeller. In an Archimedes screw, that pebble just rides the elevator to the top and gets dumped out.
Energy efficiency is another hallmark of this design. It operates at 70% to 80% efficiency, which is remarkably high for a manual or low-power device. It doesn’t waste energy creating high pressure; it only uses energy to overcome the weight of the water it is lifting. This makes it ideal for off-grid systems where every watt of solar power or every ounce of human effort counts.
Environmental friendliness is often overlooked. These pumps are “fish-friendly.” Because they move water in large, open pockets at low speeds, small aquatic life can pass through the pump completely unharmed. This makes them the perfect choice for pumping out of sensitive ecosystems or natural streams.
Maintenance is virtually zero. You might need to grease the top bearing once a season, but otherwise, the machine is self-cleaning. If it gets muddy, the next turn of the screw simply carries the mud away. It is a “set it and forget it” piece of farm infrastructure.
Challenges and Common Mistakes
The most frequent error is the “Submergence Trap.” Beginners often think that dunking the entire bottom half of the screw into the water will move more volume. It won’t. For the screw to work, air must be able to enter the top of each pocket as the water enters the bottom. If the inlet is fully submerged, you lose the air-water separation, and the device will just churn the water without lifting it.
Alignment issues can also ruin a build. If the central shaft is not straight, the screw will wobble. This wobble creates friction and can cause the screw to strike the frame or the trough. Over time, this vibration will destroy your bearings. Always use a spirit level and a string line to ensure your axle is perfectly true before you finish the mounting.
Another pitfall is using a pitch that is too wide. If the distance between your threads is too great, the water will “leak” over the inner shaft and stay at the bottom of the screw. This is especially common when people try to make the screw go faster by increasing the pitch. Stick to the 1:1 diameter-to-pitch ratio until you have mastered the build.
Choosing the wrong materials for the environment is a long-term mistake. If you build a wooden screw and do not seal it with pitch or a modern food-safe epoxy, the wood will swell and warp within weeks of being in the water. This warping changes the geometry and can jam the screw. Always treat your materials for constant water contact.
Limitations and Practical Boundaries
An Archimedes screw is not a “high-head” pump. If you need to move water 10 meters (33 feet) straight up a cliff, this is the wrong tool. To reach that height at a 30-degree angle, you would need a screw 20 meters (66 feet) long, which is structurally difficult and expensive to build. Most DIY screws are limited to a lift of about 1 to 3 meters (3 to 10 feet).
Space is another constraint. Because the screw must be tilted at a shallow angle, it takes up a lot of horizontal room. You need a clear path from your water source to your discharge point. If you have a tight, vertical space, a traditional bucket-and-pulley or a piston pump is more appropriate.
Weight is a factor for larger builds. A wooden screw full of water is extremely heavy. This requires a robust support frame and strong bearings. If you are building a screw with a diameter larger than 300 mm (12 inches), you can no longer rely on simple wooden bushings; you will need heavy-duty pillow block bearings and a concrete or timber foundation.
Speed is fixed by the mechanics. You cannot “rev up” a screw to get more water in an emergency. The flow rate is determined by the volume of the pockets and the RPM. If you need a pump that can vary between a trickle and a fire-hose blast, the Archimedes screw will frustrate you with its steady, unhurried pace.
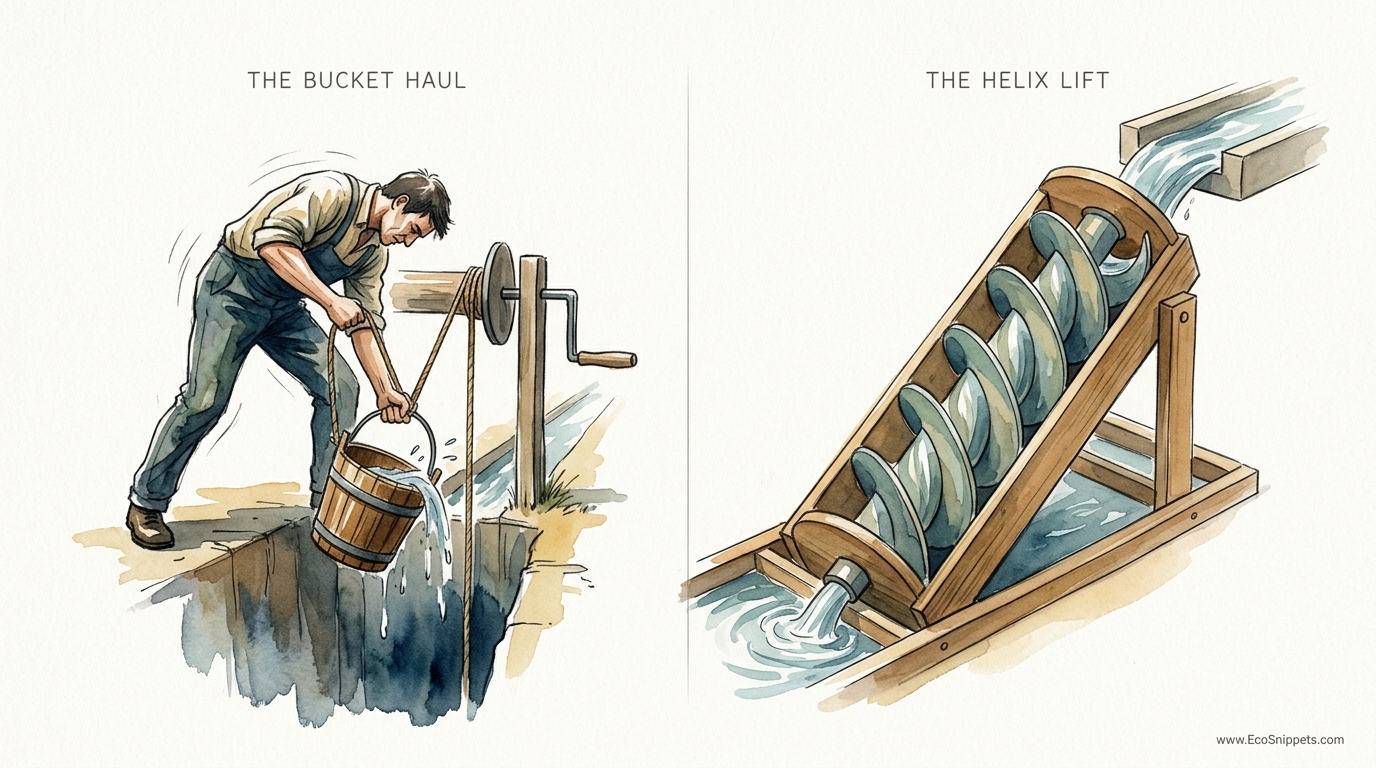
Comparison: The Bucket Haul vs. The Helix Lift
| Feature | The Bucket Haul | The Helix Lift (Archimedes Screw) |
|---|---|---|
| Human Effort | High (Intermittent lifting/carrying) | Low (Continuous steady rotation) |
| Flow Continuity | Pulsed (one bucket at a time) | Continuous (steady stream) |
| Complexity | Very Low (rope and pail) | Moderate (geometrical assembly) |
| Durability | High (few moving parts) | Very High (low-speed, no seals) |
| Debris Handling | Poor (clogs easily) | Excellent (passes solids easily) |
| Efficiency | Low (spillage and wasted motion) | High (70-85% at optimal tilt) |
When comparing these two, consider the “work-rest” cycle. A bucket haul requires high bursts of energy that tire a person quickly. The Helix Lift allows you to apply a small amount of force continuously. This is why a single person can move thousands of gallons with a screw without the exhaustion that comes from carrying water.
Practical Tips and Best Practices
Always build your discharge chute first. It sounds counterintuitive, but knowing exactly where the water needs to land will dictate the length and angle of your screw. If you build the screw first and find it is 100 mm (4 inches) too short to clear the bank, you have a very expensive piece of yard art.
Use clear tubing for your first build. Being able to see the water moving through the helix is not just satisfying; it is a diagnostic tool. If you see air bubbles trapped in the wrong place or water surging backward, you can adjust the angle or speed in real-time to fix the issue.
Lubrication is the lifeblood of the machine. For the top bearing, which sits out of the water, use a high-quality marine grease. For the bottom bearing, which is submerged, consider using a “water-lubricated” bushing like ultra-high-molecular-weight (UHMW) plastic or even a very hard wood like Lignum Vitae. These materials are slicker when wet and won’t contaminate your water source with oil.
Protect your intake. While the screw can handle debris, a large log or a heavy branch can still jam the blades. A simple “trash rack”—a cage of wide-spaced bars around the intake—will keep the big stuff out while letting the water and smaller silt pass through freely.
Advanced Considerations for Serious Practitioners
If you are looking to scale up to a permanent homestead irrigation system, you should consider the “Multi-Flight” screw. Instead of wrapping one tube around the pipe, wrap three. This triple-helix design creates more pockets and provides a much smoother flow of water. It also balances the weight of the screw, reducing the strain on your motor or your arms.
For those using metal, the “Trough vs. Tube” debate is important. A screw inside a fully enclosed tube is easier to mount, but a screw sitting in an open U-shaped trough is easier to clean and maintain. In an open trough, you can simply lift the screw out to inspect the blades. However, the gap between the blade and the trough must be very tight—usually less than 5 mm (0.2 inches)—to prevent water from leaking back down.
Consider the “Internal vs. External” screw. In the simple PVC method, the helix is on the outside of the pipe. In more advanced designs, the helix is *inside* the pipe, and the entire pipe rotates. This is often more efficient because the outer wall of the pipe helps contain the water, but it requires a more complex way to support and spin the assembly.
Think about the material of the blades. If you are building a wooden screw, the ancient Roman method involved thin willow strips or oak planks steamed and bent into shape. Today, you can use heavy-duty rubber or flexible plastic sheets. These materials provide a better seal against the trough wall and can flex slightly if a hard object gets caught, preventing a catastrophic break.
Example Scenario: The 1,000-Gallon Vineyard Lift
Imagine you have a small vineyard that sits 2 meters (approx. 6.5 feet) above a slow-moving creek. You need to deliver 1,000 gallons (approx. 3,785 liters) of water every evening to your irrigation reservoir. Using a standard 5-gallon bucket, you would have to make 200 trips up a steep bank. Even with a gas pump, the noise and the cost of fuel make it a chore.
By installing a 4-meter (13-foot) Archimedes screw at a 30-degree angle, you can solve this problem. A screw with a 200 mm (8-inch) diameter spinning at 40 RPM will move roughly 5 to 7 gallons per minute. That means in less than three hours, your reservoir is full. If you hook that screw to a small solar-powered gear motor, the entire process happens automatically while you are working on other tasks.
The cost for this setup? If you scavenge the pipe and use a recycled 12V motor, you are looking at less than $100 (approx. £75 or €90). The maintenance cost over the next ten years will be nearly zero. Compare that to the hundreds of dollars in fuel, oil, and replacement parts for a combustion pump, and the ancient wisdom of the helix becomes undeniably clear.
Final Thoughts
The Archimedes screw is more than just an antique; it is a lesson in the power of simple machines. It reminds us that we don’t always need more power to solve a problem—sometimes we just need better geometry. In an age of planned obsolescence, building a tool that can last decades with minimal care is a radical act of self-reliance.
Start small with a PVC and tubing model to grasp the physics of the “bucket” and the critical nature of the incline. Once you see that first splash of water defy gravity and spill out the top of your screw, you will understand why this design hasn’t changed in two millennia. It works because it respects the laws of nature rather than trying to overpower them.
Whether you use it for a garden, a pond, or an emergency drainage system, the Archimedes screw is a reliable partner for anyone working the land. It is quiet, it is efficient, and it is a piece of history you can hold in your hands. Build one, and you’ll never look at a moving stream the same way again.
