How To Become More Self-Sufficient Without Starting a Full-Blown Farm…
Want to start preserving your harvest, making your own soap, or building a backyard root cellar — but not sure where to begin? “Homesteading Advice” gives you instant lifetime access to 35+ practical homesteading books on food preservation, veggie gardening, DIY natural cleaning products (save over $250 per year with this skill alone), brewing, off-grid energy, and a whole lot more…
Click Here To Check It Out Now!
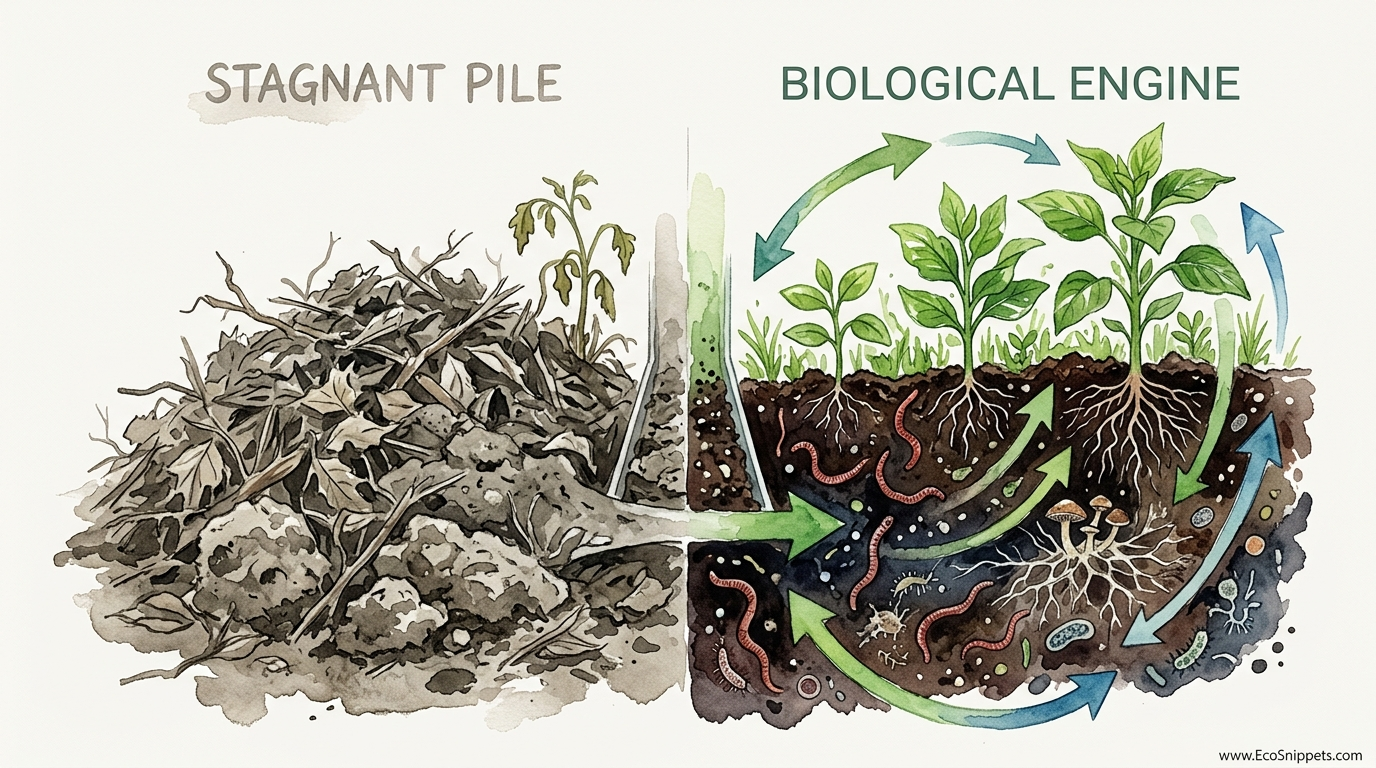
One of these takes 12 months to rot; the other produces black gold in 21 days while feeding your flock. Most backyard farmers treat composting like a waiting game. They throw scraps in a bin and hope for the best. But when you switch from a static pile to a dynamic biological loop, your ‘waste’ becomes high-speed fuel for your soil and a free buffet for your chickens.
Traditional composting is often a slow, sedentary process that relies on passive decomposition. This stagnant approach can take a full year or more to yield usable soil. In contrast, an active biological engine harnesses the natural behaviors of livestock and the rapid metabolism of thermophilic bacteria to accelerate the breakdown of organic matter.
This article explores how you can stop waiting for nature to take its course and start driving the process yourself. You will learn how to integrate your flock into a high-speed soil-building system that reduces feed costs, eliminates odors, and provides your garden with nutrient-dense humus in a fraction of the usual time.
High Speed Soil Building Techniques For Homesteaders
High-speed soil building refers to the intentional acceleration of the decomposition process to create fertile humus rapidly. Instead of letting organic matter sit in a cold, anaerobic heap, homesteaders use specific ratios of carbon and nitrogen, moisture control, and physical aeration to create a “hot” pile. This method mimics the forest floor but compresses decades of natural soil formation into just a few weeks.
In the real world, this technique is used to revitalize depleted garden beds, manage large volumes of livestock bedding, and create high-quality potting soil without external inputs. It exists at the intersection of microbiology and animal husbandry. By using chickens as the primary labor force, you outsource the heavy lifting of turning the pile while they benefit from the protein-rich larvae and sprouted seeds found within the decomposing material.
Imagine your compost pile as a high-performance engine. The carbon (browns) is the frame, the nitrogen (greens) is the fuel, and the oxygen provided by the chickens’ scratching is the intake. When these elements are balanced, the microbial “fire” burns hot and fast, sanitizing the material of weed seeds and pathogens while building soil structure that lasts for years.
How to Build a 21-Day Biological Engine
The core of this system is the Berkeley Method, modified to include the “chicken loop.” This process focuses on maintaining high temperatures through frequent aeration and precise moisture levels. Follow these steps to set up your own accelerated system.
Step 1: Gather Your Feedstocks
Successful hot composting requires a Carbon-to-Nitrogen (C:N) ratio of approximately 25:1 to 30:1. Carbon sources include wood chips, straw, shredded cardboard, and dried leaves. Nitrogen sources include fresh grass clippings, kitchen scraps, and high-protein additives like chicken manure or legume hay. Aim for a pile size of at least one cubic meter (roughly 3x3x3 feet) to ensure enough mass to insulate the core and maintain heat.
Step 2: Layer and Saturate
Begin by layering your carbon and nitrogen sources. Moisten each layer as you build it until the entire pile has the consistency of a wrung-out sponge. If you squeeze a handful of the material, only one or two drops of water should escape. Excessive water will drown the aerobic bacteria, while too little will stall the process entirely.
Step 3: The 4-Day Initiation
Let the pile sit untouched for the first four days. During this time, mesophilic microorganisms begin the breakdown, and the internal temperature will climb rapidly. By the end of day four, the pile should ideally reach between 55°C and 65°C (131°F to 150°F). Temperatures above this range can kill off beneficial microbes, while lower temperatures fail to kill weed seeds.
Step 4: Unleash the Flock
Once the initial heat has stabilized, allow your chickens access to the pile. Their natural instinct to scratch and peck will turn the outer layers into the hot core, providing the necessary oxygen for aerobic bacteria. The chickens will also consume fly larvae and beetles, which helps manage pests while adding fresh nitrogen via their manure. If the chickens do not turn the entire pile, use a pitchfork to assist them every two days until day 21.
Benefits of the Accelerated Biological Loop
Switching to a high-speed system offers measurable advantages for both the garden and the homestead budget. Unlike passive piles, which often leach nutrients into the ground over long periods, a hot pile captures and stabilizes nitrogen into microbial bodies, making it available to plants exactly when they need it.
Practical benefits include:
- Reduced Feed Costs: Chickens can obtain a significant portion of their daily protein from the insects and worms that thrive in a managed compost pile.
- Pathogen Destruction: Sustained heat between 55°C and 65°C (131°F to 150°F) effectively kills harmful bacteria like E. coli and Salmonella, as well as most common garden weed seeds.
- Odor Management: Aerobic composting, fueled by constant turning, prevents the “rotten egg” smell associated with anaerobic, stagnant heaps.
- High Volume Processing: You can cycle through large amounts of bedding and garden waste quickly, preventing the buildup of unsightly “trash” piles on the property.
The resulting “black gold” is rich in humus, which improves the water-holding capacity of sandy soils and the drainage of heavy clay. This creates a resilient growing environment that requires less irrigation and fewer supplemental fertilizers.
Challenges and Common Mistakes
Maintaining a high-speed system requires more attention than a “set it and forget it” bin. Beginners often struggle with the balance of inputs, leading to a pile that either fails to heat up or becomes a soggy mess.
One frequent error is making the pile too small. Without sufficient mass, the heat generated by the bacteria dissipates faster than it can build up. A pile should be at least 1 meter (3.3 feet) high and wide to stay insulated. If your pile stays cold, you likely need more nitrogen-rich “green” material to jumpstart the microbial activity.
Moisture imbalances are another common pitfall. A pile that is too wet becomes anaerobic, leading to foul smells and a slimy texture. If this happens, turn the pile immediately and add dry carbon like straw or wood shavings to soak up the excess liquid. Conversely, a pile that is too dry will stop decomposing because the microbes cannot move or feed without a film of water.
Neglecting the chickens’ safety is also a concern. Ensure the pile does not contain toxic plants (like nightshades or oleander) or sharp materials that could injure the birds’ feet. Monitor the temperature carefully; while the core is hot, the outer layers should be safe for the birds to scratch through.
Limitations and When This May Not Be Ideal
While high-speed composting is efficient, it is not always the best choice for every homesteader or every season. Environmental constraints and labor availability play a large role in the success of the system.
Cold climates present a significant hurdle. In regions where temperatures drop below freezing for months, maintaining a hot pile requires massive amounts of insulation or a much larger pile volume (often 2-3 times the standard size). If the core freezes, the biological engine stops, and you effectively revert to a stagnant pile until the spring thaw.
Labor is another factor. This method requires a commitment to monitoring and turning (if the chickens aren’t doing 100% of the work) every 48 hours for three weeks. If you travel frequently or have limited mobility, a slower, passive composting method—like the “cold” heap or the deep litter method—might be more practical, even if it takes a year to complete.
Flock size also dictates the scale of the system. A small flock of three or four hens may not have the scratching power to turn a cubic meter of heavy, wet material. In these cases, the homesteader must do the bulk of the turning, using the chickens primarily for pest control and final sifting.
Optional Comparison: Stagnant Pile vs. Biological Engine
Understanding the difference between these two approaches helps in choosing the right strategy for your specific needs. The table below compares the two systems based on common homestead metrics.
| Feature | Stagnant Pile (Cold) | Biological Engine (Hot) |
|---|---|---|
| Time to Completion | 6 to 12 months | 18 to 21 days |
| Labor Level | Low (Passive) | High (Active turning) |
| Pathogen Kill | Unreliable | High (at 55°C+) |
| Feed Value | Minimal | High (insect protein) |
| Space Requirement | Large (needs many bins) | Small (fast turnover) |
Practical Tips for Success
Implementing an accelerated soil-building loop can be streamlined with a few tactical adjustments. These tips help you optimize the “biological engine” for maximum efficiency.
- Use a Compost Thermometer: Stop guessing if your pile is hot enough. A long-stemmed thermometer allows you to check the core temperature and know exactly when to turn the pile to prevent overheating or stalling.
- Pre-Shred Your Carbon: Microbes work faster on smaller surface areas. Run dry leaves over with a lawnmower or use a wood chipper to break down branches before adding them to the pile.
- Strategic Placement: Build your pile directly in the chicken run or adjacent to the garden. This minimizes the distance you need to move the finished product and gives the flock constant access to the “work site.”
- Inoculate the Pile: Speed up the start of the process by adding a few shovelfuls of finished compost or forest leaf mold to the new pile. This introduces a diverse community of bacteria and fungi immediately.
- Cover the Pile: In heavy rain, a tarp prevents the pile from becoming waterlogged. In dry weather, it helps retain the moisture and heat necessary for the bacteria to thrive.
Advanced Considerations: Charging Biochar
For the serious practitioner, the high-speed compost pile is the perfect environment to “charge” biochar. Biochar is a highly porous form of charcoal that serves as a permanent housing for soil microbes. However, raw biochar can actually strip nutrients from the soil if applied directly.
By adding biochar to your hot compost pile, you allow it to soak up the nutrient-rich liquids and colonize with beneficial bacteria during the 21-day cycle. The heat and moisture ensure the pores of the charcoal are fully saturated. When you eventually spread the finished compost, the biochar acts as a long-term battery, slowly releasing nutrients into the soil for years, or even decades, after the organic matter has further decomposed.
Consider also integrating vermicompost (worm castings) after the heat phase has ended. Once the pile cools down after day 21, you can introduce composting worms to further refine the texture and add plant growth hormones. This multi-stage biological loop creates a premium product that surpasses any store-bought fertilizer in complexity and effectiveness.
Example Scenario: The 10-Hen Cycle
Consider a homestead with 10 hens and a 100-square-meter (roughly 1,000-square-foot) garden. Each week, the hens produce a significant amount of manure and soiled bedding. Instead of cleaning the coop and dumping the waste in the corner, the homesteader builds a “biological engine.”
The homesteader gathers two cubic meters of wood chips and one cubic meter of fresh stable manure. They layer these in the chicken run, soaking them thoroughly. For the first four days, the chickens are fenced off from the pile to allow the heat to rise. On day five, the thermometer reads 60°C (140°F). The chickens are allowed onto the pile.
Over the next two weeks, the 10 hens spend their mornings scratching through the pile for fly larvae and seeds. Every 48 hours, the homesteader uses a pitchfork to pull the cool edges into the hot center. By day 21, the pile has shrunk by 40% in volume, turned a dark, chocolate brown, and smells like a fresh forest floor. The homesteader now has enough nutrient-rich humus to top-dress their entire garden for the coming season, all while having reduced their chicken feed bill by nearly 20% during the process.
Final Thoughts
Transforming your composting from a passive chore into an active biological engine is a cornerstone of a self-reliant homestead. By understanding the needs of thermophilic bacteria and leveraging the natural instincts of your flock, you create a system that feeds your soil as efficiently as it feeds your birds. This approach moves beyond simple waste management and enters the realm of true resource manufacturing.
Building soil at this speed requires discipline and observation, but the rewards are tangible. You will see deeper green in your leaves, higher yields in your harvests, and a healthier, more active flock. The transition from a stagnant pile to a high-speed loop is not just about saving time; it is about embracing the ancestral wisdom of closing cycles and letting nothing go to waste.
Start your first hot pile this week. Monitor the heat, trust your chickens to do the work, and watch as your “waste” becomes the black gold that will sustain your garden for years to come. Once you experience the efficiency of a 21-day loop, you will never look at a static compost bin the same way again.
