How To Become More Self-Sufficient Without Starting a Full-Blown Farm…
Want to start preserving your harvest, making your own soap, or building a backyard root cellar — but not sure where to begin? “Homesteading Advice” gives you instant lifetime access to 35+ practical homesteading books on food preservation, veggie gardening, DIY natural cleaning products (save over $250 per year with this skill alone), brewing, off-grid energy, and a whole lot more…
Click Here To Check It Out Now!
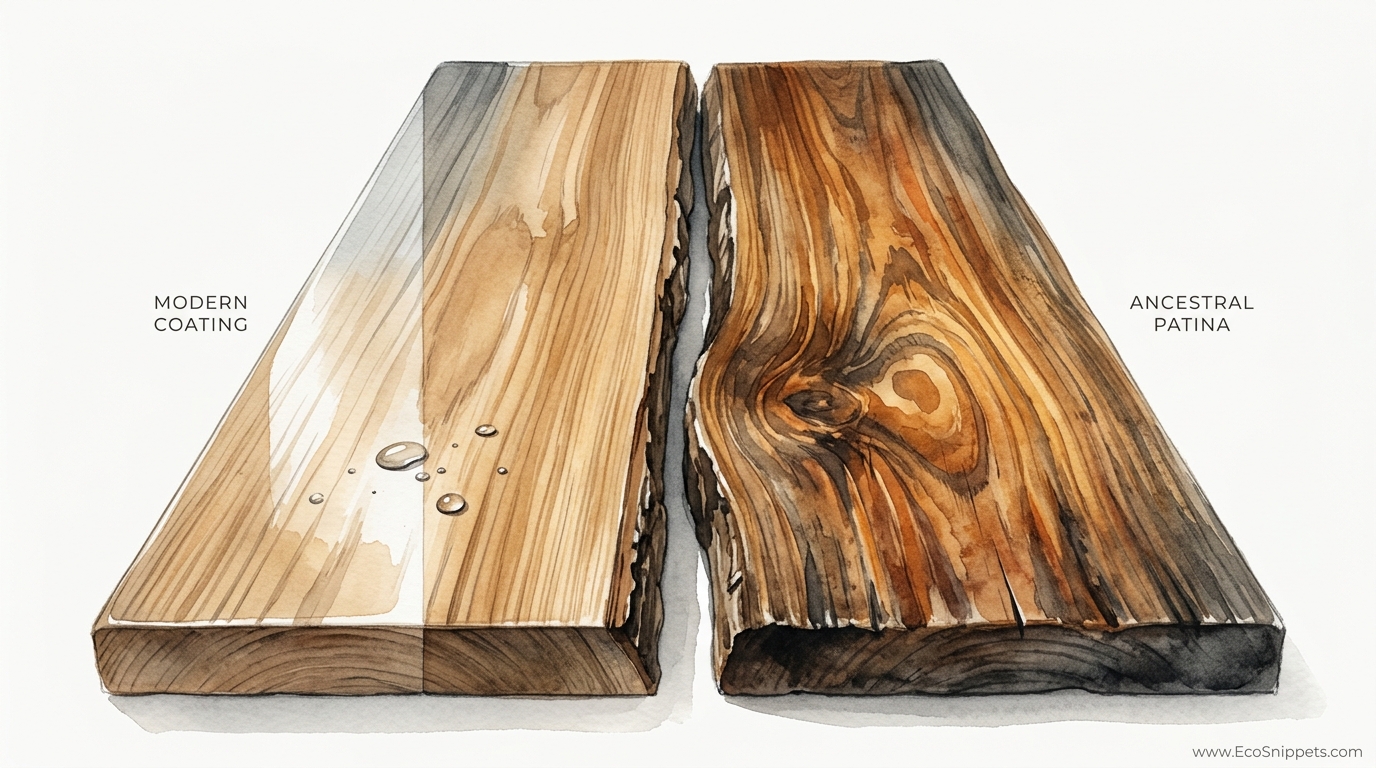
Modern finishes sit on top like a plastic bag, but this ancestral secret actually feeds the wood from within. We traded 200-year durability for 2-hour drying times. Modern lacquers eventually crack and fail, but a traditional hand-rubbed finish gets better with every generation. Here is how to make the ‘Grandfather’s Blend’ in your own kitchen for pennies.
The shift toward synthetic polyurethanes and fast-curing lacquers changed the way we interact with our furniture. We started viewing wood as a substrate to be sealed away rather than a living material to be nurtured. When you apply a modern film-forming finish, you are essentially shrink-wrapping your project. It looks great for a few years, but when it inevitably scratches or chips, the only real fix is to sand the whole thing back to bare wood and start over.
Ancestral finishes work differently. By using a blend of natural oils and waxes, you are creating a “living” finish that penetrates the grain. It doesn’t sit on the surface; it becomes part of the wood. This approach creates the legendary Ancestral Patina—that deep, translucent glow that only gets richer as the decades pass. If it gets a scratch, you simply rub a little more oil into the spot, and the damage disappears.
DIY Natural Wood Finish Recipes
A DIY natural wood finish is a homemade concoction of drying oils, natural waxes, and solvents used to protect and beautify wood. Unlike modern coatings, these recipes rely on the chemistry of nature to preserve wood fibers from the inside out. They have been used for centuries on everything from pioneer tool handles to the finest mahogany highboys of the 18th century.
In the real world, these finishes are prized for their non-toxic properties and ease of maintenance. You will find them in use today by heirloom furniture makers, green woodworkers, and restoration experts who want to match the look of 100-year-old antiques. Because the ingredients are simple and often food-safe, they are the gold standard for kitchen implements, children’s toys, and any surface where you want to feel the texture of the grain rather than the cold touch of plastic.
The most famous of these recipes is the Traditional Three-Part Blend, often called “Grandfather’s Blend.” It is the baseline from which all other oil-and-wax finishes are derived.
The Grandfather’s Blend (Standard Ratio)
- 1 Part Boiled Linseed Oil (BLO): The “food” for the wood that hardens over time through oxidation.
- 1 Part Pure Gum Turpentine: The “vehicle” that thins the oil and wax to help them penetrate deep into the fibers.
- 1 Part Beeswax: The “shield” that provides a silky feel and a moisture-resistant barrier.
The Hard-Wear Variant (For Floors and Tables)
- 1 Part Tung Oil: More water-resistant and durable than linseed oil.
- 1 Part Citrus Solvent (D-Limonene): A natural alternative to turpentine with a pleasant scent.
- 1 Part Carnauba Wax: A harder wax than beeswax that provides a higher gloss and better scratch resistance.
How It Works: The Science of Penetrating Finishes
To understand why these recipes work, you have to understand the difference between evaporation and polymerization. Most modern finishes dry by evaporation—the liquid carrier leaves, and a plastic resin remains. Natural oils like Linseed or Tung oil dry by polymerization. This is a chemical reaction where the oil molecules absorb oxygen from the air and link together to form a solid, durable polymer inside the wood cells.
When you apply the blend, the solvent (turpentine or citrus solvent) acts as a delivery system. It carries the oil and melted wax deep into the tracheids and vessels of the wood. As the solvent evaporates, it leaves the oil and wax behind. The oil begins its slow transformation into a hard solid, while the wax fills the microscopic pores to repel liquid water.
The Step-By-Step Process
First, prepare your wood. Natural finishes do not hide mistakes; they highlight them. Sand your project up to 220 grit, ensuring you remove all “pig tails” or sanding marks. Wipe the surface clean with a tack cloth or a rag dampened with mineral spirits.
Mix your ingredients in a double boiler. Never place these ingredients directly over an open flame, as turpentine and oil are highly flammable. Melt the wax first, then slowly stir in the oil and solvent. Once the mixture is a uniform liquid, it is ready for application.
Apply the finish while it is warm. Use a lint-free cotton cloth to massage the mixture into the wood. Don’t be shy; let the wood drink it up. After about 30 minutes, wipe away any excess that hasn’t soaked in. If you leave puddles, they will turn into a sticky, gummy mess that is difficult to remove.
Allow the piece to sit for 24 to 48 hours. The surface will feel dry, but the internal polymerization takes time. Apply a second or third coat as needed. For a high-sheen finish, buff the final coat vigorously with a clean wool cloth once it has set for 12 hours.
Benefits of Traditional Oil and Wax Finishes
The primary advantage of a hand-rubbed finish is repairability. In a modern home, a deep scratch in a polyurethane-coated dining table is a catastrophe. In a pioneer home, it was just a Tuesday. To fix a scratch in a natural finish, you simply apply a small amount of the blend to the affected area and buff it out. The new finish melts into the old, making the repair invisible.
Another measurable benefit is breathability. Wood is hygroscopic, meaning it absorbs and releases moisture as the seasons change. A rigid plastic coating can crack as the wood expands and contracts. A natural oil finish is flexible; it moves with the wood, preventing the “clouding” or “checking” seen in old lacquer finishes.
- Non-Toxic: Most ingredients are derived from plants or bees, making them safer for your home environment.
- Tactile Beauty: You feel the wood, not a layer of resin. The surface remains warm to the touch.
- Aging Potential: These finishes don’t “fail”; they mature. The wood develops a glow that synthetic products cannot replicate.
Challenges and Common Mistakes
The biggest challenge with natural finishes is patience. We live in a world of two-hour drying times, but a traditional blend takes time to cure. If you rush the process or apply coats too thickly, you will end up with a surface that remains tacky for weeks. This happens because the oil at the surface hardens before the oil underneath has a chance to oxidize, essentially “trapping” the wet oil inside.
Contamination is another frequent error. Using “Boiled” Linseed Oil is standard, but you must ensure it doesn’t contain heavy-metal driers if you intend for the piece to be food-safe. Always check the label. If you are using raw linseed oil, be prepared for a curing time that can last several weeks rather than several days.
Perhaps the most dangerous mistake is improper rag disposal. Drying oils like Linseed and Tung release heat as they oxidize. If you bunch up an oil-soaked rag and throw it in the trash, the heat can build up until the rag spontaneously combusts. Always lay rags flat to dry outdoors or submerge them in a bucket of water.
Limitations: When This May Not Be Ideal
While the ‘Grandfather’s Blend’ is versatile, it is not a “bulletproof” coating. It has low resistance to standing water and high heat. If you leave a wet glass on a waxed surface for several hours, you will likely see a white ring. This is caused by moisture getting trapped under the wax layer. While easy to fix, it makes this finish less ideal for high-traffic bar tops or bathroom vanities where water is constantly present.
Environmental factors also play a role. In extremely humid environments, natural oil finishes can take significantly longer to cure. If the air is stagnant and damp, the oxidation process slows to a crawl. Conversely, in very hot, dry climates, the solvent may evaporate too quickly, preventing the wax from being worked deeply into the grain.
Finally, consider the maintenance debt. A polyurethane finish is “set it and forget it” for 10 years. A natural finish requires a “refresh” coat every 12 to 24 months to maintain its protective qualities and sheen. For many, this is a labor of love, but for those seeking zero maintenance, it is a significant trade-off.
MODERN COATING vs ANCESTRAL PATINA
To help you decide which path to take, consider this comparison between modern synthetic coatings and traditional natural finishes.
| Factor | Modern Coating (Poly/Lacquer) | Ancestral Patina (Oil/Wax) |
|---|---|---|
| Application Time | Fast (2–4 hours) | Slow (24–48 hours per coat) |
| Skill Level | Moderate (needs brush/spray) | Low (wipe on/off) |
| Repairability | Difficult (requires stripping) | Very Easy (rub-in repair) |
| Durability (Water) | High (waterproof) | Moderate (water-resistant) |
| Appearance | Consistent, slightly plastic | Organic, deep grain enhancement |
| Cost | $20–$50 per quart | Pennies per project (DIY) |
Practical Tips and Best Practices
If you want to achieve a professional-grade finish with the ‘Grandfather’s Blend’, follow these best practices derived from years of shop experience.
- Sanding is everything: Stop at 220 grit for most woods. If you go too high (like 600 grit), you can actually “burnish” the wood, closing the pores and preventing the oil from soaking in.
- The “Wet Look” Test: To see what your wood will look like finished, wipe it with a rag dampened with mineral spirits. This reveals the grain and any hidden scratches you missed while sanding.
- Heat the wood: In cold weather, use a hair dryer or heat lamp to gently warm the surface of the wood before applying the finish. This thins the wax upon contact and draws it deeper into the fibers.
- Buff with wool: After the final coat has dried for 12 hours, use a piece of real wool or a high-quality buffing brush. The friction generates a small amount of heat that “sets” the wax and creates a lustrous glow.
Advanced Considerations: Additives and Resin
For the serious practitioner, the basic three-part blend can be upgraded with Pine Rosin. Rosin is the solid resin obtained from pines after the turpentine has been distilled off. Adding 5% to 10% crushed rosin to your mixture creates a much harder finish that is closer to a traditional varnish. This was the “secret sauce” for many 19th-century cabinetmakers.
Another consideration is the use of Carnauba wax. Derived from the leaves of a Brazilian palm tree, carnauba is significantly harder than beeswax. While beeswax provides a soft, “butter” feel, carnauba allows for a much higher buffed sheen and better protection against heat. Many professionals use a 50/50 blend of beeswax and carnauba in their recipes to get the best of both worlds.
When working with these advanced additives, the temperature of your double boiler becomes more critical. Rosin and carnauba have higher melting points than beeswax. Ensure your mixture is completely liquid and clear before application, or you will end up with “specks” of un-melted resin on your finished surface.
Example Scenario: The Heirloom Oak Table
Imagine you have inherited an old white oak farmhouse table. The original finish is gone, and the wood looks grey and “thirsty.” Using modern polyurethane would be a mistake; the oak has large, open pores that the plastic would simply bridge over, creating a bumpy, uneven surface.
Instead, you mix a batch of Grandfather’s Blend: 250ml (1 cup) of Boiled Linseed Oil, 250ml of Gum Turpentine, and 250g of local Beeswax. You sand the table to 180 grit, then 220. You apply the warm mixture and watch as the oak instantly transforms from a dull grey to a rich, golden amber.
The first coat disappears into the grain within minutes. You apply a second coat an hour later. By the third coat, the wood is “saturated”—it can’t hold any more oil. You wipe it dry and let it cure. Two days later, you buff it with a wool rag. The result is a table that looks like it belongs in a museum, yet is ready for another 100 years of family dinners.
Final Thoughts
The transition from modern lacquers to traditional finishes is more than just a change in technique; it is a change in philosophy. It is an acknowledgment that some things are worth the wait. By choosing to feed the wood rather than seal it, you are participating in a tradition of craftsmanship that stretches back centuries.
The ‘Grandfather’s Blend’ is a testament to the power of simple, natural ingredients. It provides a level of beauty and repairability that no laboratory-born chemical can match. Whether you are finishing a simple spoon or a complex piece of furniture, these ancestral secrets offer a path to self-reliance and a more beautiful home.
We encourage you to experiment with these ratios. Try a little more wax for a matte look, or a little more oil for a deeper glow. Every piece of wood is different, and as you learn to listen to the grain, you will find your own perfect version of the blend. Apply what you have learned here, and give your wood the finish it deserves.
