How To Become More Self-Sufficient Without Starting a Full-Blown Farm…
Want to start preserving your harvest, making your own soap, or building a backyard root cellar — but not sure where to begin? “Homesteading Advice” gives you instant lifetime access to 35+ practical homesteading books on food preservation, veggie gardening, DIY natural cleaning products (save over $250 per year with this skill alone), brewing, off-grid energy, and a whole lot more…
Click Here To Check It Out Now!
Keep your harvest fresh through a blackout using this 3,000-year-old physics trick. Active refrigeration is expensive and fragile. Passive evaporative cooling uses the power of physics to drop temperatures by 20 degrees without a single watt of power. It’s the ultimate ‘set it and forget it’ insurance for your harvest.
In an age where we rely on humming compressors and complex electrical grids, the wisdom of our ancestors often goes ignored. Yet, when the power fails or the cost of living climbs, these ancient methods prove their worth. The Zeer pot, or “pot-in-pot” refrigerator, is a testament to the ingenuity of the human spirit. It relies not on fragile technology, but on the immutable laws of thermodynamics.
If you are a gardener, a prepper, or simply someone looking to live a more self-reliant life, understanding this system is essential. This guide will walk you through the science, the construction, and the practical application of the most reliable cooling system ever devised.
DIY Zeer Pot Cooling Guide
The Zeer pot is a primitive yet highly effective refrigeration system that dates back to the Old Kingdom of Egypt and the Indus Valley Civilization. The word “zeer” itself comes from the Arabic term for the large earthenware pots used for storage. While the modern world “rediscovered” this technology through the work of Nigerian teacher Mohamed Bah Abba in the 1990s, the physics behind it has sustained desert-dwelling populations for millennia.
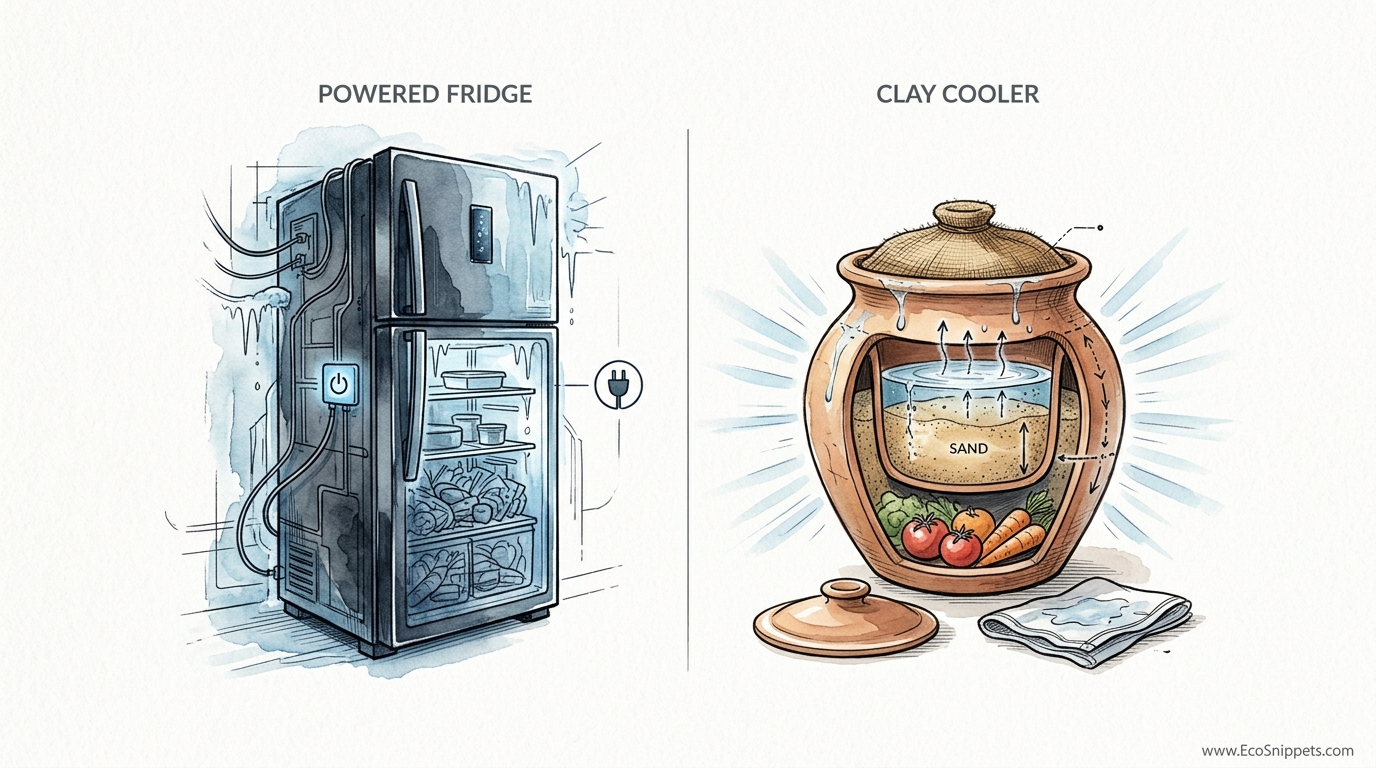
At its core, a Zeer pot consists of two unglazed terracotta pots of different sizes, nested one inside the other. The space between them is filled with sand and saturated with water. As the water evaporates through the porous outer pot, it carries heat away from the inner chamber, significantly lowering the internal temperature.
This system is widely used today in regions like Sudan and rural Nigeria, where farmers use it to keep vegetables fresh for weeks instead of days. In these environments, the difference between having a Zeer pot and not having one is often the difference between a successful market season and a total loss of the harvest.
How the Physics of Evaporation Works
The primary mechanism at play here is known as evaporative cooling. When water transitions from a liquid state to a gaseous state, it requires energy. This energy is known as the latent heat of vaporization. In a Zeer pot system, the water held in the sand wicks through the porous clay of the outer pot. When air passes over the wet surface of the pot, it causes the water to evaporate.
The energy needed for this phase change is drawn directly from the thermal mass of the inner pot and its contents. This process continuously removes heat, allowing the interior to reach what scientists call the “wet-bulb temperature.” In dry, arid climates, this temperature can be significantly lower than the ambient air temperature—often dropping by as much as 10°C to 18°C (18°F to 32°F).
Step-by-Step Construction Guide
Building your own Zeer pot requires minimal tools and affordable materials. You will need:
- One large unglazed terracotta pot (the outer shell).
- One smaller unglazed terracotta pot (the storage chamber).
- Fine, clean sand (play sand or builder’s sand works well).
- A source of water.
- Duct tape or cork to seal drainage holes.
- A thick, natural fiber cloth (burlap or heavy cotton).
Step 1: Seal the Drainage Holes. Most garden pots have holes at the bottom for water drainage. To make a refrigerator, you must seal these. Use a piece of cork or heavy-duty duct tape on the bottom of both pots. If the seal fails, the water will leak out before it can evaporate, and your cooler will fail.
Step 2: Prepare the Base. Pour a layer of sand into the bottom of the larger pot. The layer should be about 2 to 5 centimeters (1 to 2 inches) thick. This creates a bed for the smaller pot to sit on so that its rim is level with the rim of the larger pot.
Step 3: Nest the Pots. Place the smaller pot inside the larger one. Ensure it is centered so there is an even gap all the way around. This gap, usually 2 to 4 centimeters (1 to 1.5 inches), is where the cooling happens.
Step 4: Fill with Sand. Pour sand into the gap between the two pots. Pack it down gently but do not compress it so much that water cannot move through it. Leave about a centimeter (half an inch) of space at the top to prevent sand from spilling into your food.
Step 5: Saturate the System. Slowly pour water onto the sand until it is fully saturated. You will know it is ready when the sand can no longer absorb water and the outer clay pot begins to look “sweaty” or damp to the touch.
Step 6: Cover and Placement. Place your produce inside the inner pot. Cover the top with a damp cloth or a terracotta lid. For maximum efficiency, place the entire unit in a shaded, well-ventilated area. Airflow is the “engine” that drives evaporation.
The Practical Benefits of Passive Cooling
The most obvious advantage is the lack of a power requirement. In a long-term grid-down scenario, your modern refrigerator becomes a useless white box within 24 hours. The Zeer pot, however, continues to work as long as you have a little water and a breeze.
Beyond survival situations, this method offers superior storage for certain crops. Modern refrigerators use fans that strip moisture from the air, causing leafy greens and root vegetables to wilt. The interior of a Zeer pot remains humid, which keeps produce like carrots, greens, and peppers crisp for much longer than they would stay on a countertop.
The cost is another significant factor. You can assemble a high-quality Zeer pot for less than $20 (approx. €18). Compared to the hundreds or thousands of dollars required for a powered refrigerator and the solar setup needed to run it off-grid, the clay cooler is a masterpiece of economic efficiency.
Challenges and Common Mistakes
The most frequent error is improper placement. Many beginners assume that placing the pot in the sun will speed up evaporation and thus increase cooling. This is a mistake. Direct sunlight imparts more thermal energy than the evaporation can remove. You must keep the unit in the deep shade.
Another common pitfall is using the wrong type of pot. You cannot use glazed ceramic or plastic pots for the outer shell. These materials are non-porous and prevent water from reaching the surface to evaporate. Only unglazed, breathable terracotta or earthenware will work.
Mold growth is a reality of any damp environment. If you notice black spots forming on the clay or in the sand, it is time for a cleaning. You can prevent this by adding a small amount of salt or vinegar to the water you use to saturate the sand. If mold does appear, scrub the pots with a solution of white vinegar and let them dry completely in the sun before reassembling.
When This Method May Not Work
Evaporative cooling is a slave to humidity. If you live in a tropical rainforest or a region with 90% relative humidity, the Zeer pot will struggle. Evaporation happens because the air is “thirsty” for moisture. If the air is already saturated with water, the process slows to a crawl.
In high-humidity environments, you might only see a temperature drop of 2°C to 5°C (4°F to 9°F). While this is still better than nothing, it is not sufficient for long-term preservation of sensitive items like meat or dairy. This system is designed for vegetables, fruits, and water.
Additionally, the Zeer pot is heavy. Once the sand is saturated, a large unit can weigh 25 to 50 kilograms (55 to 110 pounds). It is not a portable solution. Choose your location wisely before you fill it with water.
POWERED FRIDGE vs CLAY COOLER
When considering a long-term self-reliance strategy, it helps to see how these systems stack up side-by-side.
| Feature | Modern Refrigerator | Zeer Pot (Clay Cooler) |
|---|---|---|
| Power Source | Electricity (Grid/Solar) | Physics (Evaporation) |
| Maintenance | Low (until it breaks) | Daily (water refill) |
| Typical Temp | 1°C to 4°C (34°F-40°F) | 8°C to 15°C (46°F-59°F)* |
| Initial Cost | High ($500+) | Very Low (<$20) |
| Shelf Life (Veg) | 1-2 weeks | 2-3 weeks (Humid) |
*Performance varies based on ambient humidity and airflow.
Best Practices for Peak Performance
To get the most out of your cooling system, you need to manage it like a pioneer would manage a hearth. It requires a bit of daily attention.
- Water Twice Daily: Check the sand in the morning and evening. It should always feel like a wrung-out sponge. If the top layer of sand is bone-dry, your cooling has stopped.
- Optimize Airflow: If you are in a particularly still area, placing the pot on a stand that allows air to circulate underneath the base can improve performance. Some users even use a small solar-powered fan to create a constant breeze.
- Manage the Lid: Use a heavy damp cloth as a lid. The moisture on the cloth contributes to the cooling from the top down. If you use a solid lid, ensure it is insulated or made of clay to prevent heat transfer.
- Keep it Clean: Every few months, empty the sand and scrub the pots. Mineral deposits from hard water can clog the pores of the terracotta, reducing its “breathability” and efficiency.
Advanced Considerations
For those looking to scale this system, understand that volume and surface area have a complex relationship. A massive pot holds more food, but it has less surface area relative to its volume, meaning it won’t cool as effectively as a medium-sized unit. It is often better to have three medium-sized Zeer pots than one giant one.
If you are dealing with very high temperatures, you can “supercharge” the system by using distilled water or rainwater. Tap water often contains minerals that eventually seal the clay pores. Using cleaner water extends the life of your pots and maintains a higher rate of evaporation.
Serious practitioners also monitor the “Wet Bulb” temperature of their environment using a hygrometer. By knowing the relative humidity, you can predict exactly how cool your Zeer pot will get. This allows you to decide which crops are safe to store and which should be consumed immediately.
Practical Scenarios: What Can You Store?
To visualize how this works in the field, let’s look at the shelf-life extension of common garden crops in a typical arid environment (30°C / 86°F at 20% humidity).
Tomatoes: On a countertop, a ripe tomato may last 2 to 3 days before softening. In a Zeer pot, the combination of coolness and humidity can keep them firm and fresh for up to 20 days.
Leafy Greens (Arugula/Spinach): These are the first to die in a power outage. Normally wilting within 24 hours, they can stay crisp for 5 to 7 days inside the humid environment of the inner clay pot.
Carrots and Root Crops: If kept in the inner pot and covered with a damp cloth, carrots can remain edible and crunchy for nearly a month. This is a game-changer for those without a dedicated root cellar.
Final Thoughts
The Zeer pot is more than just a science project; it is a bridge to a more resilient way of living. It reminds us that we don’t always need complex solutions to solve fundamental problems. By harnessing the power of evaporation, we can protect our hard-earned harvests and reduce our dependence on an aging and overtaxed electrical grid.
Whether you are preparing for an emergency or simply trying to reduce your carbon footprint, the clay-in-clay refrigerator is a tool every household should understand. It is low-cost, low-tech, and high-impact.
As you begin your journey with passive cooling, remember that the “magic” is in the maintenance. Keep your sand wet, keep your pots in the shade, and let the laws of physics do the heavy lifting. Once you taste a crisp, cool carrot pulled from a pot that uses no electricity, you’ll never look at your kitchen appliances the same way again.
