How To Become More Self-Sufficient Without Starting a Full-Blown Farm…
Want to start preserving your harvest, making your own soap, or building a backyard root cellar — but not sure where to begin? “Homesteading Advice” gives you instant lifetime access to 35+ practical homesteading books on food preservation, veggie gardening, DIY natural cleaning products (save over $250 per year with this skill alone), brewing, off-grid energy, and a whole lot more…
Click Here To Check It Out Now!
Wasted space is a wasted harvest – stop ‘eyeballing’ your seeds and start using the board. Most gardeners lose nearly a quarter of their growing space to ‘dead zones’ because of inconsistent spacing. This simple DIY seed board takes the guesswork out of planting, ensuring every square inch of your soil is working for you. It’s the difference between a ‘nice garden’ and a food security powerhouse.
Every year, well-meaning folks head into the garden with a packet of seeds and a hope for the best. They walk down the rows, dragging a finger through the dirt, and drop seeds at intervals that look “about right.” The problem is that human eyes are notoriously poor at calculating the specific geometry required for a high-yield harvest. If you plant too far apart, you leave bare soil exposed to the sun, inviting weeds to move in and moisture to evaporate. If you plant too close, your crops will fight for nutrients like siblings at a dinner table, resulting in stunted growth and measly yields.
A garden seed spacing template is the solution for the serious grower. This tool isn’t just a piece of wood with holes in it; it is a physical manifestation of the intensive gardening principles used by ancestors who couldn’t afford to waste a single calorie of effort. It allows you to move away from the inefficient wide-row farming of industrial agriculture and toward a high-density, high-output system that treats the garden as a living tapestry rather than a factory floor.
How To Build A Garden Seed Spacing Template
A garden seed spacing template is a physical guide, usually a square or rectangular board, pre-drilled with holes at specific intervals that correspond to the optimal growing needs of different vegetables. It serves as a master layout for your garden beds, allowing you to press the board into the soil and know exactly where every seed belongs. This tool is most commonly utilized in intensive gardening systems, such as Square Foot Gardening or French Intensive methods, where the goal is to eliminate the empty paths between rows and focus on a “grid” of growth.
In the real world, this board acts as a bridge between the data on the back of your seed packet and the actual dirt in your hands. Most seed packets give you two measurements: “plant spacing” and “row spacing.” The row spacing is a relic of the days of horse-drawn plows and heavy machinery—it exists solely to give a tractor or a pair of boots a place to walk. When you use a template board, you ignore the row spacing entirely and focus on the plant spacing. By arranging plants in a grid, you can fit significantly more food into the same footprint.
Think of the seed board like a cookie cutter for your garden. Instead of measuring out every individual dough ball, you press the cutter down and get perfect, uniform results every time. For a standard raised bed or small backyard plot, this means you can transition from a garden that looks like “lines of green in a sea of brown” to a “living mulch” where the leaves of your vegetables eventually touch, shading the ground and protecting the soil biology beneath.
To build your own, you will need a few basic materials that are likely already in your workshop. A standard 12-inch by 12-inch (30.5 cm by 30.5 cm) piece of plywood or 1×12 untreated pine is the ideal base. You will also need a drill, a set of drill bits, and some way to mark your holes. Many experienced gardeners prefer to color-code the holes to match different plant densities—for example, red for 16 plants per square foot, blue for 9, and yellow for 4.
How to Construct and Use the Template
Building the board is a straightforward project that pays for itself in the very first season. The most versatile board is a one-square-foot template that can be moved across the bed like a stamp. This size is easy to handle and fits perfectly into the standard 4-foot (1.2 m) wide raised beds that many modern gardeners prefer.
Step 1: Preparing the Board
Begin with a piece of 1/2-inch (1.3 cm) or 3/4-inch (1.9 cm) exterior-grade plywood. Sand the edges so you don’t pick up splinters while planting in the spring. Mark a perfect 12-inch by 12-inch (30.5 cm by 30.5 cm) square. If you are working in a region that uses the metric system, you might prefer a 30 cm by 30 cm square, which is the standard equivalent for intensive grids.
Step 2: Marking the Grid Patterns
This is where the precision comes in. You want to mark four distinct patterns on the same board.
- The 1-Pack: Mark a single hole exactly in the center of the board (6 inches or 15 cm from each side). This is for large plants like peppers or broccoli.
- The 4-Pack: Divide the board into four 6-inch (15 cm) squares. Mark a hole in the center of each of those squares. This is for leafy greens and corn.
- The 9-Pack: Divide the board into nine 4-inch (10 cm) squares. Mark a hole in the center of each. This is for bush beans or spinach.
- The 16-Pack: Divide the board into sixteen 3-inch (7.5 cm) squares. Mark a hole in the center of each. This is the gold standard for carrots, onions, and radishes.
Step 3: Drilling and Color Coding
Use a 1-inch (2.5 cm) spade bit or hole saw to drill out the marked spots. After drilling, use outdoor acrylic paint or permanent markers to circle the holes according to their pattern. This allows you to look at a chart and know instantly which holes to use for which crop. If you’re feeling particularly handy, you can also build a “dibber”—a small wooden peg with depth markings—that fits through the holes to poke a hole in the soil at exactly the right depth (1/4 inch, 1/2 inch, or 1 inch deep).
Step 4: Application in the Garden
Once your soil is prepped and raked smooth, place the board in the corner of your bed. Press down firmly to leave an impression. Use your dibber or a finger to poke through the holes required for your chosen crop. Drop your seeds, move the board to the next adjacent square, and repeat. You will find that a 4×8 foot (1.2 m x 2.4 m) bed can be fully and accurately seeded in less than ten minutes.
The Benefits of Grid-Based Planting
The primary advantage of using a spacing template is the staggering increase in yield. Traditional row gardening is designed for the convenience of the machine; grid gardening is designed for the biology of the plant. When you plant in a grid, you can often fit 100% to 200% more crops in the same area without sacrificing the health of the individual plants.
A major secondary benefit is weed suppression. In a traditional garden, the wide paths of bare dirt between rows are an open invitation for weeds to germinate. When you use a spacing template, the plants are spaced so that their leaves touch at maturity. This creates a “canopy effect” or “living mulch.” The shade from the crop leaves prevents sunlight from reaching weed seeds on the soil surface, effectively starving them out. This reduces your maintenance time significantly as the season progresses.
Water conservation is another measurable advantage. Bare soil loses moisture rapidly to evaporation. By covering the soil with a dense canopy of vegetable leaves, you keep the ground cooler and trap moisture in the root zone. In many climates, intensive gardeners report needing to water 30% to 50% less than those using traditional row methods.
Finally, there is the benefit of soil structure. Because intensive gardening usually takes place in permanent beds where you never step on the growing surface, the soil remains loose and aerated. The template ensures that you are utilizing the full depth of that aerated soil. The root systems of closely spaced plants actually work together to create a robust subterranean ecosystem, sharing fungal networks and stabilizing the soil against erosion.
Challenges and Common Mistakes
The most frequent error when moving to a template system is failing to thin the seedlings. Even with a perfect template, many gardeners will drop three or four seeds into a single hole “just to be safe.” If all four germinate and you don’t have the heart to pull the extras, the plants will crowd each other out. This negates the precision of the board. You must be disciplined: one hole, one plant (or thin to the strongest survivor).
Another common pitfall is ignoring soil fertility. Intensive spacing requires intensive nutrition. You cannot expect to grow 16 carrots in a single square foot of nutrient-depleted dirt. If you are going to use a spacing template, you must amend your soil heavily with high-quality compost or aged manure before every planting. You are asking more of the soil, so you must give more back to it.
Depth control is often overlooked. It is easy to get so focused on the horizontal spacing (the board) that you forget the vertical spacing (the depth). If you poke your holes too deep with your dibber, small seeds like carrots may never make it to the surface. Conversely, if large seeds like beans are too shallow, they may be pushed out of the soil by their own roots or eaten by birds. Always calibrate your dibber or your finger to the specific depth requirements of the seed.
Finally, beware of compaction during the planting process. If you are leaning heavily on your seed board in wet, clay-heavy soil, you might be compacting the very earth you want to keep loose. Use the board as a guide, not as a stepping stone. If the soil is particularly wet, wait a day for it to dry out before using the template, or use a board that spans the entire width of the bed so you don’t have to put your weight on the growing area.
Limitations and Realistic Constraints
While a seed spacing board is a powerhouse tool, it isn’t a magic wand for every situation. High-humidity environments pose a specific challenge. In regions with heavy rainfall and stagnant air, the dense canopy created by intensive spacing can trap moisture against the stems of the plants, leading to fungal issues like powdery mildew or late blight. If you live in a swampy or extremely humid climate, you may need to “upsize” your spacing—for example, using the 4-pack holes for crops that the chart says could fit in a 9-pack.
Airflow is the trade-off for density. Serious practitioners must monitor their “living mulch” closely. If you see signs of yellowing or mold at the base of the plants, you may need to selectively prune or increase the spacing in future plantings to allow the wind to move through the crop.
Soil type also plays a role in the effectiveness of the board. In heavy clay soils, the holes you poke through the template might “glaze” or become hard-sided, making it difficult for delicate root hairs to penetrate. In very sandy soils, the holes might collapse before you can even get the seed in. The template works best in “loamy” soil—that perfect mix of sand, silt, and organic matter that holds its shape but remains crumbly.
Environmental boundaries also exist for perennial crops. You wouldn’t use a seed spacing board for rhubarb, asparagus, or berry bushes. These plants require permanent, wide-reaching root zones and are best planted using traditional individual measurements rather than a repeating grid. The board is a tool for the annual vegetable garden, where quick turnarounds and high density are the goals.
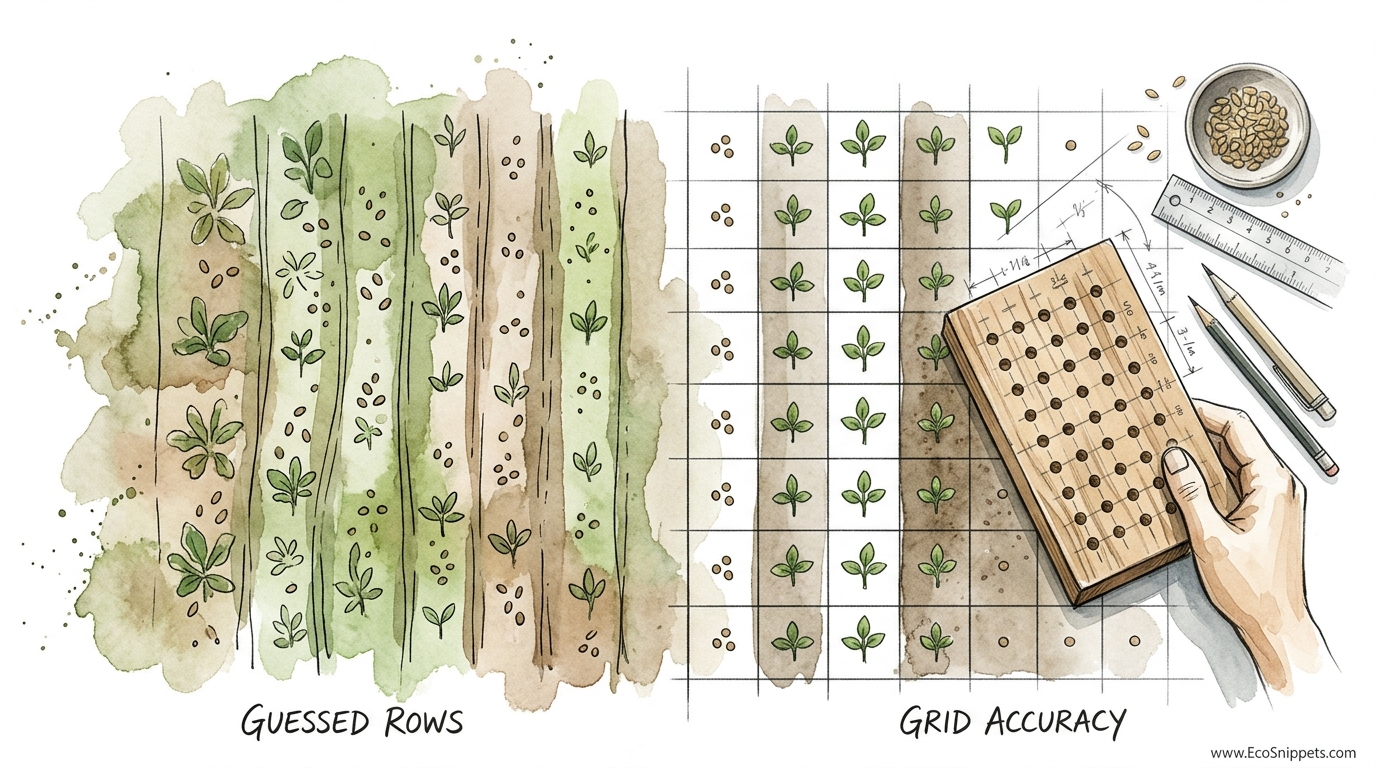
GUESSED ROWS vs GRID ACCURACY
Understanding the difference between the traditional row method and the template-based grid method is essential for any gardener looking to scale their self-reliance.
| Factor | Guessed Rows | Grid Accuracy (Template) |
|---|---|---|
| Space Efficiency | Low (40-60% wasted in paths) | High (90-100% soil utilization) |
| Weed Pressure | High (lots of open soil) | Minimal (crops shade out weeds) |
| Maintenance | Frequent tilling/hoeing between rows | Hand-weeding early; minimal later |
| Water Needs | Higher (evaporation from paths) | Lower (living mulch effect) |
| Harvest Yield | Moderate | Exceptional (up to 4x per sq. ft.) |
As seen in the comparison above, the shift to grid accuracy is a shift toward efficiency. While row gardening is easier to manage with a large tractor, most home gardens are small enough that manual grid planting is far more productive.
Practical Tips and Best Practices
To get the most out of your DIY seed board, adopt a few “pro-level” habits. First, always keep a spacing chart handy. You don’t want to be guessing which color hole to use while you’re standing in the mud. Tape a laminated spacing guide to the back of your board. Common spacings include:
- 16 per square: Carrots, Onions, Radishes, Chives.
- 9 per square: Bush Beans, Spinach, Beets, Leeks.
- 4 per square: Lettuce, Swiss Chard, Corn, Parsley.
- 1 per square: Cabbage, Broccoli, Peppers, Eggplant, Tomatoes (pruned).
Second, stagger your planting. Just because you have a template doesn’t mean you have to plant the whole bed at once. You can use the board to plant one square foot of radishes this week, and the next square foot ten days later. This “succession planting” ensures you have a steady supply of food rather than a massive mountain of radishes that all arrive on the same Tuesday.
Third, consider the “Compass Rule.” When using an intensive grid, place your tallest plants (like corn or trellised peas) on the North or West side of the bed. This prevents them from casting a long shadow over your shorter crops like lettuce or carrots. The board helps you keep these boundaries clean and organized.
Finally, maintain your board. Since it will be in contact with moist soil and potentially manure, it needs protection. A simple coat of linseed oil or a non-toxic outdoor sealant will prevent the plywood from delaminating. Store it hanging on a peg in the shed; a warped board is an inaccurate board.
Advanced Considerations: Beyond the Basics
For the gardener who has mastered the standard grid, there are ways to push the template even further. One technique is interplanting. This involves using different hole patterns within the same square foot. For example, you might use the 1-pack hole for a slow-growing pepper plant, and then use the 16-pack holes to scatter fast-growing radishes around the edges of that same square. By the time the pepper plant is big enough to need the space, the radishes have already been harvested and eaten.
Another advanced strategy is “Multi-Sowing.” This is particularly effective for crops like beets or onions. Instead of one seed per hole, you plant a small cluster of 3-4 seeds in each hole of a 4-pack grid. As they grow, they push each other apart. You harvest the largest one in the cluster first, giving the remaining ones room to expand. This “clump” method can increase yields even beyond the standard grid limits.
Scaling is the final frontier. If you are moving from a small backyard plot to a quarter-acre homestead, you might find a 12×12 inch board too small. You can build “long templates”—perhaps a 1×4 foot (30 cm x 1.2 m) board that covers the entire width of your bed. This allows you to stamp an entire row of squares at once, drastically speeding up the planting process for large-scale production without losing the precision of the grid.
Scenario: The 4×4 Powerhouse Bed
To visualize how this works in practice, let’s look at a standard 4×4 foot (1.2 m x 1.2 m) raised bed. Using the spacing board, you can divide this bed into 16 individual squares. A diverse, high-yield layout might look like this:
- Back Row (North): 4 squares of trellised Pole Beans (8 plants per square = 32 plants total).
- Second Row: 2 squares of Broccoli (1 per square) and 2 squares of Kale (1 per square).
- Third Row: 2 squares of Spinach (9 per square = 18 plants) and 2 squares of Lettuce (4 per square = 8 plants).
- Front Row (South): 2 squares of Carrots (16 per square = 32 plants) and 2 squares of Radishes (16 per square = 32 plants).
In this single 16-square-foot area, you are growing 128 individual vegetable plants. In a traditional row-based garden, this same variety would likely require three times the amount of space just to account for the paths and “breathing room” between rows. The template makes this level of density safe and manageable.
Final Thoughts
The transition from “eyeballing” to “accuracy” is the hallmark of an evolving gardener. While it might seem like a small thing—a few inches here or there—the cumulative effect over a 20-week growing season is massive. By using a DIY seed spacing board, you are reclaiming the efficiency of your ancestors and applying it with modern precision. You are turning your garden from a hobby into a reliable source of nutrition.
This tool is a physical reminder that gardening is as much a craft as it is a science. It encourages you to slow down, look at the soil, and treat each seed with the respect it deserves by giving it the exact environment it needs to thrive. Whether you are building your first raised bed or managing a multi-bed homestead, the seed board is an essential piece of kit.
Don’t be afraid to experiment. Use the standard spacing as your baseline, but observe how your specific soil and your local climate react. Maybe your carrots need a little more room, or maybe your soil is so rich you can squeeze in even more. Build the board, press it into the dirt, and start growing with intention. Your future harvests will thank you for the discipline you show today.
