How To Become More Self-Sufficient Without Starting a Full-Blown Farm…
Want to start preserving your harvest, making your own soap, or building a backyard root cellar — but not sure where to begin? “Homesteading Advice” gives you instant lifetime access to 35+ practical homesteading books on food preservation, veggie gardening, DIY natural cleaning products (save over $250 per year with this skill alone), brewing, off-grid energy, and a whole lot more…
Click Here To Check It Out Now!
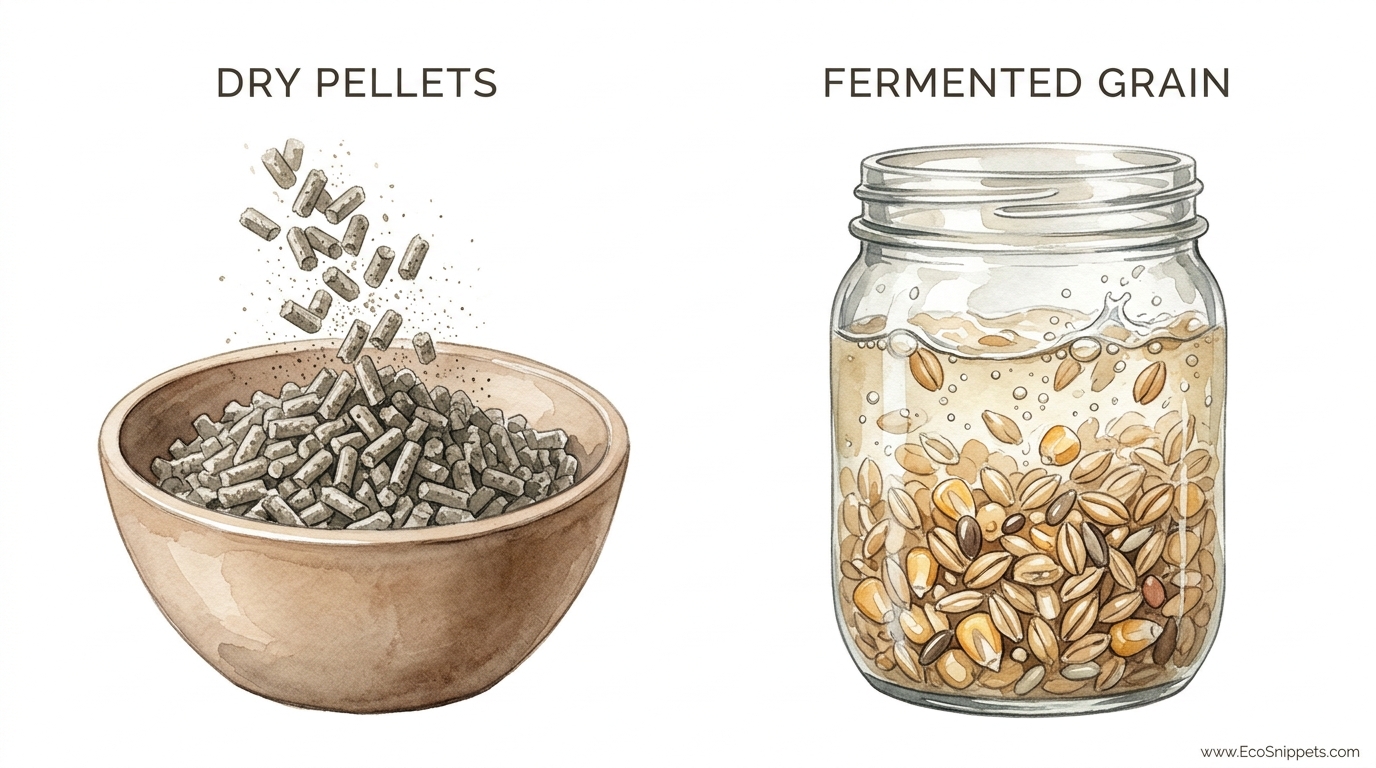
If you’re still feeding your flock dry pellets, you’re losing 30% of your nutrient value to the dirt before they even swallow. Standard dry feed is a modern convenience that leads to wasted nutrients and dusty coops. The pros use ‘lacto-fermentation’ to unlock the hidden nutrition in grain, boosting bird immunity and creating the richest yolks you’ve ever seen. Here’s why your flock is starving on a full stomach.
Choosing to ferment your poultry feed is not just a trend; it is a return to a more resilient, traditional method of animal husbandry. Generations ago, keepers did not have access to climate-controlled bags of shelf-stable pellets. They relied on the natural interaction between grain, water, and beneficial bacteria to preserve and enhance their animals’ food. This process, known as lacto-fermentation, essentially “pre-digests” the feed, making vitamins and minerals more bioavailable for the birds.
When chickens eat dry grain, their bodies must work overtime to break down complex starches and neutralize anti-nutrients like phytic acid. By moving to a fermented system, you are providing them with a superfood that is already brimming with probiotics and enzymes. This transition results in healthier birds, less waste, and a noticeable improvement in the quality of the eggs on your breakfast table.
How To Ferment Chicken Feed For Better Egg Production
Lacto-fermentation is the chemical process where natural bacteria—primarily Lactobacillus—consume the sugars and starches in grains and convert them into lactic acid. This is the same process that gives us sauerkraut, kimchi, and sourdough bread. In the world of the chicken coop, it transforms a basic ration into a nutritional powerhouse that can significantly boost egg production.
The practice exists because grains, seeds, and legumes naturally contain protective coatings and enzyme inhibitors. One of the most significant is phytic acid, which binds to minerals like phosphorus, calcium, and magnesium, preventing the chicken from absorbing them. Fermentation neutralizes this “nutrient blocker,” allowing the hen to utilize nearly every milligram of nutrition in her diet.
In real-world applications, this method is used by small-scale homesteaders and heritage breeders who prioritize bird longevity and egg quality over industrial speed. Think of it like soaking beans before you cook them. The moisture and time spent in a slightly acidic environment signal the grain to “wake up,” making it softer, more palatable, and exponentially more nutritious.
The Anatomy of the Fermentation Process
The journey from dry pellet to fermented mash takes about three days, or 72 hours, to reach peak nutritional density. During the first 24 hours, the grains absorb water and begin to expand. This initial phase is largely about hydration and the softening of the outer hulls. You may notice the water becoming cloudy; this is the first sign of nutrient release.
By the second day, the real magic begins as the carbon dioxide bubbles start to rise. The bacteria are now actively feeding on the starches, creating a bubbly, active culture. The pH level begins to drop, moving from a neutral 7.0 toward a more acidic 4.2 or 4.5. This acidity is crucial because it creates an environment where harmful pathogens like Salmonella and E. coli cannot survive.
On the third day, the mixture should smell pleasantly sour, much like a mild vinegar or fresh sourdough. This is the point where the probiotic count is at its highest. Feeding the mash at this stage ensures your hens are receiving a massive dose of beneficial gut flora, which acts as a first line of defense for their immune systems.
Practical Steps to Your First Batch
Starting a fermentation system requires very little specialized equipment. You likely have everything you need in your kitchen or barn right now. The goal is to create a consistent rotation so that you always have a fresh batch ready for the morning chores.
1. Selecting Your Container
Use a container made of glass, food-grade plastic, or lead-free ceramic. Avoid reactive metals like aluminum or galvanized steel, as the lactic acid produced during fermentation can leach minerals from the metal into the feed. A 5-gallon (19-liter) bucket is the standard choice for most backyard flocks. For smaller setups, a half-gallon (2-liter) glass mason jar works perfectly.
2. The Water Quality Matters
Chlorine is added to municipal water to kill bacteria, but in this process, we want the bacteria to thrive. If you use tap water, let it sit out in an open container for 24 hours to allow the chlorine to evaporate, or use filtered well water. Submerge the feed completely, ensuring there is at least 2 inches (5 centimeters) of water above the level of the grain.
3. The Three-Day Rotation
To ensure a constant supply, many keepers use a three-bucket system. On Monday, you start bucket one. On Tuesday, you start bucket two. On Wednesday, you start bucket three. By Thursday, bucket one is perfectly fermented and ready to be served. Once bucket one is empty, you wash it and start a new batch, continuing the cycle indefinitely.
The Measurable Benefits for Your Flock
The most immediate change you will notice is a reduction in feed consumption. Because the feed is hydrated and the nutrients are more bioavailable, birds often eat 20% to 30% less by volume than they did when consuming dry pellets. This represents a massive cost saving over the course of a year, especially for larger homesteads.
Egg quality also sees a dramatic improvement. Research published in British Poultry Science has shown that hens on a fermented diet produce eggs with thicker shells and higher weights. The yolks often take on a deeper, more vibrant orange hue, reflecting the increased absorption of fat-soluble vitamins and carotenoids.
Gut health is perhaps the most significant “hidden” benefit. The Lactobacillus cultures colonize the chicken’s digestive tract, creating a robust microbiome. This leads to drier, less-odorous droppings and a flock that is more resistant to common ailments like sour crop or coccidiosis. A healthy gut is the foundation of a productive bird.
Challenges and Common Pitfalls
The most frequent mistake beginners make is allowing the grain to be exposed to air. Fermentation is an anaerobic process, meaning it happens without oxygen. If the grain is not fully submerged in water, mold can grow on the surface. This mold is often fuzzy and can be white, green, or black. If you see fuzzy mold, do not feed it to your birds; discard the batch and start over.
Confusion often arises between “Kahm yeast” and mold. Kahm yeast is a thin, white, non-fuzzy film that can form on the surface of the water. It is harmless and can simply be stirred back into the mixture or scooped off. If the mixture smells like bread, beer, or vinegar, it is healthy. If it smells like rot, sewage, or “death,” something has gone wrong, and it should be tossed.
Another pitfall is adding “starters” that aren’t necessary. Some people add yeast or large amounts of apple cider vinegar. This can actually trigger alcoholic fermentation rather than lacto-fermentation. The grains already have natural bacteria on them; all they need is water and time. A splash of raw apple cider vinegar with the “mother” can help lower the initial pH, but it is not a requirement.
When This May Not Be Ideal
While fermented feed is superior nutritionally, it does have practical limitations. The most obvious is the “mess factor.” Wet mash cannot be fed in traditional gravity-style feeders, which will clog and mold. You must use open troughs or shallow dishes. This means you have to clean the feeders daily to prevent old, wet feed from spoiling in the sun.
Temperature also plays a significant role. In the heat of summer, fermentation can happen too quickly, leading to an over-acidified mess that birds might reject. Conversely, in the dead of winter, the process can stall completely if the buckets freeze. Keeping your fermentation station in a temperature-controlled area like a cellar or mudroom is necessary during extreme weather.
Finally, consider the logistics of travel. If you have a neighbor who watches your chickens while you are away, explaining a three-bucket fermentation rotation may be asking too much. In these cases, it is often better to switch back to dry pellets temporarily. The birds will handle the transition fine, though you may notice a slight dip in egg quality until you return to the fermented regimen.
Comparison: Dry Pellets vs. Fermented Grain
| Feature | Standard Dry Pellets | Lacto-Fermented Grain |
|---|---|---|
| Feed Waste | High (Dust and spillage) | Low (Hydrated mash stays in feeder) |
| Digestibility | Moderate (Requires heavy grit/water) | Excellent (Pre-digested by bacteria) |
| Egg Shell Strength | Standard | Increased (Higher mineral absorption) |
| Flock Immunity | Passive | Active (Probiotic-rich gut flora) |
| Labor Required | Low (Fill and forget) | Moderate (Daily stirring/rotation) |
| Water Intake | High (Birds must drink to hydrate pellets) | Moderate (Feed provides hydration) |
Practical Tips and Best Practices
The “Back-Slop” method is the best way to speed up your fermentation. Instead of starting each batch from scratch, leave about an inch (2.5 centimeters) of the liquid and grain from your previous successful batch in the bucket. This acts as a “mother” or starter, inoculating the new grain with a high concentration of established beneficial bacteria.
Always stir your ferment at least once a day. This ensures that the grain is evenly distributed and helps to release the carbon dioxide bubbles that can cause the grain to float. If the grain floats above the water line, it is at risk for mold. A quick stir with a clean wooden or plastic spoon keeps the environment stable and active.
Consider your trough design. Because fermented feed is wet and heavy, it is best served in long, shallow troughs made of rubber or high-density plastic. This allows all the birds to access the food at once, preventing the more aggressive hens from hogging the “superfood.” Ensure you only put out what they can eat in about 30 minutes to prevent spoilage in the sun.
Advanced Considerations for Serious Practitioners
For those looking to maximize their self-reliance, you can begin to mix your own whole grain rations specifically for fermentation. Whole grains like wheat, barley, and oats ferment more cleanly than processed pellets, which can sometimes turn into a “mushy” paste. Fermenting whole grains also allows you to see the “sprout” beginning to emerge, which indicates peak enzyme activity.
Monitoring the pH of your ferment can provide deep insights into its health. You can purchase simple pH test strips; a healthy ferment should sit between 3.8 and 4.5. If the pH stays too high (above 5.0), the environment is not acidic enough to inhibit bad bacteria. This usually happens if the temperature is too low or if you added too much water relative to the amount of grain.
Seasonal adjustments are vital. In winter, you can use slightly warm water (around 80°F or 27°C) to jumpstart the bacteria. In summer, you can move your buckets to a cooler corner of the barn to slow the process down. Remember that the speed of the microbes is directly tied to the ambient temperature.
Scenarios: The Backyard vs. The Homestead
Imagine a backyard keeper with 6 hens. They use a single 1-gallon (4-liter) glass jar. They fill it half-full with a high-quality layer crumble, top it with water, and let it sit on the kitchen counter. Within 48 hours, they have enough superfood to supplement their flock’s morning meal, resulting in deep orange yolks that are the envy of the neighborhood.
Contrast this with a homesteader raising 50 meat birds (broilers). They use three 5-gallon (19-liter) buckets in a basement. By fermenting their broiler starter, they reduce the “pasty butt” issues common in young chicks and see a much faster weight gain because the protein in the feed is more easily assimilated. The reduction in feed waste alone pays for the extra time spent on the rotation.
In both scenarios, the birds are not just being “fed”; they are being nourished. The transition from a dry, dusty diet to a living, probiotic-rich mash is the single most impactful change a poultry keeper can make to improve the health and productivity of their flock.
Final Thoughts
Embracing the art of lacto-fermented feed is a powerful step toward traditional self-reliance. It requires you to slow down and work with the natural rhythms of biology rather than relying on industrial shortcuts. While it adds a few minutes to your daily chores, the results—sturdier shells, vibrant yolks, and more resilient birds—are undeniable.
Your flock deserves a diet that matches their biological needs. By unlocking the hidden nutrients trapped within dry grains, you are providing them with the foundation for a long, productive life. It is a simple, cost-effective way to ensure your birds aren’t just surviving on a full stomach, but truly thriving.
Experiment with your ratios, watch your birds’ reactions, and enjoy the satisfaction of seeing your feed bill drop while your egg baskets overflow. This is the wisdom of the past, rediscovered for the modern homesteader. Stick with the process, and your chickens will reward your efforts with every egg they lay.
