How To Become More Self-Sufficient Without Starting a Full-Blown Farm…
Want to start preserving your harvest, making your own soap, or building a backyard root cellar — but not sure where to begin? “Homesteading Advice” gives you instant lifetime access to 35+ practical homesteading books on food preservation, veggie gardening, DIY natural cleaning products (save over $250 per year with this skill alone), brewing, off-grid energy, and a whole lot more…
Click Here To Check It Out Now!
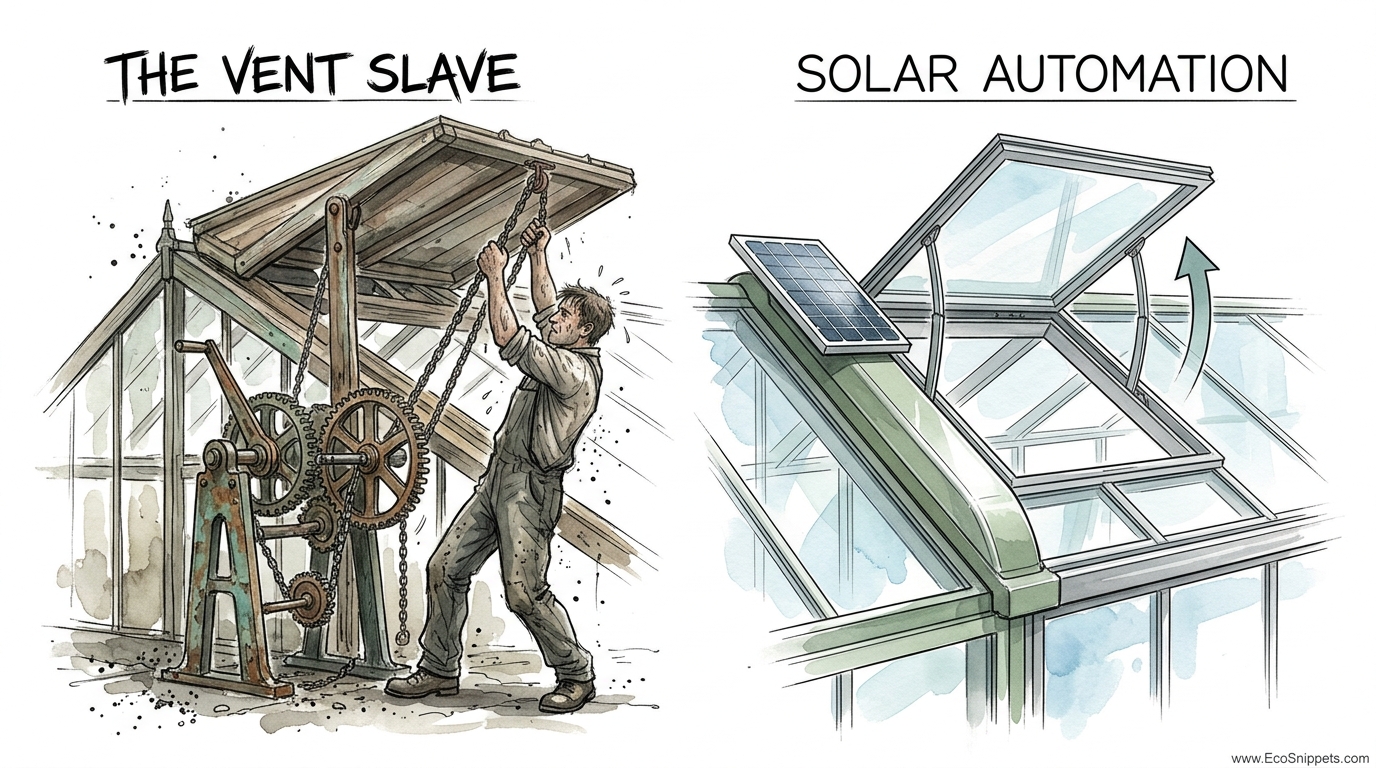
If you are the one opening and closing your greenhouse windows, you are the most expensive ‘part’ of your system. Don’t let a late morning sleep-in kill your seedlings. Stop the ‘Manual’ struggle and use ‘Strategic’ physics to let the sun manage your ventilation for you.
Every gardener eventually learns that a greenhouse is a double-edged sword. On one hand, it traps life-sustaining warmth to jumpstart your growing season. On the other, it can become a literal solar oven in less than sixty minutes if you are not there to crack a window. This constant vigil, often called being a ‘Vent Slave,’ is the primary reason many backyard growers feel tied to their property during the peak of spring.
Harnessing natural laws allows you to step away from the structure with confidence. You do not need complex circuit boards or expensive utility hookups to achieve climate control. Instead, you can rely on the very energy that threatens your plants—the sun—to provide the solution. This is the essence of self-reliance: building a system so robust and simple that it functions precisely because of the environment, not in spite of it.
Passive Greenhouse Ventilation Systems
A passive greenhouse ventilation system is any method of exchanging air that does not rely on mechanical fans or external electricity. These systems use natural forces like thermal buoyancy and wind pressure to move stale, hot air out of the structure and pull fresh, cool air in. Unlike active systems that require a power grid or solar panels, passive systems work on the fundamental principles of thermodynamics.
The core concept is the “Chimney Effect,” where hot air naturally rises because it is less dense than cool air. In a well-designed greenhouse, this rising air is funneled toward the highest point—the roof ridge. When vents at the peak are opened, the hot air escapes, creating a vacuum that draws cooler air through intake vents located lower down, typically at the base of the walls or near the plant benches.
Passive ventilation has been the standard for centuries. From the great orangeries of 18th-century Europe to the simple cold frames of homesteaders, the goal has always been the same: balance. Modern technology has simply refined this by introducing “thermal actuators”—small cylinders that act as the brain and brawn of the operation without needing a single wire.
How It Works: The Science of the Wax Cylinder
The magic behind modern passive ventilation is a device known as the wax-based thermal actuator. It is a deceptively simple metal cylinder filled with a specialized paraffin or beeswax compound. This material is chosen for its specific melting point and high coefficient of thermal expansion.
When the temperature inside the greenhouse rises above a certain threshold (usually between 60°F and 75°F / 15°C and 24°C), the solid wax inside the cylinder begins to melt. As it transitions from a solid to a liquid, the wax expands significantly. This expansion creates immense pressure inside the sealed tube, which pushes a steel piston outward. This piston is connected to a mechanical linkage that physically lifts the greenhouse window open.
As the day cools or a cloud passes over, the wax begins to solidify and contract. The pressure on the piston drops. A set of heavy-duty springs, which are part of the vent opener’s frame, pull the window back down into its frame. The system is entirely “proportional,” meaning the hotter it gets, the wider the vent opens. It is a beautiful, silent dance of physics that requires no human intervention.
- The Expansion Phase: Solar heat melts the wax; volume increases; piston extends; vent opens.
- The Contraction Phase: Ambient air cools the wax; volume decreases; piston retracts; springs close the vent.
- Calibration: Most units have a knurled thumbscrew that allows you to adjust the “start-to-open” temperature by changing the initial pressure on the piston.
Benefits of Passive Automation
Switching to a passive system offers a level of reliability that no electronic gadget can match. When the power goes out during a summer storm, an electric fan stops, and your greenhouse starts cooking. A wax cylinder, however, doesn’t care about the power grid. It only cares about the temperature of the air surrounding it.
Cost is another significant factor. A high-quality thermal vent opener can be purchased for a fraction of the cost of a commercial exhaust fan and thermostat setup. Furthermore, the operational cost is zero. There are no monthly utility bills and no expensive sensors to replace after a humid season. These devices are built to last five to ten years with minimal maintenance.
Precision is often underrated in these “old-school” tools. Because the wax responds directly to the heat it is immersed in, the vents open gradually. This avoids the “thermal shock” that can occur when a massive electric fan suddenly kicks on and sucks a volume of cold air across tender seedlings. Instead, the air exchange increases slowly as the sun intensifies, mimicking the natural rhythm of the day.
Challenges and Common Mistakes
The most frequent error growers make is failing to account for the weight of their vents. Every thermal opener has a weight rating, typically ranging from 15 lbs to 65 lbs (7 kg to 30 kg). If you try to lift a heavy glass-framed ridge vent with a standard-duty opener designed for polycarbonate, the piston will fail, or the wax will eventually leak past the seals due to over-pressurization.
Installation angle is another pitfall. For the wax cylinder to function correctly, it must be positioned so that it isn’t “fighting” the geometry of the window. If the linkage is binding, the piston will bend. It is vital to ensure the vent can move freely through its entire range of motion by hand before you ever attach the automatic opener.
Wind is the natural enemy of a passive vent. Because these systems are designed to be easily pushed open by a piston, they can also be easily caught by a gust of wind and flipped over the ridge of the greenhouse. High-quality openers include “anti-wind” springs or dampers to prevent this, but the gardener must still ensure the greenhouse is oriented so that prevailing winds do not “grab” the open vents and tear them from their hinges.
Limitations: When Passive Isn’t Enough
Passive ventilation relies on a temperature differential. If it is 100°F (38°C) outside, the inside of your greenhouse will never be cooler than 100°F, no matter how many vents you open. In tropical or extremely arid climates where the ambient air is already dangerously hot, passive systems may need to be supplemented with shade cloth or evaporative cooling (mist) systems.
Another constraint is the size of the structure. In very large, commercial-scale greenhouses, the volume of air is so great that natural convection may move too slowly to prevent “hot spots” in the center of the building. In these cases, horizontal airflow (HAF) fans are often needed to stir the air, even if the primary exchange is still handled by passive roof vents.
Humidity management can also be a challenge. While passive vents are excellent at releasing heat, they may not always provide the rapid air exchange needed to drop humidity levels quickly on a stagnant, rainy day. Serious practitioners often keep a small, low-wattage circulation fan running just to keep the air from becoming “dead” and inviting fungal pathogens like botrytis.
Practical Tips and Best Practices
To get the most out of your passive system, follow the “15-20% Rule.” This means the total area of your open vents should equal at least 15% to 20% of your greenhouse’s total floor area. If you have a 100-square-foot (9.3 sq meter) greenhouse, you need 20 square feet (1.8 sq meters) of ventilation. Split this between the roof and the sides to ensure the “Chimney Effect” works effectively.
Maintenance is simple but non-negotiable. Every spring, wipe the piston rod with a clean cloth and apply a light coating of silicone spray or light machine oil. Avoid heavy greases that attract dust, as the grit can score the metal and ruin the airtight seal. If a cylinder seems stuck, try the “Fridge Trick”: remove it and place it in the refrigerator for thirty minutes, then run it under hot water. This can often “reset” the internal wax and piston seat.
- Winter Care: In regions with heavy snow or freezing winters, it is best to unscrew the wax cylinders and store them indoors. This prevents the “piston fight” where the wax tries to expand against a window that is frozen shut or weighted down by snow.
- Placement: Always place your intake vents on the windward side (the direction the wind usually comes from) and your exhaust vents on the leeward side to maximize the “suction” effect of the wind passing over the roof.
- Redundancy: Even with automation, always have one manual door or window you can prop open on those rare, record-breaking heatwave days.
Advanced Considerations
For the serious practitioner, understanding the “Air Change Per Minute” (ACPM) goal is the next step. During the hottest months, you want to replace the entire volume of air in your greenhouse once every sixty seconds. You can calculate your greenhouse volume (Length x Width x Average Height) and compare it to the flow rate of your vents based on average wind speeds in your area.
Consider the “Orchid Wax” vs. “Standard Wax” cylinders. Some manufacturers offer different wax blends. Standard wax starts opening at about 55°F (13°C), which is great for hardy vegetables. Orchid wax is designed to stay closed until the greenhouse reaches 70°F to 85°F (21°C to 29°C), which is ideal for tropical plants that need to stay much warmer before any cooling begins.
| Feature | Passive (Wax Actuator) | Active (Electric Fan) |
|---|---|---|
| Power Source | Solar Thermal (Free) | Grid/Solar Electric ($) |
| Maintenance | Low (Lubricate Piston) | High (Motors, Wiring) |
| Reliability | Functions during blackouts | Fails without power |
| Noise Level | Silent | Moderate to Loud |
Example Scenario: A High-Desert Spring Morning
Imagine a high-desert garden where the temperature at 6:00 AM is a crisp 35°F (2°C). Your greenhouse is sealed tight, holding onto the residual heat from the thermal mass of the floor. As the sun clears the horizon at 7:30 AM, the solar radiation begins to spike. Without ventilation, the interior would hit 90°F (32°C) by 9:00 AM, even if the outside air is still only 50°F (10°C).
With a passive wax opener, the story changes. At 8:15 AM, as the air inside hits 65°F (18°C), the wax begins to liquefy. The roof vents crack open just an inch (2.5 cm). This allows the first “burp” of hot air to escape. By 10:00 AM, the vents are halfway open, maintaining a steady 75°F (24°C) inside. You are still in your kitchen, enjoying a second cup of coffee, while the “Strategic Physics” of the sun manages the climate for you.
This system doesn’t just save your plants; it saves your time. It transforms the greenhouse from a high-maintenance chore into a self-regulating ecosystem. You have effectively replaced your own labor with a few pounds of steel, springs, and wax.
Final Thoughts
Embracing passive greenhouse ventilation is a step toward true gardening independence. By understanding the simple relationship between heat, wax expansion, and air buoyancy, you can build a structure that breathes on its own. This isn’t just about convenience; it is about creating a more stable and natural environment for your plants to thrive without the jittery on-off cycles of electric machinery.
Start small if you must. Install a single automatic opener on your primary roof vent and observe how it behaves over a week of varying weather. You will likely find that the “Manual struggle” was a burden you never needed to carry. Once you see the vents lift silently as the sun hits the glass, you’ll never want to be the “most expensive part” of your greenhouse again.
Nature provides the energy and the laws of physics provide the mechanism. Your job is simply to set the stage, calibrate the tools, and get out of the way. When you let the sun manage your ventilation, you finally gain the freedom to focus on what really matters: the health of your soil and the growth of your crops.
