How To Become More Self-Sufficient Without Starting a Full-Blown Farm…
Want to start preserving your harvest, making your own soap, or building a backyard root cellar — but not sure where to begin? “Homesteading Advice” gives you instant lifetime access to 35+ practical homesteading books on food preservation, veggie gardening, DIY natural cleaning products (save over $250 per year with this skill alone), brewing, off-grid energy, and a whole lot more…
Click Here To Check It Out Now!
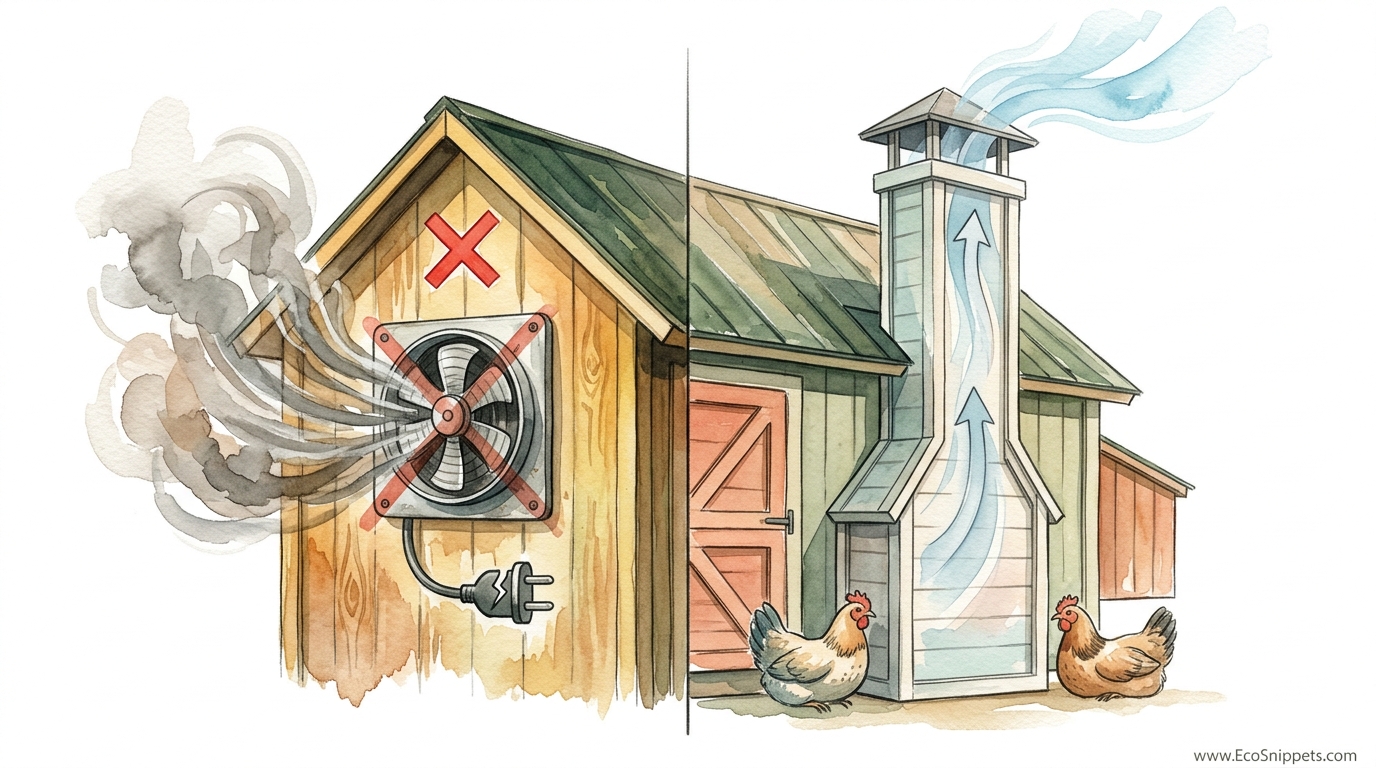
If your coop smells like ammonia, your ventilation isn’t just failing – it’s costing you money. Don’t run an extension cord to your coop this summer. Active fans are a fire hazard and a drain on your homestead budget. Instead, use the power of the ‘Stack Effect.’ By placing vents at the floor and a chimney at the peak, you create a passive thermal siphon that pulls cool air in and sucks heat and ammonia out 24/7. No wires, no noise, just physics working for your birds.
Every homesteader eventually learns that chickens are far hardier than we give them credit for, provided they have clean air. The greatest threat to a bird’s respiratory health isn’t the winter chill or the summer sun. It is the invisible buildup of ammonia and moisture that occurs in a sealed box.
Ammonia is a byproduct of nitrogen breakdown in manure. It irritates the delicate linings of a chicken’s lungs and eyes at levels humans can’t even detect. While we might not smell it until it reaches 20 or 25 parts per million (ppm), damage to the flock begins as low as 5 ppm. This is why a passive system is superior to a mechanical one. It never sleeps, never burns out, and doesn’t rely on a grid that can fail during a heatwave.
This guide will walk you through the science and the sweat of building a passive ventilation system. We will focus on the ‘Stack Effect’ to ensure your birds have a constant stream of fresh air. You will learn to work with the laws of thermodynamics rather than fight them with expensive, noisy machinery.
DIY Passive Ventilation For Chicken Coops
Passive ventilation is a system of air exchange that relies entirely on natural forces. It uses the differences in air temperature and air pressure to move stale air out and fresh air in. In the homesteading world, this is often achieved through a combination of low-level intake vents and high-level exhaust points, often designed as a chimney or a cupola.
The concept is ancient. Before the advent of electricity, barns and homes were designed with high ceilings and ventilated peaks. Builders understood that warm air is less dense than cool air. Because warm air rises, a properly placed opening at the highest point of a structure will naturally draw that air out. This movement creates a low-pressure zone at the floor level, which pulls in cooler, oxygen-rich air from outside.
This process is known as the ‘Stack Effect’ or ‘Chimney Effect.’ It is a self-regulating thermal siphon. The hotter it gets inside the coop, the faster the air moves. This is particularly useful in a chicken coop because chickens generate a significant amount of body heat and moisture through respiration. A single bird can exhale an impressive amount of water vapor every day, and without a way to escape, this moisture turns into a breeding ground for pathogens.
Think of your coop as a living lung. If the vents are only on one side, the air stagnates in the corners. If the vents are too low, the birds sit in a draft. Passive ventilation solves these problems by moving air vertically, away from the roosting birds, while ensuring a total volume exchange several times an hour.
The Physics of the Thermal Siphon: How It Works
The Stack Effect operates on the principle of thermal buoyancy. Within the coop, the air is warmed by the chickens’ bodies and the decomposition of litter. This warm air expands and becomes lighter than the surrounding atmosphere. As it rises toward the roof, it seeks an exit. If you provide a chimney or a ridge vent, this air escapes into the atmosphere.
Pressure follows temperature. When the warm air leaves, it leaves behind a slight vacuum. Nature abhors a vacuum, so it forces cool, dense air from the outside through your lower intake vents. This creates a continuous loop. The height of the “stack”—the vertical distance between the intake and the exhaust—determines the strength of the pull. A taller chimney creates a stronger siphon.
Humidity also plays a role in this physics equation. Moist air is actually less dense than dry air at the same temperature. Since chickens release moisture through their breath and droppings, the air inside a coop is often more buoyant than the dry air outside. This means the system works even on days when the temperature difference is minimal, provided the humidity inside is higher than the outside air.
Wind-driven ventilation often assists this process. When a breeze passes over the top of a chimney, it creates a zone of low pressure through the Bernoulli principle. This literally “sucks” the air out of the coop, much like a perfume atomizer. By combining thermal buoyancy and wind pressure, you ensure that your coop stays fresh even on the stillest, most humid summer nights.
Designing Your Passive Ventilation System
Building an effective thermal siphon requires more than just cutting a few holes. You must place your openings strategically to maximize the pressure differential. The system consists of three main components: the floor-level intakes, the high-level exhaust, and the unobstructed path between them.
Start with your exhaust. The best position for an exhaust vent is at the very peak of the roof. Ridge vents, which run the entire length of the roofline, are highly effective. Alternatively, a central chimney or a cupola can be used. For a standard 8×8 foot (2.4×2.4 meter) coop, a chimney with a 12-inch by 12-inch (30×30 cm) interior diameter is a solid starting point.
The intake vents should be placed as low as possible without allowing predators or snow to enter. Positioning them about 6 to 12 inches (15 to 30 cm) above the floor is ideal. These should be covered with 1/4-inch (6 mm) hardware cloth to prevent weasels or rats from entering. Do not use standard chicken wire; it is too weak to stop determined predators.
Airflow must be directed away from the roosts. In the winter, you want the air to exchange, but you do not want a cold breeze hitting the birds directly while they sleep. This is why the intake vents should be on the opposite wall from the roosting bars, or baffled with a simple wooden “hood” that directs the incoming air toward the floor. The air then travels across the floor, picks up heat and ammonia, and rises toward the ceiling away from the birds.
Building the Passive Chimney
Constructing a simple wooden chimney is a straightforward afternoon project. You can use cedar or exterior-grade plywood. Build a square box that extends at least 18 inches (46 cm) above the roofline. A taller chimney creates more “draw,” but it must be braced against the wind. Top the chimney with a “hat” or a cap to prevent rain from falling straight in, ensuring there is a 4-inch (10 cm) gap between the top of the box and the underside of the cap.
Inside the coop, the chimney should be flush with the ceiling. This ensures that the warmest, most ammonia-laden air, which pools at the very top, is the first to be exhausted. If your coop has an attic space, the chimney must be sealed as it passes through the attic to prevent moisture from rotting the roof trusses.
Installing a simple butterfly valve or a sliding damper inside the chimney allows you to tune the system. On extremely cold or windy nights, you can partially close the damper to retain some heat while still allowing a trickle of air to escape. Never close it completely. A sealed coop is a sick coop.
Calculating Vent Sizes: The Math of Fresh Air
The biggest mistake homesteaders make is under-ventilating. A common rule of thumb is to provide 1 square foot (0.09 square meters) of vent space for every 10 square feet (0.9 square meters) of floor space. However, this is a minimum requirement. In many climates, you may need as much as 1 square foot of ventilation per bird during the peak of summer.
Consider the total volume of air in the coop. For a coop that is 4 feet by 4 feet (1.2×1.2 meters), you have 16 square feet of floor space. Following the 1:10 rule, you would need 1.6 square feet of vents. This could be achieved with two 6-inch by 20-inch (15×50 cm) vents. However, if you have 6 birds in that space, 1.6 square feet will quickly feel stifling in July or January.
Balance the intake and exhaust. Your intake area should be roughly equal to or slightly larger than your exhaust area. If the exhaust is too large and the intake too small, the system will struggle to pull air in, and you may end up with “backdrafting” where air tries to come down the chimney. If the intake is too large, the air velocity might become too low to effectively push the stale air up the stack.
Table of Minimum Ventilation Requirements:
| Coop Size (sq ft / sq m) | Number of Birds | Min. Vent Area (sq ft / sq m) | Recommended Summer Vent Area |
|---|---|---|---|
| 16 sq ft / 1.5 sq m | 4 | 1.6 sq ft / 0.15 sq m | 4 sq ft / 0.37 sq m |
| 32 sq ft / 3.0 sq m | 8 | 3.2 sq ft / 0.30 sq m | 8 sq ft / 0.74 sq m |
| 64 sq ft / 5.9 sq m | 16 | 6.4 sq ft / 0.59 sq m | 16 sq ft / 1.48 sq m |
Benefits of Passive Airflow
Choosing a passive system over an electric fan is a matter of both economics and safety. The most immediate benefit is the reduction in fire risk. Chicken coops are notoriously dusty environments. Feathers, dander, and dried bedding create a fine powder that coats everything. In a mechanical fan, this dust can get into the motor, cause it to overheat, and spark a fire in a building filled with dry straw.
Cost is the second major factor. Running an electric fan 24/7 throughout the summer can add up on your utility bill. Even solar fans, while “free” to operate, require a high initial investment and often fail at night when the birds are locked inside and air quality is most critical. A passive chimney costs nothing to run and has no moving parts to wear out or replace.
Silence is a benefit for both you and the birds. Chickens are sensitive to vibration and constant noise. A loud, buzzing fan can cause stress in the flock, which in turn can lead to decreased egg production or pecking issues. The passive system works in total silence, moving air at a gentle pace that doesn’t disturb the birds’ natural rhythms.
Reliability is the hallmark of the pioneer spirit. When a summer storm knocks out the power, an electric-dependent coop becomes a death trap in hours as heat and ammonia levels spike. A passive system doesn’t care about the power grid. It works during hurricanes, heatwaves, and blizzards, providing a baseline of safety that mechanical systems simply cannot guarantee.
Challenges and Common Mistakes
The most frequent error in passive design is placing all the vents at the same height. If you have two windows on opposite sides of the coop but they are both at the same level, you will get cross-ventilation when the wind blows, but you will not get a thermal siphon. On a still day, the warm air will simply pool at the ceiling above the window line, trapping the ammonia right where the chickens are roosting.
Misunderstanding the difference between a draft and ventilation is another hurdle. A draft is a concentrated stream of air hitting a bird. Ventilation is a total exchange of air within the space. If your intake vents are positioned so that the wind blows directly onto the roosting bars in the winter, your birds will lose body heat and may suffer from frostbite or stress. You must use baffles or place vents in “dead zones” where the air can enter and disperse before reaching the flock.
Failure to protect vents from predators is a catastrophic mistake. Many beginners use window screening or lightweight chicken wire. A raccoon can tear through these in seconds. Every opening, no matter how high up, must be secured with 1/2-inch or 1/4-inch (12 mm or 6 mm) galvanized hardware cloth, screwed into the frame with washers. If you can push your thumb through it, a predator can get through it.
Ignoring the “dead air” under the roof is common. If your exhaust chimney is even six inches below the peak, a pocket of hot, humid air will remain trapped at the very top. This trapped air can cause condensation on the roof sheathing, leading to mold and rot. Ensure your exhaust is at the absolute highest point of the interior ceiling.
Limitations of Passive Systems
Passive ventilation is highly effective, but it is not a magic bullet for every scenario. In extremely deep, wide coops (over 20 feet or 6 meters wide), a central chimney may not be enough to pull air from the far corners. In these cases, you may need multiple stacks or a “Woods-style” open-front design to ensure complete air exchange.
Geography also matters. In regions with extremely high ambient humidity and no wind, the pressure differential between the inside and outside air might be too low to move significant volumes of air. If the outside air is 100 degrees Fahrenheit (38 Celsius) with 95% humidity, the air inside the coop will stay just as hot and humid unless you have a massive amount of opening to allow for a breeze.
Housing density is a major constraint. If you are packing 20 birds into a space designed for 10, no passive system will be able to keep up with the sheer volume of manure and respiration. Passive systems rely on a reasonable load. If you overstock your coop, you are essentially asking the laws of physics to do more than they are capable of, and the air will inevitably turn sour.
Finally, passive systems require a tall structure to work best. If you have a very short, “tractor-style” coop that is only 2 or 3 feet (0.6 to 0.9 meters) tall, there isn’t enough vertical distance to create a strong stack effect. These smaller units rely more on simple cross-ventilation and must be moved frequently to prevent the ground itself from becoming a source of ammonia.
Comparison: ELECTRIC FAN vs PASSIVE CHIMNEY
When deciding how to manage your coop’s climate, it is helpful to look at the hard numbers. While an electric fan can move more cubic feet of air per minute in a localized area, it lacks the holistic coverage and safety of a passive system.
| Feature | ELECTRIC FAN | PASSIVE CHIMNEY |
|---|---|---|
| Operational Cost | Moderate ($5–$15/month) | Zero |
| Maintenance | High (Cleaning motors, replacing belts) | Very Low (Occasional dusting) |
| Fire Risk | High (Dust in motor) | Non-existent |
| Night Operation | Requires grid/battery | Automatic 24/7 |
| Noise Level | 50–70 Decibels | Silent |
| Installation | Requires electrical skills | Basic carpentry |
As the table shows, the passive chimney is the winner for the self-reliant homesteader. It trades a slightly more complex initial design for a lifetime of free, safe, and silent operation. The electric fan is best reserved for emergency cooling during extreme record-breaking heatwaves when the air is stagnant.
Practical Tips and Best Practices
Regular maintenance is the key to keeping your siphon working at peak efficiency. Dust and cobwebs are the enemies of airflow. Once a month, take a long-handled broom and clear out the hardware cloth on both your intake and exhaust vents. You would be surprised how much air a thick layer of spiderwebs can block.
Adjust your vents with the seasons. In the summer, open every available vent, window, and door. In the winter, close the lower intake vents on the windward side of the coop to prevent snow from blowing in. Keep the leeward (downwind) intakes open and keep the exhaust chimney open year-round. You may reduce the exhaust opening in a blizzard, but never close it.
Monitor the air at the birds’ level. Don’t just stick your head in the door and sniff. Lean down to where the birds sleep on the roosts. If you feel a sharp breeze on your face, it’s a draft—adjust your baffles. If you feel stagnant, humid air, you need more exhaust. A simple handheld hygrometer can tell you if the humidity is climbing above 70%, which is the danger zone for frostbite in winter.
Paint or stain your chimney. Because the chimney is exhausting warm, moist air, the wood inside the stack will be subject to constant humidity. Using a rot-resistant wood like cedar or painting the interior of the plywood chimney with an exterior-grade, non-toxic paint will prevent the stack from rotting out in a few seasons.
Advanced Considerations: Tuning the System
For those who want to push the efficiency of their passive system, consider the “Solar Chimney” concept. By painting your external chimney black, you allow the sun to heat the air inside the stack. This increases the temperature difference between the inside of the chimney and the outside air, which accelerates the stack effect significantly during the hottest parts of the day.
Insulating the roof of the coop can also improve the thermal siphon. If the roof is uninsulated, the sun will beat down on it, heating the air at the very top of the coop. While this seems like it would help the air rise, it can actually create a “heat cap” that prevents the cooler (but still stale) air from the bottom from rising. A thin layer of insulation under the roof deck keeps the interior air temperature more uniform, allowing the thermal siphon to move air based on bird-generated heat rather than solar gain.
In very cold climates, you can use a “Heat Recovery” approach to passive ventilation. By running your exhaust air through a simple DIY heat exchanger made of thin-walled aluminum tubes, you can use the warmth of the exiting stale air to pre-heat the incoming fresh air. This is a complex build but can significantly reduce the amount of supplemental heat needed in arctic conditions without sacrificing air quality.
Practical Example: The 10-Hen Homestead
Let’s look at a real-world application. Imagine a homesteader in the Midwest with a 6×8 foot (1.8×2.4 meter) coop and 10 laying hens. The floor area is 48 square feet (4.5 square meters). In a standard design, they might have two small gable vents. However, in the humid summer, the coop smells like a gym locker.
The solution was to install a 14-inch (35 cm) square chimney at the center of the roof peak, extending 2 feet (60 cm) above the roofline. Four intake vents, each 4×10 inches (10×25 cm), were placed near the floor on the walls opposite the roosts. These were covered with 1/4-inch hardware cloth and fitted with simple wooden slides.
During a 95-degree (35 C) afternoon, the air inside the coop remains only 2 or 3 degrees warmer than the outside air. The hens are not panting, and the ammonia smell is gone. In the winter, the owner slides two of the four floor vents shut, leaving the chimney and the remaining two intakes to provide a gentle, continuous exchange that prevents frostbite. The total cost of materials was under $40, and the system requires no electricity.
Final Thoughts
The beauty of passive ventilation lies in its simplicity and its reliance on the fundamental laws of nature. By understanding the stack effect and the thermal siphon, you can provide your flock with a level of air quality that no electric fan can match. This approach doesn’t just save you money on your electric bill; it removes a significant fire hazard from your property and ensures your birds remain healthy even when you aren’t there to flip a switch.
Pioneer wisdom teaches us that the best systems are the ones that work when we aren’t looking. A well-designed chimney and intake system is a “set it and forget it” solution that honors the biology of the bird. Your chickens are resilient creatures, but they rely on you to provide the one thing they cannot find for themselves in a confined space: fresh, clean air.
As you continue to build and refine your homestead, look for other ways to harness these natural forces. From solar water heaters to passive-gain greenhouses, the principles of thermodynamics are the greatest tools in a self-reliant person’s kit. Start with your coop, and let the results speak for themselves in the health and productivity of your flock.
