How To Become More Self-Sufficient Without Starting a Full-Blown Farm…
Want to start preserving your harvest, making your own soap, or building a backyard root cellar — but not sure where to begin? “Homesteading Advice” gives you instant lifetime access to 35+ practical homesteading books on food preservation, veggie gardening, DIY natural cleaning products (save over $250 per year with this skill alone), brewing, off-grid energy, and a whole lot more…
Click Here To Check It Out Now!
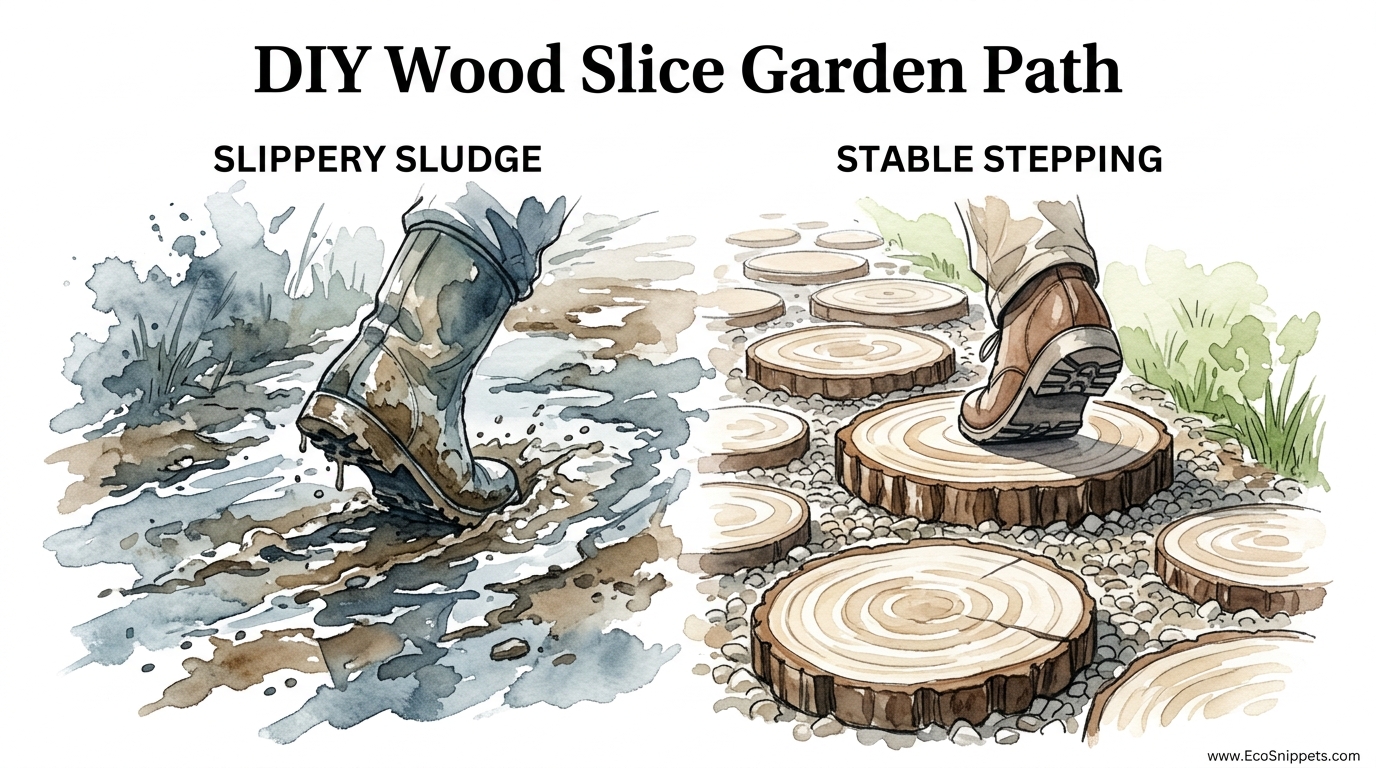
Your garden paths are either stealing your soil or building your soul – here is how to choose. Tired of tracking the backyard into your kitchen? Transform ‘Chaos’ into ‘Order’ with a path that drains itself and feeds your pollinators simultaneously.
There is a quiet, ancient satisfaction in laying a path that feels like it grew there. In a world of poured concrete and mass-produced plastic pavers, a wood slice garden path stands as a testament to self-reliance and the wisdom of the forest floor. It is a bridge between the wild edges of your garden and the structured sanctuary of your home. Instead of fighting the natural cycle of decay, this path embraces it, turning old timber into a living infrastructure that supports your soil even as it supports your feet.
We often think of garden walkways as static things, but a natural timber path is dynamic. It breathes, it changes color with the rain, and it eventually returns to the earth, leaving the soil richer than it found it. This guide is for the gardener who wants more than just a dry place to walk; it is for the practitioner who understands that every addition to the land should be a gift to the ecosystem.
DIY Wood Slice Garden Path
A DIY wood slice garden path—often called a “log round” or “wood cookie” walkway—is a traditional landscaping technique that uses cross-sections of logs as stepping stones. These rounds are laid into a prepared bed of sand or gravel, creating a mosaic of natural rings that mimic the organic patterns of a forest trail. Historically, this method shares its roots with the “corduroy roads” of the American frontier and the wood-block streets of 19th-century cities like Chicago and London.
In those days, wood was chosen for its abundance and its ability to deaden the sound of horse hooves. Today, we choose it for its character. Each slice tells the story of a tree—its age, its struggles, and its strength. Whether you are using a fallen oak from your own woodlot or sourcing cedar rounds from a local mill, you are building a structure that feels grounded and honest. It is a way to reclaim the “slippery sludge” of a muddy backyard and turn it into “stable stepping” that looks like a work of art.
Unlike stone, which can feel cold and imposing, wood is warm underfoot. It has a “give” to it that makes walking feel less like a chore and more like an experience. In real-world situations, these paths are ideal for woodland gardens, herb plots, and areas where you want to minimize your carbon footprint. Because you are using renewable, often salvaged materials, you are participating in a cycle of resourcefulness that has sustained gardeners for generations.
How to Do It: The Step-by-Step Build
Building a path that lasts requires more than just dropping logs on the ground. Soil moisture is the enemy of wood, and without proper preparation, your beautiful walkway will become a feast for termites and rot within a single season. Follow these steps to ensure your path stands the test of time.
1. Sourcing and Selecting Your Wood
The longevity of your path begins with the species of tree you choose. You want wood that is naturally resistant to decay and insects. Black Locust (Robinia pseudoacacia) is the gold standard, often used for fence posts because it can resist rot for decades in direct soil contact. Other excellent choices include Western Red Cedar, Osage Orange (also known as Bois d’arc), and Redwood. These species contain natural oils and tannins that act as built-in preservatives.
If you are using softwoods like Pine or Spruce, they must be treated or charred using the Shou Sugi Ban method to survive the damp. Aim for logs that are between 8 and 18 inches (20 to 45 cm) in diameter to provide a stable surface for your foot. Avoid using “green” wood that was cut yesterday; freshly cut wood has a high moisture content and will warp, crack, or “cup” as it dries in the sun. If possible, let your logs cure in a dry, covered area for several months before slicing.
2. Slicing the “Cookies”
Consistency is the hallmark of a professional-looking path. Each slice should be between 4 and 6 inches (10 to 15 cm) thick. Thinner slices are prone to cracking and will “float” or shift in the soil when it rains. Using a chainsaw, mark your logs at even intervals using a lumber crayon or chalk. Take your time with the cuts; a level top surface is critical for safety.
Pioneer Tip: If you find the rounds are splitting as they dry, it is because the moisture is escaping too quickly from the end grain. You can slow this down by coating the faces with a wood stabilizer or a simple mix of beeswax and linseed oil immediately after cutting.
3. Excavation and Site Prep
You cannot build on top of grass. Dig a trench for your path that is roughly 8 inches (20 cm) deep. This allows for a proper drainage base. Once the soil is removed, compact the bottom of the trench firmly. If your garden is prone to heavy weeds, lay down a professional-grade weed fabric or a thick layer of cardboard at this stage. This creates a barrier that prevents “Chaos” (weeds) from reclaiming your “Order” (path).
4. Creating the Drainage Layer
To prevent the wood from sitting in standing water, fill the first 3 to 4 inches (7 to 10 cm) of your trench with coarse gravel or crushed stone. This layer ensures that rainwater moves away from the wood slices quickly. On top of the gravel, add a 1 to 2-inch (2.5 to 5 cm) layer of coarse sand. The sand acts as a “leveling bed,” allowing you to wiggle the wood slices into place until they are perfectly flat.
5. Setting and Filling
Place your largest wood slices first to establish the main walking line. Once the “anchor” pieces are in, fill the gaps with smaller rounds. This creates a mosaic effect and reduces the amount of filler material needed. Once the slices are set, use a level to ensure none of them are tilting. Fill the remaining voids between the rounds with a mix of sand, pea gravel, or a living ground cover like creeping thyme. If you choose thyme, you’ll be creating a “pollinator highway” that releases a pleasant aroma every time you step on it.
The Practical Benefits of Timber Paths
Choosing wood over concrete or stone isn’t just an aesthetic choice; it’s an environmental one. A wood slice path acts as a “carbon sink,” locking up the carbon stored in the tree for as long as the wood remains intact. Furthermore, as the wood slowly ages over many years, it contributes to the mycorrhizal network beneath your garden. Fungi colonize the underside of the wood, sending out mycelial threads that help transport nutrients to nearby plants.
From a drainage perspective, these paths are superior to solid surfaces. Water flows through the gaps and the porous wood rather than sheeting off into your garden beds and causing erosion. This “drains itself” quality is essential for preventing the muddy patches that often plague backyard entries. Additionally, the soft texture of wood is easier on the joints of both humans and aging pets, providing a “quiet” walking surface that feels connected to the rhythms of nature.
Challenges and Common Mistakes
The most frequent error in building a wood slice path is ignoring drainage. If the wood is placed directly on heavy clay soil without a gravel base, it will act like a sponge, soaking up ground moisture until it turns soft and pulpy. This leads to the “slippery sludge” effect where the wood becomes a breeding ground for slick algae.
Another common mistake is using film-forming sealants like polyurethane. While it might look beautiful for a week, these coatings create a plastic barrier that traps moisture inside the wood, accelerating internal rot. More importantly, they become incredibly dangerous when wet. A wet, polyurethane-coated wood slice is effectively an ice rink in your garden. Always opt for penetrating oils or leave the wood natural to maintain traction.
Limitations: When This May Not Be Ideal
While wood paths are versatile, they are not a “set it and forget it” solution. In extremely humid or tropical climates where the ground never truly dries out, even Black Locust will eventually succumb to the relentless pressure of fungi. In these environments, you may find yourself replacing slices every 3 to 5 years.
They are also not ideal for high-traffic areas that require ADA accessibility or for moving heavy equipment like loaded wheelbarrows. The irregular surface of log rounds can be challenging for those with mobility issues or for wheels. If your path needs to support a 500-lb (225 kg) load daily, you may be better served by a more traditional timber-frame path using 4×4 or 6×6 beams laid horizontally.
Comparison: Wood Slices vs. Alternative Materials
To help you decide if this is the right project for your land, consider how wood rounds compare to other common path materials across several key metrics.
| Factor | Wood Slices | Natural Stone | Pea Gravel |
|---|---|---|---|
| Initial Cost | Low (often free) | High | Moderate |
| Skill Level | Intermediate (Chainsaw) | High (Heavy Lifting) | Low |
| Longevity | 5–15 Years | Indefinite | Indefinite |
| Soil Health | Improves (Organic Matter) | Neutral | Neutral |
| Maintenance | Occasional Replacement | Low | High (Weeding/Raking) |
Practical Tips and Best Practices
- The Charred Secret: Use a propane torch to char the surface of your wood slices (Shou Sugi Ban). This creates a carbonized layer that is naturally resistant to fire, insects, and rot. It also provides a stunning, high-contrast look that highlights the rings of the tree.
- Bark or No Bark? While the bark looks rustic, it is often the first part to rot and fall off, creating gaps. For a path that stays tight for years, consider peeling the bark before installation.
- Leveling with Sand: Keep a bucket of dry sand nearby during installation. If a slice feels wobbly, lift it up, toss a handful of sand in the low spot, and reset it. A stable step is a safe step.
- Winter Traction: If your path becomes slippery in the winter, do not use salt, which will damage the wood. Instead, sprinkle a light layer of coarse builder’s sand over the surface for immediate grip.
Advanced Considerations: The Mycelial Highway
Serious practitioners of sustainable gardening look at a wood slice path as more than a walkway—they see it as a biological battery. When you use untreated, natural wood, you are inviting beneficial fungi like Pleurotus (Oyster mushrooms) or Trametes versicolor (Turkey Tail) to colonize the wood. These fungi don’t just “eat” the wood; they actively break down complex lignins into bioavailable nutrients for your garden beds.
If you want to take your path to the next level, you can “innoculate” the gaps between your wood rounds with mushroom spawn. A path shaded by a canopy of trees can double as a mushroom garden, producing edible or medicinal harvests while performing its primary duty as a walkway. This is the ultimate expression of ancestral wisdom: a system that serves multiple functions with a single input of labor.
Example Scenario: The Herb Garden Trail
Imagine a 20-foot (6-meter) path winding through a kitchen herb garden. The gardener sources four fallen Cedar logs from a neighbor’s property. Using a chainsaw, they cut 50 slices, each 5 inches (12.7 cm) thick. After excavating a 30-inch (76 cm) wide trench, they lay 4 inches (10 cm) of crushed limestone for drainage.
The slices are set in a “staggered” pattern to mimic a natural flow. In the 2-inch (5 cm) gaps between the rounds, they plant Creeping ‘Elfin’ Thyme. Within one season, the thyme fills the gaps, flowering in purple and attracting honeybees and hoverflies. The wood begins to silver under the sun, and the path remains dry even after a heavy spring downpour. The total cost? Less than $50 for the gravel and sand, with the wood and labor being “sweat equity.”
Final Thoughts
A DIY wood slice garden path is a project that rewards the patient hand. It requires you to work with the grain of the wood and the slope of the land. By choosing to build with timber, you are opting for a path that integrates into the life of your garden rather than sectioning it off. It is a practical application of self-reliance that turns waste into a functional, beautiful asset.
As you walk your new path, remember that you are participating in a tradition as old as the first forest trails. You are building soil, supporting pollinators, and creating a stable, dry route through the “Chaos” of your backyard. Experiment with different wood types, play with the patterns of the rings, and let your path evolve with the seasons. Your garden will thank you for it, and so will your soul.
