How To Become More Self-Sufficient Without Starting a Full-Blown Farm…
Want to start preserving your harvest, making your own soap, or building a backyard root cellar — but not sure where to begin? “Homesteading Advice” gives you instant lifetime access to 35+ practical homesteading books on food preservation, veggie gardening, DIY natural cleaning products (save over $250 per year with this skill alone), brewing, off-grid energy, and a whole lot more…
Click Here To Check It Out Now!
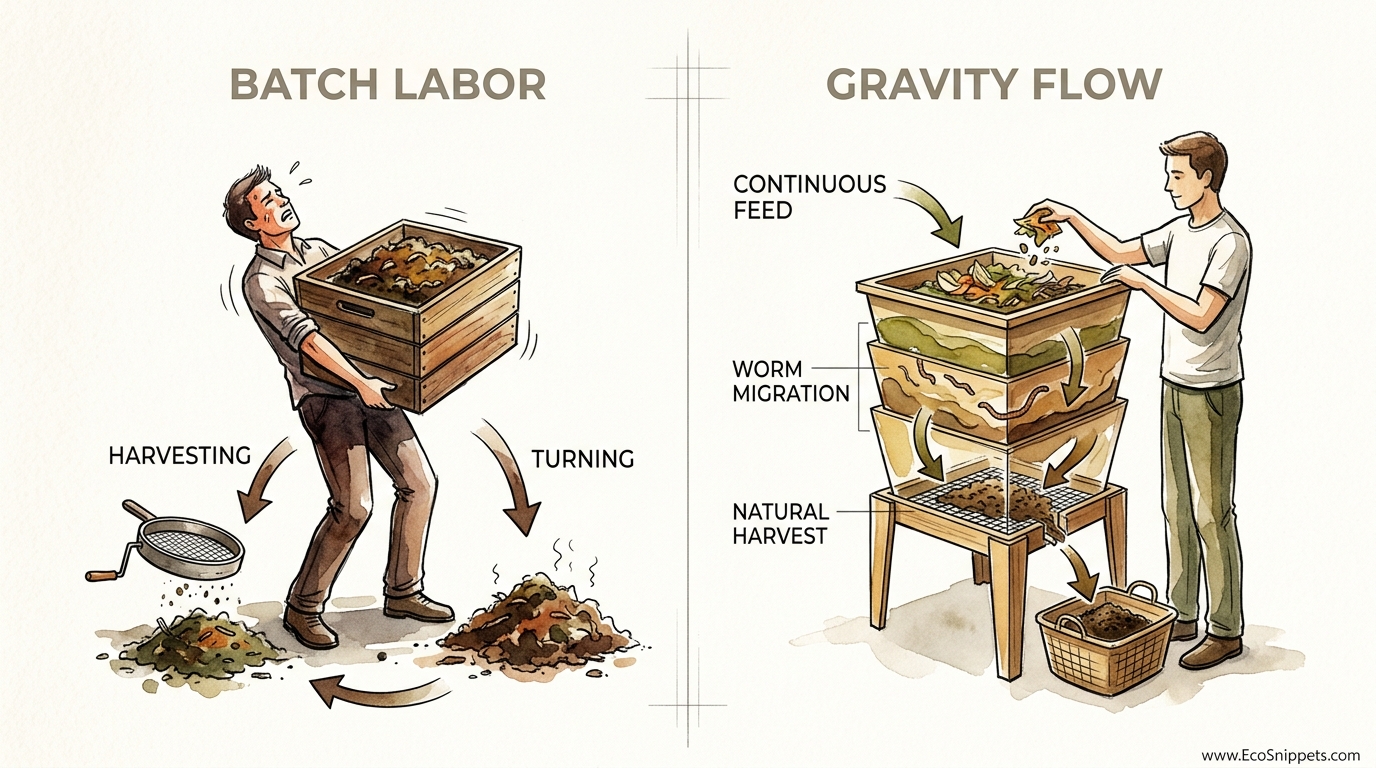
You’re working too hard for your ‘Black Gold’ – let gravity do the harvesting for you. Stop digging through rotting scraps to find your fertilizer. The continuous flow-through system turns a messy weekend chore into a five-second harvest. Utilizing the vertical movement of worms allows you to get cleaner castings with zero heavy lifting or sorting.
Vermicomposting often feels like a messy tug-of-war between you and your compost pile. Traditional batch systems force you to dump the whole bin, sift through unfinished food, and manually pluck worms from the finished product. This approach is labor-intensive and disrupts the delicate ecosystem you worked so hard to build.
A continuous flow-through (CFT) system changes that dynamic entirely. It relies on the biological fact that composting worms prefer to live in the top few inches of organic matter. Moving upward to follow fresh food leaves their waste—the castings—to settle at the bottom. This article will guide you through the transition from high-effort batch labor to the elegant efficiency of gravity flow.
Flow Through Worm Bin Benefits
A Continuous Flow-Through worm bin is a single-compartment reactor designed to move material in one direction: down. You feed organic waste at the top, and as the worms process it, they migrate upward toward the fresh snacks. The finished vermicompost settles at the bottom of the bin, where it is eventually harvested through a grate or mesh floor.
These systems exist because traditional bins create a “water-logged muck” at the bottom that is difficult to manage. Commercial farms and serious home gardeners use CFT designs because they maintain more constant conditions than outdoor windrows or small plastic tubs. The depth of these bins, typically 20 to 24 inches (50 to 60 cm), creates a massive thermal buffer that protects the worms from temperature spikes.
Imagine a tall skyscraper where the top floor is always being renovated and the bottom floor is where the finished debris is hauled away. The residents—your worms—constantly move up to the newest, cleanest floor. This vertical migration means you never have to “stop” the bin to harvest it. The system remains in constant production, providing a steady supply of fertilizer for your soil.
Efficiency is the primary driver for choosing this method. Separating worms from castings is the most time-consuming part of vermicomposting. Since the worms stay in the top 6 to 8 inches (15 to 20 cm) of the bin, the bottom layers remain relatively worm-free. This allows for a clean harvest that requires little to no post-processing or screening.
How the Vertical Migration Works
The biological engine of a CFT system is the instinctual behavior of Eisenia fetida (Red Wigglers) and Eisenia hortensis (European Nightcrawlers). These species are epigeic, meaning they live on the surface of the soil rather than deep underground. They are naturally programmed to seek out the most recent additions of decomposing organic matter.
Food scraps and carbon-rich bedding are added in thin layers to the top surface. Microorganisms like bacteria and fungi begin the decomposition process immediately. Worms follow the “microbial bloom,” consuming both the rotting food and the microbes themselves. As they eat, they leave behind nutrient-dense castings that are heavier and more compressed than the raw bedding.
Gravity pulls these castings downward. Over several months, the material at the bottom of the bin becomes a dense, dark, and homogeneous cake of fertilizer. The height of the bin ensures that by the time a layer reaches the bottom grate, it has been fully processed by multiple generations of worms. This journey from top to bottom usually takes between four to six months in a new system.
Engineering a Continuous Flow System
Building or buying a CFT system requires attention to specific dimensions. A depth of at least 24 inches (61 cm) is considered the “correct” depth by many experienced practitioners. This distance ensures that the bottom harvest zone is far enough away from the feeding zone to be free of worms and unhatched cocoons.
The floor of the bin is not a solid surface. It typically consists of a series of bars, pipes, or a heavy-duty mesh. For a DIY wooden bin, 1/2-inch (13 mm) metal conduit pipes spaced about 1.5 to 2 inches (3.8 to 5 cm) apart are a common choice. These bars support the weight of the compost while allowing air to flow up into the system.
Airflow is the secret weapon of the CFT design. Because the bottom is open to the air, the vermicompost stays aerobic, which prevents the foul odors associated with “sour” bins. This oxygen-rich environment also allows the system to support a much higher population of worms per square foot than a sealed plastic tote.
Materials and Framework
| Component | Recommended Material | Purpose |
|---|---|---|
| Bin Walls | Untreated Wood or Breathable Fabric | Maintains structure and regulates moisture. |
| Bottom Grate | 1/2″ Metal Conduit or Steel Mesh | Supports weight while allowing harvest. |
| Liner | Cardboard or Brown Paper | Prevents bedding from falling through during startup. |
| Catch Tray | Plastic Bin or Concrete Floor | Collects the harvested castings from below. |
Starting Your First Reactor
Launching a CFT system requires a different strategy than a standard tub. You cannot simply dump in worms and food and expect it to work. The “false bottom” created by the bars needs to be temporarily sealed to hold the initial bedding. Using a thick layer of cardboard or several sheets of newspaper provides a base that will eventually rot away by the time the first harvest is ready.
Start with at least 8 inches (20 cm) of high-quality bedding. A 50/50 mix of coco coir and shredded paper or cardboard works well. Moisten this bedding until it reaches the “damp sponge” consistency. Squeezing a handful should only yield one to three drops of water. If the bedding is too wet at the start, it will compact and make future harvests nearly impossible.
Introduce your worms to the top layer and let them settle for a few days before adding the first meal. Red Wigglers are the gold standard for these systems due to their high reproductive rate and surface-dwelling habits. Stocking the bin with approximately 1,000 worms (about 1 lb or 0.45 kg) per square foot of surface area provides a strong start.
Flow Through Worm Bin Management
Feeding a CFT system is an exercise in restraint. The most common error is adding too much food at once, which can lead to “hot composting.” If the material heats up above 90°F (32°C), your worms will either flee the bin or perish. Applying food in thin layers, no more than an inch (2.5 cm) thick, ensures the worms can process it quickly without the risk of overheating.
Bedding is just as important as food. Every time you add nitrogen-heavy kitchen scraps, you should cover them with a layer of carbon-rich bedding like shredded leaves or paper. This “carbon cap” maintains the 70:30 carbon-to-nitrogen ratio that keeps the bin smelling like fresh earth. It also acts as a physical barrier against pests like fruit flies.
Moisture management is the defining factor of a successful CFT. Worms breathe through their skin and require approximately 80% moisture to stay healthy. However, running the bin too wet will cause the castings to leach down and attract worms to the bottom harvest zone. If you see liquid (leachate) consistently dripping from the bottom, the system is too wet. Adding dry shredded cardboard to the top will help pull that excess moisture back into balance.
Harvesting the Black Gold
The first harvest usually occurs four to six months after the bin is established. By this point, the initial cardboard liner has decomposed, and a thick layer of compressed castings sits atop the bars. To harvest, you simply use a hand rake or a specialized “breaker bar” to scrape the material between the conduit pipes.
Scraping the bottom causes the finished castings to fall into the tray below. Most practitioners only harvest an inch or two (2.5 to 5 cm) at a time. This keeps the rest of the column stable and ensures the worms remain in the active feeding zone at the top. The beauty of this method is that the worms are never disturbed; they continue eating and reproducing while you collect their work from below.
Finished castings from a well-run CFT should be dark, crumbly, and relatively free of worms. If you find a high number of worms in your harvest, it is often a sign that the bottom of the bin is too wet or that the worms haven’t finished the food at the top. Adjusting your moisture and feeding schedule will correct this over the next cycle.
Challenges and Common Mistakes
Compaction is the primary enemy of the continuous flow system. When the material becomes too wet, it turns into an “adobe-like” block that resists harvesting. This happens most often near the walls of the bin where air circulation is lower. Breaking up these clumps manually and mixing in dry bedding can help restore the necessary porosity.
Anaerobic pockets can form if the bin is overfed with high-moisture foods like melon or squash. These pockets smell like ammonia or rotting eggs and can be toxic to the worm population. If you encounter a foul odor, immediately remove any undigested food and “fluff” the top few inches of bedding to reintroduce oxygen.
Pests like mites and fruit flies are attracted to exposed food. Mite blooms usually occur when the bin becomes too acidic. Adding crushed eggshells or a dusting of garden lime can help neutralize the pH and keep the environment balanced. Always burying your food scraps under a layer of bedding is the best defense against a fruit fly infestation.
Limitations of the CFT Method
Continuous flow-through systems require a commitment to vertical space. Because they need to be at least 2 feet (60 cm) tall and have room underneath for a harvest tray, they are not always ideal for small apartments or cramped balconies. Their height also makes them heavier than standard bins, so they are not easily moved once they are full.
Environmental temperature extremes can also challenge a CFT. While the large mass of bedding provides some insulation, a fabric or wooden bin is more susceptible to ambient air than a thick plastic tub. In freezing climates, the bin may require external insulation or a seed heating mat to keep the worms active. In extremely hot regions, the open bottom can lead to rapid drying, necessitating more frequent moisture checks.
Practical Tips and Best Practices
* The Squeeze Test: Always check moisture before adding water. A handful of material should feel like a damp sponge and yield only a couple of drops of water when squeezed firmly.
* Freeze Your Scraps: Freezing kitchen waste before adding it to the bin kills fruit fly larvae and breaks down the cellular structure of the food, making it easier for worms to eat.
* Monitor the Center: Moisture tends to accumulate near the walls. Apply water or misting toward the center of the bin to encourage the worms to stay active where the most food is located.
* Use a “Carbon Cap”: Always keep the top surface covered with a thick layer of dry shredded paper. This discourages pests and keeps the active layer dark and moist.
* Stagger Your Harvest: If you have multiple bins, harvest them at different times to ensure a constant supply of castings without depleting any single colony.
Comparison: CFT vs. Batch vs. Stackable
Choosing the right system depends on your goals and available labor. Batch systems are cheap but messy. Stackable trays are a middle ground, but they can become heavy and difficult to lift as they fill.
| Feature | Batch (Plastic Tote) | Stackable Trays | Continuous Flow (CFT) |
|---|---|---|---|
| Labor Level | High (Manual sorting) | Medium (Lifting trays) | Low (Gravity harvest) |
| Worm Disturbance | Extreme | Moderate | Minimal |
| Airflow/Aeration | Poor | Moderate | Excellent |
| Scalability | Low | Moderate | High |
| Initial Cost | $ (Very Low) | $$ (Medium) | $$$ (High) |
Advanced Considerations
Serious practitioners often look for ways to scale their production. For large-scale CFTs, manual scraping becomes inefficient. Commercial systems utilize a motorized “breaker bar” or a winch-powered cutting wire that travels the entire length of the bin’s floor. This ensures an even harvest and prevents the “caving” that can happen if you only harvest from the center.
Inoculating your bedding with beneficial fungi or pre-composted manure can also accelerate the system. Pre-composting allows you to get through the initial thermophilic (heat-generating) phase of decomposition in a separate pile. By the time the material reaches the worm bin, it is “worm-ready” and safe to apply in thicker layers, drastically increasing your throughput.
Monitoring the pH is vital for high-volume systems. As worms process waste, the environment naturally tends toward acidity. Keeping a bag of crushed oyster shells or eggshells nearby to sprinkle on the surface will keep the pH in the optimal range of 6.0 to 7.0, ensuring the worms stay productive and healthy.
Final Thoughts
Transitioning to a continuous flow-through system is the most significant upgrade a vermicomposter can make. It moves the practice from a hobby of “keeping worms” to a streamlined system of “harvesting fertility.” Trusting the natural vertical migration of the worms allows you to focus on the health of the soil rather than the mechanics of the bin.
The initial investment in time or money to build a proper CFT pays for itself in the hours of labor saved during harvest. You will find that your castings are cleaner, your worms are more prolific, and your garden is more vibrant. The simplicity of gravity is a powerful partner in the quest for sustainable, home-grown fertilizer.
Experimenting with different bedding materials and feeding schedules will help you find the “groove” for your specific climate. Whether you are using a commercial bag or a hand-built wooden reactor, the principles of flow-through remain the same. Feed from the top, harvest from the bottom, and let the worms do the heavy lifting.
