
How To Become More Self-Sufficient Without Starting a Full-Blown Farm…
Want to start preserving your harvest, making your own soap, or building a backyard root cellar — but not sure where to begin? “Homesteading Advice” gives you instant lifetime access to 35+ practical homesteading books on food preservation, veggie gardening, DIY natural cleaning products (save over $250 per year with this skill alone), brewing, off-grid energy, and a whole lot more…
Click Here To Check It Out Now!
A 10-degree temperature jump is as simple as changing the ‘Shape’ of your land. Stop fighting the wind and start harvesting the light. A simple U-shaped ‘Sun Trap’ captures radiant heat and blocks the chilling wind, allowing you to grow peppers in the north or extend your season by months. Don’t leave your plants exposed when the land wants to shelter them.
Building a garden often feels like a battle against the elements. You watch the thermometer drop and the wind whip across an open field, knowing your most delicate crops are struggling just to stay alive. Most growers try to fix this with plastic covers or expensive heaters, but the ancestors knew a better way. They understood that the physical geometry of a space dictates its climate. A well-designed sun trap can shift your growing zone effectively, making a cold Northern property feel like a Mediterranean terrace.
This concept is one of the most powerful tools in the permaculture kit. It moves beyond just planting seeds and enters the realm of landscape engineering. You aren’t just growing food; you are crafting a microclimate that works for you 24 hours a day.
How To Build A Permaculture Sun Trap
A permaculture sun trap is a landscape feature designed in a horseshoe or “U” shape to capture solar radiation while deflecting prevailing cold winds. It creates a localized pocket of warmth, often referred to as a microclimate, that can be 5°C to 10°C (9°F to 18°F) warmer than the surrounding exposed landscape. These structures have been used for centuries, from the traditional walled gardens of Victorian England to the ancient stone terraces of the Andes.
The core principle involves two primary functions: shelter and storage. The “arms” of the U-shape act as a windbreak, stopping the convective cooling that strips heat away from plant leaves. Meanwhile, the back and sides of the trap serve as a “thermal battery.” Whether they are made of dense vegetation, stone, or earth, these barriers absorb the sun’s energy during the peak of the day and slowly radiate it back into the central growing area as the air cools.
In a real-world setting, a sun trap might look like a curved hedge of evergreen trees protecting a small orchard, or a semi-circular cob wall wrapped around a patio of peppers and tomatoes. It is a design that mimics a cozy campfire. Just as you sit with your back to the wind and your face to the heat, a sun trap ensures your plants are cradled in a pocket of stillness and light.
The Mechanics of Microclimates: How It Works
Understanding the physics of a sun trap is the first step toward building one that actually performs. Solar energy hits the earth in three ways: direct radiation, reflected light, and conducted heat. A sun trap manipulates all three to your advantage.
Direct radiation is the light falling directly from the sun onto your plants. By orienting the opening of the “U” toward the equator—South in the Northern Hemisphere and North in the Southern Hemisphere—you maximize the hours of direct solar access. This orientation ensures that even when the sun is low on the horizon during the spring and autumn, the trap is still catching every possible photon.
Reflection is a secondary but vital component. When light hits the interior walls of your sun trap, it bounces back toward the center. If your walls are light-colored or involve water features, the amount of reflected light can significantly increase the rate of photosynthesis. This is particularly useful in high-latitude regions where winter sun is scarce.
Absorption and thermal mass provide the “battery” effect. Materials like stone, brick, and water have high volumetric heat capacity. This means they can hold a massive amount of energy without a massive rise in their own temperature. As the sun beats down on a stone wall, the wall “charges” up. When night falls and the ambient temperature drops, the wall begins to release that heat, keeping the air inside the trap above the frost point long after the open fields have frozen.
Wind deflection is the final piece of the puzzle. Wind is the great thief of garden heat. A 15 km/h (9 mph) breeze can make 12°C (54°F) air feel like 8°C (46°F) to a plant. By breaking the wind’s path, you stop the rapid evaporation of moisture from the leaves and soil, which in turn prevents “transpirational cooling.” The air inside the hub remains still, allowing a layer of warm air to settle over the soil like an invisible blanket.
Siting and Orientation: The Geometry of the Equator
Placement is the most common point of failure for new builders. If you site your sun trap in the wrong direction, you might accidentally create a “shade trap” or a “wind tunnel” that actually kills your plants faster. The primary rule is orientation relative to the sun’s path.
In the Northern Hemisphere, your sun trap must open to the South. The tallest part of the structure—the “back” of the U—should be on the North side to block the chilling North winds. In the Southern Hemisphere, this is reversed; the opening faces North, and the protective high wall sits on the South side. You want the interior of the curve to be bathed in light from sunrise to sunset.
Slopes also play a critical role. Cold air behaves exactly like water; it is heavy and flows downhill. If you build a sun trap on a slope without considering drainage, you will catch a pool of cold air at the bottom, creating a frost pocket. Ensure that the land inside your trap has a slight exit point or that the structure is built on a “mid-slope” position where cold air can continue to flow past it rather than settling inside it.
Consider the “1:2 rule” for shading. Tall structures or trees to the east or west of your trap can cast long shadows that rob you of morning or evening warmth. A good rule of thumb is to place the sun trap at a distance at least twice as far from an obstacle as the height of that obstacle. If you have a 10-meter (33-foot) tree to the south, your sun trap should be at least 20 meters (66 feet) away to avoid being shaded during the low-angle winter sun.
Living Walls vs. Hard Masonry: Choosing Your Materials
The materials you choose define the “personality” of your sun trap. You can build with living biology or inert geology. Each has its own strengths and maintenance requirements.
Living sun traps are made of trees and shrubs. This is the “soft” approach. A classic design uses a tiered planting system. You might plant tall, hardy evergreens like cedar or spruce at the very back to act as the primary windbreak. In front of those, you plant mid-sized nitrogen-fixing shrubs like Siberian Pea Shrub or Autumn Olive. The tips of the “U” are finished with low-growing perennial herbs or small fruiting bushes.
The advantage of a living wall is its multifunctionality. It provides habitat for pollinators, produces mulch in the form of fallen leaves, and can even yield its own harvest of nuts or berries. However, plants take time to grow, and they compete with your central crops for water and nutrients.
Hard masonry traps utilize stone, brick, cob, or concrete. These provide immediate results and superior thermal mass. A stone wall doesn’t need five years to “reach height,” and it won’t drink the water intended for your tomatoes. Cob—a mixture of clay, sand, and straw—is a favorite in the permaculture community because it can be sculpted into beautiful, flowing organic shapes that perfectly mirror the sun’s path.
Hard walls are also excellent at blocking 100% of the wind, whereas a hedge might let 20-50% of the breeze through. The downside is the cost and labor of construction. Moving tons of rock or mixing yards of cob is a significant physical investment.
Thermal Mass Mastery: Ranking Your Heat Batteries
Not all materials are created equal when it comes to holding heat. If you want the most “bang for your buck,” you need to look at the density and volumetric heat capacity of what you are using.
| Material | Density (kg/m³) | Heat Capacity (kJ/kg·K) | Thermal Performance |
|---|---|---|---|
| Water | 1,000 | 4.18 | Highest; best for overnight stability. |
| Granite/Stone | 2,600 | 0.79 | Excellent; high density provides long lag time. |
| Brick | 1,920 | 0.84 | Very Good; standard for “walled gardens.” |
| Concrete | 2,400 | 0.75 | Good; widely available but high embodied energy. |
| Cob/Earth | 1,600 | 0.80 | Great; inexpensive and easy to shape. |
Water is the undisputed champion of thermal mass. It holds about four times as much heat as dry soil and twice as much as concrete. Integrating water into your sun trap—whether through a pond at the base of a wall or black-painted water barrels—can provide a massive buffer against frost. A pond also offers the benefit of light reflection, bouncing extra solar energy up into the underside of the plant canopy.
Stone and brick follow closely. Their “thermal lag” is their greatest asset. It takes a long time for a thick stone wall to heat up, but it takes just as long for it to cool down. This lag time is what protects your plants during those crucial hours between 2:00 AM and 6:00 AM when temperatures hit their lowest point.
The Design Anatomy of a High-Performance Sun Trap
A truly efficient sun trap is more than just a wall; it is a system of layers. To get the best results, you should aim for a “concave” interior.
Start with the core of the trap, which is the “Hub.” This is the lowest point and the primary growing area. This space should be filled with your most heat-demanding annuals: peppers, eggplants, or melons. The soil here should be heavily mulched to prevent evaporation, as the increased heat will dry the earth quickly.
Next, build the “Thermal Spine.” This is the back of the “U.” If you are using a stone wall, this is where the wall is highest—ideally 1.8 to 2.5 meters (6 to 8 feet). This height is necessary to create a significant “wind shadow.” A wall typically provides a calm zone for a distance of roughly twice its height. A 2-meter wall protects the ground for 4 meters in front of it.
Finally, design the “Arms.” These are the sides of the “U” that taper down in height as they move toward the opening. These arms catch the morning sun (East arm) and the afternoon sun (West arm), while still providing protection from side-winds. Tapering the arms prevents them from casting unwanted shadows on the central hub during the middle of the day.
Benefits: Turning a Zone 5 Garden into Zone 6
The primary benefit of a sun trap is the expansion of possibilities. By raising the average temperature of a small area, you are effectively “moving” your garden several hundred miles toward the equator. This allows for the cultivation of “marginal” plants—species that shouldn’t survive in your climate but do because of the sheltered pocket.
Season extension is the most measurable advantage. In a sun trap, the soil warms up weeks earlier in the spring, allowing for earlier transplanting. In the autumn, the trapped heat prevents the first few “light frosts” from killing your tender perennials. This can add 30 to 60 days to your total growing season.
Yield and quality also improve. Most heat-loving vegetables, like tomatoes and peppers, have a “metabolic floor.” If the temperature stays below 15°C (59°F), they essentially stop growing. By keeping the temperature consistently above that threshold for more hours of the day, the plants produce more fruit, and the fruit often has a higher brix (sugar) content because the plant isn’t wasting energy on survival.
Biodiversity flourishes in these pockets. You might find that beneficial insects, like predatory wasps and bees, congregate in the sun trap because it is the warmest place on the property. This creates a self-regulating ecosystem where pests are managed naturally by the residents of your microclimate.
Challenges and Common Mistakes: The Danger of the Frost Pocket
Building a sun trap without considering air movement is a recipe for disaster. The most frequent error is creating a “cold air sink.” Because cold air is denser than warm air, it flows down slopes like a liquid. If your sun trap is a solid “U” shape and sits at the bottom of a hill, it will catch all that descending cold air and hold it.
To avoid this, you must allow for “cold air drainage.” This can be done by leaving a small gap (about 30-50 cm / 12-20 inches) at the very bottom of your wall or by ensuring the trap is open at the downhill side. You want the warm air to stay, but the heavy cold air to be able to “leak” out.
Over-shading is another pitfall. In your excitement to build a massive windbreak, you might build a wall so high that it blocks the very sun you are trying to trap. Always calculate your sun angles for the winter solstice. If the sun doesn’t clear the top of your wall in December, the interior of your trap will be a frozen, dark tomb until spring.
Lack of ventilation can cause issues in mid-summer. In the peak of July or August, a sun trap can actually become *too* hot. If the air is perfectly still and the thermal mass is fully charged, temperatures can soar past 40°C (104°F). This can lead to blossom drop in tomatoes and heat stress. Designing your trap with “removable” sections or choosing a hedge that allows some air filtration can help mitigate this.
Limitations: When the Trap Becomes a Greenhouse
While sun traps are revolutionary, they are not a universal fix. There are specific environmental constraints where a sun trap might not be the ideal choice.
In very humid, tropical environments, a sun trap can be a liability. The combination of high heat and still air is the perfect breeding ground for fungal diseases like powdery mildew and blight. In these regions, “cooling” microclimates—focused on shade and maximum airflow—are usually more beneficial than “heating” ones.
Scale is also a limitation. A sun trap is, by definition, a small-scale feature. It is perfect for a backyard or a small market garden “hub,” but it is difficult to scale to a broad-acre farm without significant earthworks. For large-scale grain or hay production, standard windbreaks (shelterbelts) are more practical.
Construction constraints can also play a role. If your soil is primarily heavy, waterlogged clay, building a heavy stone wall might lead to subsidence and cracking unless you invest in a serious foundation. Always assess your soil’s load-bearing capacity before stacking tons of rock.
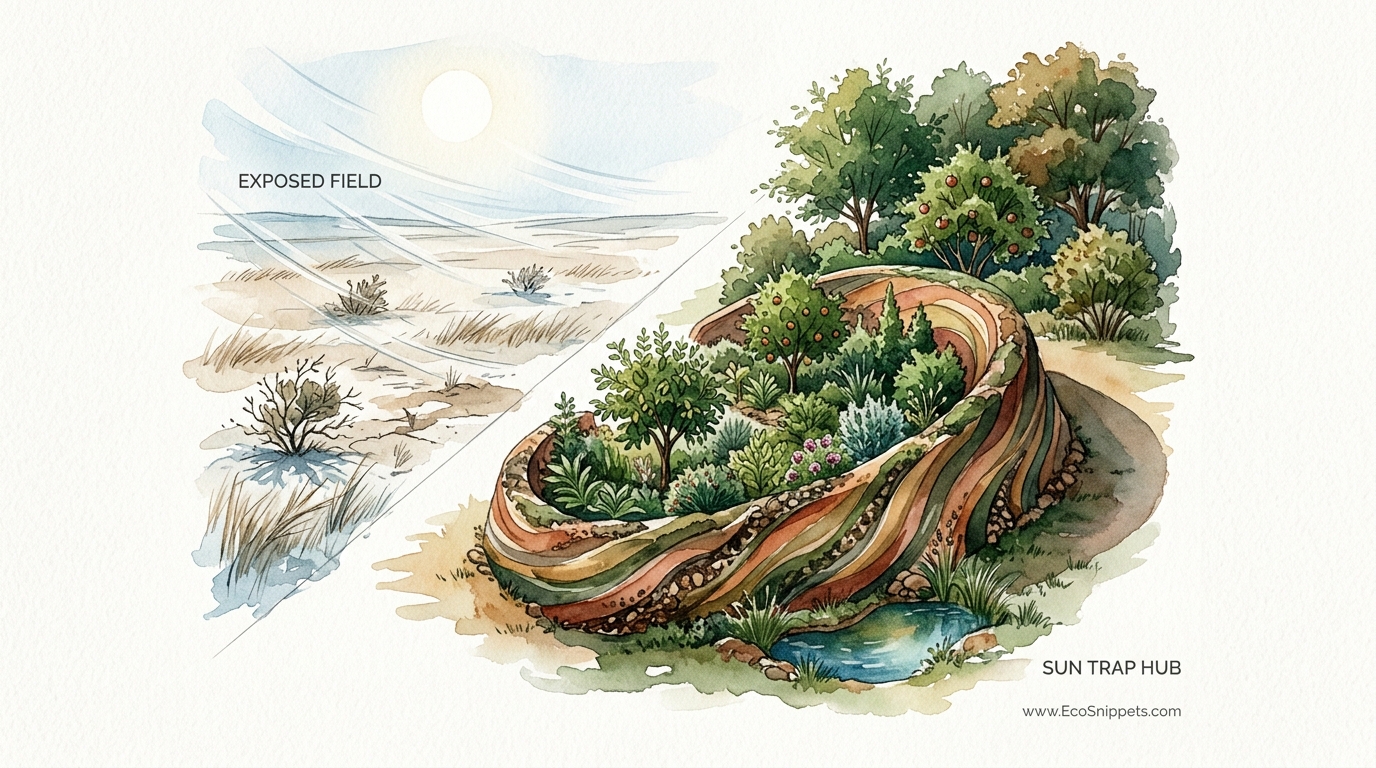
Exposed Field vs. Sun Trap Hub
Choosing between a traditional open row system and a sun trap depends on your goals and resources.
| Factor | Exposed Field | Sun Trap Hub |
|---|---|---|
| Establishment Cost | Low; just tilling and seeding. | High; requires walls, hedges, or earthworks. |
| Maintenance | Moderate; easy for machinery. | High; requires pruning or wall repair. |
| Growing Season | Standard for the region. | Extended by 4–8 weeks. |
| Plant Health | Vulnerable to wind and frost. | Protected; higher metabolic rates. |
| Complexity | Beginner-friendly. | Requires design knowledge. |
The exposed field is for reliability and volume. The sun trap hub is for high-value, high-risk crops that require that extra edge to thrive.
Practical Tips for Year-Round Management
Managing a sun trap requires a shift in how you observe your garden. In the spring, your focus is on “un-insulating” the thermal mass. Remove any straw or mulch that was covering your stone walls during the winter so the sun can start hitting the stone directly and charging the battery.
During the summer, monitor for “hot spots.” If you notice leaves wilting even when the soil is moist, your trap might be over-performing. This is the time to add temporary “dappled shade” using tall sunflowers or a light trellis of climbing beans. This provides the plants with relief during the 2:00 PM to 4:00 PM heat spike.
In the autumn, use the trap to its full potential. This is when you can leave your peppers on the vine to fully ripen into red or yellow gems. While your neighbors are pulling their plants in anticipation of the first frost, your sun trap should still be comfortably warm.
Winter is the time for structural maintenance. If you have a living hedge, prune it to ensure the “U” shape is maintained and that no branches have grown over to shade the center. If you have stone or cob walls, check for cracks caused by the freeze-thaw cycle and repair them with a simple lime mortar or clay slip.
Advanced Considerations: Water Reflection and Verticality
For those who want to push the system to its limit, consider the “Reflective Pond” strategy. By placing a small pond or water feature at the Southern opening of your trap, you catch the low-angle winter sun. The water acts as a mirror, reflecting light deep into the back of the trap where the thermal mass is located. This effectively doubles the solar input for those few hours.
Verticality is another advanced technique. Don’t just plant on the ground. Use the walls of your sun trap for “espalier” fruit trees. Training a peach or apricot tree flat against a South-facing stone wall is a classic technique. The tree receives heat directly from the sun and “conductive” heat from the wall behind it. This can allow you to grow stone fruits in climates where they would normally never survive the winter.
Think about “Guilding” your trap. Instead of a monoculture of one crop, fill the trap with a diverse stack of plants. Deep-rooted comfrey can pull nutrients from below the thermal wall, while nitrogen-fixing clover acts as a living mulch for your heat-loving eggplants. Every plant should have at least two functions: one for harvest and one for the health of the trap.
Real-World Example: Growing Peppers in a Northern Autumn
Consider a gardener in Zone 5 (average minimum temperature -28°C / -20°F). In a standard open field, the first frost typically arrives in late September. Most bell peppers require 70 to 90 days of warm weather to reach full maturity. By the time the peppers are ready to turn red, the frost hits, and the gardener is left with a basket of green, bitter fruit.
By building a 2-meter (6-foot) high stone sun trap, the gardener changes the math.
The stone wall absorbs the 20°C (68°F) daytime sun in September. At night, when the field temperature drops to 2°C (36°F), the air inside the trap stays at 10°C (50°F) due to the radiating stone and the lack of wind.
This prevents the plants from entering “stress mode.” The peppers continue to ripen through October. By the time a “killing frost” finally penetrates the trap in November, the gardener has harvested 40% more fruit, and nearly all of it has reached full color and sweetness. This isn’t magic; it is simply the strategic use of captured energy.
Final Thoughts
A permaculture sun trap is a testament to the power of working with, rather than against, the natural world. It proves that we do not have to be victims of our climate. By understanding the simple physics of light, heat, and wind, we can carve out a sanctuary for our plants and ourselves.
Building one of these structures requires a shift in perspective. You must stop seeing your land as a flat surface and start seeing it as a three-dimensional vessel for energy. Whether you stack stones, mix cob, or plant a hedge, you are participating in an ancient tradition of landscape stewardship.
Start small. Find a corner of your yard that already feels a little warmer than the rest. Build a small semi-circle of rocks or plant a curved row of shrubs. Observe how the snow melts there first in the spring. Once you see the power of the sun trap in action, you will never look at an open, exposed field the same way again.
