How To Become More Self-Sufficient Without Starting a Full-Blown Farm…
Want to start preserving your harvest, making your own soap, or building a backyard root cellar — but not sure where to begin? “Homesteading Advice” gives you instant lifetime access to 35+ practical homesteading books on food preservation, veggie gardening, DIY natural cleaning products (save over $250 per year with this skill alone), brewing, off-grid energy, and a whole lot more…
Click Here To Check It Out Now!
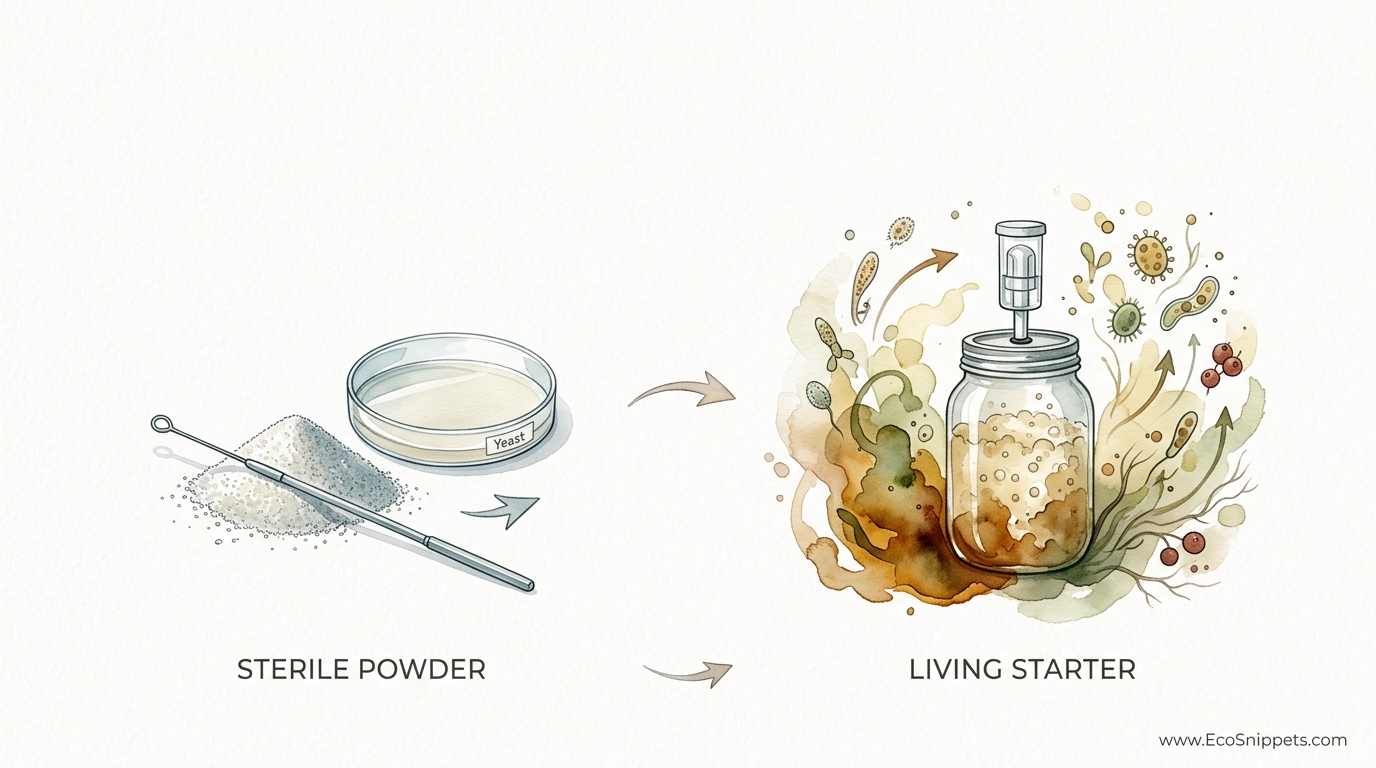
One is a lab-grown monoculture that tastes the same everywhere; the other is a living portrait of your unique land. Most brewers are terrified of ‘wild’ organisms, but that is exactly where the soul of the beer lives. I traded the sterile, store-bought packets for a jar of life caught directly from my own apple trees. The result? A flavor profile that can’t be bought in any store and a fermentation cycle that never has to end.
Stepping away from the convenience of commercial yeast is an act of reclamation. It is a return to a time when the brewer was not just a technician following a manual, but a partner with the local ecosystem. Every orchard, meadow, and backyard is teeming with microscopic life waiting to be invited into the brewhouse.
Learning to harness these local microbes allows you to create a “house character” that is entirely your own. This guide provides the blueprint for capturing, culturing, and mastering the wild yeast that lives right outside your door.
How To Catch Wild Yeast For Brewing
Capturing wild yeast, often called “yeast wrangling” or “bioprospecting,” is the process of collecting naturally occurring microorganisms from the environment to ferment beer. In a world of standardized laboratory strains, these wild organisms represent the true terroir of brewing. They exist on the skins of fruit, the petals of flowers, and even floating on the breeze in the very air we breathe.
Historically, all beer was wild. Before Louis Pasteur isolated Saccharomyces cerevisiae in the mid-19th century, brewers relied on the invisible “magic” of their environment. Whether it was the wooden stir-sticks passed down through generations or the open cooling trays of Belgian lambic producers, the microbes were the silent architects of flavor.
In practical terms, you are looking for a specific subset of fungi and bacteria. While thousands of species exist in nature, the goal is to find those that can tolerate high sugar environments, produce pleasant esters, and survive the rising alcohol levels of a fermenting wort. This is not about leaving your beer to chance; it is about providing a specific environment that favors the “good” bugs while suppressing the “bad” ones.
The Methodology: How to Catch Your Own Culture
Success in wild brewing depends on a structured approach to selection. You do not simply dump a handful of dirt into a five-gallon (19-liter) batch of beer. Instead, you start small, using “capture starters” to see which local microbes have the potential to produce greatness.
1. Selecting Your Source
Yeasts thrive where there is sugar. Ripe, unwashed organic fruits are the gold standard for wild capture. The “bloom”—that dusty white coating often seen on grapes, blueberries, or plums—is essentially a concentrated colony of wild yeast.
- Apple Skins: Apples from an unsprayed tree are powerhouse sources of yeast.
- Flowers: Pollen-rich blossoms like elderberry, honeysuckle, or dandelion carry unique floral-focused microbes.
- Raw Grain: Unmalted or raw barley and wheat often harbor Lactobacillus and wild Saccharomyces.
2. Preparing the Capture Wort
Create a low-gravity “capture wort” to act as a trap. Aim for an Original Gravity (OG) of 1.030 to 1.040. To make this, mix 100 grams (3.5 ounces) of Dry Malt Extract (DME) with 1 liter (1.05 quarts) of water. Boil this for 15 minutes to ensure it is sterile before you introduce your wild source.
3. The Inoculation
Cool the wort to roughly 21°C to 24°C (70°F to 75°F). Pour it into small, sanitized glass jars. Drop your chosen source—a few apple peels, a handful of berries, or a cluster of flowers—directly into the jars. Cover the jars with a clean cloth or a loosely fitted lid to allow CO2 to escape while keeping out dust and insects.
4. The Selection Process
Watch the jars closely over the next 3 to 7 days. You are looking for signs of life: small bubbles, a thin layer of white foam (krausen), or a cloudy appearance. Once activity peaks, smell the starters.
- The Good: Fruity, spicy, floral, or “bread-like” aromas.
- The Bad: Smells of rotten eggs, vomit, nail polish remover, or putrid decay.
If a jar smells foul or grows fuzzy mold (especially black, green, or bright red mold), discard it immediately. Only proceed with starters that exhibit pleasant or interesting aromas.
Benefits of the Wild Approach
Choosing wild yeast over a sterile powder packet offers several distinct advantages for the dedicated practitioner. It is a choice that prioritizes depth over ease.
True Terroir: Just as a winemaker speaks of the soil, a wild brewer captures the essence of a specific time and place. A beer brewed with yeast from your own garden cannot be replicated by anyone else. It is a signature of your land.
Complexity of Flavor: Commercial yeasts are bred for speed and predictability. Wild cultures are often “mixed cultures,” containing various strains of yeast and beneficial bacteria. This diversity creates layers of flavor—spicy phenols, tart acidity, and funky esters—that a single lab-matured strain cannot match.
Self-Reliance: Mastering the art of the living starter means you are no longer dependent on a supply chain. You possess a “perpetual” organism. Much like a sourdough starter, a healthy wild culture can be harvested from one batch and pitched into the next for years, evolving and adapting to your specific brewing style.
Challenges and Common Mistakes
The path of the wild brewer is not without its thorns. Because you are working with an unknown population, you must be more vigilant than a standard homebrewer.
Pathogen Risk: While the acidity and alcohol of beer eventually make it a hostile environment for human pathogens, the early stages of a wild starter are vulnerable. To mitigate this, many experienced wranglers pre-acidify their capture wort to a pH of 4.0 to 4.5 using lactic acid. This suppresses dangerous bacteria like E. coli or Clostridium botulinum before the yeast can take hold.
The “Mousy” Off-Flavor: A common pitfall in wild fermentation is the development of THP (tetrahydropyridines), which tastes like crackers or mouse bedding. This often occurs when oxygen is introduced too late in the process or when certain wild bacteria are present. Patience is the only cure; these flavors often age out over several months.
Inconsistency: Wild yeast does not follow a calendar. One batch may ferment in a week, while the next takes six months to reach terminal gravity. If you require a beer to be ready for a specific event, wild yeast is a risky choice.
Limitations of the Method
This approach is not a universal solution for every beer style. There are practical boundaries where a living local starter may not be ideal.
| Factor | Commercial Yeast (Sterile Powder) | Living Wild Starter |
|---|---|---|
| Predictability | High; consistent results every time. | Low; flavors vary by season and source. |
| Fermentation Speed | Fast (4–10 days). | Slow (2 weeks to 12 months). |
| Equipment Risk | Low; easily sanitized. | High; can “infect” plastic equipment. |
| Cost | $8–$15 per batch. | Nearly free after initial setup. |
Wild yeast is generally unsuitable for clean, crisp styles like German Pilsners or Mexican Lagers where yeast character should be minimal. Additionally, once you introduce wild organisms into your brewery, you must be meticulous with your “cold side” equipment. Many wild strains (especially Brettanomyces) can linger in plastic buckets or vinyl tubing, potentially “contaminating” future batches of standard beer.
Practical Tips and Best Practices
If you are ready to begin your first capture, follow these refined techniques to improve your success rate.
- Use Hops as a Shield: Adding a small amount of hop extract or a few hop pellets to your capture wort can inhibit many types of Lactobacillus. This is useful if you want a funky, “wild” beer that isn’t necessarily sour.
- The “Step-Up” Method: Never pitch a raw capture jar into a full 20-liter (5-gallon) batch. Always “step it up.” Take 100ml of your successful capture, add it to 500ml of fresh wort, wait for fermentation, and then move to a 2-liter starter. This ensures the yeast population is healthy and dominant.
- Sanitization is Still King: Just because you are “inviting” wild microbes doesn’t mean you should be sloppy. Keep your jars, spoons, and airlocks as clean as possible to ensure only the microbes on your fruit or flowers are the ones being cultured.
- Temperature Stability: While some wild yeasts (like Norwegian Kveik) love heat, most prefer a stable room temperature between 18°C and 22°C (64°F to 72°F). Rapid swings in temperature can stress the yeast and produce harsh solvent-like flavors.
Advanced Considerations: Plating and Isolation
For the practitioner who wants to go beyond the basics, the next level involves isolating a single strain from a mixed wild culture. This requires basic laboratory skills and agar plates.
By streaking a drop of your wild starter across an agar-filled Petri dish, you can grow individual colonies. Each tiny dot on the plate is a pure colony of a single organism. You can then “pick” a colony that looks healthy, grow it in a small vial of wort, and test its individual flavor profile. This allows you to separate a fantastic-tasting Saccharomyces strain from a less desirable souring bacteria.
Scaling up a wild culture also requires monitoring the “terminal gravity.” Wild yeasts often ferment more deeply than commercial strains, consuming complex sugars that lab yeasts leave behind. Always ensure your gravity readings are stable for at least two weeks before bottling to avoid “bottle bombs” caused by over-pressurization.
Example Scenario: The Orchard Ale
Imagine a late-summer evening in a northern-hemisphere orchard. You pick three ripe apples from a tree that hasn’t seen pesticides in decades. Following the steps above, you peel the apples and drop the skins into a 500ml (17-ounce) jar of 1.035 OG wort.
After four days, you see a vigorous foam and smell notes of ripe pineapple and black pepper. You decant the liquid, leaving the sediment behind, and “feed” it a fresh liter of wort. Two weeks later, you pitch this 1.5-liter starter into a simple Pale Ale recipe. The resulting beer is bone-dry, effervescent, and carries a unique “wild” spiciness that perfectly complements the malt. This is a beer that belongs to that specific orchard and that specific harvest.
Final Thoughts
Embracing wild yeast is an admission that we are not the masters of the fermentation process, but its stewards. It requires a shift from the rigid control of modern industrial brewing toward a more intuitive, observational approach. This “pioneer-grit” brewing is about testing the limits of your environment and finding the hidden gems in the world around you.
The transition from sterile powder to a living, breathing starter is a journey of discovery. Some captures will fail, and some will be mediocre, but the one that succeeds will provide a level of satisfaction that no store-bought packet can ever offer. It is the difference between a photograph and a lived experience.
Start small, stay observant, and don’t be afraid of the “wild.” The most profound flavors are often the ones you catch yourself, just outside your window, waiting for an invitation to the jar.
