How To Become More Self-Sufficient Without Starting a Full-Blown Farm…
Want to start preserving your harvest, making your own soap, or building a backyard root cellar — but not sure where to begin? “Homesteading Advice” gives you instant lifetime access to 35+ practical homesteading books on food preservation, veggie gardening, DIY natural cleaning products (save over $250 per year with this skill alone), brewing, off-grid energy, and a whole lot more…
Click Here To Check It Out Now!
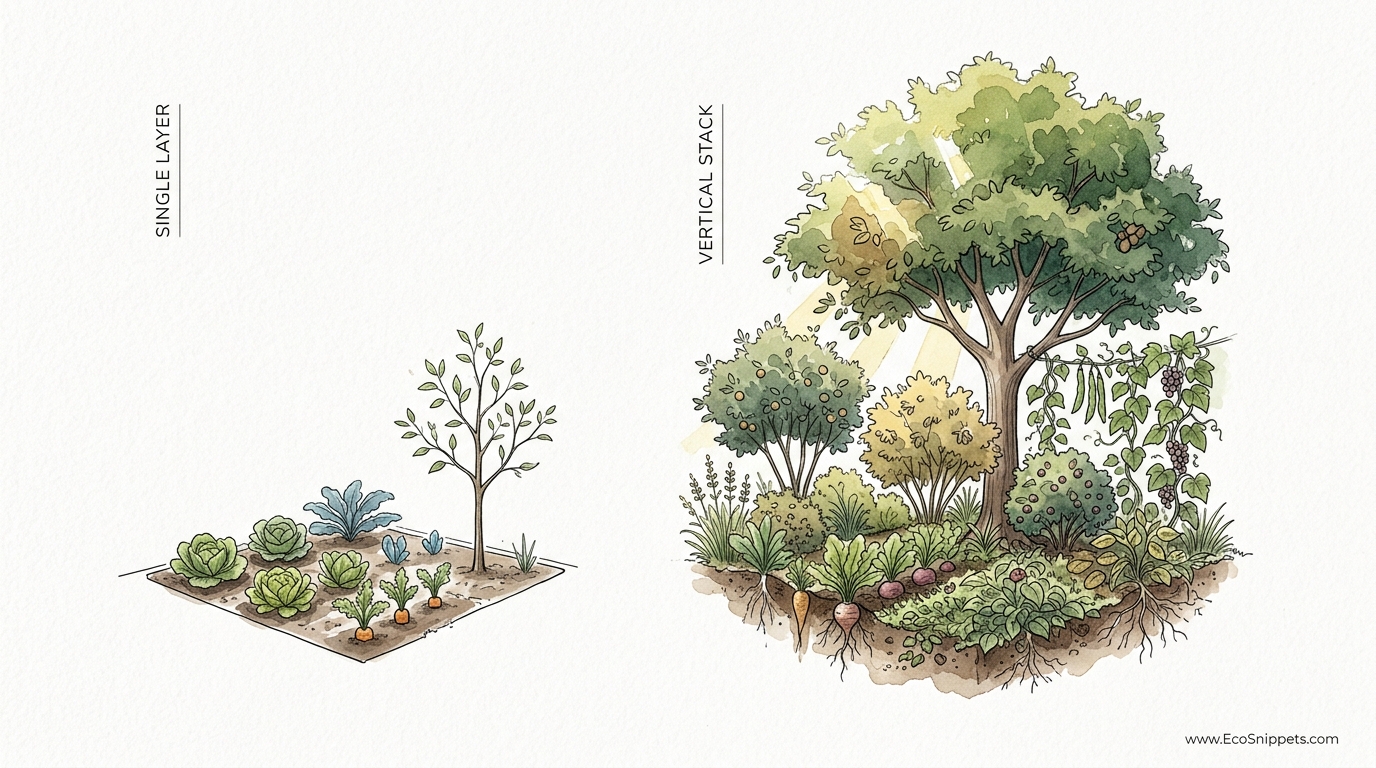
You don’t need a bigger backyard; you just need to start using the 3D space you already own. Traditional gardening thinks in 2D, but Permaculture thinks in layers. Why use a patch of land for just one crop when you can stack an overstory, understory, and groundcover in the exact same spot? It’s the multi-use strategy that turns tiny yards into massive food producers.
Most modern homeowners are trapped in a cycle of mowing grass and pulling weeds. This approach treats the soil like a blank canvas that must be kept empty except for a few isolated plants. It is a high-energy, high-maintenance way to live. Ancestral wisdom suggests a different path: the food forest. By mimicking the structure of a natural woodland, you can create a self-sustaining ecosystem that provides food, medicine, and beauty with a fraction of the long-term work.
This method isn’t just about planting more; it’s about planting smarter. When you look at a natural forest, nobody is out there with a bag of fertilizer or a garden hose, yet the growth is lush and abundant. This happens because every niche is filled. Sunlight is captured at different heights, and the soil is protected by a living carpet of greenery. By bringing these principles to your backyard, you transform a flat patch of grass into a productive, three-dimensional landscape.
Multi-layer Food Forest Design For Backyards
A multi-layer food forest is an edible ecosystem designed to mirror the structure of a young natural woodland. It is the pinnacle of permaculture design, where plants are chosen not just for their fruit, but for their role in the overall system. In a traditional garden, you might have a row of tomatoes. In a food forest, you have a tall nut tree, a smaller fruit tree beneath it, berry bushes around the trunk, and herbs and root crops filling the gaps at the bottom. It is vertical integration for the earth.
The concept relies on the seven-layer model popularized by Robert Hart and later expanded by permaculture pioneers like Bill Mollison. These layers work together to maximize photosynthesis and soil health. In the real world, this system is used everywhere from small urban lots in Seattle to ancient home gardens in the tropics. It exists to solve the problem of limited space and high input costs. Instead of fighting nature to keep a garden “tidy,” you guide nature toward a state of productive chaos.
Think of your backyard as a factory. In a 2D garden, only the ground floor is working. In a 3D food forest, every floor—from the basement (roots) to the penthouse (canopy)—is generating value. This strategy allows a homeowner on a 1/4 acre (1,000 m²) to grow as many as 300 different species, providing a diversity of nutrients that a monoculture patch could never match.
The Seven Layers of Abundance
To design a successful forest garden, you must understand the seven distinct layers that make up the system. Each layer occupies a specific vertical niche and serves a unique function in the ecosystem.
1. The Canopy Layer
This is the overstory, consisting of the tallest trees in your system. In a large backyard, these might be full-sized nut trees like Walnuts (Juglans spp.) or Chestnuts (Castanea dentata). In smaller urban spaces, the “canopy” might actually be a standard-sized fruit tree like a Pear (Pyrus communis) or a large Apple (Malus domestica). These trees provide the primary structure, wind protection, and shade for the layers below.
2. The Understory Layer
The understory, or sub-canopy, consists of smaller trees that thrive in the filtered light of the overstory. This is often the most productive layer for fruit. Examples include dwarf fruit trees, Pawpaws (Asimina triloba), or Mulberries (Morus spp.). These trees fill the 10 to 30 feet (3 to 9 meters) height range, bridging the gap between the tall canopy and the lower shrubs.
3. The Shrub Layer
This tier includes woody perennials that stay relatively close to the ground, usually between 3 and 15 feet (1 to 4.5 meters). Think of berry bushes like Blueberries (Vaccinium spp.), Currants (Ribes spp.), and Elderberries (Sambucus nigra). This layer is where you often find the highest “pounds per square foot” yield of nutrient-dense fruit.
4. The Herbaceous Layer
These are non-woody plants that die back to the ground each winter but return in the spring. This layer is home to culinary and medicinal herbs like Comfrey (Symphytum officinale), Yarrow (Achillea millefolium), and Sage (Salvia officinalis). Many of these plants act as “dynamic accumulators,” mining minerals from deep in the soil and making them available to the trees above.
5. The Groundcover Layer
This layer acts as a living mulch. Instead of buying wood chips every year, you plant low-growing, creeping plants like Alpine Strawberries (Fragaria vesca) or Creeping Thyme (Thymus praecox). These plants carpet the soil, suppressing weeds and retaining moisture by preventing the sun from baking the earth bare.
6. The Rhizosphere (Root) Layer
The “basement” of your forest includes plants grown for their edible roots and tubers. Sunchokes (Helianthus tuberosus), Garlic (Allium sativum), and Turmeric (Curcuma longa) live here. These plants utilize the space beneath the surface, breaking up compacted soil and providing a hidden harvest.
7. The Vertical (Vine) Layer
Climbing plants like Grapes (Vitis vinifera), Hardy Kiwis (Actinidia arguta), and Hops (Humulus lupulus) represent the final layer. They utilize the vertical trunks of the canopy and understory trees as trellises, reaching for the sun without taking up any extra footprint on the ground.
How to Design and Plant Your Food Forest
Creating a food forest is not about planting everything at once in a haphazard mess. It requires a staged approach that prioritizes long-term structure over immediate gratification. Follow these steps to ensure your backyard system survives and thrives.
Step 1: Site Observation and Sun Mapping
Spend a full season observing your yard before you dig a single hole. You need to know where the water pools during heavy rain and where the sun hits during the peak of summer. Most fruit trees require at least 6 hours of direct sunlight to produce well. Map out your “Sun Traps”—U-shaped clearings that open to the south (in the Northern Hemisphere) to capture the maximum amount of light and heat.
Step 2: Soil Preparation with Sheet Mulching
Do not till your soil. Tilling destroys the delicate fungal networks (mycelium) that fruit trees rely on for nutrient transport. Instead, use “sheet mulching” or “lasagna gardening.” Lay down a layer of cardboard to smother the grass, then pile on 6 to 12 inches (15 to 30 cm) of organic matter like wood chips, straw, and compost. This builds topsoil from the top down, mimicking the natural leaf fall of a forest floor.
Step 3: Planting the “Anchors”
Start with your canopy and understory trees. These are the most permanent elements and will define the microclimates of the rest of the garden. When you plant a tree, you aren’t just planting a single specimen; you are planting the center of a “guild.” A guild is a group of plants that support the central tree. For every fruit tree, you should plant at least two nitrogen-fixers (like Clovers or Alfalfa) and one dynamic accumulator (like Comfrey).
Step 4: Filling the Niche Layers
Once your trees are in the ground, move to the shrub and herbaceous layers. It is often recommended to plant all layers at once if you have the resources, as this prevents weeds from colonizing the empty spaces. However, if you are on a budget, focus on the groundcover first. Getting a living mulch established early will save you hundreds of hours in weeding later on.
Step 5: The “Chop and Drop” Maintenance
As your forest grows, your main job shifts from planting to pruning. In a permaculture system, we use “chop and drop.” When a nitrogen-fixing shrub or a thick-leaved herb like comfrey grows too large, you chop it back and leave the foliage right there on the ground. The leaves decompose, feeding the soil and the surrounding trees. You are essentially growing your own fertilizer.
Benefits of a Multi-layer System
The primary reason people choose a food forest over a traditional garden is resilience. Because the system is diverse, it is less susceptible to total failure. If a late frost kills the apple blossoms, you still have your summer berries, autumn nuts, and perennial root crops. You have built a diversified portfolio of food.
Efficiency of Space: By stacking plants vertically, you can produce three to five times more food per square foot than a conventional row garden. This is the only way to achieve true food security on a standard suburban lot.
Water Retention: The dense layering of plants and the thick mulch layer create a “sponge” effect. In a well-established food forest, the soil remains moist and cool even during a drought, significantly reducing your water bill.
Pest Management: Monocultures are a magnet for pests because they provide an all-you-can-eat buffet for specific insects. A food forest is a confusing maze for pests. The aromatic herbs in the herbaceous layer mask the scent of fruit trees, while the diversity of flowers attracts predatory insects like ladybugs and lacewings that keep pest populations in check naturally.
Challenges and Common Mistakes
The most frequent error is overplanting. When you buy a fruit tree from a nursery, it looks like a stick. It is tempting to plant four of them in a small space. However, you must design for the mature size of the tree. A standard apple tree can have a spread of 20 feet (6 meters). If you plant them too close, they will shade each other out, air circulation will drop, and fungal diseases will run rampant.
Another challenge is the “Chaos Phase.” For the first three to five years, a food forest can look like a patch of weeds to the uninitiated. Your neighbors might not understand why you aren’t mowing your lawn. To solve this, “make it look loved.” Add defined pathways, a stone border, or a garden bench. These “cues to care” signal that the wild growth is intentional and managed.
Neglecting Access: Many beginners forget to leave wide enough paths. You need to be able to get a wheelbarrow through the forest to add mulch or harvest heavy crates of fruit. Aim for primary paths that are at least 3 feet (1 meter) wide.
Limitations of the Food Forest Model
While food forests are incredibly productive, they are not a silver bullet for every situation. One major constraint is time to maturity. A traditional vegetable garden can give you a harvest in 60 days. A food forest is an investment that takes 3 to 7 years to start providing significant yields. If you are renting a house for only one year, a food forest is not the right strategy.
Environmental constraints also play a role. If your yard is in deep shade from a neighbor’s two-story house or a stand of ancient oaks, you cannot grow sun-loving fruit trees like peaches or cherries. You must work within the limits of your site. In deep shade, you may be restricted to mushrooms, ramps, and shade-tolerant greens.
Finally, there is the harvesting complexity. In an orchard, you harvest all the apples at once. In a food forest, things ripen at different times throughout the year. This requires a “foraging” mindset rather than a “farming” mindset. It takes more time to walk through the forest and pick a handful of different items every day than it does to harvest a single row of corn.
Comparison: Traditional Orchard vs. Food Forest
To help decide which approach fits your goals, consider the following differences between a managed monoculture (like a standard orchard) and a multi-layer food forest.
| Factor | Traditional Orchard | Food Forest |
|---|---|---|
| Species Diversity | Low (1–3 species) | High (30–100+ species) |
| Initial Setup Cost | Medium | High (more plants needed) |
| Maintenance Level | High (mowing, spraying, fertilizing) | Low (once established) |
| Yield per Plant | High (optimized for one crop) | Medium (shared resources) |
| Total System Yield | Medium | Very High (calories across all layers) |
| Resilience | Low (vulnerable to specific pests) | High (ecosystem balance) |
Practical Tips for Success
Start with Nitrogen Fixers: Do not wait to plant your support species. For every fruit tree, plant a nitrogen-fixing shrub like a Goumi Berry (Elaeagnus multiflora) or a Siberian Pea Shrub (Caragana arborescens). These plants pull nitrogen from the air and pump it into the soil through their roots, essentially acting as a permanent, slow-release fertilizer for your fruit trees.
Limb Up for Light: As your canopy trees grow, you can prune the lower branches to allow more light to reach the shrub and herbaceous layers. This is called “limbing up.” It keeps the air moving and ensures the lower stories don’t become unproductive “dead zones.”
Use Vertical Space First: If you have a fence, use it. A grapevine or a passionflower vine on a fence takes up zero floor space but can provide 50 pounds (22 kg) of fruit per year. This is the easiest way to start “stacking functions” in a small yard.
Advanced Considerations: Succession and Timing
Serious practitioners understand that a food forest is a moving target. It is a process of “succession.” In the beginning, your system will be dominated by sun-loving annuals and fast-growing pioneer trees. As the canopy closes, the environment will become shadier and more fungal-dominant.
Phase Your Planting: You don’t have to plant everything in Year One. Many experts suggest planting the canopy and the groundcover first. This secures the height and the floor. You can then spend years experimenting with the middle layers (shrubs and herbs) as you see how the light patterns change. This avoids “analysis paralysis” and gets the most important trees growing as soon as possible.
The 40-60 Rule: Aim for a canopy cover of roughly 40% to 60%. If your canopy is 100% closed, nothing will grow underneath. You want to see “dappled sunlight” on the forest floor during the middle of the day. If it becomes too dark, it is time to get out the saw and thin the canopy to let the life back in.
Example Scenario: The 1/4 Acre Temperate Food Forest
Imagine a standard suburban backyard in a temperate climate (USDA Zones 5–7). A homeowner decides to replace their lawn with a food forest. Here is how they might layer a 20′ x 20′ (6m x 6m) section of that yard:
- Canopy: One semi-standard Apple tree (Malus domestica).
- Understory: Two dwarf Plum trees (Prunus domestica) on the southern edge.
- Shrub: Three Blueberry bushes (Vaccinium) and one Goumi berry for nitrogen.
- Herbaceous: A ring of Comfrey around the apple tree drip line, interspersed with Lemon Balm and Echinacea.
- Groundcover: A thick carpet of White Clover (Trifolium repens) and Alpine Strawberries.
- Rhizosphere: Sunchokes planted on the northern boundary and Garlic tucked between the herbs.
- Vertical: A Hardy Kiwi vine (Actinidia arguta) climbing a sturdy wooden fence on the property line.
In this single 400 square foot (37 m²) area, the homeowner is now producing fruit, nuts, berries, medicine, and root vegetables. In a traditional garden, that same space might only hold four or five tomato plants and some zucchini.
Final Thoughts
Building a food forest is an act of quiet rebellion against a food system that is increasingly fragile and disconnected from nature. It is a way to reclaim your land and turn it into a legacy. By thinking in layers, you aren’t just growing food; you are building a self-repairing engine of abundance that will continue to produce long after you have stopped working it.
Start small. Plant one tree and surround it with its “helpers”—the shrubs, herbs, and groundcovers that will keep it healthy. As you watch that small guild thrive, you will gain the confidence to expand. The 3D space in your backyard is waiting to be filled. You don’t need more land; you just need to look up.
The transition from a flat lawn to a multi-dimensional forest is a journey of observation and partnership with the earth. It requires patience and a willingness to embrace a little bit of wildness. But the reward—a backyard that feeds you, shades you, and heals the soil—is worth every bit of the effort. Begin today, and in a few years, you’ll be walking through your own personal Eden, harvesting the fruits of your foresight.
