
How To Become More Self-Sufficient Without Starting a Full-Blown Farm…
Want to start preserving your harvest, making your own soap, or building a backyard root cellar — but not sure where to begin? “Homesteading Advice” gives you instant lifetime access to 35+ practical homesteading books on food preservation, veggie gardening, DIY natural cleaning products (save over $250 per year with this skill alone), brewing, off-grid energy, and a whole lot more…
Click Here To Check It Out Now!
Modern engineering tries to get rid of water; ancient wisdom knows how to make it stay and power the landscape. When it rains, most people try to hide the water in pipes. Ancient Incan and Zuni farmers did the opposite. They used ‘Check Dams’ and terraces to integrate the energy of the rain into the soil. This creates a hydrated landscape that grows food even during a 3-month drought. Stop treating water like a nuisance and start treating it like a resource.
If you look at a modern housing development, you will see a network of concrete gutters, plastic pipes, and storm drains designed for one purpose: high-velocity removal. The goal is to get every drop of rain off the property as fast as possible. This approach is efficient for preventing immediate puddles, but it is catastrophic for the long-term health of the land. It turns living soil into a dry, hydrophobic brick and sends valuable topsoil downstream to clog up rivers.
In contrast, the “Check Dam” is a humble, low-tech structure that reverses this trend. It is essentially a small, leaky barrier placed across a channel or a gully. Its job is not to stop the water entirely, but to “check” its speed. By slowing the flow, you allow the water to drop its sediment and, more importantly, you give it the time it needs to soak deep into the earth. This is the foundation of a resilient, self-watering landscape.
How To Use Check Dams For Free Irrigation
A check dam is a small structure built across a swale, drainage ditch, or gully to reduce the velocity of concentrated water flow. While it may look like a pile of rocks or a fallen log, it is a precision tool for hydrological management. Historically, civilizations like the Zuni in what is now the American Southwest and the Incas in the high Andes used these structures to turn seasonal runoff into a year-round hydration system.
The Zuni people developed a sophisticated method of “runoff farming.” They didn’t rely on massive rivers; instead, they built small, temporary check dams made of brush, soil, and logs along the natural drainage paths of the high desert. When the monsoons hit, these dams would slow the rushing water and spread it out across “waffle gardens” and terraced fields. This didn’t just water the crops; it deposited rich silt that replenished the soil’s fertility year after year.
The Incan Empire took this concept to a monumental scale. At sites like Tipón, near Cusco, Peru, they engineered stone-lined channels and series of check-dam-like weirs that split and recombined water with mathematical precision. These systems were built at altitudes of 3,500 meters (11,500 feet), where water management was the difference between a thriving empire and starvation. They understood that water is energy, and a check dam is the most effective way to harvest that energy for the benefit of the soil.
In a modern context, you can use these same principles on a small homestead or a large farm. Whether you are dealing with a dry creek bed that only flows during storms or a new gully forming in a pasture, a check dam acts as a passive irrigation system. It recharges the groundwater table (the “water bank” beneath your feet) and keeps the surrounding vegetation green long after the rains have stopped.
How It Works: The Physics of Hydration
To build an effective system, you must understand the two primary forces at play: velocity and infiltration. Water’s ability to erode soil increases exponentially with its speed. When water moves quickly, it has the kinetic energy to pick up soil particles and carry them away. This process creates a “vicious cycle” where a small gully becomes deeper, which concentrates more water, which increases the speed, which makes the gully even deeper.
A check dam breaks this cycle by creating a series of “pools and drops.” Instead of water rushing down a 10% slope for 100 meters (328 feet), it hits a check dam and pools up. This pooling effectively flattens the slope. The water then spills over the dam into a protected “apron” before moving to the next dam. By dividing one long, steep drop into several small, flat segments, you drastically reduce the water’s erosive power.
The secondary effect is infiltration. When water is moving at 2 meters per second (6.5 feet per second), it has zero chance of soaking into the ground. When it is held behind a check dam in a “leaky” reservoir, it begins to seep vertically into the soil and horizontally into the banks. This creates a “plume” of moisture in the earth. If you have a series of check dams, these plumes overlap, creating a sub-surface reservoir of water that the roots of your trees and crops can tap into during the dry season.
Choosing Your Materials
You don’t need a degree in civil engineering or a massive budget to build a check dam. In fact, the best materials are often the ones already on your land.
- Loose Rock: The most durable and permanent option. Use a mix of sizes, from large “anchor” stones (25-30 cm / 10-12 inches) to smaller “chinking” stones.
- Brush and Branches: Excellent for small gullies with low flow. You can pack a gully with branches, ensuring the “butt ends” face upstream. This traps sediment effectively and eventually turns into a soil-filled terrace.
- Logs: Best for wider, shallower channels. Logs must be “keyed” into the banks (buried at the ends) to prevent the water from simply washing around them.
- Gabions: These are wire mesh cages filled with rocks. They are ideal for high-flow areas where loose rocks might be swept away.
- Earth and Sod: Used primarily by the Zuni, these require more maintenance but are excellent for creating temporary irrigation diversions.
Step-By-Step Construction: The Rock Check Dam
The rock check dam is the gold standard for most practitioners. It is resilient, looks natural, and improves with age as plants grow through the cracks.
- Site Selection: Identify a channel where water concentrates. Look for “headcuts” (where the soil is dropping off) or existing gullies.
- The Keyway: This is the most important step. You must dig a trench roughly 15-30 cm (6-12 inches) deep into the bottom and the sides of the channel. This “keys” the dam into the earth so water cannot flow under or around it.
- Base Layer: Place your largest stones into the keyway. These are your foundation. If the soil is very sandy or silty, you may want to lay a piece of non-woven geotextile fabric down first to prevent the soil from migrating through the rocks.
- Building the Weir: Continue stacking rocks in a “trapezoidal” shape. The dam should be wider at the base than at the top. A good rule of thumb for side slopes is 2:1 (for every 2 units of width, 1 unit of height).
- The Center Notch (Spillway): The center of your dam must be lower than the ends. Aim for a center that is 15-20 cm (6-8 inches) lower than where the dam meets the banks. This ensures that when the water overflows, it stays in the center of the channel rather than cutting into the vulnerable side banks.
- The Apron: On the downstream side of the dam, place a flat layer of rocks (an “apron”). This prevents the falling water from scouring a hole at the base of your dam, which would eventually cause it to collapse.
Benefits and Advantages of Check Dams
The immediate benefit of a check dam is erosion control, but for the serious practitioner, the long-term advantages are far more profound. By installing these structures, you are essentially “terraforming” your landscape into a sponge.
1. Groundwater Recharge: Studies have shown that a well-designed series of check dams can increase groundwater recharge by up to 15-20% compared to an untreated landscape. In arid regions like Rajasthan, India, the traditional “johads” (small earthen check dams) have revitalized entire villages by bringing dried-up wells back to life.
2. Soil Building: Every time it rains, your check dam traps sediment. This is often the most fertile topsoil from further up the watershed. Over time, the area behind the dam will fill in, creating a flat, nutrient-rich “bench” of soil. This is the perfect place to plant high-value crops or fruit trees that require consistent moisture and good fertility.
3. Extended Growing Season: Because the soil behind and around the check dam stays hydrated longer, the vegetation remains active into the dry season. This “green strip” effect provides forage for livestock and habitat for beneficial insects and wildlife when the rest of the landscape is brown and dormant.
4. Flood Mitigation: While one small dam won’t stop a massive flood, a thousand small dams across a watershed can significantly lower the “peak flow” of a storm event. By slowing the water down and making it “take the stairs” instead of the “elevator,” you protect downstream neighbors and infrastructure.
Challenges and Common Mistakes
Building a check dam is simple, but it is not “set it and forget it.” Many beginners fail because they underestimate the power of moving water.
Building Too High: This is the most common error. A check dam should rarely be higher than 60 cm (24 inches). If you build it too high, the water pressure behind it becomes immense, and the drop on the downstream side becomes too powerful. It is always better to build three small dams (30 cm / 12 inches tall) than one large dam (90 cm / 36 inches tall).
Ignoring the Spillway: If the top of your dam is perfectly flat, the water will find the path of least resistance, which is usually the soft soil of the banks. Once the water starts “outflanking” the dam, it will quickly carve a new channel around your structure, leaving it high and dry like a useless monument. Always ensure the center is lower than the sides.
Poor Spacing: Check dams work as a system. If they are spaced too far apart, the water gains too much speed between them. The “gold standard” for spacing is the “Head-to-Toe” rule: the base (toe) of the upstream dam should be at the same elevation as the spillway (head) of the downstream dam. This ensures that the water is always in a state of “slow” as it moves down the system.
Failure to Key-In: If you just pile rocks on top of the grass, the water will eventually wash away the soil underneath them. This is called “piping.” By the second or third big storm, your dam will be sitting on air, and the water will be flowing underneath it. You must dig that foundation trench.
Limitations: When Check Dams Are Not Ideal
While check dams are a powerful tool, they are not a universal solution for every drainage problem. There are specific environmental and practical boundaries you must respect.
First, check dams are not intended for “live” perennial streams. If a creek flows year-round, it has its own established ecology and sediment transport system. Placing check dams in a live stream often requires complex environmental permits and can disrupt fish passage and aquatic habitats. These structures are best suited for ephemeral (seasonal) channels, gullies, and swales.
Second, consider the slope. On extremely steep slopes (greater than 20-30%), check dams must be placed so close together that they essentially become a continuous stone-lined channel. In these cases, it may be more effective to use other techniques like “fascines” (bundles of live willow cuttings) or heavy-duty terracing.
Finally, consider the flow volume. If you are at the bottom of a 400-hectare (1,000-acre) watershed, the sheer volume of water during a 100-year storm event will likely destroy a hand-built rock check dam. These structures are most effective in “first and second-order” catchments—the small fingers of the watershed where the water is just beginning to concentrate.
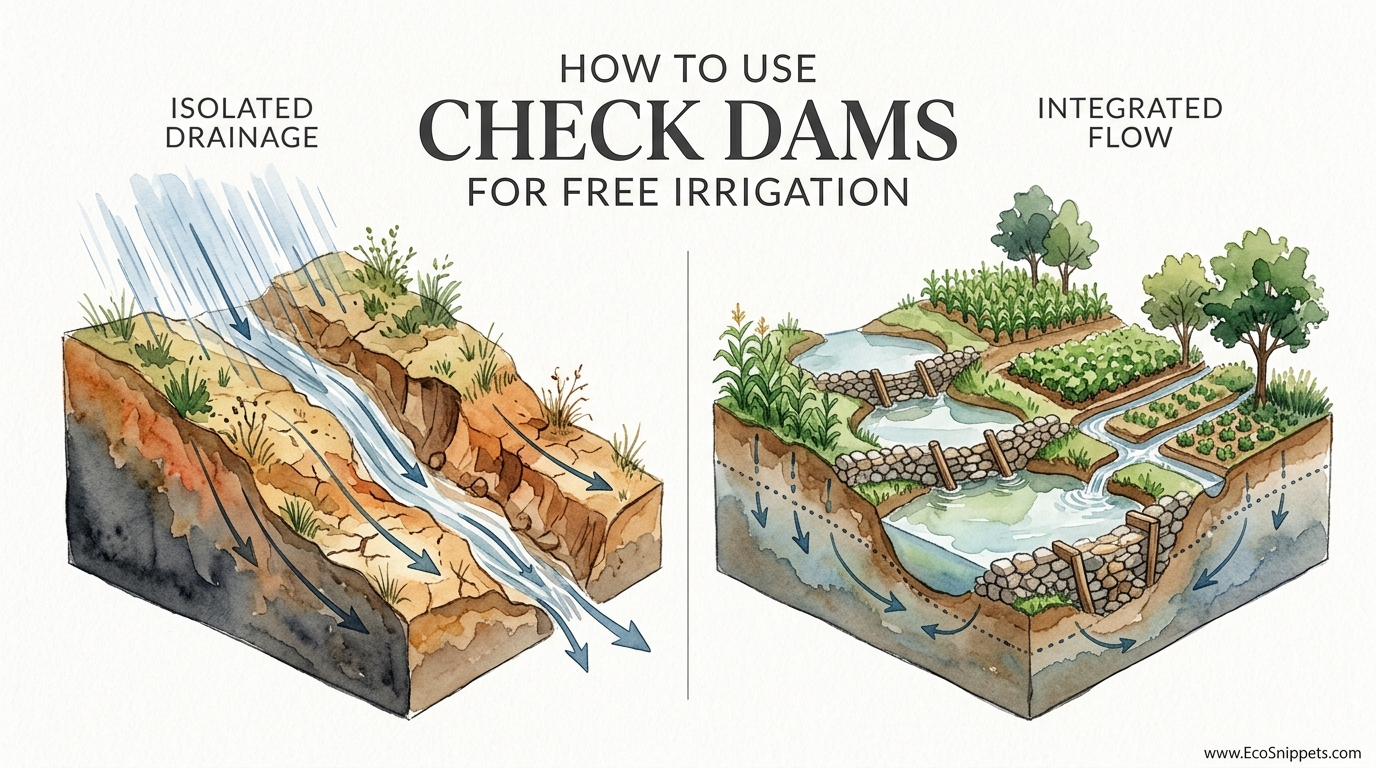
Isolated Drainage vs. Integrated Flow
To understand why check dams matter, it helps to compare the modern approach of “Isolated Drainage” with the ancestral approach of “Integrated Flow.”
| Factor | Isolated Drainage (Modern) | Integrated Flow (Check Dams) |
|---|---|---|
| Primary Goal | Removal of water from site. | Infiltration and hydration of site. |
| Material Cost | High (Concrete, PVC, Steel). | Low (Rock, Logs, Brush). |
| Maintenance | Occasional (Clearing debris). | Frequent (Sediment management). |
| Environmental Impact | Dehydrates landscape; downstream flooding. | Hydrates landscape; builds soil. |
| Skill Level | Professional Engineering required. | Simple principles; DIY-friendly. |
The modern system treats water as a liability. The integrated system treats it as an asset. When you isolate drainage, you are essentially throwing away a free resource and then paying for municipal water or pumping groundwater later. When you integrate flow, you are letting the rain do the work for you.
Practical Tips and Best Practices
If you are ready to start building, keep these best practices in mind to ensure your system survives the first decade.
- Use “One-Man Rocks”: Unless you have heavy machinery, use stones that you can lift and place by hand. This allows for tighter “chinking” (filling small gaps with small stones), which makes the dam much stronger.
- Incorporate Vegetation: Once your dam is built, plant moisture-loving species like willow, elderberry, or native grasses just upstream and on the banks. The roots will weave into the rocks and soil, “locking” the dam into place.
- Monitor After Storms: Go out during or immediately after the first few rain events. Look for where the water is going. If it’s trying to go around the sides, add more rocks to the wing walls. If it’s scouring the bottom, add more stones to the apron.
- Manage Your Sediment: As the area behind the dam fills with soil, you have two choices: leave it to become a permanent terrace, or shovel it out and use it in your garden. If you want to keep the “pool” for water storage, you must periodically remove the silt.
Advanced Considerations: The Manning Formula
For those looking to scale up or work in high-stakes areas, it helps to understand the basic math behind water flow. Engineers use “Manning’s Equation” to calculate the velocity of water in a channel. The formula is:
V = (1/n) * R^(2/3) * S^(1/2)
Where:
- V: Velocity
- n: Roughness coefficient (how “bumpy” the channel is)
- R: Hydraulic radius (shape of the channel)
- S: Slope (the steepness)
As a practitioner, you can control two of these variables: Roughness (n) and Slope (S). A check dam increases the “roughness” of the channel by adding obstructions, and it decreases the “slope” by turning one long incline into a series of flat pools. By manipulating these variables, you can precisely control how much energy the water has when it reaches the bottom of your property.
Example Scenario: Rehabilitating a 50-Meter Gully
Imagine you have a 50-meter (164-foot) gully on your property with a 6% slope. Left untreated, every rainstorm carves it deeper.
To treat this using the “Head-to-Toe” rule:
1. You decide on a check dam height of 0.5 meters (1.6 feet or 20 inches).
2. With a 6% slope, the water drops 0.06 meters for every 1 meter of distance.
3. To find the spacing (S), divide the height (h) by the slope (s): S = h / s.
4. 0.5 / 0.06 = 8.33 meters.
You will need roughly 6 check dams spaced every 8 meters (26 feet) along the gully. By the time the water reaches the bottom, it will have been “reset” to zero velocity six different times. Instead of a rushing torrent, you have a gentle series of cascades that soak the surrounding land. Within two seasons, that bare, eroding gully will likely be a lush, green ribbon of vegetation.
Final Thoughts
The check dam is more than just a pile of rocks; it is a statement of intent. It is an acknowledgment that we are not separate from the hydrological cycle, but a part of it. By choosing to slow, spread, and sink the rain, we are practicing the same “ancestral wisdom” that allowed the Incas and the Zuni to thrive in environments that would baffle a modern civil engineer.
This approach requires a shift in perspective. You must stop looking for the “drain” and start looking for the “sponge.” It requires a bit of manual labor—moving rocks, digging keyways, and observing the flow—but the reward is a landscape that grows more resilient with every passing year.
Start small. Find one eroding path on your land and build one well-designed check dam. Watch how it behaves during a storm. See the silt it traps and the plants that begin to colonize the damp soil behind it. Once you see the transformation, you will never look at a rainstorm as a “nuisance” again. You will see it as the gift of life, and you will know exactly how to make it stay.
