How To Become More Self-Sufficient Without Starting a Full-Blown Farm…
Want to start preserving your harvest, making your own soap, or building a backyard root cellar — but not sure where to begin? “Homesteading Advice” gives you instant lifetime access to 35+ practical homesteading books on food preservation, veggie gardening, DIY natural cleaning products (save over $250 per year with this skill alone), brewing, off-grid energy, and a whole lot more…
Click Here To Check It Out Now!
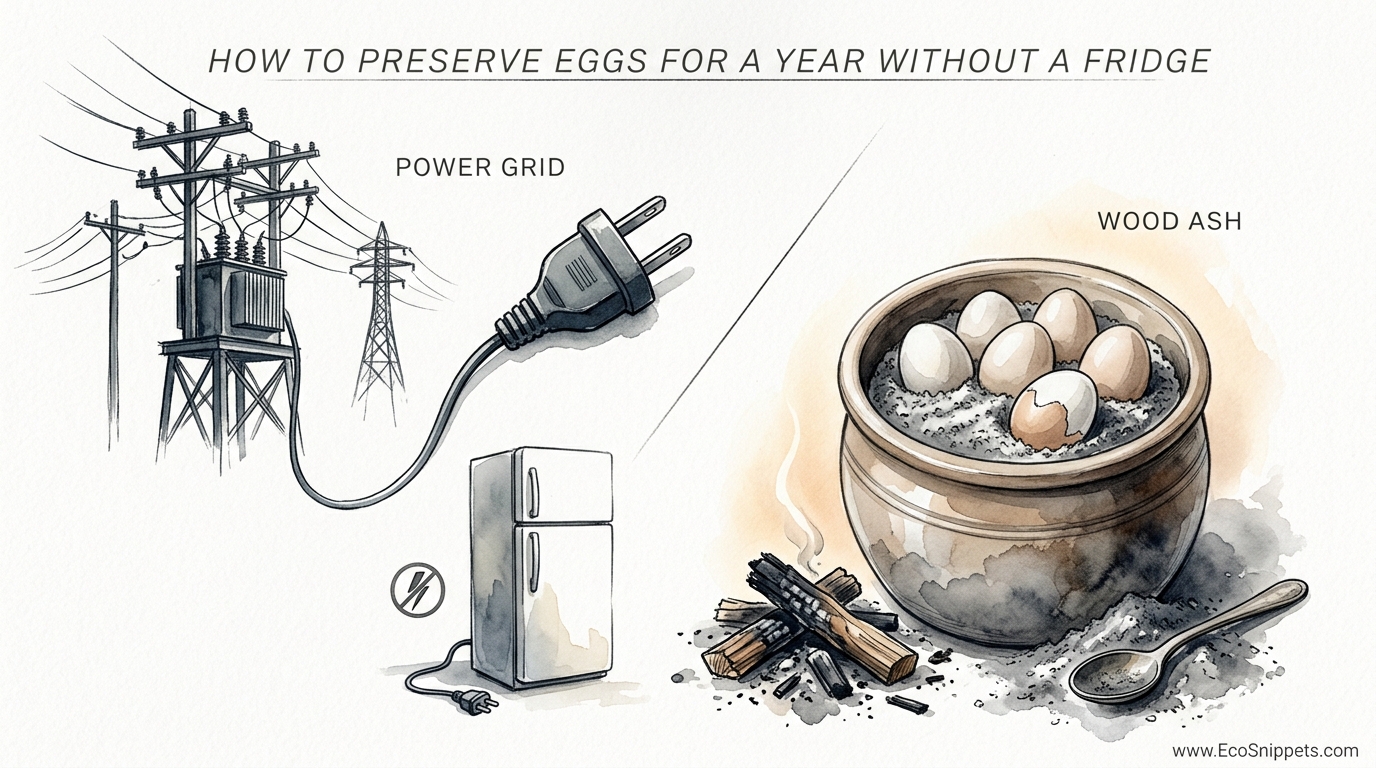
See how a simple bucket of fireplace ‘waste’ can keep your eggs fresh for 8 months with zero electricity. We’ve been taught that eggs belong in a cold box that costs $15 a month to run. But our ancestors knew a secret hidden in the fireplace. By using the natural alkaline properties of hardwood ash, you can create a protective ‘shield’ that prevents spoilage for nearly a year. No grid, no batteries, and no expiration dates—just pure ancient logic.
Modern convenience has a way of making us forget the skills that kept humanity thriving for millennia. We rely on a humming refrigerator to keep our basic staples safe, yet that very reliance creates a point of failure. If the power falters, the timer on your food security starts ticking down immediately. Understanding how to use the resources already present on your homestead, like the leftover gray powder from your woodstove, changes the game entirely.
This method isn’t just a survival trick; it’s a masterful application of chemistry. Hardwood ash contains minerals that naturally ward off the microscopic threats that cause food to decay. When you pack eggs into this medium, you are stepping away from the fragile infrastructure of the 21st century and into a world of self-sufficiency. It is about reclaiming control over your pantry and ensuring that your family has high-quality protein even when the hens take their winter break.
Learning this technique requires a bit of patience and a shift in perspective. You aren’t just “storing” eggs; you are creating a stable micro-environment that halts the aging process. This guide will walk you through the nuances of selecting the right ash, preparing your eggs, and managing your “ash-cellar” for maximum longevity. Whether you are an experienced homesteader or a curious beginner, the logic of the fireplace remains as sound today as it was three hundred years ago.
How To Preserve Eggs For A Year Without A Fridge
Egg preservation in wood ash is a traditional technique used to extend the shelf life of fresh eggs by utilizing the chemical and physical properties of hardwood residue. For centuries, farmers and pioneers throughout Europe, Asia, and North America relied on this method to bridge the gap between the high-production months of spring and the lean months of winter. It is a dry-storage method that stands in contrast to “water glassing” (using a liquid lime solution) or mineral oil coating.
The core of this method lies in the high alkalinity of the ash. Freshly burned hardwood produces ash with a pH level typically between 10 and 12. This level of alkalinity is naturally hostile to bacteria, fungi, and other pathogens that would otherwise penetrate the porous shell of an egg. In addition to chemical protection, the fine particles of the ash act as a physical sealant, filling the microscopic pores of the shell and preventing the exchange of gases that leads to oxidation and spoilage.
In real-world terms, this process mimics the way a time capsule works. You are placing the egg in a medium that is both dry and chemically stable. Unlike salt, which can draw moisture out of the egg and cause the contents to shrink or become “rubbery,” wood ash maintains a more neutral moisture balance. This ensures that when you finally crack the egg open eight months later, the yolk remains intact and the white stays fluid enough for traditional cooking and baking.
Historical records show that this method was often the preferred choice for sailors and travelers. A crate of eggs packed tightly in sifted ash could withstand the vibrations of a wagon or the rolling of a ship without breaking. Because the ash is soft and lightweight, it provides a natural cushion, making it a dual-purpose tool for both preservation and transportation. It is the ultimate example of a “waste” product being repurposed into a vital asset for survival.
How the Chemistry of Ash Protects Your Harvest
Understanding the “why” behind ash preservation is just as important as knowing the “how.” The eggshell is not a solid wall; it is a semi-permeable membrane with thousands of tiny pores designed to let a developing chick breathe. These pores are also the entry point for oxygen, which causes the egg to age, and bacteria, which causes it to rot. To keep an egg fresh, you must seal these pores without introducing toxins.
Hardwood ash is rich in potassium carbonate and calcium carbonate. When these minerals come into contact with the moisture on the surface of the egg (even the trace amounts in the air), they create a surface environment that is highly basic. Bacteria like Salmonella or E. coli cannot survive in high-pH environments. This chemical barrier keeps the exterior of the egg sterile throughout the storage period.
The physical structure of the ash provides a second layer of defense. Because the ash is so fine—especially when sifted through a tight mesh—it settles into every microscopic nook of the shell. This “plugs” the pores, significantly slowing down the evaporation of the water inside the egg. This is why eggs preserved in ash don’t develop the large air pockets common in old, refrigerated eggs. They stay heavy and full, preserving the internal texture for months on end.
Temperature management remains a factor, even with the protection of ash. While the ash provides a buffer, storing your container in a cool, dark place like a basement or root cellar is ideal. The chemical reactions that lead to spoilage are slowed by cold temperatures. By combining the alkalinity of the ash with a cool environment, you create a “suspended animation” effect that keeps the egg’s biological clock from ticking.
Step-by-Step: The Sifting and Packing Process
Executing this method correctly starts with your fire. Use only hardwood like oak, maple, hickory, or ash for your fuel. Avoid pine, fir, or other softwoods, as their resins can impart a “turpentine” flavor to the eggs and do not provide the same mineral profile. Ensure the wood was untreated and free of paints, stains, or chemical fire-starters. Once the fire has completely cooled, you can begin the collection process.
1. Sifting the Ash
Fresh ash from the stove is often full of small chunks of charcoal and unburnt wood. These “clinkers” can put uneven pressure on the eggshells and cause breakage. Use a fine wire mesh sifter or a kitchen sieve to process the ash until it is a smooth, flour-like powder. This step is non-negotiable, as the fine texture is what allows the ash to seal the egg’s pores effectively. Wear a mask during this process to avoid inhaling the fine dust.
2. Selecting the Eggs
Only use the freshest eggs available—ideally those laid within the last 24 to 48 hours. The most critical rule is that the eggs must be unwashed. Every egg is laid with a natural protective coating called the “bloom” or cuticle. Washing the egg removes this first line of defense and introduces water into the pores, which can lead to internal spoilage. Check each egg for hairline cracks; a single broken egg in your container can create a mess and potentially spoil the surrounding batch.
3. The Layering Technique
Choose a sturdy container such as a ceramic crock, a wooden box, or a food-safe plastic bucket. Start by pouring a 5 cm (2 inch) layer of sifted ash at the bottom. Place the eggs into the ash with the pointed end facing down. This orientation keeps the air cell at the blunt end of the egg, which helps prevent the yolk from touching the shell and sticking. Ensure the eggs are not touching each other or the sides of the container.
4. Sealing the Batch
Gently pour more ash over the eggs until they are completely covered by at least 3 cm (1 inch) of powder. You can continue adding layers of eggs and ash until the container is full. Once the final layer is in place, give the container a very gentle shake to help the ash settle into any gaps. Cover the container with a lid to keep out moisture and pests. Label the container with the date so you can track the age of the batch.
The Practical Benefits of Ash Preservation
Choosing wood ash over modern refrigeration or even other traditional methods like salt-curing offers several distinct advantages. The most obvious is the cost. If you heat your home with wood or enjoy occasional bonfires, your preservation medium is entirely free. This eliminates the need for expensive specialized products like sodium silicate or food-grade mineral oils, making it a truly “zero-cost” survival skill.
Reliability is the second major benefit. Mechanical systems fail, and liquid-based preservation methods can be messy or prone to evaporation. A dry bucket of ash is stable. It doesn’t require monitoring of water levels or checking for mold in a brine. As long as the container stays dry and the ash was properly sifted, the system works passively. This “set it and forget it” nature is highly valued in a busy homestead environment.
Environmental impact is also worth considering. Traditional refrigeration is one of the most energy-intensive appliances in a home. By moving a portion of your food storage to an ash-based system, you reduce your carbon footprint and decrease your dependence on the electrical grid. In a long-term power outage, this skill ensures that your most nutrient-dense food source remains viable while others are forced to throw away their spoiled stocks.
Flavor retention is surprisingly high with this method. Unlike pickling, which drastically changes the chemistry and taste of the egg, ash-packing keeps the egg in its raw, “fresh” state. While some users report a very slight “earthy” hint after many months, the eggs remain suitable for everything from morning omelets to delicate cakes. This versatility makes it superior to methods that permanently alter the culinary use of the egg.
Challenges and Common Pitfalls to Avoid
Success with ash preservation isn’t guaranteed if you cut corners. The most common mistake is using ash that contains contaminants. If you burn trash, cardboard with heavy inks, or treated lumber in your stove, those chemicals will reside in the ash. Because eggshells are porous, these toxins can migrate into the egg itself. Stick strictly to clean, natural hardwood to ensure your food stays safe for consumption.
Moisture is the enemy of this system. If the ash becomes damp, it loses its ability to seal the pores and can actually encourage the growth of mold. This is why storing the container in a humid environment without a tight lid is a recipe for failure. Always ensure your ash is bone-dry before you begin packing, and if you live in an extremely humid climate, consider adding a layer of dry sand or a desiccant pack to the top of the container.
Egg cleanliness is another area where people stumble. While you must not wash the eggs, you also shouldn’t pack eggs that are covered in heavy manure or mud. Dirt introduces a massive bacterial load that even high-pH ash might struggle to neutralize. Select only the cleanest eggs from the nesting box. If an egg has a small smudge, gently buff it off with a dry, abrasive pad rather than using any liquid.
Patience is required during the “unearthing” process. When you are ready to use an egg, you must find it without cracking the others. Digging haphazardly into the ash can lead to “clinking” eggs together, causing breakage. Use a large spoon or your hand to gently feel for the eggs. Once removed, the egg will be covered in fine dust. Always wash the egg thoroughly just before cracking it to ensure no ash falls into your bowl.
Limitations and Realistic Constraints
While wood ash is a powerful tool, it is not a magic bullet. The success rate for ash-preserved eggs is generally cited between 60% and 80% after eight months. This means that out of a dozen eggs, you might find one or two that have lost their quality or developed an off-smell. This is higher than the failure rate for refrigerated eggs, but significantly better than leaving them on the counter. Always perform the “float test” before using an old egg.
The “runny yolk” phenomenon is another limitation to be aware of. As eggs age, the proteins in the white (albumen) naturally break down and become more watery. The yolk membrane also weakens. This happens in ash just as it does in the fridge, though at a different rate. If you are looking for a firm, “perky” fried egg, an ash-preserved egg that is six months old might disappoint you. These eggs are best utilized for baking, scrambles, or quiches where the texture of the raw yolk is less critical.
Availability of the right material can be a barrier for urban dwellers. If you do not have access to a woodstove or a clean source of hardwood, you cannot safely perform this method. Buying “barbecue ash” or commercial charcoal briquette ash is not recommended, as these often contain coal dust or chemical binders. This method is truly a “pioneer” skill that thrives in environments where wood heat is a standard part of life.
Flavor transfer is a subtle but real factor. Hardwood ash has a distinct, smoky scent. Over several months, a small amount of this aroma may penetrate the shell. For most people, this is unnoticeable once the egg is cooked, but those with very sensitive palates might detect it. If this is a concern, the “advanced” technique of coating the eggs in a thin layer of lard before ash-packing can act as an additional flavor barrier.
Comparison: Ash Packing vs. Other Methods
When deciding how to store your surplus, it helps to see how wood ash stacks up against other popular off-grid techniques. Each method has a trade-off between cost, complexity, and the final quality of the egg.
| Method | Medium | Shelf Life | Cost | Primary Drawback |
|---|---|---|---|---|
| Wood Ash | Dry Sifted Ash | 6–9 Months | Zero | Slight flavor change; messy to handle. |
| Water Glassing | Hydrated Lime & Water | 12–18 Months | Low | Requires water & specialized lime. |
| Mineral Oil | Food-grade Oil | 6–9 Months | Moderate | Eggs can become greasy; oil may go rancid. |
| Salt Packing | Coarse Dry Salt | 2–4 Months | High | Dehydrates the egg; yolk becomes hard. |
As seen above, wood ash is the champion of cost-efficiency. While water glassing (slaked lime) often provides a slightly longer shelf life and better texture, it requires a steady supply of clean water and specific “pickling lime.” For a true “no-grid” scenario where resources are limited to what you can produce on-site, the ash method is the most sustainable option.
Practical Tips for Success
Refining your technique can make the difference between a successful batch and a wasted one. Implementing these small adjustments will help you master the craft of ash preservation quickly.
- The Float Test: Before using any preserved egg, place it in a bowl of water. If it sinks to the bottom and stays flat on its side, it is very fresh. If it stands on one end but stays on the bottom, it is aging but safe to eat. If it floats to the surface, discard it immediately. This indicates the air pocket has grown large enough to signal spoilage.
- Rotate Your Stock: Don’t just pack one giant container. Use several smaller buckets and label them by the month. This allows you to use the oldest eggs first and prevents you from disturbing hundreds of eggs just to find a few for breakfast.
- Temperature Stability: Fluctuating temperatures cause the air inside the egg to expand and contract, which can “breathe” bacteria through the shell. A consistent 10°C to 15°C (50°F to 60°F) is much better than a place that is cold at night and hot during the day.
- The Ash Mix: Some practitioners find that mixing 10% dry sand with the ash helps the mixture settle more firmly around the eggs, providing better physical support and preventing them from shifting during storage.
- Egg Color: While there is no scientific proof that one color stores better than another, many homesteaders find that thick-shelled breeds like Rhode Island Reds or Marans produce eggs that hold up better in ash than thin-shelled commercial leghorn eggs.
Advanced Considerations: The Lard-Ash Hybrid
If you want to push the preservation time toward the 12-month mark, you can utilize a hybrid method. This involves lightly coating each unwashed egg in a thin layer of rendered animal fat (lard) or beeswax before burying them in the ash. The fat acts as an airtight primary seal, while the ash provides the alkaline environment and secondary physical protection. This dual-barrier approach was a common practice in 18th-century Europe.
Scaling this for a large family requires planning. A single hen typically lays about 250 eggs a year, with the vast majority coming in the spring and summer. To have a dozen eggs a week through the four months of winter, you need to preserve roughly 200 eggs during the peak season. This would require approximately four 20-liter (5-gallon) buckets of sifted ash. Start collecting and sifting your ash in February so you are ready when the spring “egg explosion” begins.
Thinking about the mineral content of your wood is another “pro-level” step. Oak and Hickory are prized not just for their heat, but for the high potassium content in their ash. Fruitwoods like apple or cherry are excellent as well, though they produce a slightly less alkaline ash. Avoid using ash from a “pellet stove” unless you are certain the pellets are 100% hardwood with no chemical binders or additives.
Scenario: The Winter Baking Surplus
Imagine it is mid-January in a northern climate. Your hens have almost completely stopped laying due to the short days, and the local store is sold out of eggs because of a supply chain disruption. In your cool basement sits a ceramic crock you packed in late June when your birds were producing five dozen eggs a week.
You reach into the soft, gray powder and pull out six heavy eggs. After a quick rinse under the tap to remove the dust, they look exactly like they did the day they were laid. You crack them into a bowl; the yolks are dark orange and firm, and while the whites are a bit thinner than a “day-of” egg, they whisk up perfectly for a batch of sourdough pancakes and a pound cake. This isn’t just theory—this is the reality of homestead security. You’ve bypassed the grocery store and the power grid using nothing but logic and a byproduct of your winter heating.
In this scenario, the “float test” confirms all six eggs are safe. The peace of mind that comes from knowing you have hundreds of eggs “in the bank” cannot be overstated. It transforms the way you manage your flock, allowing you to keep your hens through the winter without feeling the “pressure” of their low production. You are eating the sun-drenched nutrition of June in the dark heart of January.
Final Thoughts
Mastering the use of hardwood ash for egg preservation is a bridge to a more resilient lifestyle. It proves that we don’t always need complex technology to solve fundamental problems. By observing the natural laws of chemistry and biology, our ancestors developed a system that is as effective today as it was centuries ago. It is a quiet, powerful act of defiance against a fragile, “just-in-time” food system.
Experimentation is the best teacher. Start by preserving just one dozen eggs this spring. Check one each month to observe the changes in texture and flavor. Once you see the results for yourself, the fear of “refrigerator-free” storage fades away, replaced by the confidence of a practitioner. You’ll find that the “waste” in your fireplace is actually one of the most valuable tools on your land.
The journey toward self-reliance is built on small, repeatable skills like this. As you grow more comfortable with ash-packing, you might find yourself looking at other “waste” products with new eyes. Every resource on a homestead has a secondary or tertiary use if you know where to look. Keep your fire burning, keep your eggs unwashed, and keep your pantry full.
