How To Become More Self-Sufficient Without Starting a Full-Blown Farm…
Want to start preserving your harvest, making your own soap, or building a backyard root cellar — but not sure where to begin? “Homesteading Advice” gives you instant lifetime access to 35+ practical homesteading books on food preservation, veggie gardening, DIY natural cleaning products (save over $250 per year with this skill alone), brewing, off-grid energy, and a whole lot more…
Click Here To Check It Out Now!
One house is a 30-year liability waiting for a renovation; the other is a 200-year heirloom built to survive the centuries. We have traded the health and longevity of our homes for construction speed and toxic adhesives. Modern ‘stick-frame’ houses are designed for a 30-year mortgage, not a 300-year legacy. Straw bale building returns us to the era of the ‘Fortress Home’ – structures that are fireproof, super-insulated, and carbon-negative. Stop building for the bank and start building for your grandchildren.
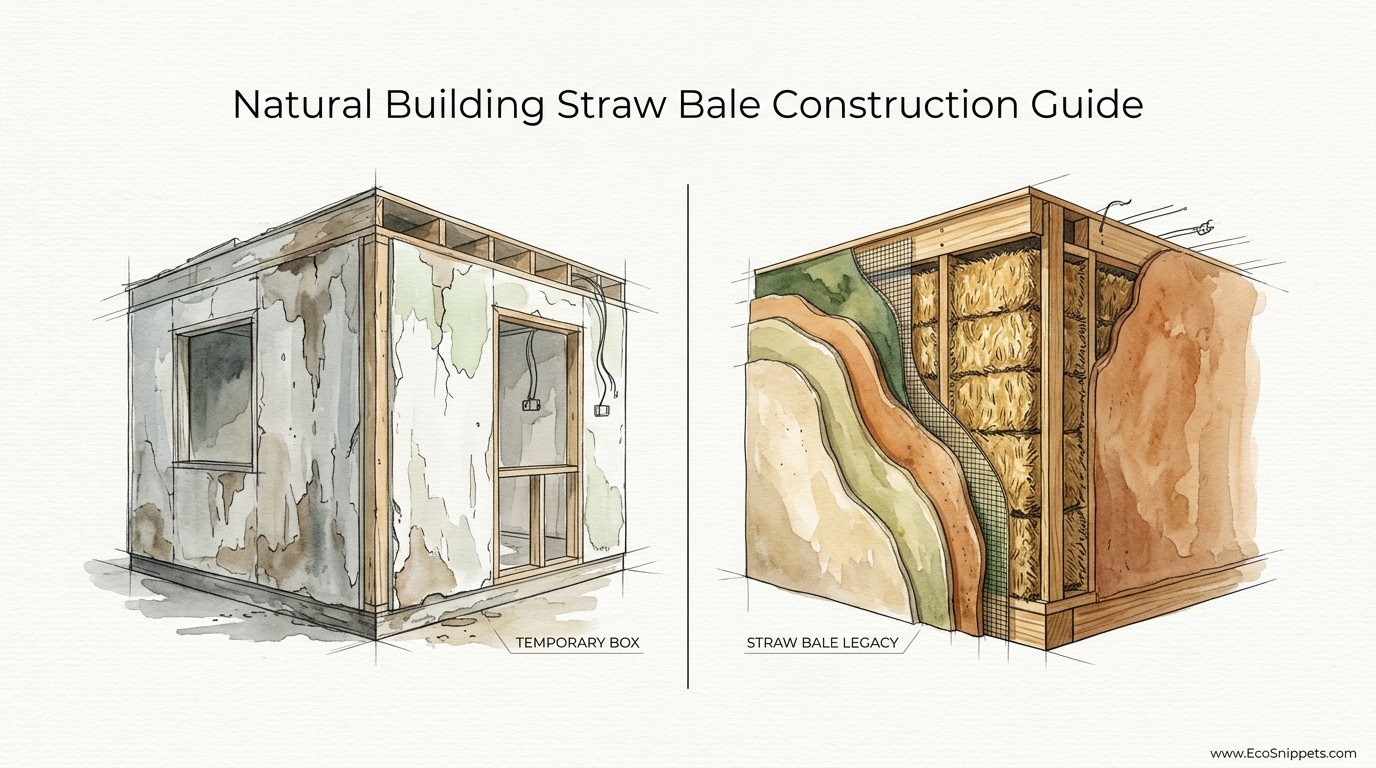
Building with the earth’s leftovers is not merely an aesthetic choice; it is a declaration of independence from the industrial supply chain. For over a century, families in the Nebraska Sand Hills have lived in homes made of baled meadow grass, proving that when high-quality straw is compressed and sealed within mineral plasters, it creates a wall system that outlasts stick, brick, and stone. This guide explores the transition from a TEMPORARY BOX mindset to a STRAW BALE LEGACY, offering the technical depth needed to turn agricultural byproduct into a multi-generational sanctuary.
Natural Building Straw Bale Construction Guide
Natural building through straw bale construction is the process of using tightly bound blocks of cereal grain stalks as both the structural insulation and the substrate for plaster. Unlike hay, which is a nitrogen-rich food source for livestock, straw is the carbon-heavy waste product left after the harvest of wheat, rice, barley, or rye. It is essentially nature’s hollow-core fiber, trapping air in millions of tiny chambers to resist the transfer of heat.
This method exists because it solves the fundamental paradox of modern shelter: how to achieve massive thermal performance without the massive carbon footprint of petroleum-based foams. In real-world application, straw bale walls provide a thickness—often 18 to 24 inches (45 to 60 cm)—that creates deep, recessed windows and a sense of “quiet” that no 2×6 (38×140 mm) wall can match. It is used everywhere from the humid coastal regions of France to the sub-zero winters of the American Midwest, proving that a “breathable” wall is a durable wall.
Visualize the straw bale as a giant, oversized brick. When stacked in a running bond and pinned together, these bales create a monolithic mass. Once coated in a 1 to 1.5-inch (25 to 38 mm) layer of lime or clay plaster, the wall becomes a composite system. The plaster provides the “skin” (tensile strength and weather protection), while the straw provides the “meat” (compressive resistance and insulation).
How to Build the Fortress Home Step-by-Step
The construction of a straw bale legacy follows two primary paths: Load-Bearing (Nebraska Style) and Non-Load-Bearing (Infill). Each requires a different approach to engineering but relies on the same core principles of moisture management and compression.
Step 1: The Foundation and the “Toe-Up”
Every straw bale wall must start with a “toe-up,” which is a small wooden or masonry curb that lifts the first course of bales at least 6 to 8 inches (15 to 20 cm) off the finished floor. This protects the straw from accidental interior flooding or rising damp. A capillary break, such as a heavy-duty EPDM membrane or a high-quality bitumen sealer, is essential between the foundation and the straw.
Step 2: Stacking and Pinning
Bales are stacked like bricks, ensuring that vertical seams do not align from one course to the next. In traditional Nebraska-style builds, the bales themselves support the weight of the roof. To keep the wall stable during the stack, vertical “pins” are used. Modern practitioners have shifted away from internal metal rebar—which can create “cold spots” that invite condensation—favoring external bamboo or wooden pins cinched together with high-tension poly-twine or aircraft cable.
Step 3: Managing the “Settle” and Pre-Compression
One common pitfall is plastering too early. A straw bale wall will naturally settle under its own weight and the weight of the roof. For load-bearing structures, this “squish” is managed through pre-compression. Threaded rods or heavy-duty strapping are used to pull the top plate (the wooden frame sitting on the bales) down toward the foundation, squeezing the bales until they are rock-hard. This prevents future cracks in the plaster and ensures the wall is seismically stable.
Step 4: Plastering the Skin
The plaster is the most critical component for fire resistance and durability. The first coat, often called the “scratch coat,” must be pushed deep into the straw fibers to create a mechanical bond. This is typically followed by a “brown coat” for leveling and a “finish coat” for aesthetics and weatherproofing. Lime plaster is the standard for exteriors due to its ability to “self-heal” small cracks and its high alkalinity, which discourages mold growth.
Benefits of the Straw Bale Legacy
The decision to build with straw is often driven by a desire for a home that performs better than the industrial standard. These benefits are measurable, observable, and contribute to the “heirloom” quality of the structure.
* Extreme Thermal Insulation: Modern tests by the California Energy Commission and Oak Ridge National Laboratory confirm that a plastered straw bale wall provides an R-value of R-1.45 to R-1.55 per inch. For a standard 23-inch (58 cm) bale, this results in a wall system rated at R-30 to R-35+. This is nearly triple the performance of a standard 2×4 (38×89 mm) fiberglass-insulated wall.
* Superior Fire Resistance: It is a common misconception that straw bale homes are fire hazards. In truth, they are safer than wood-frame houses. An ASTM E119 fire test subjected a plastered straw bale wall to 1,942°F (1061°C) for over two hours. The straw did not ignite because it was so tightly compressed that there was no oxygen to support combustion—a phenomenon known as “oxygen starvation.”
* Acoustic Sanctuary: The density of a 2-foot-thick wall creates a near-silent interior environment. These homes are ideal for building near busy highways or in urban centers where external noise pollution is a constant stressor.
* Carbon Sequestration: While a standard home emits tons of CO2 during the manufacturing of concrete and steel, a straw bale home is a carbon bank. The straw removes CO2 from the atmosphere as it grows, and that carbon is “locked” into the walls for the life of the building.
Challenges and Common Mistakes
The primary enemy of a straw bale home is not fire or wolves; it is water. Specifically, liquid water that enters the wall and cannot escape.
The “Ziploc” Error: Many modern builders try to apply “stick-frame” logic to straw by using vapor barriers or plastic wraps. This is a fatal mistake. Straw bale walls must be vapor-permeable. If you seal the wall with cement-heavy stucco or plastic membranes, moisture from cooking, bathing, and breathing will condense inside the wall, turning your home into a 2,000-square-foot compost pile.
The Short Eave Problem: In a straw bale house, the roof is the “umbrella.” Using standard 12-inch (30 cm) eaves is insufficient. To ensure longevity, eaves should extend at least 24 to 36 inches (60 to 90 cm) from the wall to prevent driving rain from saturating the plaster.
Plumbing in the Bales: Never run water pipes through the center of a straw bale wall. If a pipe sweats or leaks, the damage will be invisible until the structural integrity of the straw is compromised. All plumbing should be kept in interior partition walls or specialized “chases” separate from the bale envelope.
Limitations: When This May Not Be Ideal
Despite its benefits, straw bale construction is not a universal solution for every building site or climate.
* Space Constraints: Because the walls are roughly two feet thick, they consume a significant amount of the building’s footprint. On a small urban lot with strict setback requirements, this loss of “net internal area” may make the project unfeasible.
* High Labor Requirements: While the materials are inexpensive, the labor to stack, trim, and plaster the bales is intensive. If you are hiring a professional crew, the cost of a straw bale home will likely equal or slightly exceed a high-end custom wood-frame home. It is most cost-effective for the owner-builder who provides their own “sweat equity.”
* Sustained High Humidity: In tropical environments where the relative humidity remains above 80% for months at a time, keeping straw below the 20% moisture threshold (the point at which rot begins) requires advanced engineering, such as rain screens and mechanical dehumidification.
Comparison: Standard Stick-Frame vs. Straw Bale Legacy
| Feature | Standard Stick-Frame | Straw Bale Legacy |
|---|---|---|
| Wall Thickness | 6.5″ (165 mm) | 18″–24″ (450–600 mm) |
| Typical R-Value | R-13 to R-21 | R-30 to R-45+ |
| Fire Rating | 20–40 Minutes | 120+ Minutes (Plastered) |
| Carbon Impact | High Emitted Carbon | Carbon Negative (Sequestered) |
| Lifespan | 30–50 Years | 100–200+ Years |
Practical Tips and Best Practices
If you are ready to move from theory to application, these practices will ensure a smoother build.
- Source Bales Early: Ensure your straw is “building quality”—tightly baled, kept bone-dry since harvest, and containing less than 15% moisture upon delivery. Test this with a long-probe moisture meter.
- The “Boots and Hat” Rule: A straw bale house needs a high-quality foundation (boots) and a generous roof overhang (hat). If the “boots” are high enough and the “hat” is wide enough, the “coat” (plaster) will stay dry even in stormy weather.
- Use Lime for Exteriors: Avoid cement stuccos. Type S hydrated lime mixed with sharp sand allows the wall to “breathe,” letting internal moisture escape while preventing external water from soaking in.
- Window Bucks: Build heavy-duty wooden frames (bucks) for windows and doors before you start stacking. These bucks must be strong enough to withstand the pressure of the compressed bales and provides a solid point to attach flashing.
Advanced Considerations: The Physics of Breathability
The “breathability” of a straw bale wall is often misunderstood as air movement. In reality, we are talking about **vapor permeability**. In a heating climate, moisture vapor moves from the warm interior to the cold exterior. As it moves through the straw, it must never hit a “dew point” on a non-permeable surface.
Serious practitioners often use clay plaster on the interior and lime plaster on the exterior. Clay is more “hygroscopic” than lime, meaning it can absorb and release moisture from the indoor air, acting as a natural humidity regulator. This prevents the interior air from becoming too dry in winter or too humid in summer, creating a “living” wall that stabilizes the indoor environment.
Furthermore, for those in seismic zones, consider the use of “structural plaster.” By adding a stainless steel or geo-grid mesh into the scratch coat and pinning it through the wall to the mesh on the other side, you create a “stressed-skin” panel. This makes the wall incredibly rigid, allowing it to withstand earthquake forces that would shatter a brick-and-mortar home.
Example: The 1,200 Sq Ft (111 Sq Meter) Cottage
Consider a modest 1,200 sq ft (111 sq meter) cottage built using the infill method. In this scenario, a simple post-and-beam timber frame is erected first, followed by the roof. This allows the builders to stack the straw bales under the protection of a finished roof, eliminating the risk of rain damage during construction.
The walls would require roughly 300 to 350 three-string bales. Each bale, costing between $5 and $12 (source-dependent), brings the raw wall material cost to under $4,500. While the plastering labor may take three weeks for a small crew, the result is a home where the heating bill in a Canadian winter might be less than $50 a month. By comparison, a stick-frame home of the same size would require thousands of dollars in fiberglass, vapor barriers, and drywall, yet still fail to provide the same thermal or acoustic comfort.
Final Thoughts
The modern construction industry has convinced us that building is a disposable act—that a house is a product with an expiration date. Straw bale building is a return to a different philosophy. It acknowledges that the most sustainable materials are often the ones growing in the fields around us, and that the best technology is often the simplest.
By choosing to build with straw, you are not just opting for lower energy bills or a smaller carbon footprint. You are choosing to inhabit a structure that respects the biology of its inhabitants. You are building a fortress of quiet and comfort that will serve your family long after the “temporary boxes” of today have returned to the earth.
Start small. Build a garden wall or a studio. Feel the weight of a bale and the texture of the plaster. Once you experience the solid, grounded “spirit” of a natural home, the paper-thin walls of the industrial world will never feel like home again.
