How To Become More Self-Sufficient Without Starting a Full-Blown Farm…
Want to start preserving your harvest, making your own soap, or building a backyard root cellar — but not sure where to begin? “Homesteading Advice” gives you instant lifetime access to 35+ practical homesteading books on food preservation, veggie gardening, DIY natural cleaning products (save over $250 per year with this skill alone), brewing, off-grid energy, and a whole lot more…
Click Here To Check It Out Now!
Why pay for a motor to fight the heat when the sun will do the heavy lifting for free? Your attic fan is eating your budget to fix a problem that physics solves for zero dollars. The solar chimney uses the sun’s own heat to create a vacuum that pulls cool air through your entire home.
This ancient technology, refined by modern materials, turns your roof into a silent engine of fresh air. It is the ultimate expression of self-reliance, requiring no wires, no circuit boards, and no monthly bill from the power company.
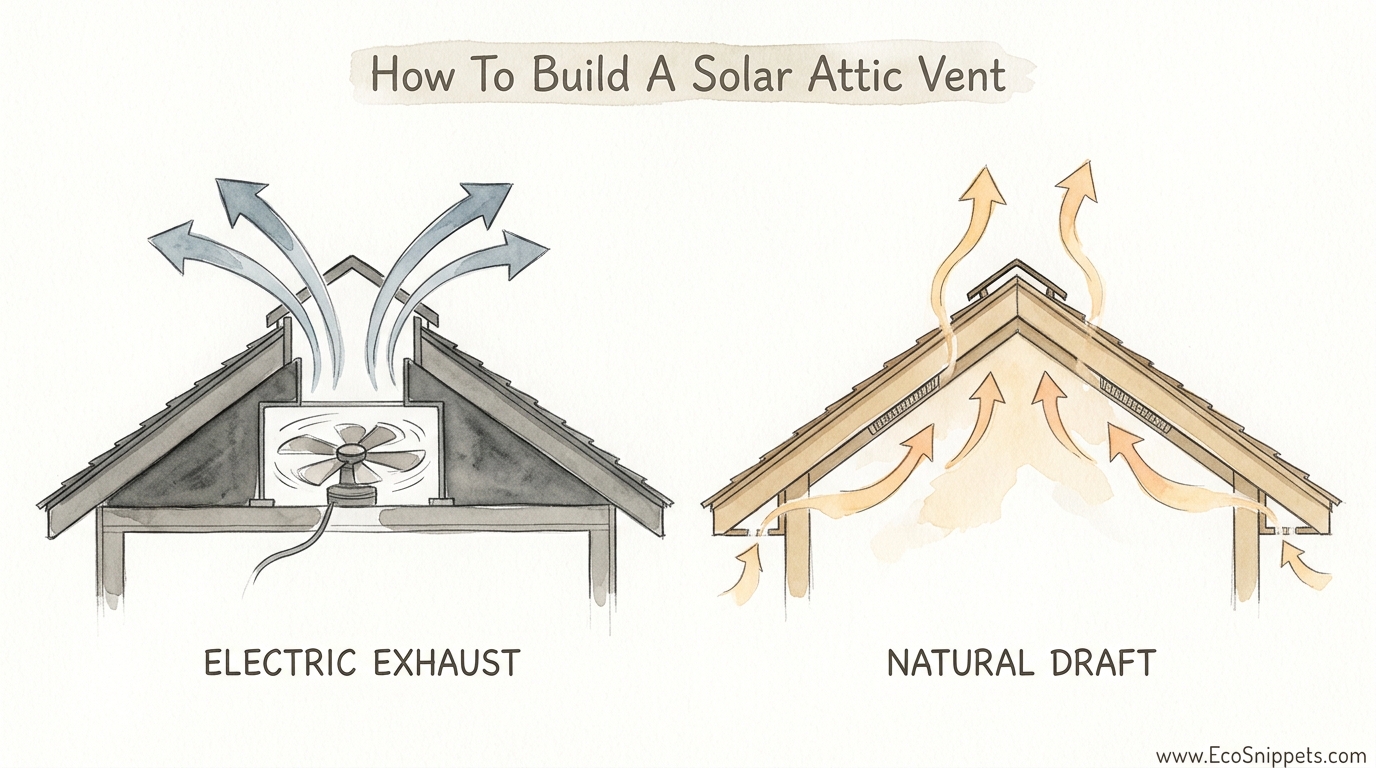
How To Build A Solar Attic Vent
A solar attic vent, or solar chimney, is a vertical shaft designed to harness the stack effect for passive cooling. Unlike a standard hole in your roof, this device uses a glazed surface to trap solar radiation and superheat the air inside the column. As this air grows hot and buoyant, it rushes upward, creating a powerful low-pressure zone at the base of the chimney.
This suction pulls stale, overheated air out of your attic and, by extension, draws fresh air into the lower levels of your home through windows or intake vents. It is a “breathing” system that operates at its maximum capacity exactly when you need it most—the hottest part of the afternoon.
Historical examples of this wisdom are found in the wind towers of ancient Persia, known as Badgirs, which kept homes comfortable in 110°F (43°C) heat for centuries without a single watt of electricity. Today, we use the same principles but with the advantage of high-efficiency glazing and thermal absorbers to move even more air per square inch of space.
The Physics of Passive Power: How It Works
Natural ventilation relies on two primary forces: wind pressure and thermal buoyancy. The solar chimney focuses on thermal buoyancy, often called the “stack effect.” When air is heated, its molecules move faster and spread out, making it less dense than the cooler air surrounding it.
The chimney provides a dedicated path for this light, hot air to travel. By painting the interior of the chimney matte black and covering the sun-facing side with glass or polycarbonate, you create a localized greenhouse. Temperatures inside the shaft can easily reach 140°F to 160°F (60°C to 71°C), even on a moderately warm day.
The greater the temperature difference between the air inside the chimney and the air outside, the faster the air moves. This is measured in Cubic Feet per Minute (CFM) or Cubic Meters per Hour (m³/h). A well-constructed solar chimney can move hundreds of cubic feet of air every minute, rivaling the performance of many electric fans but without the mechanical hum or electrical risk.
Step-by-Step: Constructing Your Thermal Engine
Building a solar chimney requires basic carpentry skills and a solid understanding of air-tight sealing. You are essentially building a long, insulated box with one clear side and one black, heat-absorbing side.
Materials You Will Need:
- Framing: 2×4 lumber (38×89 mm) for the main structure.
- Absorber Plate: A sheet of aluminum or galvanized steel, painted with high-heat matte black paint.
- Glazing: Tempered glass or 6mm twin-wall polycarbonate. Polycarbonate is lighter and easier for DIY builds.
- Insulation: Rigid foam board (R-5 or higher) for the back and sides of the chimney to prevent heat from bleeding back into the attic.
- Sealant: High-temperature silicone caulk.
Step 1: Frame the Shaft
Construct a rectangular frame. For most residential attics, a chimney height of at least 6 to 8 feet (1.8 to 2.4 meters) is necessary to create a significant pressure differential. The internal cross-section should be at least 2 feet wide by 6 inches deep (61 cm by 15 cm).
Step 2: Install the Absorber and Insulation
Line the back of the frame with your rigid insulation. Attach the black-painted metal plate over the insulation. This plate is the heart of the system; it absorbs solar energy and transfers it directly to the air in the cavity. Ensure there is a 2-to-4-inch (5 to 10 cm) air gap between the metal and the glazing.
Step 3: Glazing and Sealing
Attach the polycarbonate or glass to the front of the frame. This allows sunlight to enter but prevents the resulting heat from escaping back into the atmosphere. Use your high-temperature silicone to seal every joint. Any air leak in the chimney walls acts as a “pressure leak,” reducing the draw from the attic.
Step 4: Integration with the Roof
Cut an opening in your roof or gable wall at the highest point possible. The base of the chimney must connect seamlessly to this opening. Install robust flashing to ensure the unit is completely waterproof. The top of the chimney should be capped with a “rain hat” or a turbine vent to prevent weather from entering while allowing air to exhaust freely.
Benefits of the Solar Chimney Approach
The most immediate benefit is financial. A typical electric attic fan might cost $15 to $35 a month to operate during the summer. Over a decade, a solar chimney pays for its materials several times over. However, the advantages go beyond the wallet.
Silence is a secondary but profound benefit. Mechanical fans vibrate and hum, often resonating through the rafters into the living spaces below. A solar chimney is perfectly silent. It moves air through the gentle laws of physics, creating a peaceful environment that feels more “natural” than a house pressurized by spinning blades.
Longevity is also a factor. Motors burn out, bearings seize, and solar panels on “solar fans” degrade or become covered in dust. A well-built solar chimney has no moving parts to fail. It is a structural addition to your home that will function as long as the sun rises and the seals remain intact.
Challenges and Common Mistakes to Avoid
Many DIY builders fail because they neglect the importance of insulation. If the back of your solar chimney is not insulated, the heat it generates will simply conduct through the wood and plywood, heating up your attic even further. The goal is to keep the heat trapped inside the chimney cavity so it can work to move air.
Another frequent error is improper sizing of the intake vents. For the chimney to pull air out, there must be a path for new air to enter. If your soffit vents are blocked or undersized, the chimney will struggle to create a draft. Ensure your intake vent area is at least equal to the cross-sectional area of the chimney itself.
Orientation is critical. In the Northern Hemisphere, the glazed face of the chimney must face South. In the Southern Hemisphere, it must face North. If the chimney is shaded by trees or neighboring buildings during the peak hours of 10:00 AM to 4:00 PM, its efficiency will drop significantly.
Limitations of Passive Ventilation
While powerful, a solar chimney is not a magic bullet for every climate. In regions with extremely high humidity, the cooling effect of moving air is diminished because sweat cannot evaporate as effectively from the skin. The chimney will still exhaust hot air, but the perceived comfort level might be lower than in arid climates.
Nighttime performance is another constraint. Without the sun to heat the absorber plate, the “solar” part of the chimney ceases to function. The unit will still provide some ventilation due to the standard stack effect (internal house heat rising), but it will not have the same “turbo-charged” draw it possesses during the day.
Geographic latitude also plays a role. In extreme northern or southern latitudes, the sun’s angle may be too low for a vertical chimney to work effectively without a tilted collector. In these areas, an inclined solar chimney—built into the slope of the roof itself—is often a better design than a vertical one.
ELECTRIC EXHAUST vs NATURAL DRAFT
Choosing between a powered fan and a solar chimney involves weighing reliability against raw volume. While electric fans provide a consistent, high-volume blast of air regardless of the sun’s intensity, they are a “brute force” solution.
| Feature | Electric Exhaust Fan | Solar Chimney (Natural Draft) |
|---|---|---|
| Operating Cost | $150–$400 per year | $0 |
| Maintenance | Motors need replacement every 5–8 years | Near zero; occasional cleaning of glazing |
| Noise Level | Audible hum and vibration | Silent |
| Installation | Requires electrical wiring and permits | Requires carpentry and roof flashing |
| Reliability | Depends on grid and mechanical parts | Works as long as the sun is shining |
For those seeking true grid independence, the natural draft of a solar chimney is the superior choice. It offers a “set it and forget it” solution that doesn’t rely on the fragility of the electrical grid or the lifespan of a cheap DC motor.
Practical Tips for Maximum Efficiency
If you want to squeeze every possible CFM out of your build, consider the height of your shaft. Increasing the height of the chimney increases the “pressure head.” A chimney that extends 3 feet (0.9 meters) above the roofline will pull significantly harder than one that is flush with the shingles.
Surface texture matters. Instead of using a flat sheet of metal for your absorber, use corrugated metal roofing. The ridges increase the surface area available to heat the air, creating more turbulence and better heat transfer. Ensure the ridges run vertically so they don’t obstruct the rising air.
Don’t forget the Venturi Effect. If you place a specialized cap on top of your chimney that narrows the exit point, wind passing over the top will create an even stronger vacuum. This allows your solar chimney to use both the heat of the sun and the power of the wind simultaneously, supercharging your attic ventilation.
Advanced Considerations: The Dual-Season Chimney
A serious practitioner can design a solar chimney to be useful in the winter as well. By installing a simple bypass damper at the top and bottom of the unit, you can change the direction of the airflow. In the summer, the hot air is exhausted outside. In the winter, the top exhaust vent is closed, and a vent into the living space is opened.
This converts the cooling chimney into a “Solar Air Heater” or a “Trombe Wall” variant. The sun heats the air in the cavity, which then circulates into your home to provide free supplemental heat. This double-duty functionality turns a summer-only tool into a year-round energy asset.
Another advanced strategy is coupling the solar chimney with Earth Tubes. Earth tubes are pipes buried 6 to 10 feet (2 to 3 meters) underground where the soil temperature remains a constant 55°F (13°C). The solar chimney provides the “pull” needed to draw air through these underground pipes, delivering naturally refrigerated air into your home without a compressor or refrigerant.
Real-World Scenario: The Off-Grid Cabin
Imagine a small, 800-square-foot (74 m²) cabin in a sunny, high-altitude region. During the day, the metal roof absorbs immense heat, turning the loft into an oven. An electric fan would require a larger battery bank and more solar panels, increasing the system’s complexity and cost.
By installing a 10-foot (3 meter) vertical solar chimney on the south-facing gable, the owner creates a constant air exchange. During peak sun, the chimney exhausts air at a rate of 400 CFM. This is enough to replace the entire volume of air in the cabin every two minutes. The result is a home that stays within 5 degrees of the outdoor ambient temperature, even without active cooling.
This scenario proves that you don’t need “smart” technology to solve a fundamental problem. You need a better understanding of how air behaves when it meets heat. The cabin remains cool, the owner saves money, and there is no mechanical noise to disturb the surrounding wilderness.
Final Thoughts
The solar chimney is a testament to the idea that the most effective solutions are often the simplest. By moving away from mechanical “brute force” and embracing the natural movement of air, you reclaim a piece of your independence. You are no longer reliant on a spinning motor to keep your home habitable.
Building a solar attic vent requires an afternoon of work and a few hundred dollars in materials, but it provides a lifetime of service. It encourages a deeper connection with the rhythms of the day and the orientation of your home toward the sun.
As you look at your own roof, ask yourself if you are working with the environment or against it. The sun is providing all the energy you need to keep your attic cool—you just need to provide the path for it to work. Experiment with these principles, start small with a gable-mounted unit, and experience the silent power of a home that breathes on its own.
