How To Become More Self-Sufficient Without Starting a Full-Blown Farm…
Want to start preserving your harvest, making your own soap, or building a backyard root cellar — but not sure where to begin? “Homesteading Advice” gives you instant lifetime access to 35+ practical homesteading books on food preservation, veggie gardening, DIY natural cleaning products (save over $250 per year with this skill alone), brewing, off-grid energy, and a whole lot more…
Click Here To Check It Out Now!
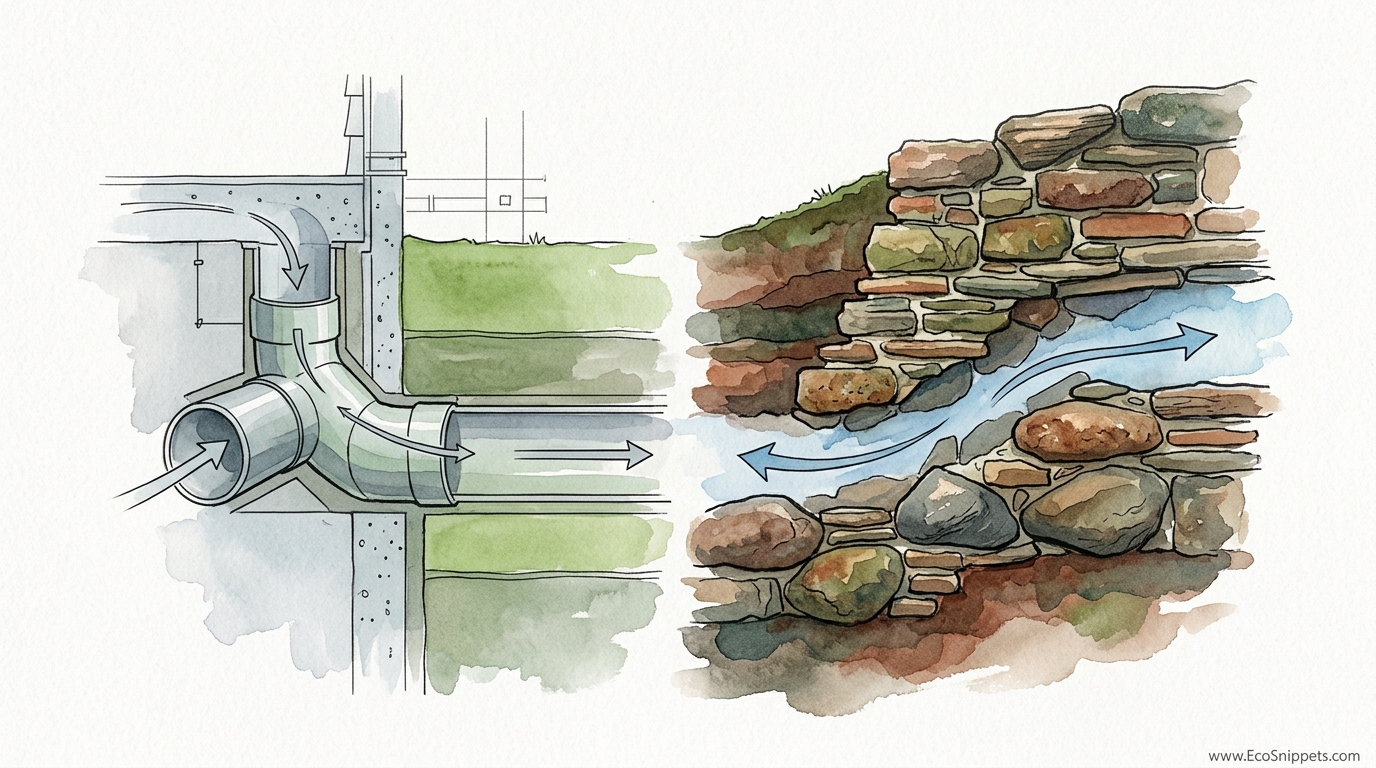
Plastic pipes will crush and clog in a decade, but this ancient stone technique provides free air conditioning for your grandchildren. Most people build earth tubes out of PVC because it’s cheap, but plastic leaches and collapses. We decided to build a legacy. By lining our passive geothermal cooling tunnels with local stone, we’ve created a permanent, mold-resistant air intake that stays 55 degrees (13 degrees Celsius) year-round. No electricity, no plastic, no maintenance.
When we look at modern building practices, we see a lot of “fast furniture” logic applied to infrastructure. We use materials that have a shelf life of thirty years to build homes we hope will last a hundred. The earth tube is one of the most effective ways to naturally regulate the temperature of a home, but the modern execution often fails because it relies on thin-walled polymers that can’t handle the shifting weight of the soil or the persistent moisture of the underground environment.
A stone earth tube is different. It is a masonry project buried deep enough to tap into the thermal constancy of the planet. It uses the thermal mass of the rocks and the surrounding soil to strip heat from the summer air and add warmth to the winter air. This isn’t just a cooling duct; it is a lung for your home that breathes with the rhythm of the earth.
Building this way requires more sweat equity and a deeper understanding of site-specific geology than simply throwing a plastic pipe in a trench. However, the reward is a system that outlasts the mortgage, the roof, and perhaps even the house itself. You are building a geological feature that serves your family’s comfort.
How To Build A Stone Earth Tube Cooling System
A stone earth tube cooling system, often called a “ground-coupled heat exchanger,” is a subterranean tunnel used to pre-condition air before it enters a building. It relies on the fact that once you go about 6 to 10 feet (2 to 3 meters) below the surface, the ground temperature remains stable regardless of what the weather is doing above. In most temperate climates, this temperature hovers around 50 to 60 degrees Fahrenheit (10 to 15 degrees Celsius).
The concept is simple: you pull hot, humid summer air through a long, buried stone corridor. As the air travels, it touches the cool stones. The stones absorb the heat, and the air cools down significantly before it reaches your living space. In the winter, the process reverses; the relatively “warm” earth (at 55 degrees) heats up the freezing outside air before it hits your furnace or woodstove, saving massive amounts of energy.
Historically, this technique shares DNA with the Persian qanat systems and ancient Roman cooling chambers. These civilizations understood that the earth is the ultimate heat sink. While modern engineers try to solve cooling with chemicals and compressors, the stone earth tube solves it with physics and mass. It exists where traditional wisdom meets modern thermodynamics.
You will find these systems in off-grid homesteads, permaculture-designed estates, and high-efficiency “Earthship” style builds. They are ideal for anyone living in a climate with high seasonal temperature swings. If you have access to rocks on your property—whether they are fieldstones, river rocks, or quarried limestone—you already have the primary building material for your cooling system.
How It Works: The Physics of Thermal Mass
To build this correctly, you must understand how heat moves. Stones have high thermal density, meaning they can hold a lot of “coolness” (or more accurately, they can absorb a lot of heat). When you line a tunnel with stones, you are increasing the surface area available for heat exchange. Unlike a smooth PVC pipe, the irregular surfaces of stones create slight turbulence in the air, which forces more of the air molecules to come into contact with the cold surface.
The system relies on a few critical factors: depth, length, and diameter. If the tube is too shallow, the sun will warm the soil and ruin the cooling effect. If it is too short, the air won’t have enough time to dump its heat. If it is too narrow, the friction of the air against the stones will make it hard to move the air into the house without a massive industrial fan.
Standard designs usually call for a trench at least 80 to 100 feet (24 to 30 meters) long. We recommend burying the intake at a depth of at least 7 feet (2.1 meters) to ensure you are below the “thermal swing” zone. At this depth, the temperature is influenced by the average annual temperature of your location rather than the daily weather report.
Drainage is the most important technical hurdle. All air contains moisture. When hot, humid air enters a cool underground tunnel, it hits the “dew point” and the water condenses on the stones. If your tunnel doesn’t have a slight 2% grade toward a drainage pit or “sump,” that water will pool, go stagnant, and eventually cause mold. A stone tube handles this better than plastic because the gaps between the floor stones allow water to weep back into the earth, provided you’ve built your foundation correctly.
The Step-by-Step Construction Process
The first step is site analysis. You need to know where your water table is. If you dig a 7-foot trench and it fills with water, a stone earth tube will not work; you’ll essentially be building a well. You need dry, well-draining soil. Once you’ve confirmed the depth is feasible, you begin the excavation using a backhoe or excavator. The trench should run from a point in your yard (the intake) to the foundation of your home.
Once the trench is open, lay a thick bed of structural gravel at the bottom. This acts as your drainage layer. On top of this gravel, you begin laying your “sole stones”—large, flat rocks that form the floor of the tunnel. You are essentially building a dry-stack stone box underground. The walls should be built with stout, heavy stones that can withstand the lateral pressure of the earth. Avoid using mortar if possible; a dry-stack approach allows for better drainage and handles the natural expansion and contraction of the earth better.
The internal dimensions of the tunnel should be roughly 12 to 18 inches (30 to 45 centimeters) wide and high. This provides enough volume for significant airflow without requiring a massive excavation. As you build the walls, cap the tunnel with large “lintel” stones—flat, thick slabs that bridge the gap. These slabs will bear the weight of the several feet of soil you’ll be putting back on top, so choose them for their strength.
Before backfilling, wrap the entire stone structure in a heavy-duty non-woven geotextile fabric. This is a crucial step. It allows water to pass through but prevents silt and soil from washing into your tunnel and clogging it over time. Think of it as a permanent filter for your air duct. Once wrapped, carefully backfill with clean gravel around the stones to lock them in place, then fill the rest of the trench with the native soil you dug out.
Benefits of Choosing Stone Over Plastic
The primary advantage of a stone earth tube is its lifespan. PVC and HDPE pipes are susceptible to “creep” and deformation. Over twenty years, the weight of the earth can ovalize a plastic pipe, leading to cracks. Once a plastic pipe cracks underground, it is nearly impossible to repair without digging up the entire yard. A stone tunnel, if built with proper lintels, is a structural vault that can last for centuries.
Stone also offers superior moisture management. In a plastic pipe, condensation has nowhere to go but the bottom of the pipe, where it sits in a puddle. This is why many people complain that earth tubes smell “musty.” In a stone tube, the condensation drips off the rocks and filters through the floor into the gravel bed and back into the subsoil. This natural “weeping” action keeps the air crisp and dry.
Thermal performance is another win for stone. Plastic is actually a bit of an insulator. Stone is a conductor. The rate at which stone pulls heat out of the air is much more efficient than the rate at which a thin wall of PVC can transfer that heat to the surrounding soil. This means you can achieve the same cooling effect with a shorter stone run than you would need with a plastic one.
Finally, there is the health aspect. We are increasingly aware of the “off-gassing” of plastics, especially when they are subjected to temperature changes. While the temperatures underground are relatively low, many homesteaders prefer the peace of mind that comes from knowing their home’s primary air supply isn’t being pulled through 100 feet of synthetic chemicals. Stone is inert, natural, and clean.
Common Challenges and How to Avoid Them
The most frequent failure in earth tube systems is the “dead animal” scenario. If a rodent, toad, or large insect gets into your intake and dies, your cooling system becomes a delivery system for rot. You must install a heavy-duty stainless steel mesh screen at the intake. This screen should be fine enough to keep out bees and wasps but strong enough to stop a determined squirrel. Check this screen seasonally to clear away leaves or debris.
Radon gas is another serious consideration. Radon is a naturally occurring radioactive gas that seeps out of certain types of bedrock. Because your earth tube is an underground void, it can act as a collector for radon, which is then pumped into your home. To mitigate this, ensure your stone tunnel is well-ventilated and consider installing a radon detector in the room where the air enters. In high-radon areas, you may need to seal the interior of the stone tube with a lime-based plaster, which is more “breathable” than cement but provides a barrier against soil gases.
Airflow resistance is a pitfall for those who make their tunnels too small or too long. Every time air has to turn a corner or rub against a rough stone, it loses momentum. Use a low-wattage, high-efficiency inline fan to “pull” the air into the house rather than trying to “push” it. Placing the fan at the exit (inside the house) creates a slight negative pressure in the tube, which helps draw the air through the system effectively.
Limitations and Environmental Considerations
Stone earth tubes are not a “one size fits all” solution. If you live in a region with extremely high humidity and no “diurnal” (day to night) temperature swing, the ground may eventually saturate with heat. The earth tube works best when it has time to “recharge” its coolness during the night or during cooler seasons. In tropical climates with 90% humidity and constant heat, the system may struggle to provide significant cooling without a secondary dehumidification strategy.
The geology of your land dictates your success. If your soil is primarily solid granite, the cost of blasting or heavy excavation will far outweigh the energy savings of the cooling system. Conversely, if you live in a sandy area with a high water table, the risk of collapse or flooding is high. These systems perform best in clay, loam, or silty soils where the earth is stable enough to hold a trench but porous enough to drain.
Space is also a constraint. You need a significant “run” of land to make this work. If you are on a small urban lot, you likely won’t have the 100 feet of clearance needed to install a proper system. You also need to keep the intake away from sources of pollution, such as driveways (car exhaust), septic drain fields, or areas where you spray pesticides. You want the intake to be in a shaded, clean, “green” part of your property.
Comparing Stone Tunnels to Modern HVAC
| Factor | Stone Earth Tube | Modern AC Unit |
|---|---|---|
| Initial Cost | High (Labor/Materials) | Medium |
| Operating Cost | Near Zero | High (Electricity) |
| Lifespan | 100+ Years | 15–20 Years |
| Maintenance | Minimal (Cleaning Intake) | Annual Servicing |
| Air Quality | Naturally Filtered/Earthy | Recycled/Dry |
When comparing PLASTIC PVC vs LEGACY STONE, the difference is primarily in the structural integrity and the “wicking” ability of the materials. While PVC is easier to install, the stone system provides a higher quality of air and a significantly longer service life. If you are building a home for the next generation, stone is the clear winner.
Best Practices for Peak Performance
To maximize the cooling power of your stone tube, plant large-leafed deciduous trees over the path of the trench. The shade from the trees keeps the soil even cooler during the heat of the summer, and the roots—if managed correctly with a geotextile barrier—help stabilize the soil. The trees act as a natural parasol for your underground radiator.
Consider the “chimney effect” for your home’s design. If you have a high window or a thermal chimney on the top floor of your house, opening it will allow hot air to rise and escape. This creates a natural suction that pulls the cool air through the stone earth tube and into the lower floors of the house without using a fan at all. This is the pinnacle of passive design.
Install a “bypass” damper. There will be days in the spring and fall when the outside air is a perfect 70 degrees (21 degrees Celsius), but your earth tube is still chilling the air down to 55 degrees (13 degrees Celsius). A bypass allows you to draw air directly from the outside when the underground temperature isn’t needed, giving you total control over your home’s climate.
Advanced Considerations: Multi-Stage Cooling
For those looking to take this further, you can integrate your stone tube with a “cool pantry” or a root cellar. By running the intake through a stone-lined cellar before it reaches the living quarters, you can use that same geothermal energy to keep your food storage at a constant temperature. This multi-stage approach squeezes every bit of utility out of the cool earth.
Another advanced technique involves “pre-filtering” the air using a simple charcoal box at the intake. While the stones do a great job of cooling, a charcoal filter can strip out pollen and allergens, making the air entering the house cleaner than the air outside. This is particularly useful for those with seasonal allergies or those living in areas prone to wildfires.
If you are in an exceptionally dry climate, you can add a small “drip” system to the stones near the beginning of the tunnel. As the air passes over the wet stones, it undergoes evaporative cooling in addition to the geothermal exchange. This “swamp cooler” effect can drop the air temperature by another 10 to 15 degrees, though it requires careful management to prevent excess humidity inside the home.
A Realistic Example: The High-Desert Homestead
Imagine a homestead in the high desert of the American Southwest or the Australian Outback. Daytime temperatures can hit 100 degrees Fahrenheit (38 degrees Celsius), but the ground 8 feet down stays a constant 58 degrees (14 degrees Celsius). By installing a 120-foot (36-meter) stone earth tube, the homeowner can pull that 100-degree air underground.
By the time the air has traveled 60 feet, it has already dropped to 75 degrees. By the time it reaches the end of the 120-foot tunnel, it enters the house at a crisp 62 degrees. Even with a small 50-watt fan running, the energy consumption is less than a single lightbulb, yet the house stays comfortable throughout the heat of the day. No noisy compressors, no massive electric bills, just the steady, silent breath of the earth.
In the winter, when the desert night drops to 20 degrees Fahrenheit (-6 degrees Celsius), the same system pulls that freezing air through the “warm” 58-degree stones. The air enters the house at 50 degrees, meaning the woodstove only has to raise the temperature by 20 degrees instead of 50. This significantly reduces firewood consumption and keeps the home’s interior from ever reaching freezing temperatures, even if the heat source goes out.
Final Thoughts
Building a stone earth tube is an act of defiance against the “disposable” culture of modern construction. It requires a return to foundational principles—understanding the land, respecting the laws of thermodynamics, and choosing materials that endure. It is a slow project, a heavy project, but one that pays dividends in comfort and autonomy for decades.
When you sit in your living room on a blistering summer afternoon and feel a cool, earthy breeze coming from a vent in the floor—knowing that breeze is being chilled by stones you laid with your own hands—you feel a connection to your environment that a thermostat can never provide. You are not just surviving the climate; you are participating in its natural balance.
We encourage anyone with a bit of land and a lot of grit to consider this legacy project. Start by observing your soil, digging a test pit, and sourcing your stones. The earth is ready to keep you cool; you just have to build the way for it to happen.
