How To Become More Self-Sufficient Without Starting a Full-Blown Farm…
Want to start preserving your harvest, making your own soap, or building a backyard root cellar — but not sure where to begin? “Homesteading Advice” gives you instant lifetime access to 35+ practical homesteading books on food preservation, veggie gardening, DIY natural cleaning products (save over $250 per year with this skill alone), brewing, off-grid energy, and a whole lot more…
Click Here To Check It Out Now!
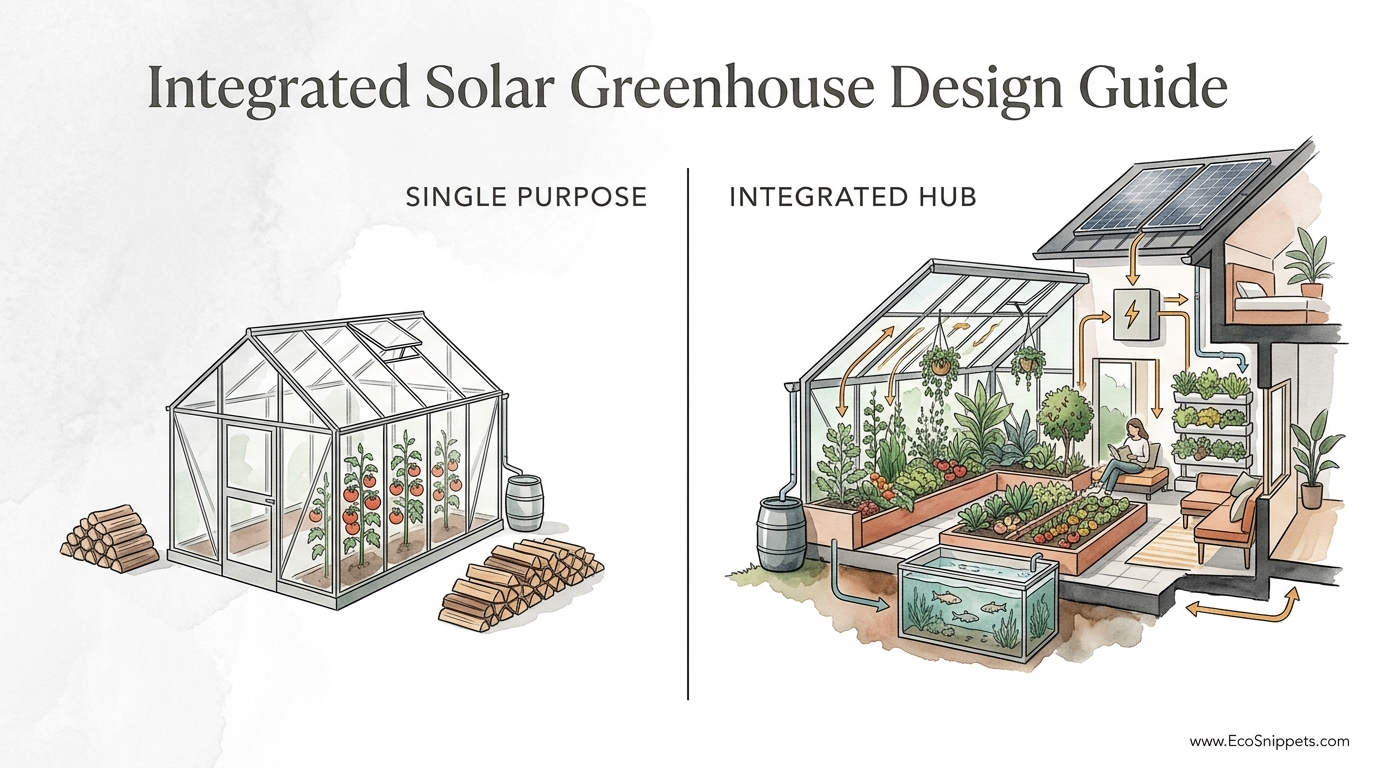
Why build a structure that only does one job when it could be your power plant, water filter, and grocery store? Most greenhouses are a liability in the winter. A ‘Multi-Use’ hub turns the same square footage into a solar array, a thermal battery, and a year-round food source. Stop building boxes and start building ecosystems.
Traditional gardening often relies on a fragile string of external inputs—bags of soil, city water, and expensive grid electricity to keep things from freezing. This old way of thinking treats the greenhouse as a detached room that only works when the sun is high and the air is warm. An integrated hub, however, is a living machine that captures and cycles energy internally.
Every beam, barrel, and bed in this system serves multiple purposes. The water that keeps your fish alive also stores the heat that keeps your lemons growing during a blizzard. The sun that feeds your kale also powers the pumps that move that water. This is the difference between a high-maintenance hobby and a self-sustaining lifeline.
Integrated Solar Greenhouse Design Guide
An integrated solar greenhouse is a structure designed to harvest solar energy and store it for use during periods of low light or extreme cold. Unlike standard glass greenhouses that lose heat rapidly once the sun sets, these systems prioritize thermal retention and energy efficiency. They are often called “passive solar” because they rely on the physics of the sun’s path rather than mechanical heaters.
The primary function of this design is to create a microclimate that remains productive 365 days a year, regardless of the outside temperature. This is achieved through five core principles: orientation, high-performance glazing, thermal mass, heavy insulation, and strategic ventilation. When these elements work together, the greenhouse becomes a thermal battery that “charges” during the day and “discharges” at night.
Real-world applications of these hubs range from the earth-sheltered “Walipinis” of the Bolivian highlands to modern, building-integrated photovoltaics (BIPV) in suburban homesteads. In a Walipini, for instance, the structure is dug several feet (meters) into the ground to take advantage of the earth’s constant 50°F to 60°F (10°C to 15°C) temperature. This natural insulation allows for tropical production in sub-zero climates with minimal extra heating.
Imagine your greenhouse as a sponge. On a sunny winter afternoon, even if it is 10°F (-12°C) outside, the intensity of the sun can drive internal temperatures up to 80°F (27°C). A standard greenhouse would vent that “excess” heat to prevent wilting. An integrated hub captures that heat in water barrels or underground rock beds, holding it until 3:00 AM when the frost starts to creep in.
How to Build Your Integrated Energy Hub
Building a multi-use hub requires a shift from lightweight aesthetics to heavy-duty performance. Start with the foundation and orientation. In the Northern Hemisphere, the long axis of your structure must face true south to capture the maximum amount of winter sun. The north wall should be solid, heavily insulated, and potentially buried or bermed with earth to prevent heat loss.
1. Implementing the Thermal Battery (GAHT System)
One of the most effective ways to manage temperature is a Ground-to-Air Heat Transfer (GAHT) system, often called a “climate battery.” This involves burying perforated pipes 4 to 8 feet (1.2 to 2.4 meters) below the greenhouse floor. During the day, a small fan pulls hot air from the peak of the greenhouse and pushes it through these pipes. The surrounding soil absorbs the heat, cooling the air before it returns to the greenhouse.
As night falls, the fan continues to run, but now it pulls cool air through the warmed soil. The soil “gives back” its stored energy, heating the air and preventing the greenhouse from freezing. This cycle not only regulates temperature but also manages humidity, reducing the risk of fungal diseases. The earth under your feet effectively becomes a massive, free radiator.
2. The Jean Pain Compost Heating System
For those in extreme northern or southern latitudes, solar gain may not be enough during the darkest months. You can integrate a Jean Pain-style compost bioreactor directly into or adjacent to the hub. This involves creating a large mound of woody biomass—shredded brush, woodchips, and nitrogen-rich waste—and running water lines through the center of the pile.
As the microbes break down the wood, they generate temperatures of 140°F (60°C) or more. The water in the pipes absorbs this heat and carries it into the greenhouse to warm the soil or a radiant floor system. A single 10-foot (3-meter) tall mound can provide consistent heat for up to 18 months while eventually producing several cubic yards (meters) of high-quality compost for your garden beds.
3. Integrated Photovoltaics (BIPV)
Modern hubs can replace standard roofing with semi-transparent solar panels. These Building Integrated Photovoltaics (BIPV) allow enough light through for plant growth while generating the electricity needed to run fans, pumps, and automated vents. This turns the roof of your greenhouse into a power plant that offsets the energy costs of your entire homestead.
The Practical Benefits of Integration
The most immediate advantage is resilience. Because the system is designed to handle its own heating and cooling, it is less vulnerable to power outages or fuel shortages. If the grid goes down during a winter storm, your thermal mass and compost-heated beds will keep your food alive. This provides a level of peace of mind that a plastic hoop house cannot offer.
Financial savings are another measurable benefit. By using “waste” heat from compost or the ground, you eliminate the need for propane or electric heaters. Over a ten-year period, the cost of an integrated hub is often lower than a traditional greenhouse when you factor in the energy savings and the value of the food produced. You are essentially pre-paying for twenty years of heat and power during the construction phase.
Water efficiency is also drastically improved. Integrated hubs often feature internal greywater biofilters. Water from a small sink or even a residential shower can be run through a series of gravel and plant-based filters inside the greenhouse. The plants (like reeds or water hyacinths) clean the water, while the humidity levels remain stable. This cleaned water can then be used to irrigate non-edible plants or non-root crops, reducing your total water footprint.
Finally, the “grocery store” aspect cannot be overstated. With a stable climate, you can grow high-calorie, nutrient-dense foods year-round. While your neighbors are buying wilted lettuce shipped from 2,000 miles (3,200 km) away, you can harvest fresh kale, spinach, citrus, and even ginger from your own backyard hub.
Challenges and Common Pitfalls
Designing an ecosystem is more complex than building a kit. The most common mistake is insufficient thermal mass. New builders often underestimate how much water or rock is needed to hold heat. A small barrel will be cold by midnight; you need roughly 2 to 5 gallons (7.5 to 19 liters) of water for every square foot (0.09 sq meter) of south-facing glazing to make a significant impact.
Humidity management is another frequent challenge. In a sealed, insulated environment, plants transpire and create a jungle-like atmosphere. Without adequate ventilation or a climate battery to condense that moisture, you will face mold, mildew, and rot. Integrated hubs must include automated vents or heat-recovery ventilators (HRV) to exchange air without losing all the warmth.
Drainage issues ruin more underground “Walipini” style greenhouses than any other factor. If you dig a pit without a clear path for water to exit, you have essentially built a swimming pool. You must ensure your site has a low water table and install a robust perimeter drain system to prevent the hub from flooding during heavy rains.
Limitations and Trade-offs
Integration comes with a higher upfront labor and material cost. Excavating for a GAHT system or building a concrete-and-earth-bermed north wall requires significant physical effort or heavy machinery. This is not a weekend project for a single person; it is a major infrastructural improvement to a property.
Environmental constraints also play a role. If you live in a region with extremely high humidity and low solar gain (such as certain coastal areas), the passive solar approach may struggle to keep up. In these cases, the greenhouse may still require a backup wood stove or heat pump to bridge the gap during “dark weeks” where no sun is visible for several days.
There is also a learning curve for the biology. An integrated hub is a living system. You have to learn the “personality” of the structure—how long it takes to heat up, how much water it needs, and how the different components (like the compost heater) interact. It requires more observation and tuning than a simple thermostat-controlled heater.
Comparing Integrated Hubs vs. Standard Greenhouses
| Feature | Standard Greenhouse | Integrated Multi-Use Hub |
|---|---|---|
| Energy Use | High (Electric/Gas Heaters) | Very Low (Passive Solar/Thermal Mass) |
| Winter Production | Minimal without expensive heat | High (Year-round production) |
| Durability | Low (Plastic/Thin Glass) | High (Earth-bermed/Insulated) |
| Additional Uses | Growing plants only | Power generation, water filtration, storage |
| Upfront Cost | $500 – $3,000 | $5,000 – $15,000+ |
| Operational Cost | $100 – $500 / month in winter | $5 – $20 / month (Fans/Pumps) |
Practical Tips for Success
Always prioritize insulation over glazing. Beginners often think more glass equals more heat, but glass is also where heat escapes. Insulate the north, east, and west walls as much as possible. Use triple-wall polycarbonate or double-pane tempered glass for the south side. Every BTU you don’t lose is one you don’t have to generate or store.
Select your plants for the “swing seasons.” While you can grow tomatoes in February in a well-designed hub, it is much more efficient to focus on cold-hardy greens and brassicas that thrive in 40°F to 60°F (4°C to 15°C) temperatures. This allows you to run the system with less “charging” from the thermal battery, making it more resilient during cloudy stretches.
Incorporate a “sink and soak” area. Design the floor with a slight slope toward a gravel-filled trench. This allows you to wash vegetables or spray down the floor for humidity without creating puddles. The water will soak into the ground, slowly releasing moisture and helping the thermal battery stay hydrated, which actually improves its heat-storage capacity.
Advanced Considerations: Tuning Your Ecosystem
Serious practitioners should look into Phase Change Materials (PCM). These are substances (like specific salts or waxes) that absorb massive amounts of heat as they melt and release it as they solidify. Integrating PCM panels into the north wall can provide the thermal storage of a 55-gallon (200-liter) drum of water in a fraction of the space. This is ideal for smaller hubs where floor space is at a premium.
Automated sensor arrays are another game-changer. Using an affordable microcontroller like an Arduino or Raspberry Pi, you can monitor the soil temperature at different depths of your climate battery. If the soil is fully “charged,” the system can automatically pivot to venting the air or heating a different zone. This precision allows you to squeeze every possible watt of energy out of the sun.
Consider the “Sun Path” throughout the year. The angle of the sun changes drastically between the summer solstice and winter solstice. A well-designed hub will have an overhang (evas) on the south side. This overhang is calculated to shade the interior during the hot summer months when the sun is high, while allowing the low winter sun to penetrate deep into the structure to hit your thermal mass.
Example Scenario: The 200 Sq Ft Homestead Hub
Imagine a homestead in a Zone 5 climate, where winter temperatures regularly drop to -10°F (-23°C). The owner builds a 10′ x 20′ (3m x 6m) hub. The north wall is built from concrete blocks filled with sand and backed by 4 inches (10 cm) of rigid foam insulation. Six black-painted 55-gallon (200-liter) water barrels sit against this wall.
Under the floor, three runs of 4-inch (10 cm) perforated pipe are buried 5 feet (1.5 meters) deep. A solar-powered vent fan moves air through this system. In January, while the outside world is frozen, the internal temperature of the hub stays at a minimum of 45°F (7°C) at night without any supplemental fuel. During the day, the temperature rises to 75°F (24°C), and the excess heat is pushed underground.
The owner grows enough spinach, kale, and carrots to provide daily salads for a family of four throughout the winter. On the roof, three 300-watt solar panels provide enough power to run the fans, a small LED grow light for seedlings, and a pump for a 100-gallon (380-liter) fish tank. The waste from the fish provides the nitrogen for the plants, completing the loop. This is not just a garden; it is a 200-square-foot survival insurance policy.
Final Thoughts
The integrated solar greenhouse is the ultimate expression of homesteading wisdom. It moves us away from the “single-use” mindset that creates waste and toward an integrated approach that mimics the efficiency of nature. By combining the ancestral logic of thermal mass with modern advancements like BIPV and GAHT systems, we can create structures that provide more than they consume.
Success in this endeavor comes down to two things: planning and observation. Spend the time to calculate your solar angles and thermal mass requirements before you dig. Once the hub is built, pay attention to how the air moves and how the temperatures fluctuate. Every adjustment you make is a lesson in self-reliance that will serve you for decades.
Do not be afraid to start small, but always design with the whole ecosystem in mind. Whether you are building a simple earth-sheltered pit or a high-tech agrivoltaic hub, the goal is the same: to turn your square footage into a thriving, resilient power plant that feeds your family and your soil. The sun is providing the energy; all you have to do is build the vessel to catch it.
