How To Become More Self-Sufficient Without Starting a Full-Blown Farm…
Want to start preserving your harvest, making your own soap, or building a backyard root cellar — but not sure where to begin? “Homesteading Advice” gives you instant lifetime access to 35+ practical homesteading books on food preservation, veggie gardening, DIY natural cleaning products (save over $250 per year with this skill alone), brewing, off-grid energy, and a whole lot more…
Click Here To Check It Out Now!
Stop fighting the wind with expensive heaters and start using the earth’s natural 55-degree embrace. Our ancestors didn’t have heat lamps, yet their birds thrived. The earth-sheltered ‘Garth’ uses the constant temperature of the ground to keep chickens warm in winter and cool in summer. It’s the ultimate shelter that never needs a plug.
Modern homesteading often forgets the simple wisdom of the soil. We spend hundreds on thin-walled wooden coops and even more on electric bills to keep them habitable. Meanwhile, a few feet below the frost line, the earth maintains a steady temperature regardless of the blizzard or heatwave raging above. This is the principle behind the Garth, an ancient design that relies on thermal mass rather than technology.
Building into the ground allows you to tap into a massive battery of stored energy. This approach is more than just digging a hole; it is a way to create a self-regulating microclimate for your flock. Whether you live in the frozen north or the searing desert, the earth is your most powerful ally in poultry management.
This guide will walk you through the design, physics, and construction of an earth-sheltered chicken coop. You will learn how to harness geothermal stability while avoiding the common pitfalls of moisture and poor air quality. Let’s return to the ways that worked before the grid existed.
Earth Sheltered Chicken Coop Design
An earth-sheltered chicken coop, often historically referred to as a “Garth” or a “bank coop,” is a structure that uses the earth as its primary insulation. Unlike a traditional coop that stands fully exposed to the elements, this design is either partially or fully buried. The surrounding soil acts as a thermal buffer, slowing down the transfer of heat and keeping the interior environment stable.
History shows us that this method has been used for millennia. From the pit-houses of ancient Europe to the soddies of the American Great Plains, builders understood that the ground provides a 55-degree Fahrenheit (13 degrees Celsius) constant once you get deep enough. This temperature is the average annual air temperature for most temperate regions, and it remains remarkably consistent year-round.
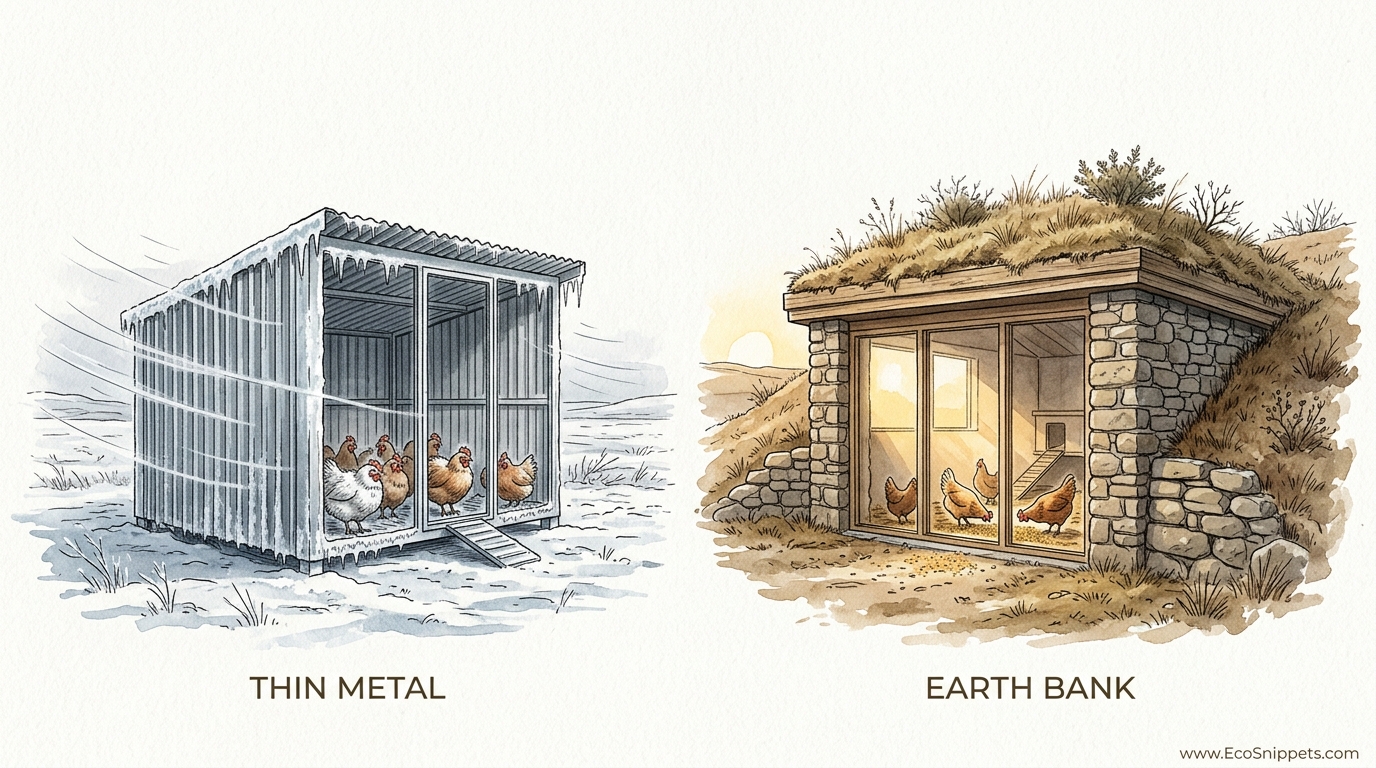
In the world of poultry, this design solves the two biggest killers: extreme cold and extreme heat. While a thin metal or wood coop can swing 40 degrees in a single day, an earth-sheltered structure might only vary by 5 degrees. This stability reduces stress on the birds, keeps egg production steady during winter, and prevents heat stroke in the summer.
Visualizing a Garth is easy if you think of a cellar with a glass front. One side—usually the south-facing side in the northern hemisphere—remains open to capture sunlight. The other three sides and often the roof are encased in earth. This creates a “cave” that is bright, dry, and protected from the biting winds that rob a bird of its body heat.
The Concept of Thermal Mass
Thermal mass is the ability of a material to absorb and store heat energy. Soil, concrete, and stone have high thermal mass. During a sunny winter day, the sun shines through the front windows and warms the floor and walls. The earth absorbs this heat and holds it, slowly releasing it back into the coop as the sun sets and the air cools.
This “thermal lag” means the coop is actually warmest when the chickens need it most—in the middle of the night. In the summer, the process reverses. The cool earth pulls heat away from the coop interior, keeping the chickens 20 degrees cooler than the outside air. It is a natural air conditioning system that requires zero maintenance.
How It Works: The Science of the Soil
To understand why an earth-sheltered coop is superior, you must understand the difference between insulation and thermal mass. Traditional insulation, like fiberglass or foam, works by trapping air to slow heat movement. However, it cannot store energy. Earth-sheltering uses both the insulating properties of the soil and its massive weight to create a “heat battery.”
The frost line is a critical measurement in this design. In many cold climates, the frost line can reach 3 to 4 feet (0.9 to 1.2 meters) deep. Above this line, the soil temperature fluctuates with the weather. Below this line, the temperature stabilizes. By sinking the floor of your coop below the frost line, you ensure that the chickens are standing on a surface that stays well above freezing even in a blizzard.
Orientation is the second key factor. For those in the northern hemisphere, the open or glazed side of the coop must face south. This allows for maximum solar gain during the short days of winter. In the southern hemisphere, the coop should face north. This passive solar design ensures the coop stays bright and sanitized by UV rays, which naturally kill many poultry pathogens.
Passive Solar Gain
Direct sunlight hitting a dark-colored earthen floor or a concrete footer creates a “heat sink.” This is not just about comfort; it is about biology. Chickens need sunlight to process Vitamin D and maintain high egg production. A Garth with a large, south-facing window wall provides more light than a tiny window in a wooden box, all while maintaining a tighter thermal seal.
Roofing can also be part of the system. A “green roof” or sod roof adds another layer of thermal protection. The plants on the roof transpire, which helps cool the structure in the summer. The thick layer of soil and roots on top acts as a heavy blanket, preventing the summer sun from baking the birds inside.
How to Build Your Earth-Sheltered Coop
Building a Garth is a labor-intensive process, but the results last for generations. Unlike a wooden coop that might rot in ten years, an earth-sheltered structure is essentially a permanent part of the landscape. Success depends on careful site selection and moisture management.
Step 1: Site Selection and Drainage
Never build an earth-sheltered coop at the bottom of a hill. Water follows gravity, and a buried structure in a low spot will become a swimming pool. Choose a south-facing slope or high ground where you can ensure water flows away from the structure. Test your soil; well-draining sandy loam is ideal, while heavy clay requires more aggressive drainage solutions.
Installing a French drain system is mandatory. This involves a trench filled with gravel and a perforated PVC pipe at the base of your excavation. This pipe should lead water at least 10 feet (3 meters) away from the coop site. Preventing hydrostatic pressure—the weight of water-saturated soil against your walls—is the single most important part of the build.
Step 2: Excavation
Dig into the bank or hillside to the desired depth. For a standard flock of 10 to 12 birds, a 10×10 foot (3×3 meter) footprint is usually sufficient. Excavate deep enough so that at least three sides are protected by at least 4 feet (1.2 meters) of earth. Keep the back wall vertical and stable; you may need to shore it up temporarily if your soil is loose.
Step 3: Wall Construction
Standard 2×4 framing will not work for the buried portions of a Garth. The weight of the earth will crush it over time. You must use materials capable of withstanding lateral pressure. Concrete blocks (CMUs), stone, or earthbags are excellent choices. If you use wood, it must be heavy-duty, marine-grade pressure-treated timbers or logs, though masonry is always preferred for its superior thermal mass.
Seal the exterior of the walls with a waterproof membrane. A thick rubber liner or a bitumen-based coating prevents moisture from seeping through the porous masonry. Without this barrier, your coop will remain perpetually damp, leading to respiratory issues for your birds and rot for your internal fixtures.
Step 4: The South Wall and Roof
The front wall should be primarily glass or heavy-duty clear polycarbonate. This acts as your solar collector. Ensure this wall is well-sealed against drafts but includes adjustable vents. The roof should have a significant overhang to prevent summer sun from entering the coop when it is high in the sky, while allowing the low winter sun to flood the interior.
For the roof, you can use traditional shingles or a living sod roof. A sod roof requires heavy-duty rafters—usually 2x10s or 2x12s spaced closely—to support the weight of the wet soil. If you choose a metal roof, insulate the underside heavily to prevent condensation from dripping onto your birds at night.
Benefits of the Earth-Sheltered Garth
The primary advantage of this system is total energy independence. You will never have to worry about a power outage during a cold snap. While your neighbors are running extension cords for heat lamps—which are a major fire hazard—your chickens will be roosting in a stable 50-degree environment. This is the ultimate in self-reliant animal husbandry.
Predator protection is another massive benefit. Most predators like raccoons, foxes, and weasels look for weak points in wooden panels or gaps in wire. An earth-sheltered coop is surrounded by several feet of solid earth on three sides. By burying hardware cloth 12 inches (30 cm) deep along the front wall, you create a fortress that is nearly impossible for a digging predator to breach.
Noise reduction is an overlooked plus. If you have a rooster and close neighbors, the earth acts as a natural sound muffler. The “crow” of a rooster inside an earth-sheltered coop is significantly dampened by the time it reaches the surface. This can be the difference between keeping your flock or facing a noise complaint in semi-rural areas.
Finally, there is the factor of longevity. Wood coops eventually succumb to the cycles of wetting and drying, UV damage, and insect infestation. A masonry-lined earth bank coop is essentially a bunker. It can withstand high winds, hail, and even falling tree limbs without flinching. It is a one-time investment of labor for a lifetime of service.
Challenges and Common Mistakes
Moisture is the primary enemy of the earth-sheltered builder. Because the coop is cooler than the outside air in summer and warmer in winter, condensation can form on the walls if there is not enough airflow. High humidity leads to ammonia buildup from droppings, which can cause permanent lung damage to chickens. Never compromise on ventilation to save heat.
Improper drainage is the second most common failure. Many people underestimate how much water moves through the soil after a heavy rain. If you do not have a robust gravel and pipe system, the floor of your coop will become a muddy mess. This moisture will rot your bedding and create a breeding ground for coccidiosis and other parasites.
Another mistake is failing to account for “thermal bridging.” If you have a concrete wall that is partially underground and partially exposed to the cold air above, the cold will travel down the wall and into the coop. You must insulate the top “lip” of your buried walls to break this bridge and keep the thermal energy inside where it belongs.
The Ammonia Trap
In a traditional raised coop, air often leaks through the floor and walls, which inadvertently helps clear out ammonia. In a tightly sealed earth-sheltered coop, ammonia will settle near the floor because it is heavier than air. You must design your ventilation to pull air from the bottom and vent it out the top, creating a “chimney effect” that keeps the air fresh and breathable.
Limitations and Environmental Constraints
Earth-sheltering is not a universal solution for every property. If your water table is within 3 or 4 feet (0.9 to 1.2 meters) of the surface, you cannot build a Garth. You will be fighting a losing battle against rising groundwater. In flat, marshy areas, a raised wooden coop is a much safer and more practical choice for the health of your flock.
Soil type also dictates feasibility. If you live on a solid granite ledge, the cost of blasting or jackhammering a hole will far outweigh the energy savings. Conversely, if your soil is pure sand, it will not have the structural integrity to support a berm without extensive and expensive retaining walls. The best candidates for this design are those with deep, stable soil on a sloped grade.
Maintenance access is another limitation. It can be harder to “deep clean” an earth-sheltered coop because you cannot simply hose it out as easily as a raised coop with a sloped floor. You must design the interior for ease of access, with wide doors and enough headroom for you to stand up comfortably. If it is a chore to clean, it will not get done, and your birds will suffer.
Comparison: Thin Metal vs. Earth Bank
Understanding the difference between modern “retail” coops and an ancestral Garth is a study in efficiency. Most commercial coops are designed for the ease of the manufacturer, not the comfort of the bird.
| Factor | Thin Metal/Wood Coop | Earth Bank Garth |
|---|---|---|
| Thermal Stability | Poor; mimics outside temp within an hour. | Excellent; maintains 50-60°F year-round. |
| Lifespan | 5–10 years. | 50+ years. |
| Predator Security | Moderate; prone to chewing/prying. | Maximum; three sides are solid earth. |
| Initial Cost | Low to Medium ($300–$800). | High (Labor + Heavy Materials). |
| Energy Use | Requires heaters in winter/fans in summer. | Zero external energy required. |
While the initial investment in a Garth is higher, the “cost per egg” drops significantly over the life of the structure. You aren’t just building a coop; you are building an asset that adds value to your land and provides security for your food supply.
Practical Tips and Best Practices
To maximize the efficiency of your earth-sheltered coop, use the “Deep Litter Method” for your floor. This involves starting with 6 inches (15 cm) of wood shavings or straw and simply adding more as it breaks down. The composting action of the litter generates a small amount of its own heat, which stays trapped in the earthen floor, adding a few extra degrees of warmth during the coldest months.
Paint the interior walls white. Earth-sheltered coops can be dark, and white walls will help reflect the limited winter sunlight into every corner. This discourages mites and lice, which prefer dark, dusty crevices. It also makes it easier for you to inspect your birds for health issues during your daily chores.
Install “Earth Tubes” for ventilation. These are long PVC pipes buried 4 to 6 feet (1.2 to 1.8 meters) deep that run from an inlet 20 feet (6 meters) away into the coop. As fresh air travels through the buried pipe, the earth warms it (in winter) or cools it (in summer) before it ever enters the coop. This provides “tempered” fresh air that doesn’t shock the birds with a freezing draft.
- Use double-pane glass or twin-wall polycarbonate for the south-facing windows to prevent heat loss at night.
- Place roosts toward the back of the coop, where the earth’s thermal mass is most consistent.
- Install a heavy, insulated door with a good weather-strip to prevent the “wind tunnel” effect.
- Include a “mud room” or airlock entry if you live in an extremely windy area to keep the main chamber stable.
Advanced Considerations: The Walipini Integration
For the serious practitioner, an earth-sheltered coop can be integrated with an underground greenhouse, also known as a Walipini. Chickens and plants have a symbiotic relationship. The chickens exhale carbon dioxide (CO2), which the plants need to grow. In return, the plants produce oxygen and help filter the air.
The chickens also provide “biological heat.” Each bird is like a small 10-watt heater. In an integrated system, the warmth from the chickens can help keep your winter vegetables from freezing. Furthermore, the chickens can be allowed into the greenhouse portion during the off-season to tilling the soil and provide high-nitrogen fertilizer directly where it’s needed.
This “closed-loop” system is the pinnacle of permaculture design. It requires careful planning to manage smells and ensure the birds don’t eat your seedlings, but the efficiency is unmatched. You are essentially creating a self-sustaining life-support system for both your protein and your produce.
Example Scenario: A Montana Winter
Imagine a January night in Montana where the temperature drops to -20 degrees Fahrenheit (-29 degrees Celsius). In a standard wooden coop, the water is frozen solid within an hour, and the chickens are huddled together, burning all their energy just to stay alive. Egg production has stopped entirely, and frostbite on combs is a real threat.
In the Garth, 10 feet (3 meters) away, the scene is different. The floor of the coop is 52 degrees Fahrenheit (11 degrees Celsius). The thick earth walls have released the heat they collected from the afternoon sun. The water in the drinker is liquid without the need for a heater. The birds are sleeping comfortably on their roosts, their bodies not under the stress of extreme thermoregulation. The next morning, the owner finds a full clutch of eggs, despite the arctic conditions outside.
This is not a fantasy; it is the reality of thermal inertia. By working with the earth rather than fighting it, you change the rules of the game. You move from a state of constant crisis management to one of relaxed, predictable husbandry.
Final Thoughts
The earth-sheltered chicken coop is a return to a more grounded way of living. It acknowledges that the solutions to our modern problems often lie in the soil beneath our feet. While it requires more sweat and planning than a store-bought kit, the payoff is a structure that is silent, steady, and incredibly secure.
Applying these principles doesn’t require you to be an engineer. It only requires a respect for the natural laws of thermodynamics and a willingness to dig. By providing your flock with a shelter that mirrors the stability of the earth, you are ensuring their health and your own self-reliance for years to come.
Experiment with these designs. Start with a simple bermed wall or a partially sunken foundation. Once you see the difference in your birds’ behavior and your own peace of mind, you may never go back to “thin-wall” farming again. The earth is ready to protect your flock; all you have to do is let it.
