
How To Become More Self-Sufficient Without Starting a Full-Blown Farm…
Want to start preserving your harvest, making your own soap, or building a backyard root cellar — but not sure where to begin? “Homesteading Advice” gives you instant lifetime access to 35+ practical homesteading books on food preservation, veggie gardening, DIY natural cleaning products (save over $250 per year with this skill alone), brewing, off-grid energy, and a whole lot more…
Click Here To Check It Out Now!
You are literally throwing away the secret ingredient to the perfect set in every single apple peel. Most jam makers are slaves to the yellow box in the canning aisle. They pay for industrial thickeners that mask the true flavor of the fruit. But the pro preservationists know that the most powerful setting agent on earth is hiding in the ‘waste’ of your harvest. Here is how to extract precision pectin from scraps for $0.
Making your own pectin is not just about saving a few dollars at the grocery store. It is about reclaiming a lost art that connects you to the rhythm of the seasons and the logic of the kitchen. When you rely on store-bought powders, you are using a standardized product designed to work with massive amounts of sugar. This often results in a jam that tastes more like a candy bar than the fruit it came from.
Homemade pectin allows you to control the texture and the sweetness of your preserves. It gives you the flexibility to work with the natural chemistry of your fruit. By learning this skill, you move from being a recipe-follower to a true craftsman of the larder. You will find that the best jellies do not come from a factory, but from the discarded cores and skins of your autumn harvest.
This guide will walk you through the entire process of extracting, testing, and using liquid pectin. Whether you are dealing with a bumper crop of tart apples or just want to reduce your kitchen waste, this method is the gold standard for self-reliant canning. Let us dive into the science and the soul of the perfect set.
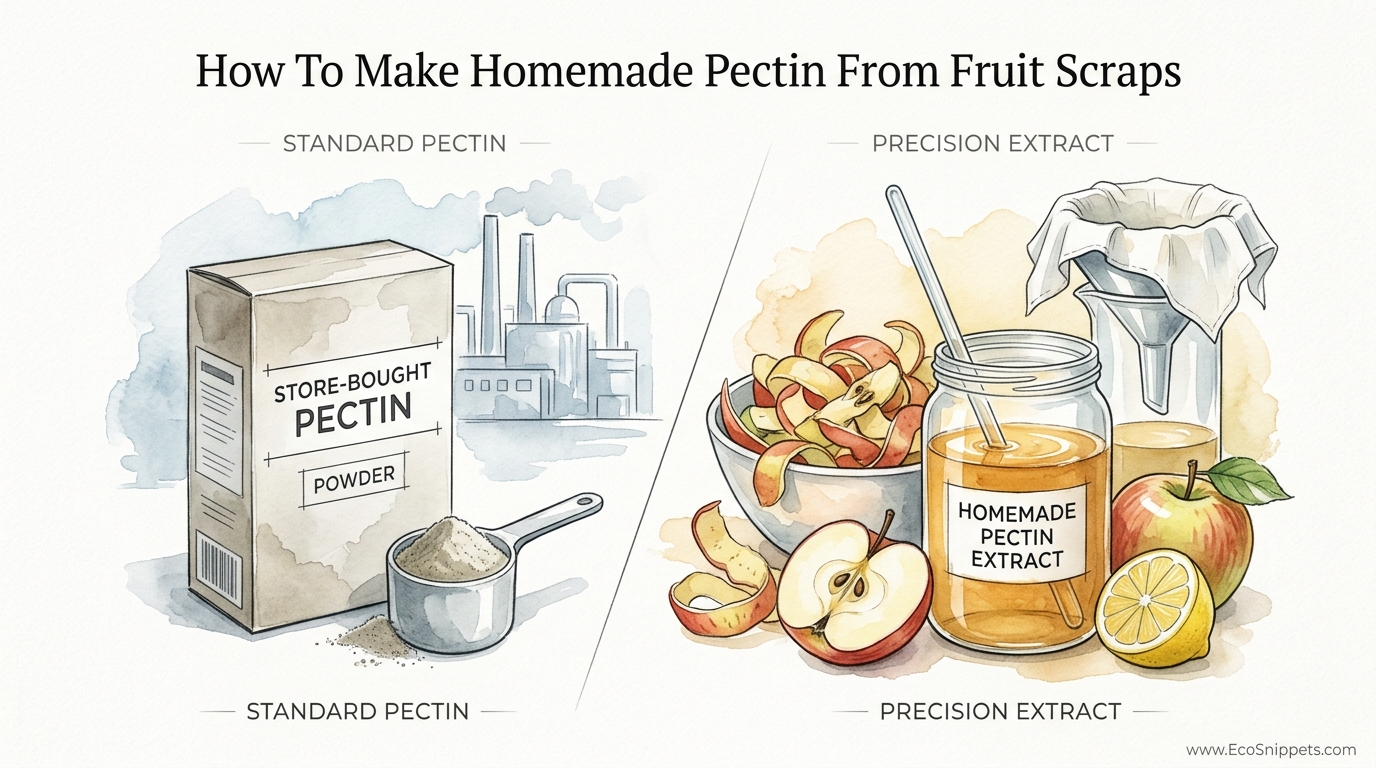
How To Make Homemade Pectin From Fruit Scraps
Homemade pectin is a liquid extract pulled from the cell walls of high-pectin fruits, most commonly tart apples, crabapples, or citrus peels. In the plant world, pectin is the “glue” that holds cell walls together. When you heat these scraps in an acidic environment, that glue dissolves into the water, creating a thick, syrupy concentrate. This concentrate is what causes your jam to transition from a runny sauce to a spreadable delight.
This extract exists because not all fruits are created equal in the eyes of the preserver. Strawberries, peaches, and cherries are notoriously low in natural pectin. Without an assist, they will never reach a firm set no matter how long you boil them. Traditionally, cooks would mix these low-pectin fruits with “pectin stock” made from more resilient fruits. This allowed them to preserve the delicate flavors of summer berries without turning them into a caramelized mess through over-boiling.
In real-world terms, making your own pectin is the ultimate exercise in nose-to-tail vegetable gardening. If you are making apple pie or applesauce, you are usually left with a mountain of peels and cores. Instead of tossing them in the compost, you can turn them into the most valuable tool in your pantry. It is a closed-loop system that honors the whole fruit and ensures nothing goes to waste.
Think of homemade pectin as a culinary foundation, similar to a high-quality bone broth. Just as a good stock provides the body for a soup, this extract provides the structure for your preserves. It is subtle, natural, and carries a hint of the fruit’s original tartness, which actually enhances the flavor of the jam rather than dulling it with the chalky aftertaste some commercial powders can leave behind.
The Science of the “Set”: How Pectin Extraction Works
To extract pectin effectively, you must understand the relationship between heat, acid, and time. Pectin is most abundant in fruit that is slightly under-ripe. As fruit ripens, the pectin breaks down into pectic acid, which does not have the same gelling power. This is why we use tart, green apples or crabapples—they are essentially pectin factories in their prime.
The extraction process involves simmering these scraps in water. The heat breaks down the cellular structure, while the natural acidity of the fruit (or added lemon juice) helps pull the pectin into the liquid. If you boil the mixture too hard or for too long, you risk breaking the pectin chains you are trying to capture. A gentle, persistent simmer is the key to a high-quality extract.
Once the scraps have surrendered their pectin, the resulting liquid is strained. This liquid is essentially “raw” pectin. To make it “precision” pectin, we often reduce it further through evaporation. This concentrates the pectin molecules, making the extract more potent. A more concentrated extract means you can use less of it in your jam, preventing the final product from becoming too diluted or tasting too much like apples.
The final component of the science is the “gelation” that happens in the jam pot. Pectin molecules are naturally negatively charged, meaning they repel each other. To get them to bond together into a mesh (the gel), you need two things: sugar and acid. The sugar attracts water molecules away from the pectin, and the acid neutralizes the negative charges. This allows the pectin chains to lock together, trapping the fruit juice in a beautiful, spreadable matrix.
Choosing Your Scraps
While apples are the most common source, citrus fruits are also pectin powerhouses. The white pith (the albedo) of lemons, limes, oranges, and grapefruits contains incredible amounts of pectin. If you are a fan of marmalade, you are already using this principle. For a neutral pectin that works with almost any fruit, however, tart apples remain the undisputed champion.
The Role of Maturity
Always aim for a mix of ripeness if you are using whole fruit. A good rule of thumb is 1/4 under-ripe fruit for the pectin and 3/4 ripe fruit for the flavor. If you are using only scraps, try to ensure they come from firm, tart varieties like Granny Smith or Northern Spy. Avoid using over-ripe, mealy apples, as their pectin has already begun to degrade into sugar and water-soluble pectic acid.
Step-by-Step Extraction Process
Gather approximately 2 to 3 kilograms (4 to 6 pounds) of apple peels, cores, and scraps. If you have crabapples, you can use them whole, just halved. Place the scraps into a large, non-reactive stockpot. Stainless steel or enamel-coated cast iron is best; avoid aluminum or unlined copper, as the high acidity can react with the metal and give your pectin a metallic tang.
Add enough water to just barely cover the scraps. You do not want them swimming in a deep pool of water, or your extract will be too thin. A good ratio is roughly 2.5 liters (10 cups) of water for every 1 kilogram (2.2 pounds) of scraps. If you are using very dry peels, you might need a touch more. Add 30 milliliters (2 tablespoons) of bottled lemon juice to provide the necessary acidity for extraction.
Bring the pot to a boil over medium-high heat. Once it reaches a rolling boil, immediately turn the heat down to a low simmer. Cover the pot and let it cook for 40 to 60 minutes. You are looking for the scraps to become completely mushy. If you are using cores, you should be able to easily crush them against the side of the pot with a wooden spoon. The liquid should look cloudy and feel slightly “slippery” or “slimy” between your fingers—that is the pectin.
Prepare a straining station. Place a colander over a large bowl and line it with several layers of cheesecloth or a clean, tight-weave cotton jelly bag. Pour the contents of the pot into the strainer. Now comes the most important rule of the old-school preserver: **Do not squeeze the bag.** If you squeeze the pulp, you will force fine particles of fruit fiber through the cloth, resulting in a cloudy, muddy-looking pectin and, eventually, a cloudy jelly.
Let the mixture strain for at least 4 hours, or ideally overnight. Once the dripping has stopped, you will have a bowl of pale, amber-colored liquid. This is your raw liquid pectin. To ensure it is strong enough to set a jam, return this liquid to a clean pot and boil it until it has reduced by about half. This concentration step is what turns a “maybe” set into a “precision” set.
- Metric: 2.5 Liters water to 1 kg scraps.
- Imperial: 10 Cups water to 2.2 lbs scraps.
- Temperature: Maintain a gentle simmer around 85°C to 95°C (185°F to 203°F).
The Alcohol Test: How to Verify Pectin Strength
Because every batch of apples is different, you cannot rely on a timer alone to tell you if your pectin is ready. Professional preservers use the Isopropyl Alcohol Test to measure the concentration of the extract. This is a simple, visual way to see if your pectin has the “muscle” to do its job. Note that this test is for measurement only; the test sample is poisonous and must be discarded immediately.
Take one teaspoon of your *cooled* liquid pectin and place it in a small glass jar or bowl. Add three teaspoons of rubbing alcohol (70% or higher isopropyl alcohol). Gently swirl the mixture or give it a light shake. Let it sit for about 60 seconds. You are looking for the pectin to coagulate into a solid mass in the presence of the alcohol.
If the pectin forms a single, firm, jelly-like blob that you can pick up with a fork, you have a high-concentration extract. This is “Precision Pectin.” If it forms several small, weak-looking clumps, it is moderate. If it stays liquid or forms tiny, hair-like threads, it is too weak. If your test fails, simply return the liquid to the stove and boil it down further to concentrate the molecules, then test again once it has cooled.
Always perform this test on cooled pectin. Heat keeps the pectin molecules moving too fast to bond correctly with the alcohol, which can lead to a false negative. Once you have a batch that produces a solid, “fork-able” mass, you can be confident that it will set your jams and jellies with ease. This takes the guesswork out of the canning process and prevents the heartbreak of “runny syrup” syndrome.
Benefits of Making Your Own Pectin
The primary benefit is flavor. Commercial pectins often require a specific, very high ratio of sugar to fruit to activate the gel. This can lead to a “sugar-forward” jam where the nuances of the fruit are lost. Homemade pectin is more forgiving. Because you are controlling the concentration of the extract, you can often achieve a set with less sugar, allowing the natural tartness and aroma of the fruit to shine through.
There is also the matter of cost and self-reliance. A small box of commercial pectin can be surprisingly expensive, especially if you are processing a large harvest. By using scraps, you are creating a premium product for essentially $0. In a world where supply chains can be fragile, knowing how to produce your own setting agent from your own backyard is a vital skill for the modern homesteader.
Furthermore, homemade pectin is free from additives. Many commercial brands contain dextrose (often derived from GMO corn) and citric acid to standardize the product. While these are generally safe, they are industrial inputs that many people prefer to avoid in their artisanal cooking. Your homemade extract is just fruit, water, and perhaps a splash of lemon juice—clean, simple, and ancestral.
Finally, the texture achieved with homemade pectin is often superior. It produces a “soft set” that is spreadable and luscious, rather than the “rubber-ball” texture that can occur if you over-medicate a jam with too much commercial powder. It feels more like a preserve and less like a store-bought gelatin dessert.
Challenges and Common Mistakes
One of the most frequent errors is using over-ripe fruit. We have all been tempted to use those soft, sweet apples that are past their prime for eating, but for pectin making, they are useless. The enzyme polygalacturonase has already broken down the pectin chains into smaller pieces that cannot form a strong mesh. Stick to the tart, firm, and “ugly” apples for this job.
Another mistake is rushing the straining process. If you get impatient and start squeezing the jelly bag, you will regret it. The resulting jam will have a cloudy, matte appearance instead of the sparkling, jewel-like clarity that defines a master-level preserve. If clarity is your goal, let gravity do the work. If you don’t mind a “rustic” look, you can squeeze, but be aware it may also change the flavor by introducing more tannins from the skins.
Over-boiling the pectin during the reduction phase can also be a problem. While you want to concentrate the liquid, boiling it for hours at a violent roll can eventually degrade the pectin molecules. You are looking for a steady, controlled reduction. If the liquid starts to smell like “cooked” or “burnt” apples, you have gone too far. It should smell fresh and tart.
Lastly, many beginners fail to adjust their jam recipes for the extra liquid. Remember, homemade pectin is a liquid, not a powder. When you add a cup of pectin extract to your fruit, you are adding a cup of water along with it. This means you will need to boil your jam slightly longer than a “no-pectin” recipe to evaporate that extra moisture, or ensure your pectin is highly concentrated before you start.
Limitations: When This Method May Not Be Ideal
Homemade pectin is not a “set-and-forget” solution. Because every batch varies in strength, it requires a level of intuition and testing that commercial products do not. If you are in a massive hurry or are canning hundreds of jars for a commercial venture where absolute consistency is required for labeling, the standardized “yellow box” might be more practical.
Environmental factors can also play a role. In very humid climates, getting a firm set with homemade pectin can be more challenging because the sugar absorbs moisture from the air. You may find yourself needing to reduce your pectin to a very thick syrup to compensate for the humidity during the final jam-making process.
Additionally, if you are making “low-sugar” or “no-sugar” jams, traditional homemade pectin is not the best choice. This type of pectin is “High-Methoxyl,” meaning it *requires* a significant amount of sugar (usually 55% to 65% by weight) to form a gel. If you want to use stevia or very little sugar, you would need a “Low-Methoxyl” pectin, which usually requires the addition of calcium to set—something that is difficult to replicate with simple kitchen scraps.
PRECISION EXTRACT vs. STANDARD PECTIN
It is helpful to see how these two options stack up when you are planning your canning season. While both serve the same purpose, the experience of using them is quite different.
| Feature | Homemade Precision Extract | Standard Boxed Pectin |
|---|---|---|
| Cost | Near zero (uses scraps) | $3 – $6 per batch |
| Flavor Impact | Enhances fruit with natural tartness | Neutral, but can be “chalky” |
| Sugar Requirement | Flexible (but generally high) | Strictly high for most types |
| Skill Level | Intermediate (requires testing) | Beginner (follow the chart) |
| Consistency | Variable batch to batch | Highly predictable |
Practical Tips and Best Practices
One of the best ways to manage your pectin supply is to “build” it over time. Keep a gallon-sized freezer bag in your kitchen. Every time you peel an apple for a snack or a pie, toss the peels and cores into the bag. When the bag is full, you have enough for a batch. This removes the pressure of having to process everything at once during the height of the harvest.
When you are ready to make jam, start with a 1:4 ratio. That is, use 125 milliliters (1/2 cup) of your precision pectin for every 500 grams (roughly 2 cups) of prepared fruit. If your alcohol test showed a very strong set, you might be able to use less. If the set was weak, you might need to go up to 250 milliliters (1 cup) of pectin per 500 grams of fruit.
Always add your pectin at the *beginning* of the cooking process with the fruit and the lemon juice. This gives the pectin molecules time to fully hydrate and begin their work before the sugar is added. Sugar should generally be added only after the fruit has softened and the mixture has come to a boil. Adding sugar too early can toughen the fruit skins and interfere with the pectin’s initial activation.
- Use Bottled Lemon Juice: Fresh lemons vary in acidity. For consistent pectin extraction and jam setting, bottled juice provides a reliable pH level.
- Clean Your Gear: Any grease or residue in your pots can interfere with the pectin chains. Ensure your equipment is “squeaky clean.”
- The Sheet Test: In addition to the alcohol test, use the “cold plate” or “spoon sheet” test during the final jam boil. Dip a cold metal spoon into the jam; if the drops run together and “sheet” off the edge in a single flap, your set is achieved.
Advanced Considerations: Preservation and Scaling
If you have made a large batch of pectin, you need to store it correctly. Liquid pectin is a biological product and will spoil if left on the counter. You have three main options: refrigeration, freezing, or canning. Refrigerated pectin should be used within 5 to 7 days. If you don’t plan to jam immediately, freezing is an excellent option. Pour the extract into silicone muffin molds or ice cube trays to create “pre-measured” pectin pucks that you can drop straight into the jam pot later.
For long-term shelf storage, you can water-bath can your pectin. Pour the hot, reduced extract into sterilized half-pint (250 ml) jars, leaving 6 millimeters (1/4 inch) of headspace. Process them in a boiling water bath for 10 minutes (adjusting for altitude). This allows you to have a “pectin library” ready for whenever a friend gifts you a bucket of low-pectin berries out of season.
Scaling up requires attention to the pot size. When you double a pectin recipe, do not just double the water and the scraps in the same pot. You need a wide, shallow pan to allow for efficient evaporation. If the pot is too deep and narrow, the bottom layer of pectin may begin to break down from over-cooking before the top layer has properly reduced. Professional jam makers often use wide copper or stainless steel “maslin” pans for this very reason.
Serious practitioners also look at the “pectin potential” of different apple varieties. While Granny Smith is the standard, wild crabapples or “hedgerow” apples often have significantly higher pectin levels due to their high tannin content and smaller size (more skin-to-flesh ratio). If you find a wild apple tree that produces fruit too tart to eat, you have found a pectin goldmine.
Example Scenario: Strawberry Jam from Scratch
Let’s look at how this works in a real kitchen scenario. You have 1 kilogram (about 2.2 pounds or 4-5 cups) of fresh, ripe strawberries. Strawberries are notorious for being low-pectin. In a “standard” recipe, you might be told to use a whole box of powdered pectin and 7 cups of sugar. Instead, we will use our precision extract.
First, prepare your strawberries by hulling and mashing them. Add 30 milliliters (2 tablespoons) of lemon juice and 250 milliliters (1 cup) of your concentrated homemade apple pectin. Bring this mixture to a boil. Notice how the mixture already feels slightly “heavier” than plain strawberry juice.
Next, add 750 grams (about 3.75 cups) of sugar. This is significantly less sugar than many commercial recipes require. Bring the mixture back to a full rolling boil—one that cannot be stirred down. Continue to boil, stirring frequently to prevent scorching, for about 10 to 15 minutes. Start performing your “cold plate test” at the 10-minute mark.
When the jam wrinkles on the cold plate, you have achieved a perfect set. The resulting jam will be bright red, taste intensely of strawberries with a slight tart backbone from the apple pectin, and will spread perfectly on your morning toast. You have successfully bypassed the “yellow box” and used science and scrap-wisdom to create a superior product.
Final Thoughts
Learning how to make your own pectin is a foundational skill for anyone serious about food preservation. It moves you away from the “industrial” model of canning and back into a world of sensory experience and natural cycles. By using the scraps that others throw away, you are participating in a tradition of thrift and quality that has sustained households for centuries.
Don’t be discouraged if your first batch isn’t perfect. Pectin making is as much about feel as it is about measurement. The more you work with the Isopropyl test and the cold plate, the more you will develop a “sixth sense” for the set. You will start to recognize the specific amber hue of a strong extract and the way the bubbles change shape in the jam pot when the gel is about to form.
The next time you peel an apple, remember that you are holding the key to a better pantry. Save those scraps, fire up the stove, and start experimenting. Your preserves—and your wallet—will thank you. Once you have mastered the art of the precision extract, you will never look at a “yellow box” the same way again.
