How To Become More Self-Sufficient Without Starting a Full-Blown Farm…
Want to start preserving your harvest, making your own soap, or building a backyard root cellar — but not sure where to begin? “Homesteading Advice” gives you instant lifetime access to 35+ practical homesteading books on food preservation, veggie gardening, DIY natural cleaning products (save over $250 per year with this skill alone), brewing, off-grid energy, and a whole lot more…
Click Here To Check It Out Now!
The difference between a record-breaking harvest and a total failure is often just three feet of shadow you didn’t see coming. Most people plant where there is empty space. The pros use a Sun-Path map to find the 8-hour sweet spot that never moves. Learn how to stop guessing and start growing.
Understanding the land is the first duty of any steward. We often look at a flat piece of dirt and see a blank canvas, but the sky tells a different story. The sun is not a static lamp; it is a moving engine of energy that dictates the rhythm of every living cell on your property. If you ignore its path, you are fighting a battle against physics that you cannot win. Permaculture solar mapping is the art of translating that celestial movement into a practical blueprint for survival and abundance.
This process is about more than just finding a sunny spot for a tomato plant. It is about identifying the “solar sector”—the specific arc of energy that moves across your site throughout the year. By mapping this sector, you can place your home to stay warm in the winter without a furnace, cite your greenhouse to catch the first rays of spring, and ensure your orchards aren’t plunged into a killing shadow during the shortest days of the year. It is the foundation of self-reliance, rooted in the ancestral wisdom of those who built according to the seasons long before the advent of the electric grid.
Permaculture Solar Mapping Guide
Permaculture solar mapping is the systematic observation and recording of how sunlight and shadow interact with a specific piece of land across all four seasons. In the world of ecological design, we call this “sector analysis.” While a wind sector might show you where the cold gales come from, the solar sector reveals where your primary energy source originates. It exists to remove the guesswork from homesteading and landscape design, ensuring that every element—from a chicken coop to a vegetable bed—is placed in its optimal environment.
At its core, solar mapping is a bridge between the cosmic and the terrestrial. In the Northern Hemisphere, the sun always travels through the southern sky, casting shadows to the north. In the Southern Hemisphere, the reverse is true; the sun moves through the northern sky, and shadows fall to the south. Understanding these fundamental rules allows a practitioner to predict exactly where light will be six months from today. This is crucial because a spot that looks like a sun-drenched paradise in July might be a frozen, lightless tomb in December. Real-world applications range from professional farm design to urban backyard gardening, where every square inch of light is a precious commodity.
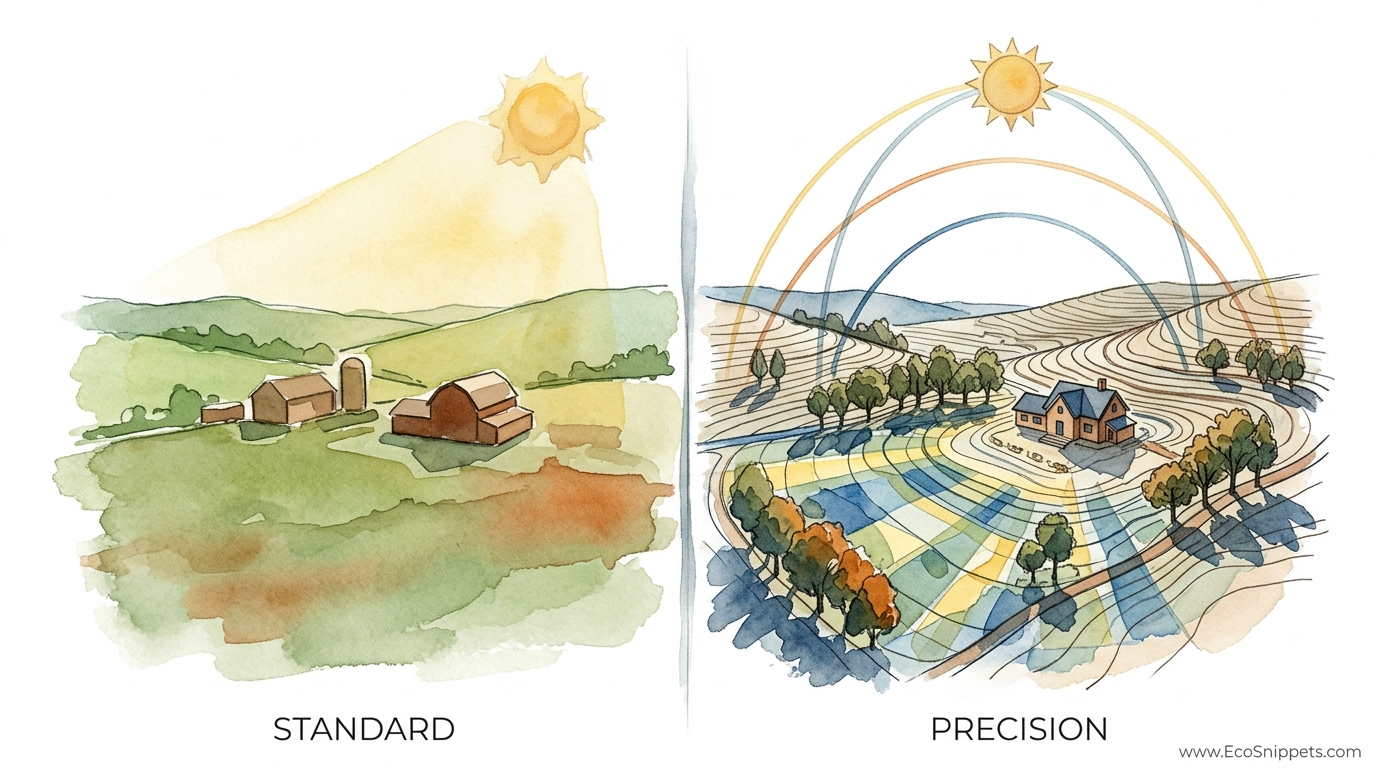
Think of the sun as a slow-moving flood of light. Some areas of your land are high ground, bathed in this flood for most of the day. Others are canyons, deep in the shadow of trees or buildings. A solar map is your topographic guide to this “light-scape.” By creating one, you are no longer a passive observer of the weather; you become a designer who works with the natural flows of the planet. This is the hallmark of PRECISION over STANDARD guesswork, where you trade hope for data-driven confidence.
How the Solar Clock Works: Azimuth and Altitude
To map the sun with any degree of accuracy, you must understand two primary measurements: azimuth and altitude. Azimuth is the compass bearing of the sun—where it is horizontally in relation to North, South, East, and West. Altitude is the vertical angle—how high the sun sits above the horizon. These two numbers change every minute of every day, but they follow a predictable pattern dictated by the tilt of the Earth’s axis.
During the Summer Solstice, the sun reaches its highest point in the sky and travels its longest arc, rising and setting further towards the poles. This is the time of maximum energy but also maximum heat stress. Conversely, during the Winter Solstice, the sun stays low on the horizon, traveling a much shorter path and rising/setting further towards the equator. This is when shadows are at their longest, stretching deep across your land and potentially blocking your greenhouse or solar panels. The Equinoxes—Spring and Autumn—mark the midpoint, where day and night are equal and the sun follows a central path.
Mapping these extremes is the key to a resilient design. If you know the “solar window”—the area between the high summer arc and the low winter arc—you can place deciduous trees to provide cooling shade in the summer while dropping their leaves to allow warming light through in the winter. This is the essence of passive solar design, a technique that has been used for millennia to keep dwellings comfortable without the need for external energy inputs.
Tools of the Trade: From Shadows to Software
There are many ways to capture the sun’s path, ranging from ancient techniques to modern digital interfaces. The method you choose depends on your needs, your budget, and how much time you are willing to spend in the field. Every tool has its place, whether you are managing a 100-acre farm or a tenth-of-an-acre urban lot.
Analog and Manual Methods
- The Observation Log: The simplest and most reliable tool is your own eyes. By taking a photograph or sketching your yard at 9:00 AM, 12:00 PM, and 3:00 PM on the solstices and equinoxes, you create a visual record of shadow movement. This requires patience—ideally a full year of observation—but it provides a visceral understanding of the land that no app can replicate.
- The Solar Pathfinder: This is the gold standard for many professional permaculture consultants. It is a non-electronic device consisting of a reflective dome and a sun-path chart. When placed on a site, the dome reflects all nearby obstacles—trees, buildings, fences—and shows exactly which months and hours they will cast a shadow. It allows you to do a full year’s solar analysis in about ten minutes, regardless of whether the sun is actually shining at that moment.
- Stakes and Strings: For those who prefer a hands-on approach, driving stakes into the ground at the tip of a shadow at various times of day can create a physical map of light movement. This is particularly useful when planning a new building or a major garden bed.
Digital and High-Tech Solutions
- Sun-Mapping Apps: Applications like Sun Seeker or Lumos use augmented reality (AR) to project the sun’s path onto your phone’s camera view. You can stand in your garden in the middle of a rainstorm in October and see exactly where the sun will be at 2:00 PM on the Fourth of July. These are excellent for quick assessments.
- SunCalc.org: This free online tool allows you to input your address and see a top-down view of the sun’s angles for any date and time. It is a fantastic resource for initial planning before you even step onto the property.
- 3D Modeling (SketchUp): For complex sites with many buildings or steep topography, professional designers often build a 3D model. Most architectural software allows you to “geo-locate” the model, enabling you to run shadow simulations for any time of the year.
Step-by-Step: Creating Your Sun-Path Map
Creating a solar map doesn’t require a degree in astrophysics, but it does require a disciplined approach. Follow these steps to build a map that will serve as your property’s “energy manual” for years to come.
Step 1: Create Your Base Map
Start with a clear, birds-eye view of your property. You can use a satellite image from Google Earth as a template. Trace the major features: the house, large trees, sheds, fences, and property lines. Make sure you have a clear “North” arrow on your map. For accuracy, measurements should be included—either in meters or feet—to ensure that a 10-foot (3-meter) shadow on your map corresponds to the real-world conditions.
Step 2: Identify Obstacles
Walk your property and note the height of any structures or plants that might block the sun. A 20-foot (6-meter) evergreen tree on your southern boundary (in the Northern Hemisphere) will cast a very different shadow than a 5-foot (1.5-meter) fence. Note whether trees are deciduous or evergreen; this is critical, as a deciduous tree “disappears” as an obstacle for half the year, allowing sunlight to pass through its bare branches.
Step 3: Plot the Solstice Shadows
If you are using the manual method, choose the Winter Solstice (around December 21 in the North, June 21 in the South) to map your “worst-case” shadows. This is when shadows are longest. Mark the shaded areas at 9 AM, Noon, and 3 PM. Then, do the same for the Summer Solstice. The area that remains sunny even in the dead of winter is your “8-hour sweet spot.” This is where your high-value crops, greenhouses, and solar panels belong.
Step 4: Divide Into Light Zones
Color-code your map based on the hours of direct light received:
- Full Sun (Yellow): 6 to 8+ hours of direct light year-round. This is prime real estate for vegetables, fruit trees, and solar energy.
- Partial Sun/Shade (Blue): 3 to 6 hours of light, or dappled light through trees. Ideal for leafy greens, berries, and certain root crops.
- Full Shade (Brown): Less than 3 hours of light. This area is best for mushrooms, cool-season storage, or utility areas like compost piles and tool sheds.
Benefits of Precision Solar Mapping
The primary advantage of solar mapping is the massive increase in efficiency and yield. When a plant is in its ideal light environment, it grows faster, resists pests better, and produces more fruit. You aren’t just planting a seed; you are placing it in a high-octane energy stream. This extends beyond the garden, however. Proper solar mapping can reduce your home heating bills by up to 30% or more by simply allowing the winter sun to hit your windows and thermal mass surfaces.
Furthermore, solar mapping is essential for animal welfare. Chickens that receive morning sun in the winter are healthier and more productive. Livestock need shade in the height of summer to prevent heat stress. By mapping your sectors, you can ensure that your coop and paddocks provide the right microclimate for every season. This is the difference between a homestead that struggles and one that thrives with minimal external input. It is the ultimate expression of pioneer-grit—using your head to save your back.
Challenges and Common Mistakes
The most frequent error in solar mapping is ignoring the seasonal shift. Beginners often map their yard in the spring when everything looks bright and sunny, only to find that half their garden is in deep shade by October when the sun drops lower. This results in stunted growth and rot. Another common pitfall is failing to account for the “heat of the day.” Western sun in the afternoon is significantly hotter than eastern sun in the morning, even if the hour count is the same. Plants that love morning light might scorch under the intense western sun.
Many people also underestimate the height of obstacles. A chimney or a neighbor’s house can cast a shadow much further than you expect during the winter months. Using simple trigonometry—or a tool like the Solar Pathfinder—can prevent these surprises. Finally, don’t forget that your own trees will grow. A small sapling today will be a 30-foot (9-meter) shadow-caster in ten years. Your solar map should be a living document that accounts for the future growth of your landscape.
Limitations: When the Map Isn’t Enough
While solar mapping is powerful, it has its boundaries. It cannot account for local weather patterns like chronic afternoon cloud cover or fog banks. If you live in a coastal region where the sun is obscured by mist until noon, your “8-hour sweet spot” might only provide 4 hours of actual solar energy. In these cases, you must layer your solar map with local climate data.
Additionally, solar mapping doesn’t tell you anything about soil quality, water flow, or wind. You might find a perfectly sunny spot that is also a swampy frost pocket. Permaculture is about holistic design, so your sun map must be used in conjunction with a water map and a soil analysis. The sun provides the energy, but the rest of the system must be there to catch and use it. In dense urban environments, you may also be limited by “solar rights”—laws regarding whether a neighbor can build a structure that blocks your sunlight. Always check local regulations before investing heavily in solar infrastructure.
Advanced Considerations: Thermal Mass and Microclimates
For the serious practitioner, solar mapping is the first step in creating “sun traps” and managing “thermal mass.” Thermal mass refers to materials like stone, brick, water, or heavy soil that can absorb solar heat during the day and release it slowly at night. By placing a stone wall on the northern side of a garden bed (in the Northern Hemisphere), you can reflect light back onto your plants and create a warm microclimate that stays several degrees higher than the surrounding area.
Advanced mapping involves identifying these potential heat sinks. For example, placing black water barrels in a greenhouse can help regulate temperatures, but they only work if they are placed exactly where the winter sun will hit them. Use your solar map to fine-tune these placements. You can even use reflective surfaces—like white-painted walls or ponds—to bounce light into shaded corners, effectively “increasing” your solar resource without moving a single tree.
Practical Examples and Scenarios
Consider a small urban lot in the Northern Hemisphere. The owner wants to plant a food forest. The base map shows a two-story house to the south. A manual solar analysis reveals that from November to February, the entire backyard is in the shadow of the house. If they had planted sun-loving fruit trees like peaches there, the trees would likely fail. Instead, using the solar map, they place their fruit trees in the front yard, which has clear southern exposure, and use the shaded backyard for a woodland garden featuring currants, hostas, and a mushroom log station.
In another scenario, a homesteader in a cold climate uses solar mapping to site a new chicken coop. By placing the coop where it catches the very first rays of the winter sun (the southeastern corner of a clearing), the birds get a natural “alarm clock” and warmth early in the day, which encourages them to stay active and maintain egg production. These simple adjustments cost nothing but time, yet they provide a massive return on investment over the life of the homestead.
| Feature | Standard Planting | Precision Solar Mapping |
|---|---|---|
| Yield Efficiency | Variable; many plants stunted by shadow. | Optimized; plants placed in peak energy zones. |
| Heating Costs | Higher; no utilization of free solar gain. | Lower; home sited to catch winter sun. |
| Plant Health | Prone to mildew and pests in damp shade. | Stronger; plants receive correct light for immunity. |
| Maintenance | High; constantly moving struggling plants. | Low; right plant, right place from day one. |
Practical Tips for Immediate Application
- Start Today: Don’t wait for the solstice. Go outside right now and mark where the shadows are. Use a brick or a stake. Do it again in three hours. This is the start of your journey.
- Use a Key: When drawing your map, use a clear legend. Use yellow for full sun, light blue for partial, and dark blue for shade. It makes the map readable at a glance.
- Watch the “Golden Hour”: The low-angle light of morning and evening is often blocked by distant hills or trees. Take note of when the sun actually “clears” the horizon for your specific site.
- Factor in Reflection: A light-colored shed or a greenhouse window can reflect a surprising amount of energy. If you have a dark, cold corner, see if you can “aim” some light into it with a reflective surface.
Final Thoughts
Permaculture solar mapping is the difference between working with nature and fighting against it. It is a fundamental skill for anyone seeking a more self-reliant lifestyle. By taking the time to observe the “dance of the sun” across your land, you are honoring an ancient tradition of stewardship that values observation over ego. You are not imposing your will on the land; you are listening to what the sky is telling you.
The maps you create today will become the foundation for a more resilient, productive, and comfortable future. Whether you are planting a single apple tree or designing a full-scale farm, the sun is your greatest ally. Learn its path, respect its power, and place your elements where they can truly shine. The rewards are measured in baskets of fruit, lower bills, and the deep satisfaction of a job done right.
