How To Become More Self-Sufficient Without Starting a Full-Blown Farm…
Want to start preserving your harvest, making your own soap, or building a backyard root cellar — but not sure where to begin? “Homesteading Advice” gives you instant lifetime access to 35+ practical homesteading books on food preservation, veggie gardening, DIY natural cleaning products (save over $250 per year with this skill alone), brewing, off-grid energy, and a whole lot more…
Click Here To Check It Out Now!
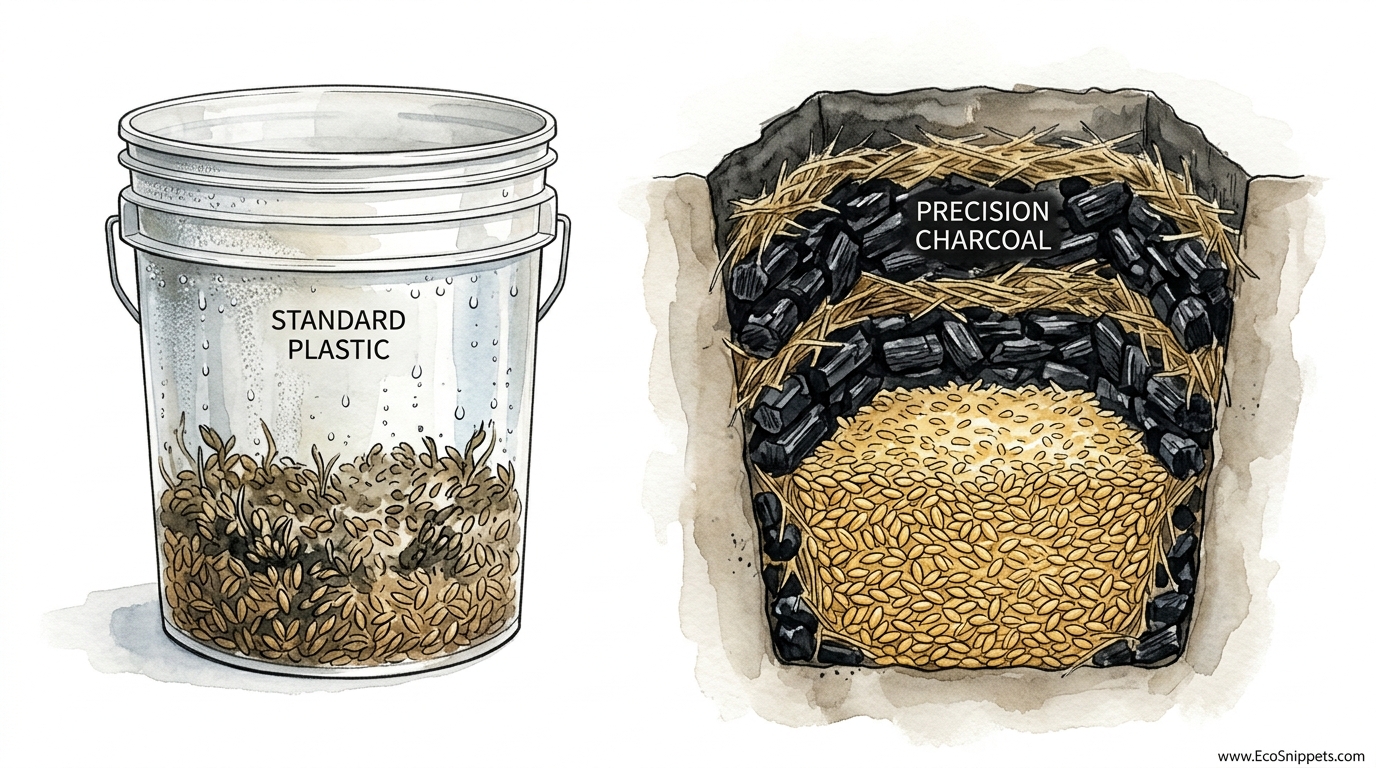
Plastic locks moisture in; ancient charcoal-lined pits use the laws of chemistry to pull it out and keep your harvest safe for a decade. Modern plastic buckets are great for a year, but they eventually fail due to temperature fluctuations and trapped humidity. Ancient civilizations used ‘precision’ underground pits lined with charcoal – a natural desiccant and anti-microbial barrier. This system doesn’t just store grain; it actively preserves it.
How To Store Grain For 10 Years
Storing grain for a decade requires more than just a sturdy container. It requires a fundamental shift in how we think about the environment surrounding our food. In modern homesteading, the default is often the five-gallon (19-liter) plastic bucket paired with a Mylar bag. This method relies on a physical barrier to keep the outside world out. While effective for short-term needs, plastic is a static material that cannot breathe or react to the slow, inevitable changes in humidity and temperature over 10 years.
Ancient civilizations, from the Iron Age hillforts of Britain to the Roman agricultural estates in Spain, perfected a more dynamic system: the underground storage pit. These weren’t just holes in the ground; they were carefully engineered chambers designed to manipulate the biological processes of the grain itself. By utilizing the earth’s natural thermal mass and the chemical properties of charcoal, these ancestors created a “self-sterilizing” environment where time effectively stops for the seeds within.
In a world of fluctuating climates and supply chain uncertainty, understanding this “precision charcoal” method is vital. It offers a low-cost, high-resilience alternative to industrial solutions. Whether you are storing hard red winter wheat, dent corn, or hull-less barley, the goal is to achieve a state of dormancy where neither pests nor mold can survive. This guide will show you how to merge that ancient wisdom with modern scientific principles to secure your harvest for a generation.
The Science of the Self-Sterilizing Pit
The core principle behind a 10-year grain pit is the creation of a controlled, anaerobic atmosphere. When you fill a pit with grain and seal it hermetically, the grain continues to “breathe” on a microscopic level. This process is called respiration. The grain consumes the small amount of oxygen (O2) trapped in the pit and releases carbon dioxide (CO2), moisture, and a tiny amount of heat.
The chemical equation for this process is C6H12O6 + 6O2 ? 6CO2 + 6H2O + Heat. In a perfectly sealed pit, the oxygen level eventually drops to around 1%, while the carbon dioxide level rises to 30% or higher. At these concentrations, the environment becomes lethal to aerobic organisms. Grain weevils, flour beetles, and even the fungi that cause mold are essentially suffocated by the very harvest they intended to consume. This is the “self-sterilizing” effect that allows grain to remain viable and edible for years without chemical pesticides.
Temperature control is the second pillar of this system. Above-ground structures are subject to the daily and seasonal swings of the sun. Underground, once you descend past 3 feet (0.9 meters), the temperature of the soil remains remarkably stable, usually reflecting the annual average temperature of your region. Keeping grain below 60°F (15°C) slows down the metabolic rate of the seeds and puts any dormant insect eggs into a state of deep hibernation. If the soil remains cool enough, the “allowable storage time” (AST) of the grain doubles for every 10-degree Fahrenheit drop in temperature.
Building Your Ancestral Silo: Step-by-Step
Building an underground storage pit requires careful site selection and precise geometry. You cannot simply dig a hole anywhere; the physics of the soil will dictate your success or failure. Follow these steps to create a high-performance grain cache.
Step 1: Site Selection and Soil Testing
Choose the highest point on your property where the water table is deep. The soil must be well-drained and stable. Historically, loess (wind-blown silt) or heavy clay was preferred because these soils hold their shape and resist water penetration. Avoid sandy soils that may slump or areas where water pools after a heavy rain. Dig a test hole to at least 6 feet (1.8 meters) to ensure you don’t hit bedrock or a seasonal spring.
Step 2: The Geometry of the Pit
The most efficient shape for a storage pit is the “beehive” or “pear” shape. This involves a narrow circular opening, roughly 20 inches (50 cm) in diameter, which widens out as you go deeper. A typical pit might be 5 feet (1.5 meters) wide at the base and 6 feet (1.8 meters) deep. The narrow opening makes it much easier to create an airtight seal at the top, while the wide base maximizes storage capacity within the stable thermal zone of the earth.
Step 3: Preparing the “Precision Charcoal” Lining
Once the pit is dug, the interior walls must be treated. In ancient times, a fire was often built inside the pit to bake the clay walls into a hard, ceramic-like surface. This also sterilized the ground. After the fire is extinguished and the pit has cooled, line the bottom with a 4-inch (10 cm) layer of raw, hardwood charcoal. This acts as your first line of defense against moisture wicking up from the soil. The walls can then be lined with a mixture of charcoal dust and clay or a thick layer of dry straw and bark to create a breathable buffer between the grain and the earth.
Step 4: Filling and Sealing
Pour in your grain, ensuring it has a moisture content of 12% or lower. Fill the pit to the very top to minimize the “headspace” where oxygen can linger. The final seal is the most critical part. Place a heavy stone or a wooden lid over the narrow neck, then cap it with a thick plug of wet clay (puddled clay). Once the clay dries, it forms an airtight bond. Finally, mound earth over the top to divert rainwater away from the opening.
The Strategic Role of Charcoal
Charcoal is the “secret ingredient” that elevates a simple hole into a precision storage system. Unlike the standard plastic approach, charcoal is an active participant in the preservation of the grain. It serves four distinct functions that are critical for long-term survival.
First, charcoal acts as a powerful desiccant. It has an immense surface area—one gram of activated charcoal can have a surface area of over 1,000 square meters. This allows it to adsorb excess water molecules from the air before they can reach the grain. If a small amount of moisture manages to penetrate the soil lining, the charcoal traps it, maintaining the “Equilibrium Moisture Content” (EMC) of the grain at a safe level.
Second, charcoal is an antimicrobial agent. It inhibits the growth of bacteria and fungi by filtering out the organic compounds they need to thrive. Third, it acts as a gas filter. As grain ages, it can release ethylene (a ripening hormone) or other volatile organic compounds (VOCs) that might cause the grain to turn rancid or lose its flavor. Charcoal adsorbs these gases, keeping the environment chemically “clean.” Finally, charcoal provides a physical barrier against burrowing insects, who find the dry, abrasive texture of the carbon dust inhospitable.
Benefits of Underground Preservation
The decision to move away from modern silos and buckets toward charcoal-lined pits is driven by several measurable advantages. These benefits are particularly clear when looking at a timeline of 10 years or more.
- Energy Independence: This method requires zero electricity. No fans for aeration, no dehumidifiers, and no refrigeration. It relies entirely on the thermodynamics of the earth.
- Passive Security: Underground pits are invisible to the naked eye once mounded and camouflaged. In times of social instability, an above-ground silo is a target; a buried cache is a secret.
- Thermal Stability: The earth provides a level of insulation that no plastic bucket can match. By eliminating the “temperature spikes” that cause condensation inside containers, you eliminate the primary cause of grain spoilage.
- Cost Efficiency: The materials needed—soil, clay, straw, and charcoal—are often available for free or can be produced on-site. This makes it the most accessible form of large-scale food storage for the self-reliant practitioner.
- Sustainability: Unlike Mylar bags and plastic buckets, which eventually become landfill waste, the materials used in a pit are completely biodegradable. When the storage cycle is over, the “spent” charcoal can be tilled into the garden as high-quality biochar.
Challenges and Common Mistakes
While the principles are simple, the execution of an underground pit is unforgiving. A single mistake in the sealing process can lead to the loss of your entire harvest. Understanding where others fail is the best way to ensure your own success.
The most common mistake is storing grain with too much internal moisture. If your grain is above 13% or 14% moisture when it goes into the pit, the respiration process will be too aggressive. Instead of creating a sterile CO2 environment, the grain will produce excessive heat and water, leading to “hot spots” and rapid fermentation. Always use a moisture meter or the “hammer test” (dry grain should shatter, not flatten) before sealing the pit.
Another frequent error is poor site drainage. If the pit is located in a low spot, hydrostatic pressure from heavy rains can force water through even the best clay lining. This is why mounding the earth above the seal is non-negotiable. The mound should extend at least 3 feet (1 meter) beyond the edges of the pit to ensure water shed is distant from the chamber walls.
Finally, many people fail because they open the pit too frequently. The “self-sterilizing” atmosphere depends on the seal remaining unbroken. Every time you open the pit to “check” on the grain, you introduce fresh oxygen and humidity, which resets the biological clock and allows dormant pests to wake up. This is a long-term storage solution; once it’s closed, it should stay closed until you are ready to use the contents.
Limitations: When This May Not Be Ideal
An underground charcoal pit is a powerful tool, but it is not a universal solution. Certain environmental and practical constraints may make other methods, like STANDARD PLASTIC vs PRECISION CHARCOAL, more appropriate for your specific situation.
Geological limitations are the most significant factor. If you live in an area with a high water table—such as a coastal plain or a river delta—underground storage is extremely risky. No amount of clay or charcoal can withstand a pit that is physically sitting in groundwater. In these regions, elevated granaries or airtight metal drums are superior choices.
Similarly, the type of grain matters. High-oil grains like soybeans, flaxseed, or brown rice have a much shorter shelf life because the fats within them can turn rancid even in an anaerobic environment. These grains are better suited for shorter-term storage or refrigeration. The 10-year pit is best reserved for low-oil “hard” grains like wheat, corn, millet, and polished white rice.
Finally, there is the labor requirement. Digging and preparing a proper pit is physically demanding work. It also requires a level of monitoring—checking the mound for cracks after a storm, for example—that a bucket in a pantry does not. If you are physically unable to manage the construction or the heavy lifting involved in retrieving the grain, a more modern, accessible system may be necessary.
Comparison: Modern Plastic vs. Precision Charcoal
To understand the value of the ancient method, we must look at how it stacks up against the modern standard. The following table compares the two most common approaches to long-term grain storage.
| Feature | Standard Plastic (Buckets/Mylar) | Precision Charcoal (Underground Pit) |
|---|---|---|
| Lifespan | 5–10 years (seal dependent) | 10–30 years (proven historically) |
| Moisture Control | Passive (Barriers) | Active (Charcoal Adsorption) |
| Temperature | Fluctuates with ambient air | Stable (Earth Insulation) |
| Pest Control | Oxygen Absorbers (finite) | Self-Generated CO2 (infinite) |
| Initial Cost | Moderate ($20-$50 per 100 lbs) | Low (Material costs are minimal) |
| Maintenance | Low (Shelved storage) | Moderate (Site monitoring) |
Practical Tips and Best Practices
If you are ready to begin your own 10-year storage project, keep these best practices in mind to optimize your results. These small adjustments can significantly increase the resilience of your system.
- Use “Active” Charcoal: While raw lump charcoal works, using activated charcoal (which has been treated with steam to increase its porosity) provides significantly better moisture adsorption. You can create a high-performance liner by mixing 20% activated charcoal with your wall-lining material.
- The “Sacrificial” Layer: In many ancient pits, the outer two inches (5 cm) of grain would naturally spoil or germinate, forming a dense, airtight crust that protected the core. Don’t be alarmed if the grain touching the walls looks different when you open the pit; this “sacrificial” layer is actually part of the preservation mechanism.
- Cold-Season Sealing: Aim to seal your pit during the coldest part of the year. This ensures the grain starts its journey at a low temperature, which immediately slows down respiration and helps establish the CO2 atmosphere more quickly.
- Moisture Buffering with Straw: Place a thick layer of very dry straw or chaff between the charcoal liner and the grain. The straw acts as a mechanical filter, preventing charcoal dust from coating your food while still allowing gases to pass through to the carbon for adsorption.
Advanced Considerations: Biochar Integration
For the serious practitioner, the underground storage pit is not just a food vault; it is part of a larger, circular agricultural system. This involves the integration of “biochar.” Biochar is charcoal that is specifically produced for use in soil, but it can serve its first life as a grain preservative.
When you produce charcoal for your pit, you are essentially sequestering carbon. Over the 10 years that the charcoal sits in the ground, it adsorbs nutrients and minerals from the surrounding soil environment. When you eventually empty the pit and retrieve your grain, the “spent” charcoal can be crushed and added to your compost piles or tilled directly into your garden beds. This creates a “closed-loop” where the tools of your survival also become the foundation of your future fertility.
Furthermore, consider the “multi-pit” strategy. Rather than building one massive pit, build three smaller ones. This allows you to rotate your stores. If one pit fails due to an unforeseen leak or pest intrusion, you only lose 33% of your harvest rather than the entire supply. It also allows you to experiment with different lining materials or grain types to see what works best in your specific micro-climate.
Example Scenario: The 1,000-Pound Cache
Let’s look at a practical application of this theory. Imagine a homestead that produces a surplus of 1,000 pounds (approx. 450 kg) of hard red wheat. To store this in standard plastic buckets, you would need roughly 30 buckets and 30 Mylar bags, costing upwards of $400. Over 10 years, you would need to store these in a climate-controlled room to prevent the plastic from degrading and the grain from overheating.
Instead, the homesteader digs a single beehive-shaped pit. The excavation takes two days of manual labor. They produce 50 pounds (22 kg) of charcoal from deadfall oak on their property. The pit is lined, the wheat is dried to 10% moisture in the sun, and the pit is sealed with a clay plug and a stone cap. The cost in cash is nearly zero.
Eight years later, during a severe drought, the homesteader opens the pit. The “sacrificial” layer against the walls has darkened, but the 900-pound core of the wheat is golden, dry, and free of weevils. The wheat is milled into flour with its nutritional profile largely intact. The spent charcoal is then moved to the potato patch to improve the next season’s yield. This is the difference between simply “keeping” food and actively “managing” a resource.
Final Thoughts
The modern obsession with plastic and electricity has blinded us to the elegant efficiency of ancestral technology. The charcoal-lined pit is a testament to what is possible when we work with the laws of chemistry and the natural insulation of the earth. It is a system designed for the long haul, capable of protecting a community’s most precious resource for a decade or more without a single external input.
As you begin your journey into long-term grain storage, remember that success is found in the details. Respect the moisture levels, trust the charcoal, and let the earth do the heavy lifting. By reviving these techniques, you are doing more than just saving seeds; you are reclaiming a form of self-reliance that has sustained humanity for millennia.
Experiment on a small scale first. Build a mini-pit for a few bags of grain and monitor it for a year. Once you have mastered the art of the seal and the science of the lining, you can scale up your efforts, knowing that your family’s food security is anchored deep in the ground, safe from the whims of the world above.
